Aryson Universal Mail Converter
- Table of Content
- Software Working Process
- Activation Guide
- Installation & Uninstallation
- User Interface
Software Working Process
Source Format to File Formats
Step 1: Download and launch the Aryson Universal Mail Converter on your system.
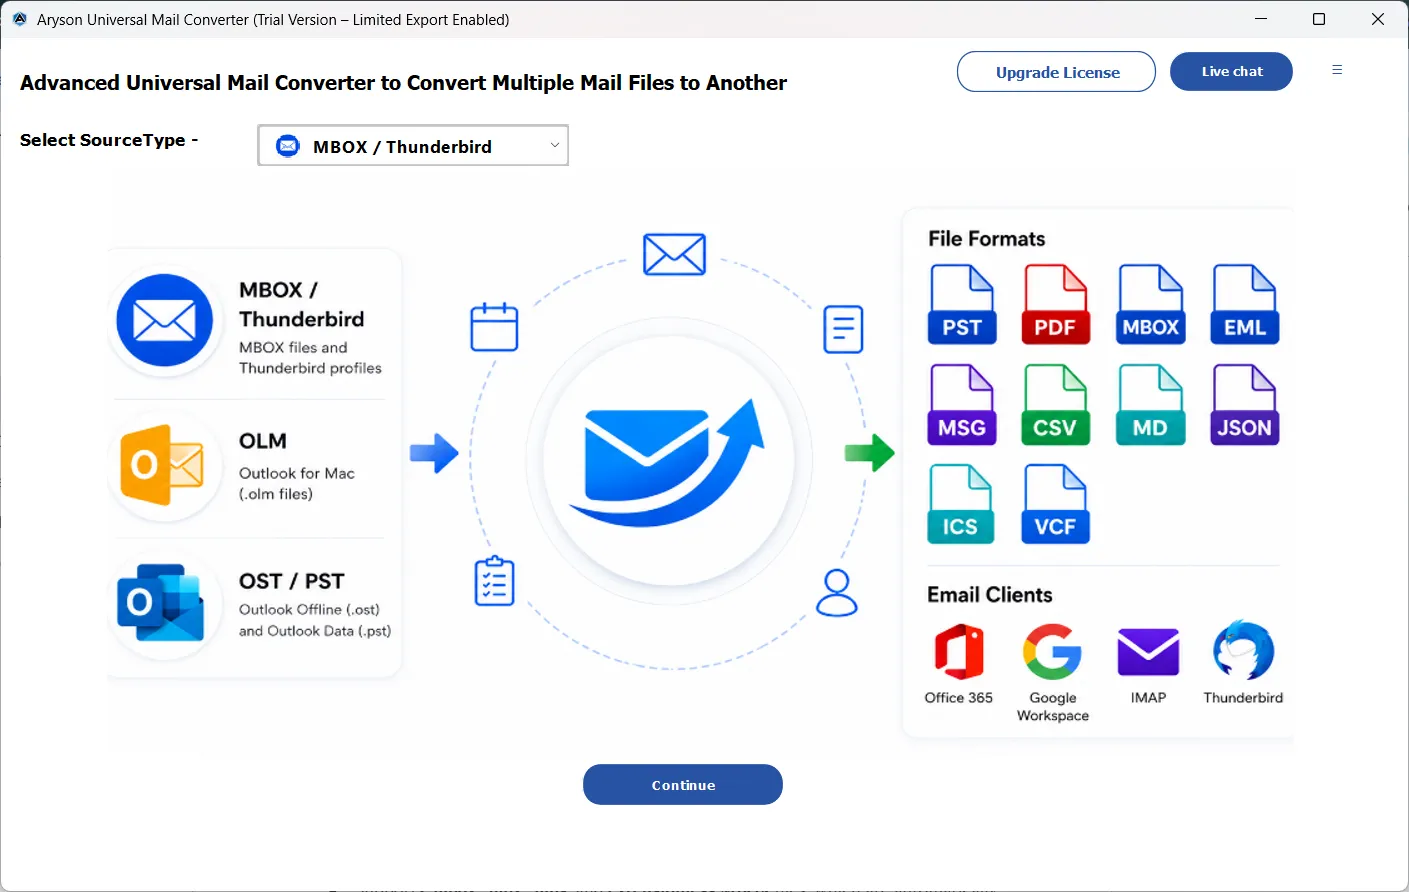
Step 2: Under the Select Source Type dropdown, select the required source format (MBOX/Thunderbird, PST/OST, OLM).
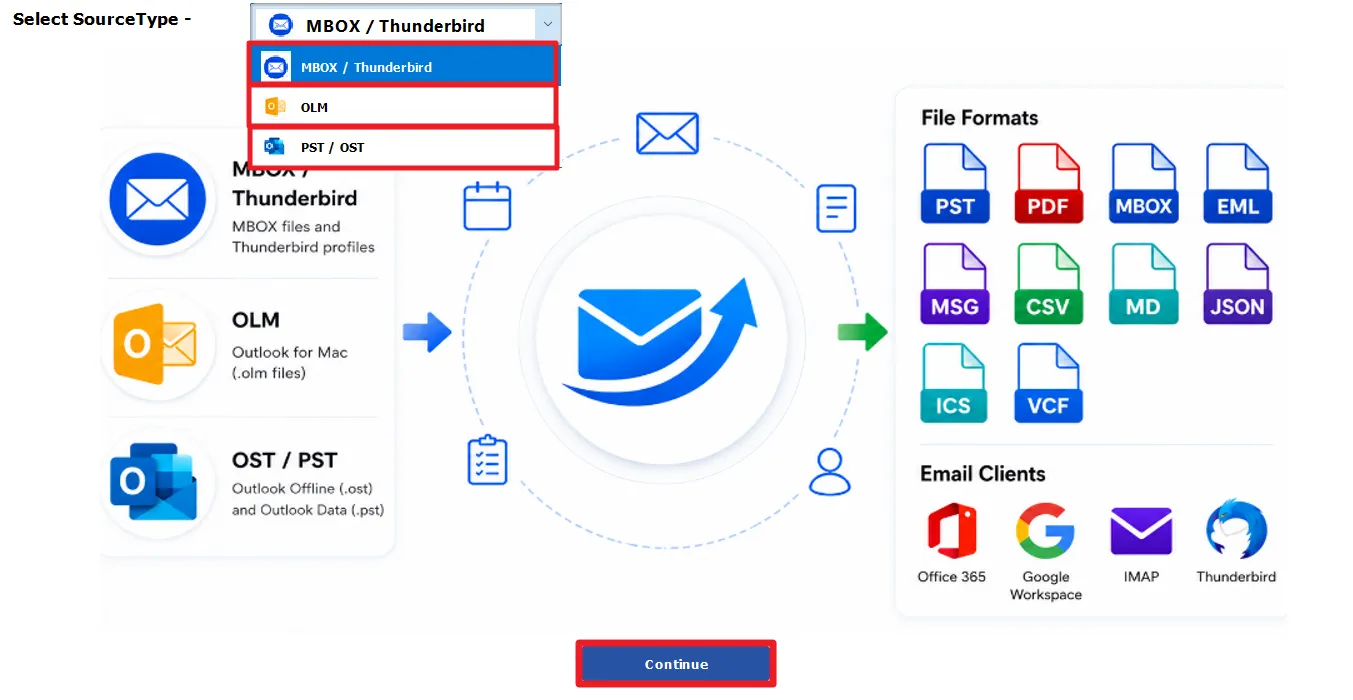
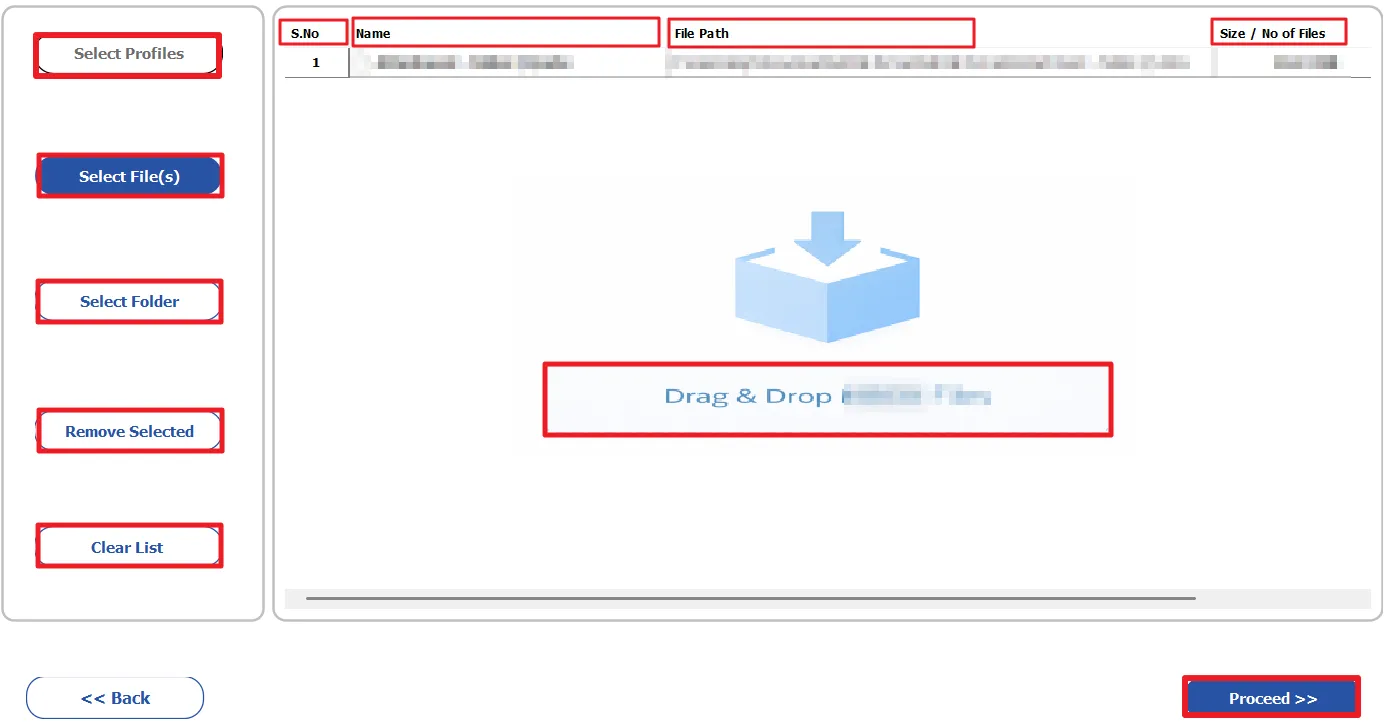
Step 3: Add the Required Source Files
Use the available options to load your mailbox data into the software.
- Select File(s): Browse and add one or multiple mailbox files.
- Select Folder: Load all supported mailbox files from a selected folder.
- Drag & Drop: Drag mailbox files directly into the application.
- File Details Grid: Displays the Serial Number, File Name, File Path, File Size/Number of Files, and Selection Checkbox for every loaded mailbox.
- Select All: Select all loaded mailbox files.
- Remove Selected: Remove only the selected mailbox files.
- Clear List: Remove all loaded mailbox files.
- Upgrade License: Upgrade from the trial version to unlock full functionality.
- Live Chat: Contact the support team directly for assistance.
- After verifying the loaded mailbox details, click Proceed to continue
Source-Specific Loading Options
MBOX:
- Supports .mbox, .mbx, .mbs, and extensionless MBOX files, which are automatically detected during loading.
Thunderbird:
- Click 'Select Profiles' to automatically load available Thunderbird profiles and local folders.
- The detected profiles are displayed in the File Details Grid for selection.
PST/OST
- Automatically detects .pst, .ost, and supported extensionless mailbox files.
- Corrupted, invalid, or locked PST/OST files are identified automatically and skipped during loading.
OLM
- Load one or multiple OLM files using Select File(s), Select Folder, or Drag & Drop.
- No additional source-specific loading configuration is required.
Step 4: Preview & Search Mailbox Data
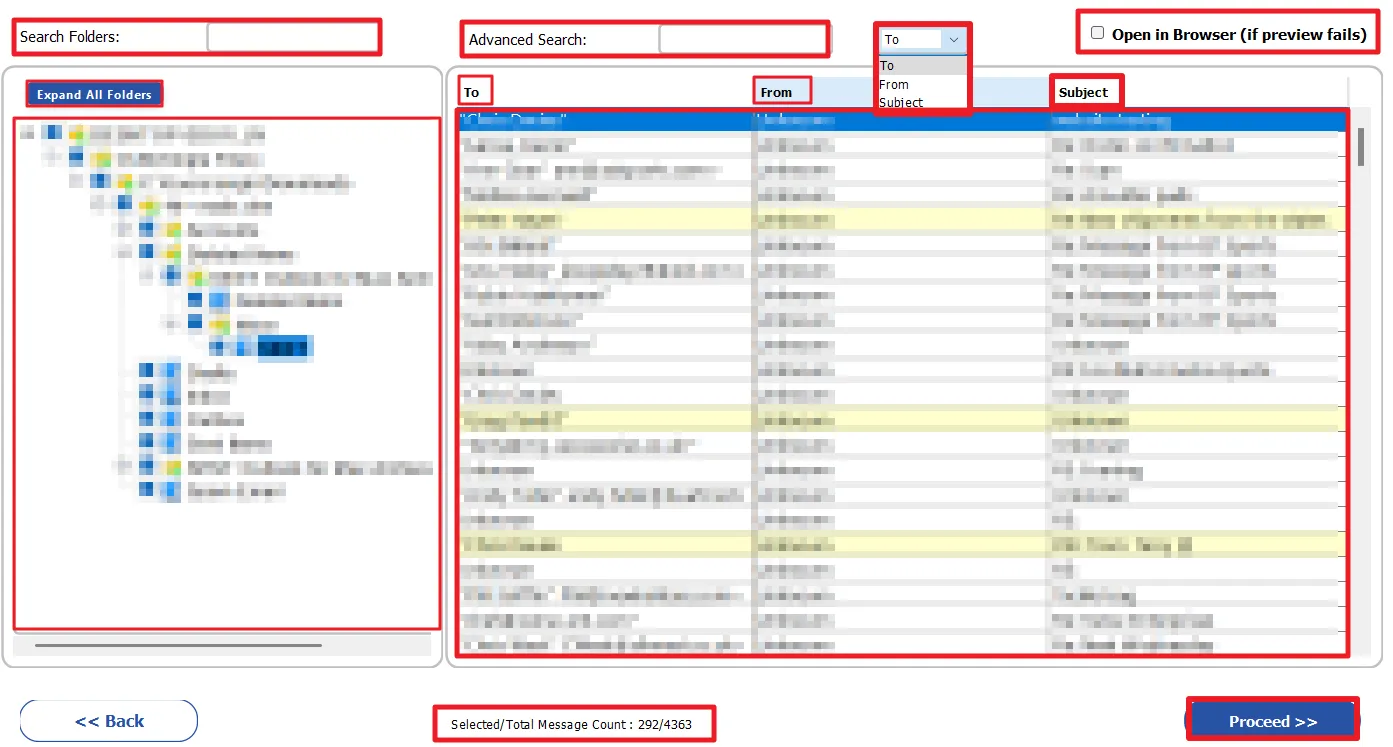
- Browse and expand mailbox folders to view all available emails and items.
- Use Search Folders to quickly locate a specific mailbox folder.
- Double-click the folder to load it into the J-table.
- Apply Advanced Search and select fields like To, From, or Subject to find particular emails.
- Double-click on a particular email to preview it in the advanced preview panel (explained below).
- Enable Open in Browser if the email preview does not load properly within the application.
The Advanced Preview Panel displays the following details:
The Date, To, From, and Subject fields of the email. Along with that, the following details are displayed as well.
- HTML Body: View the original email with complete formatting and styling.
- Plain Text: Check the email content in a simple text format.
- Attachments: Preview all files attached to the selected email.
- Calendar: Review event details, including subject, date, time, and location.
- Contacts: View contact information stored in the mailbox.
- Notes: Access and verify saved notes.
- Tasks: Preview task details and related information.
- Headers: Examine technical email properties and routing information.
- MIME: View the MIME structure of the selected message.
- Raw HTML: Inspect the email's source HTML code and formatting structure.
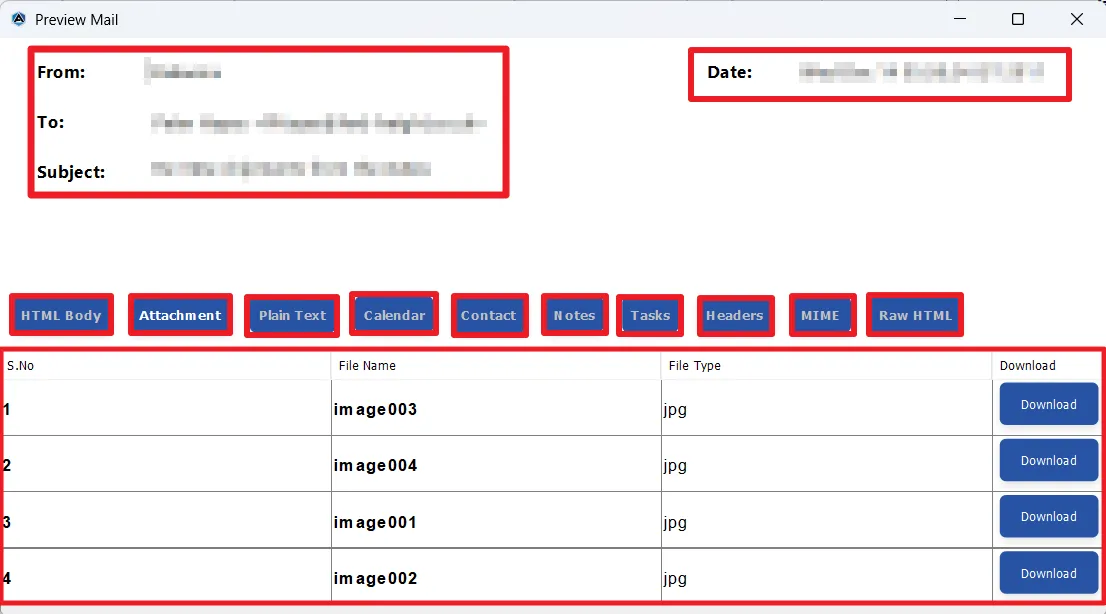
Note: For the MBOX/Thunderbird source format, Calendar, Contacts, Notes, and Tasks are not available in the preview panel.
Step 5: Now, select File Formats or Email Clients as the destination.
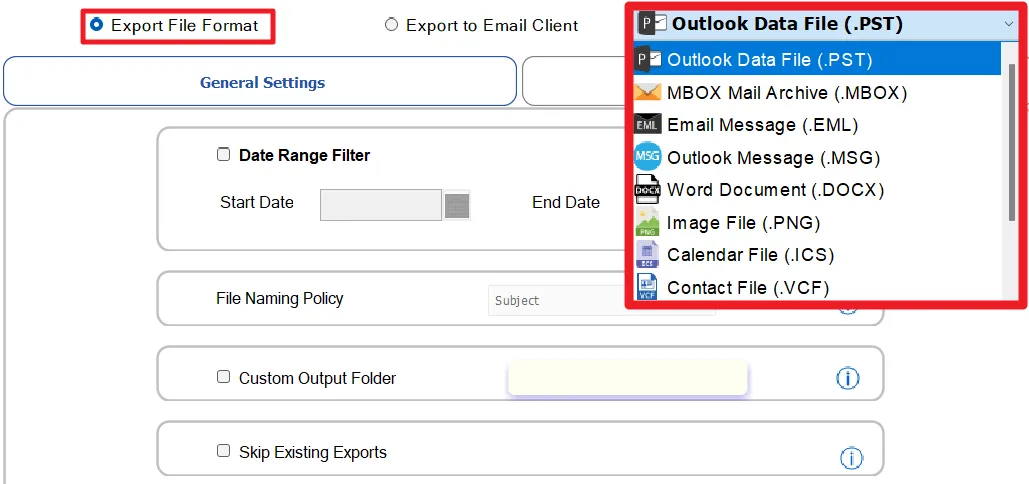
Step 5(A): To Select File Formats:
- Mark the Export File Format radio button and select the required file formats as required.
The supported output formats for specific source file formats.
- MBOX: PST, MBOX, EML, MSG, PDF, CSV, and Mozilla Thunderbird.
- Thunderbird: PST, MBOX, EML, MSG, PDF, CSV.
- PST/OST: PST, MBOX, EML, MSG, DOCX, PNG, ICS, VCF, PDF, CSV, MD, JSON, Mozilla Thunderbird
- OLM: PST, PDF, MBOX, CSV, EML, MSG, DOCX, PNG, ICS, VCF, PDF, CSV, and Mozilla Thunderbird.
Step 5(B): To Select Email Clients:
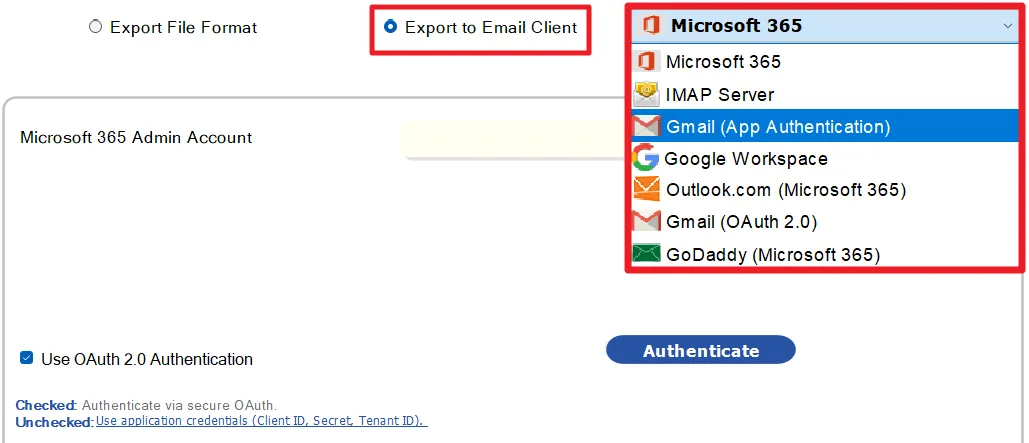
Mark the Export to Email Clients radio button and select the required email client as required.
The supported destinations for specific source file formats.
- MBOX/Thunderbird: Microsoft 365, IMAP Server, Gmail (app authentication), Google Workspace, Outlook.com (Microsoft 365), Gmail (OAuth 2.0), and GoDaddy (Microsoft 365).
- OLM: Microsoft 365, IMAP Server, Gmail (app authentication), Google Workspace, Outlook.com (Microsoft 365), Gmail (OAuth 2.0), and GoDaddy (Microsoft 365).
- OST/PST: Microsoft 365, IMAP, Google Workspace, Outlook.com, GoDaddy.
Step 6: Authenticate the Accounts
Step 6(A): If selected Office 365 as the Destination
Step 6(A): 1: Authenticate an active Microsoft 365 account
You may choose the A or B login method to log in to the Microsoft 365 account using valid credentials.
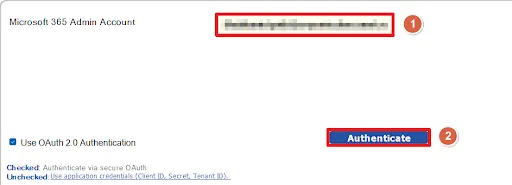
- Use OAuth 2.0 authentication
- Enter your Microsoft admin account email and click on Authenticate.
- Log In To Your Account
- Select an Account
- In the Pick an account window, click the Microsoft account you want to use.
- Alternatively, select Use another account if your account is not listed.
- Provide your password and click Sign in.
- Approve Multi-Factor Authentication (MFA)
- If prompted, open the Microsoft Authenticator app on your mobile device.
- Approve the sign-in request.
- If a matching number is displayed (e.g., 53), enter that number in the Authenticator app and approve the request.
- Authentication Successful
- Once verification is completed, a confirmation message will appear: "Authentication complete. You can close the browser and return to the application."
- Close the browser window.
- Select an Account
- Enter your Microsoft admin account email and click on Authenticate.
- Use an Application Credential
- Disable Use OAuth 2.0 Authentication.
- Enter the Microsoft 365 Admin Account, Application (Client) ID, Client Secret, and Tenant ID to authenticate the connection.
- After generating the credentials, fill in the required fields and click on Authenticate.
Note: While selecting the Office 365 account in the browser window, make sure you have already logged in to the required account before.
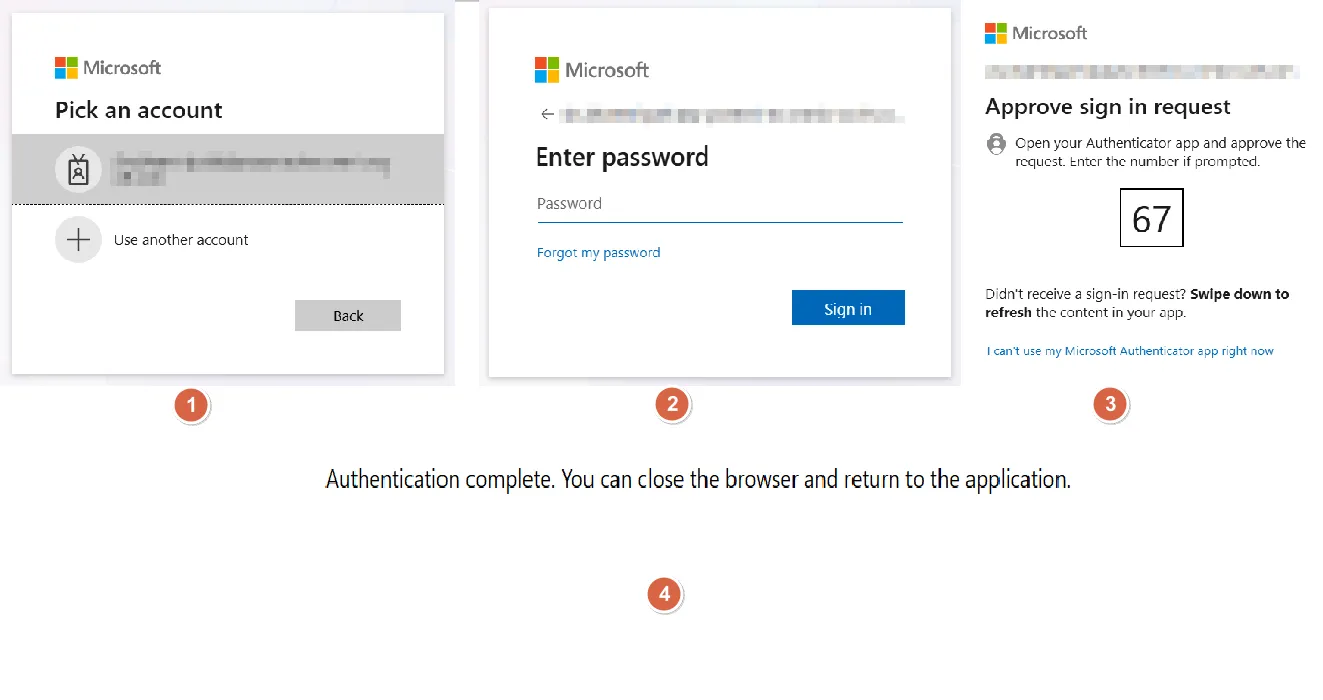
Note: Sign in to the required Microsoft 365 account in your browser before starting the migration. If multiple browser windows are open with different accounts, use the one where the required Microsoft ID is already logged in, as authentication will proceed only in that browser.
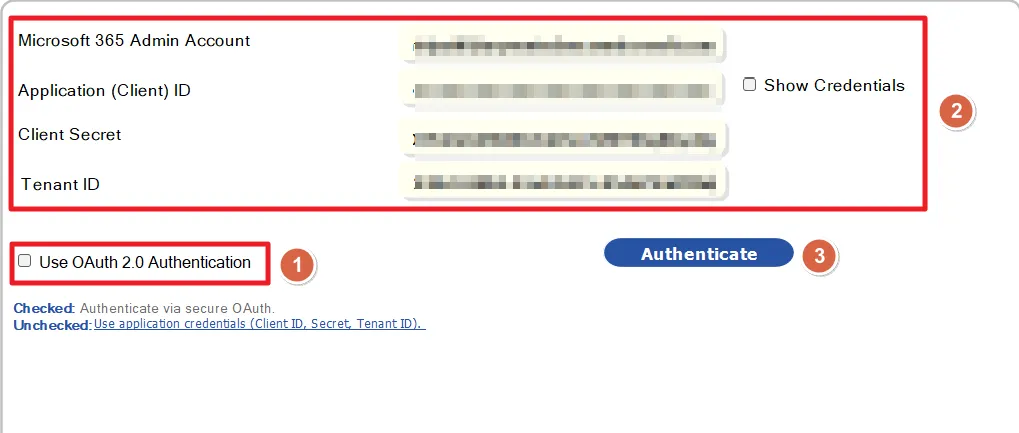
Enter Azure Application Details
Fill in the following information from your Azure app registration:
| Field | Description |
|---|---|
| Microsoft 365 Admin Account | Admin email address |
| Application (Client) ID | Azure App Client ID |
| Client Secret | Secret generated in Azure |
| Tenant ID | Microsoft Entra ID (Azure AD) Tenant ID |
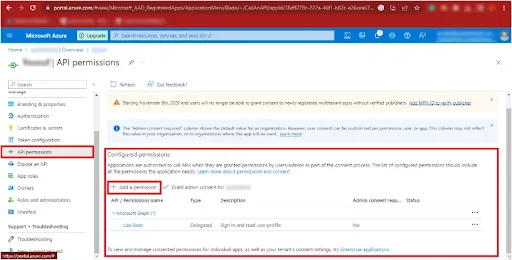
If you choose Application Credentials Authentication (Client ID, Client Secret, and Tenant ID), you must first create an Azure App Registration and assign the required API permissions in Microsoft Entra ID (Azure AD).
For complete instructions on creating the Azure Active Directory application and enabling API permissions, visit:
Create Azure Active Directory and Enable API Permission GuideIn the guide at step 17, you need to add the required API permissions. The image below lists all the API permissions that must be configured for successful authentication and migration.
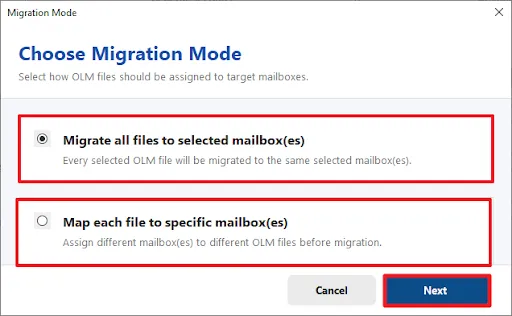
B. 1: Choose Mailbox Mapping Mode
- Migrate All Files to Selected Mailbox(es): Transfer all selected files into the same destination Microsoft 365 mailbox(es).
- Map Each File to Specific Mailbox(es): Assign individual files to different Microsoft 365 mailboxes before migration.
- Next: After selecting the preferred mapping mode, click Next to continue with mailbox mapping and migration.
B. 1.1: Migrate All Files to Selected Mailbox(es):
Select Destination: Microsoft 365 Mailboxes
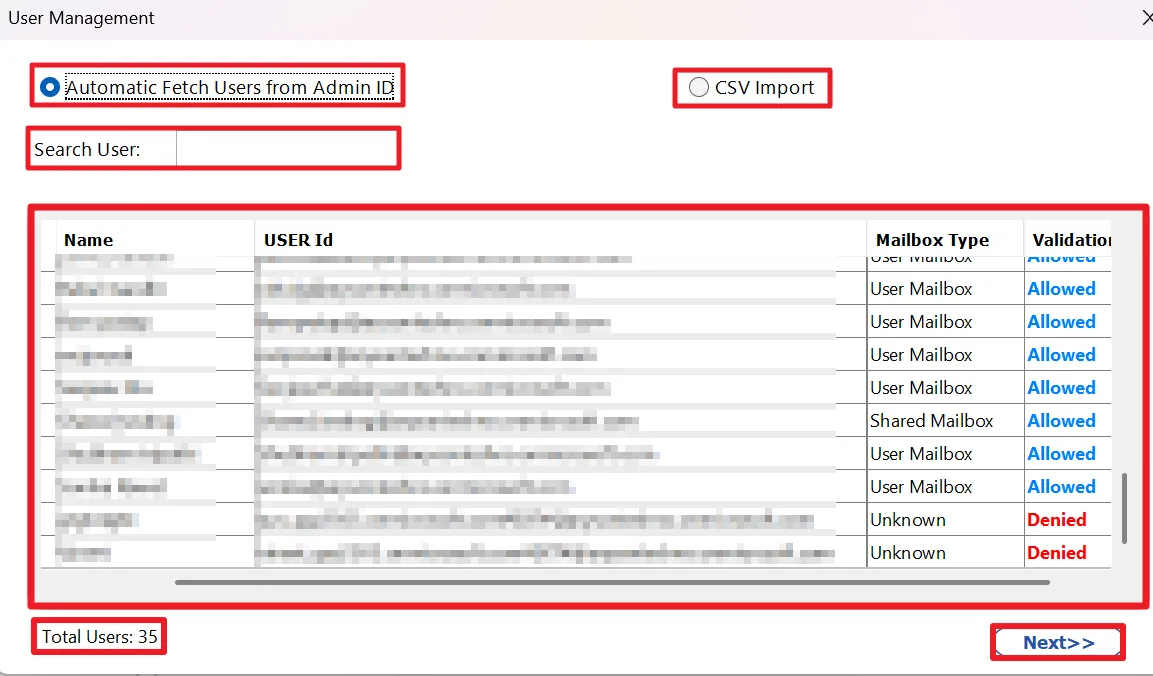
- Automatic Fetch Users: Retrieve all mailboxes from the authenticated Microsoft 365 tenant automatically.
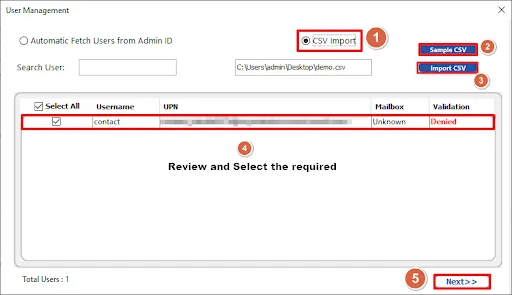
- CSV Import (Optional): Import specific mailbox users using a CSV file.
- Search User: Locate a mailbox quickly using the search option.
- Review User Details: Verify Name, User ID, Mailbox Type, and Validation Status.
- Select Mailboxes: Choose the required destination mailboxes or use Select All.
- Verify Validation: Ensure the selected mailboxes display Allowed status.
- Next: Click Next to proceed with mailbox mapping and migration.
Note:
- Allowed indicates a licensed and valid mailbox, while Denied indicates a non-licensed or invalid mailbox.
- Mailbox types may include User Mailbox and Shared Mailbox.
- Only mailboxes with Allowed status can be selected as migration destinations.
Import Users via CSV
- Enable CSV import and download the sample CSV template.
- Enter mailbox details in the required format and save the file.
- Click Import CSV and browse to the updated CSV file.
- Review the imported users and verify their validation status.
- Select the required mailboxes and click Next to continue.
B. 1.2: Map Each File to Specific Mailbox(es):
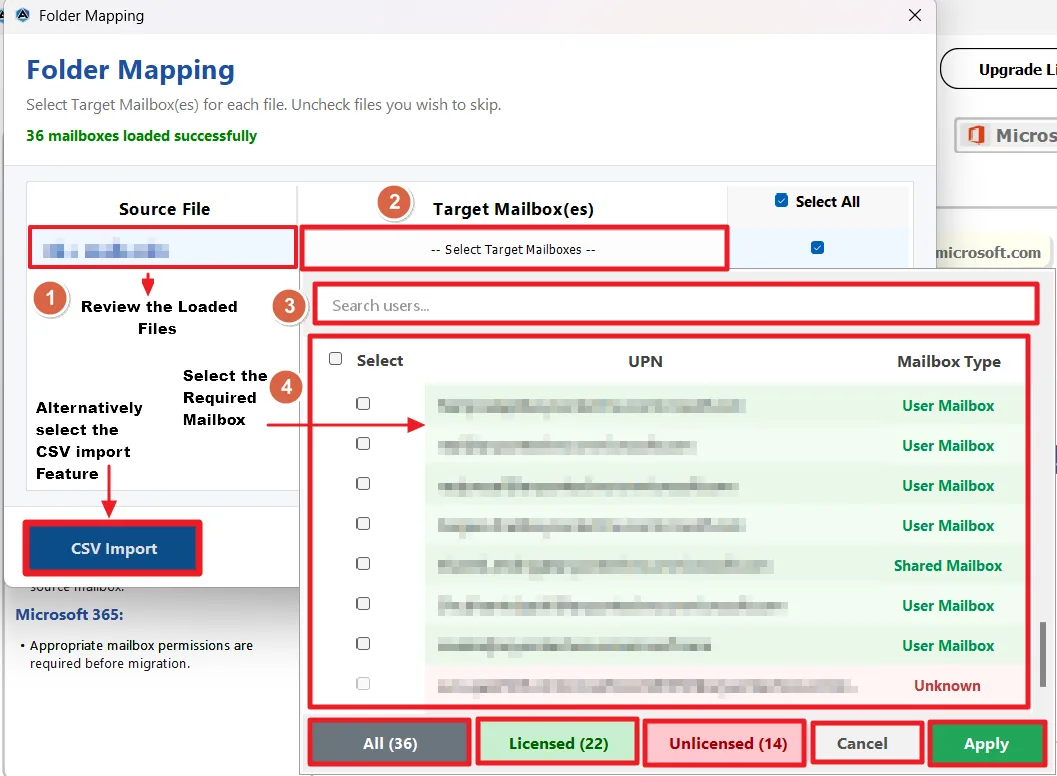
- Review Loaded Folders: Verify your retrieved folders under the Source Folder column and ensure all mailboxes are loaded successfully.
- Map Target Mailboxes: Click the -- Select Target Mailboxes -- dropdown next to each folder to map its destination.
- Select the corresponding target Microsoft 365 mailbox from the mailbox list.
- Use the Search Users option to quickly find destination mailboxes.
- Verify the UPN and mailbox type before mapping.
- Check licensed mailboxes to ensure they are ready for migration.
- Click Select All to map multiple mailboxes at once.
- Review the mailbox summary (All, Licensed, Unlicensed) for validation.
- Click Apply to save the mappings and proceed with migration.
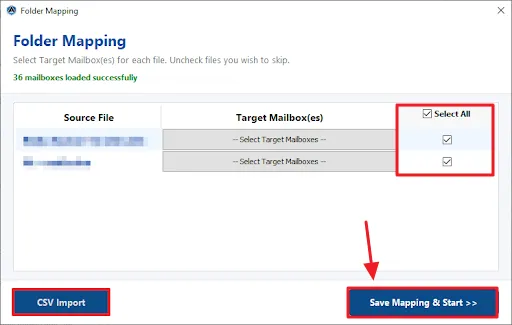
- Filter Selection: Use the checkboxes on the right (or toggle Select All) to exclude any folders you do not want to migrate.
- CSV Import (Optional): Click the CSV Import button to upload a mapping file if you are migrating multiple users' profiles at once.
- Save and Migrate: Click Save Mapping & Start >> to lock in your folder configuration and begin the migration process.
Step 6(B): If you selected Gmail as the Destination
Step 6(B): 1: Select Gmail app authentication or OAuth 2.0 under the Export to Email Client option.
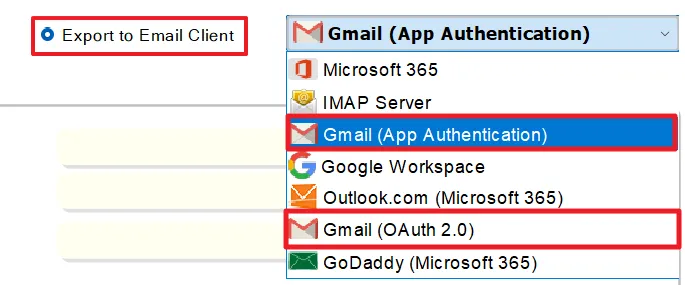
Step 6(B):2: Authenticate your Gmail Account
Step 6.2.1: For Gmail App Authentication:
- Enter the target Gmail email address, OAuth client ID, and OAuth client secret. You can create a Google Client ID and Client Secret using the Google Developers Console
- Click Authenticate to securely authorise the Gmail account and proceed with the migration.
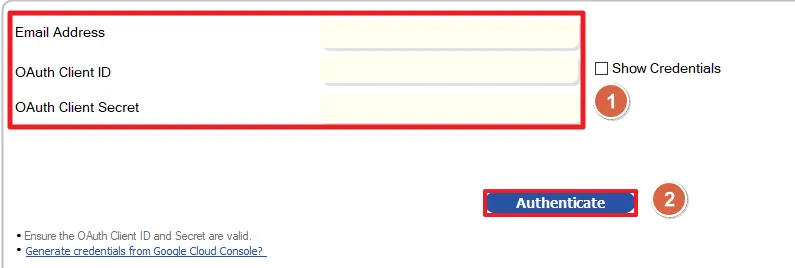
Note: Before starting the migration, sign in to the required Gmail account in the same browser. Ensure the correct account is active and avoid using multiple browser windows with different Gmail accounts, as authentication will open only in the browser where the selected account is signed in.
Step 6.2.2:For Gmail OAuth 2.0:
- Enter the Gmail email address and click on the Authenticate button.

Step 6.2:Authenticate the Gmail Account
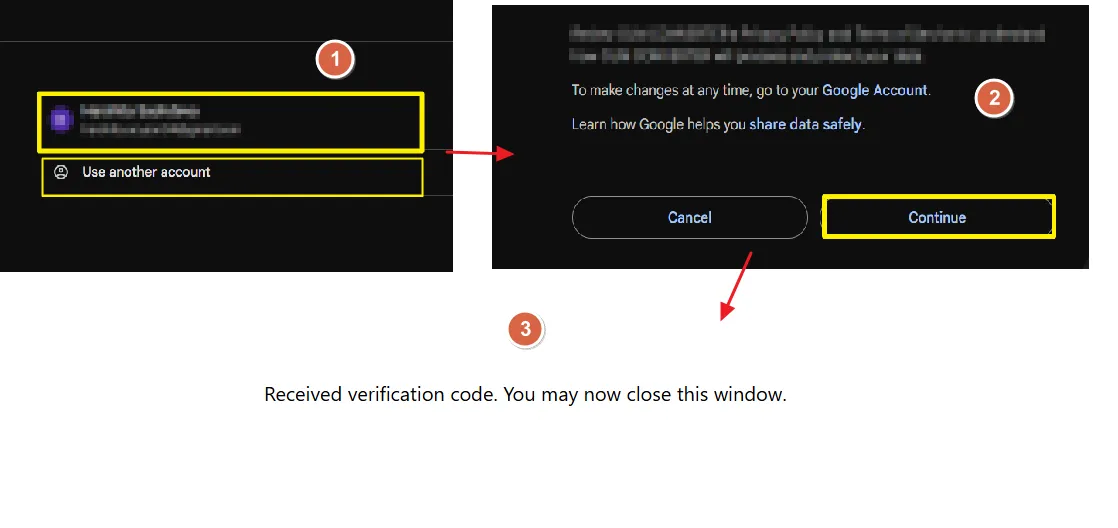
- Select the required Gmail account as per the requirement or click on the Use another account' option to add another account.
- Click Continue if you agree to Universal Mail Converter’s privacy policy and proceed further.
- After authentication, the browser window displays "Received verification code. You may close this window."
Step 6(C):If you selected Google Workspace as the Destination
Step 6(C):1: Select Google Workspace under the Export to Email Clients drop-down list.
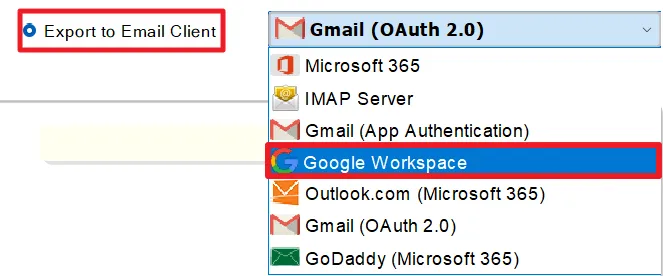
Step 6(C):2: Log in via the workspace admin account and JSON key and click Authenticate.
You can generate a JSON file with the help of the detailed guide.
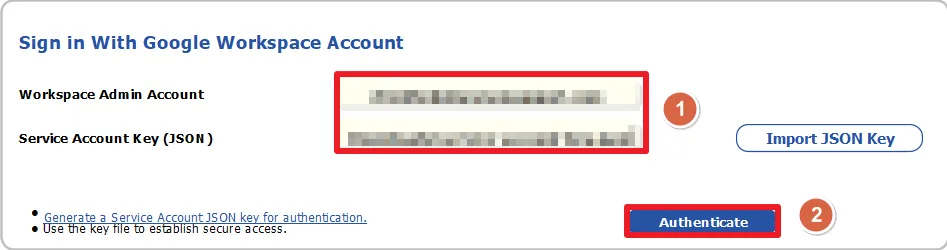
Step 6(C):3: Map Source Files to Google Workspace User Accounts
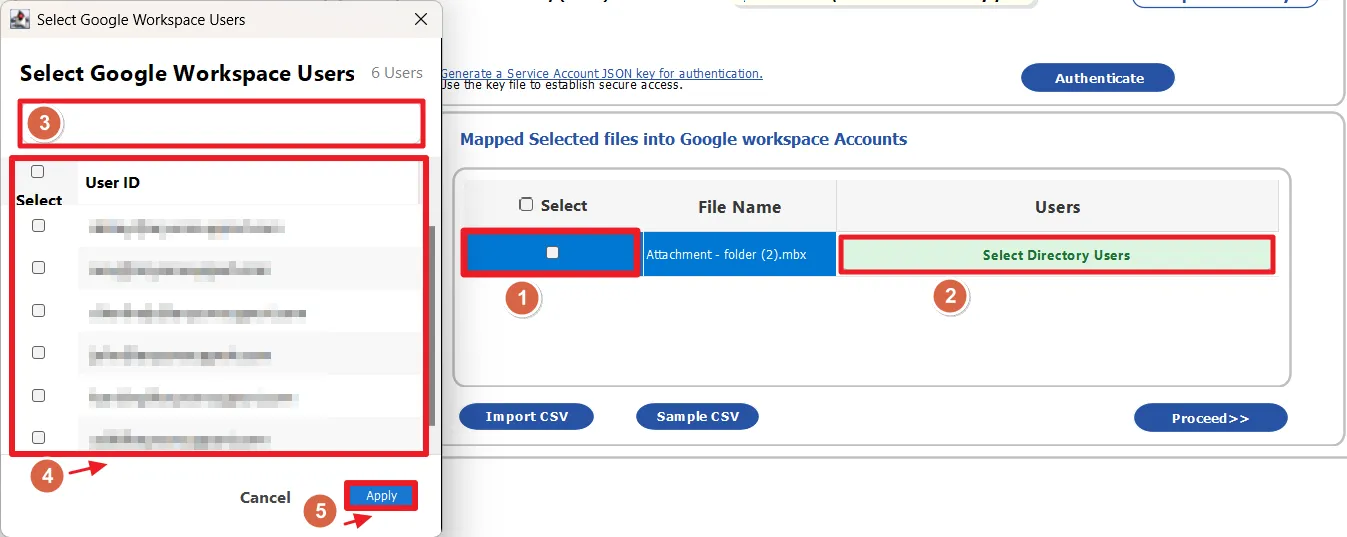
Associate the selected source file with the corresponding Google Workspace mailbox before starting the migration.
- Select the imported source file from the mapping list.
- Click Select Directory Users and choose the target Google Workspace user account.
- Search or select the required User ID to map and click Apply.
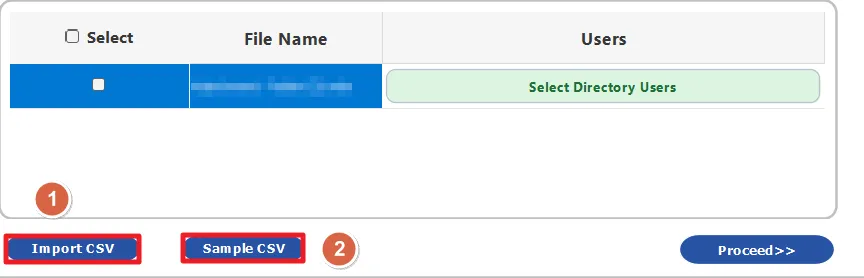
- Alternatively, you can import a CSV file for bulk user mapping.
- Click on the Sample CSV button to save a demo CSV file.
- Afterwards, click on the Import CSV button to import the saved CSV file.
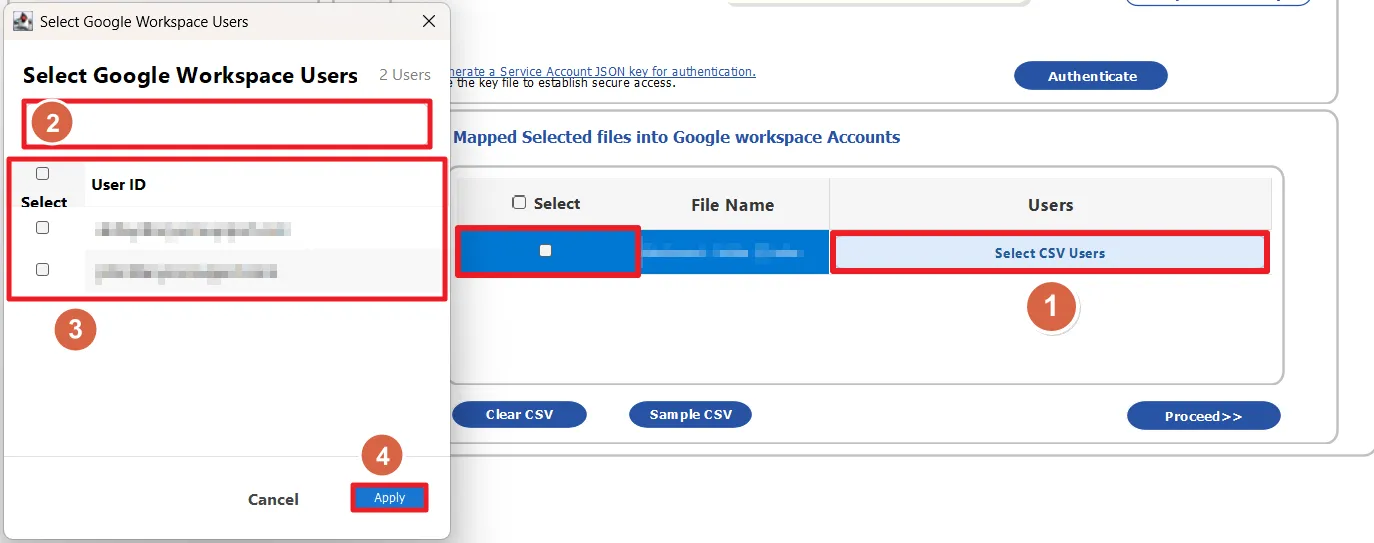
- Click ok and click on Select CSV users.
- Select the required user IDs of the users and click Apply.
Step 6(D):If you selected IMAP as the Destination
Step 6(D):1: Mark the Export to Email Clients radio button and select IMAP as the destination.
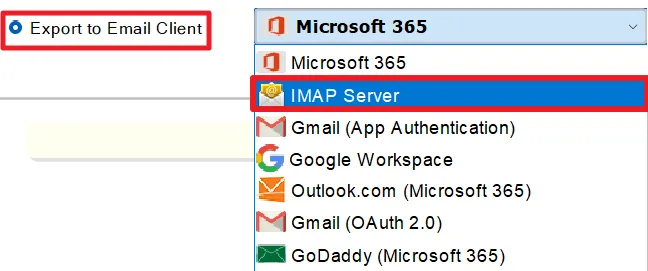
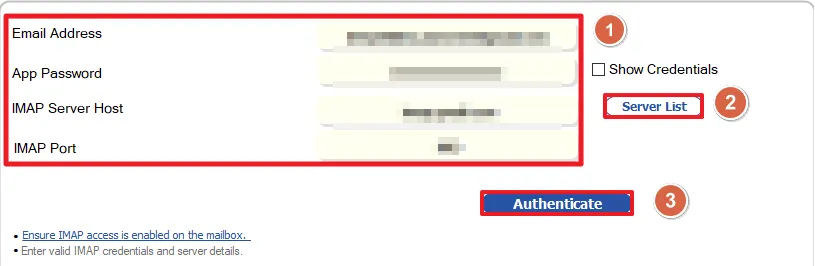
Step 6(D):2: Configure IMAP Server and Authenticate
- Enter the destination email address.
- Provide the app password or mailbox password.
- Specify the IMAP Server Host and IMAP Port Number.
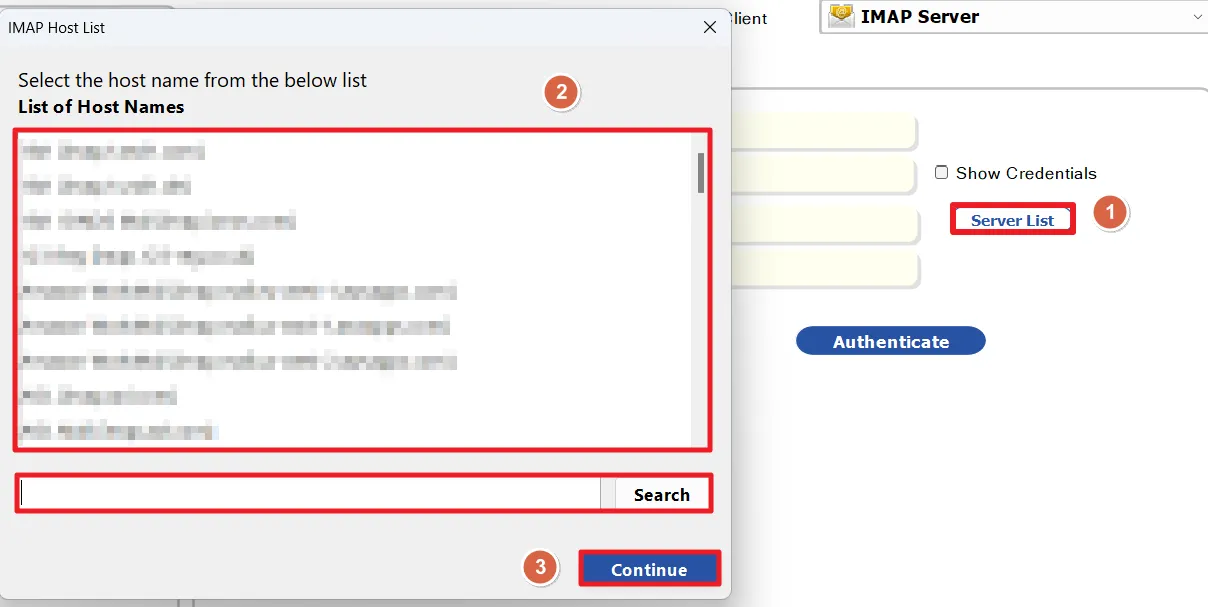
- Click on the Server List option to fetch supported IMAP server details automatically.
- Select the IMAP host as desired or search for a specific one and click Continue.
- Enable Show Credentials to verify the entered password.
- Click Authenticate to validate the mailbox connection and proceed with the migration.
Step 7:Apply the Additional Features of the Software
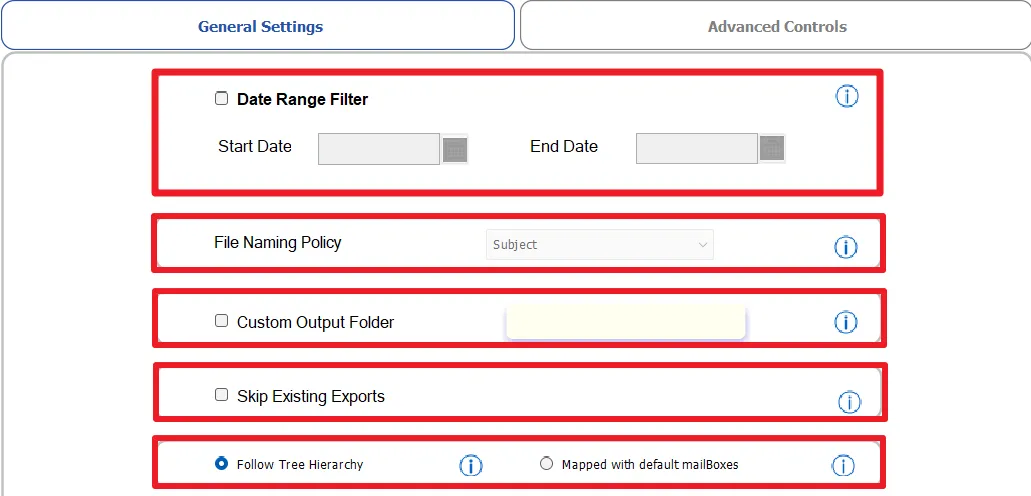
- Configure General Export Settings Apply the required export settings before starting the conversion.
- Date Range Filter: Export emails within a specific date period.
- Custom Output Folder: Select a destination folder for exported data.
- Skip Existing Exports: Prevent re-exporting previously converted items.
- Feature Exclusive to Specific Formats/ Email Clients:
File Naming Policy: Applies a custom naming convention to exported files using combinations of subject and date formats for organised file management. - Follow Tree Hierarchy: Preserve the original mailbox folder structure during migration.
- Mapped with Default Mailboxes: Automatically map source default folders to Gmail's/Office 365’s/Google Workspace’s default mailbox folders.
Note:
- The File Naming Policy feature is available only for EML, MSG, VCF, ICS, DOCX, PNG, ICS, VCF, and PDF.
- The Follow Tree hierarchy and mapped default mailboxes apply to Gmail, Office 365, Google Workspace, GoDaddy, and Hotmail only.
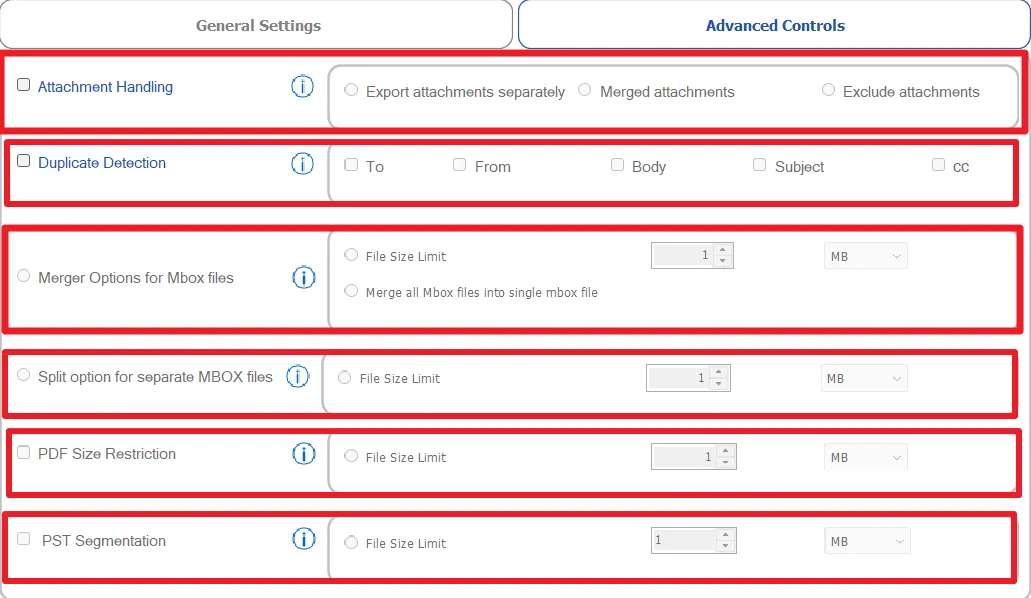
- Apply Advanced Export Controls
Use advanced options to customise the export process and manage attachments, duplicates, and file size limits.
- Attachment Handling: Export attachments separately or exclude them.
- Duplicate Detection: Identify and skip duplicate emails using fields like To, From, Subject, Body, and CC.
Features Exclusive to Specific Output Formats:
For PST:
- PST Segmentation: Divide large PST files into smaller parts based on a specified size limit.
For MBOX:
- MBOX Segmentation: Splits large MBOX files by file size or creates a separate MBOX file for each mailbox folder.
- MBOX Merge: Combines all loaded MBOX files into a single MBOX output or splits output by file size (no size limit). (*Only applicable when MBOX is selected in the source).
Note: The MBOX Merge option is available only for the Thunderbird/MBOX sources.
For PDF:
- PDF Size Restriction: Limits the size of exported PDF files by splitting them as per the specified size limit (the maximum size limit that can be specified is 500MB).
- Merge Attachments: Keeps the attachments saved in a written format in PDF pages.
Step 8:Click Browse to browse and choose your preferred saving location, and click on the 'Start Export' button to begin the conversion process.
Note: The selection of the destination only applies if you have selected any file format as the output format.

Step 9: Monitor and Complete the Conversion Process
After clicking Start Export, track the migration progress and review the conversion details in real time.
- Source & Destination: View the selected source file and target export location.
- File Count & Total Messages: Monitor the number of processed files and emails.
- Processing Status: Check the current status of the export operation.
- Execution Time: Track the total time taken for the conversion.
- Output Location: Verify where the converted data is being saved.
- Progress Bar: Monitor overall conversion progress in real time.
- Stop Process: Cancel the export operation if required.
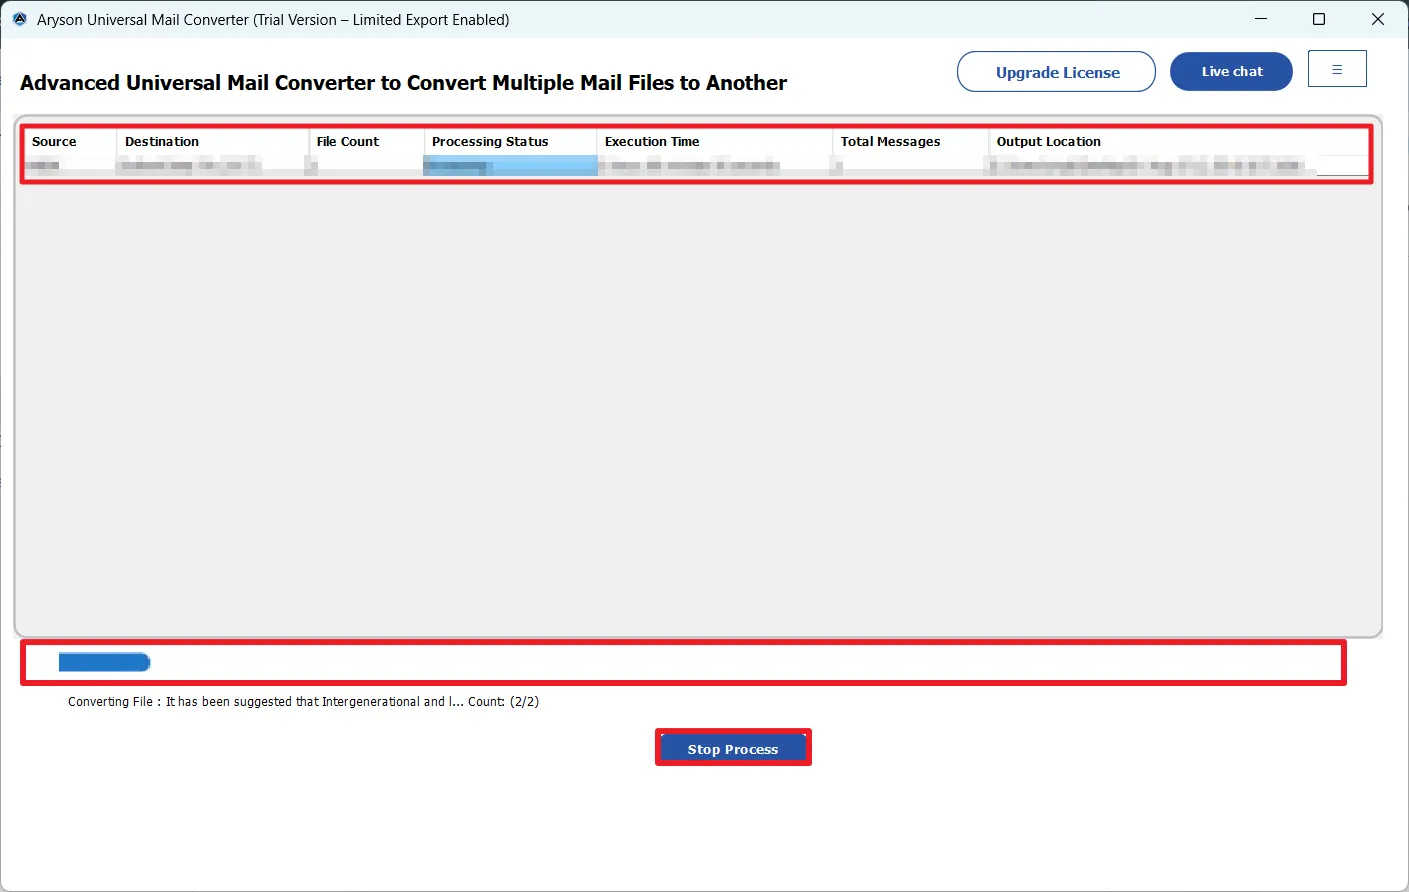
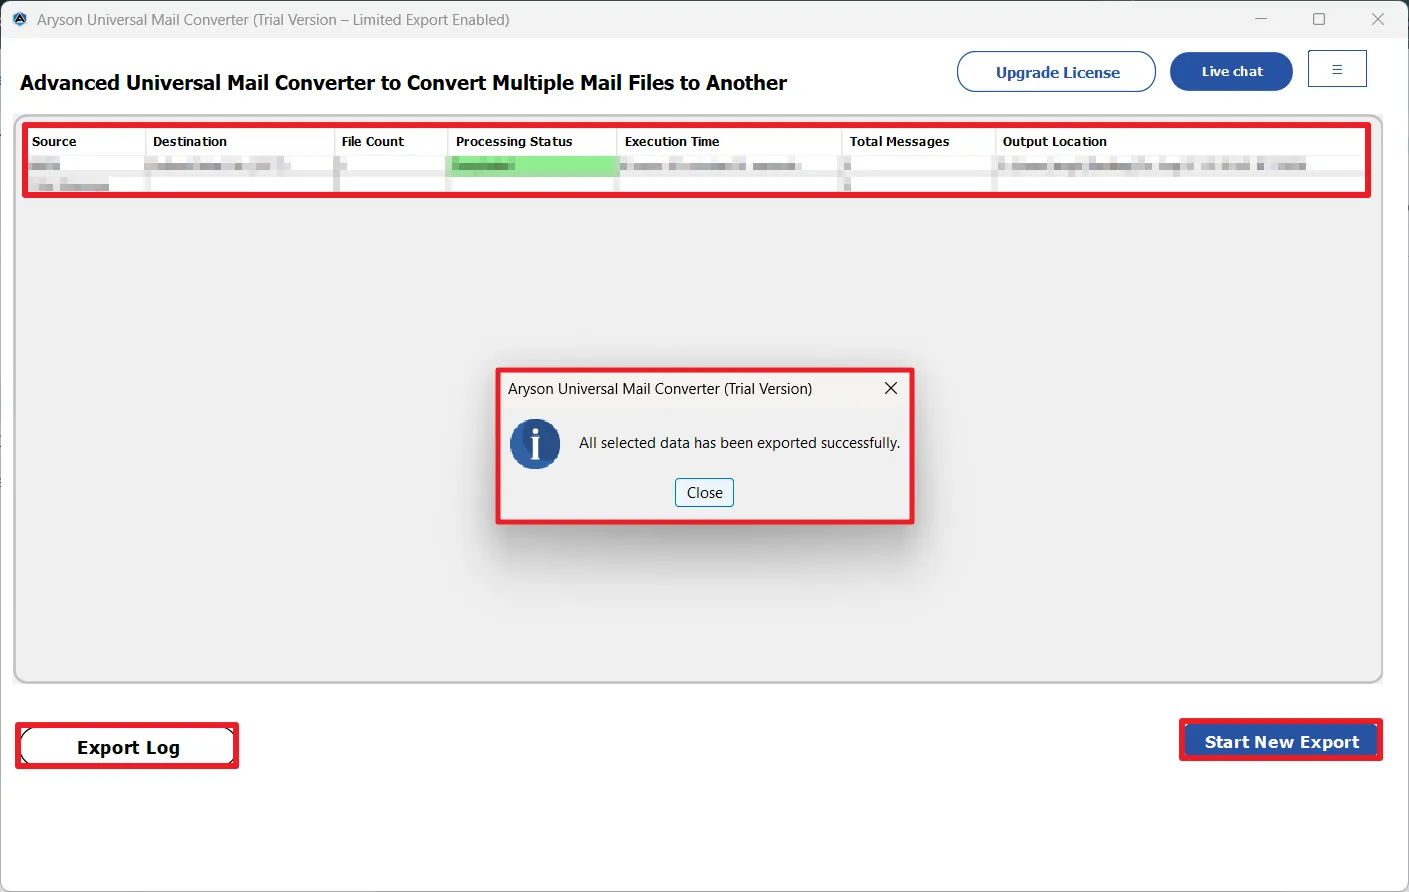
Step 10:Once the conversion is complete, the software displays, “All selected data has been exported successfully." You can even use the additional options to proceed further.
- Export Log: Open the detailed log report to verify the export process and results.
- Start New Export: Begin another file conversion or migration task if required.
Activation Guide
Activate the Software
Installation & Uninstallation
Installation & Uninstallation of Software
User Interface
User Interface
After downloading the Aryson Universal Mail Converter Tool, you will find the welcome screen as played below.