Complete Step-by-Step Guide for Aryson Pegasus Mail Converter
Simplify email migration with the Aryson Pegasus Mail Converter, a reliable solution for both Windows and Mac systems. It allows users to convert Pegasus Mail mailbox data into multiple formats such as PST, PDF, MBOX, EML, MSG, and more. The tool maintains folder hierarchy, attachments, and metadata throughout the process. With its intuitive interface and advanced features, it ensures secure, accurate, and efficient email conversion without data loss. For detailed instructions, refer to our detailed user guide.
-
Table of Content
- Software Working Process
- Activation Guide
- Installation & Uninstallation
- User Interface
Software Working Process
Software Working Process
Step 1: Download and install the Aryson Pegasus Mail Converter on your system.
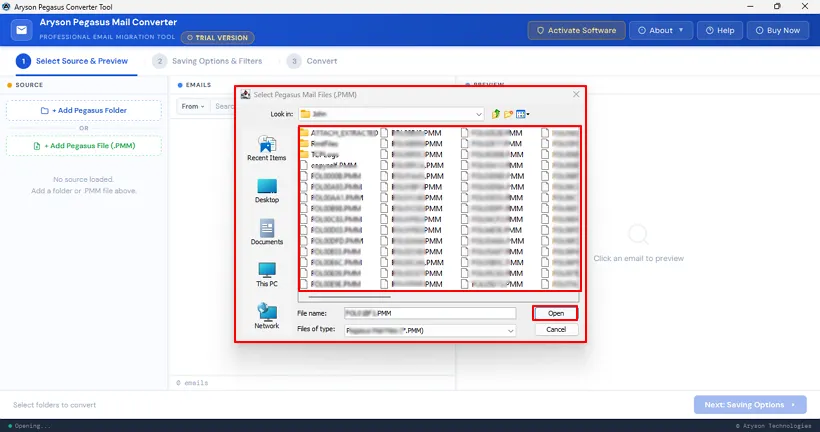
Step 2: Launch the software and click on the Add Pegasus Folder/File(.PMM) option to load Pegasus Mail mailbox data into the tool.
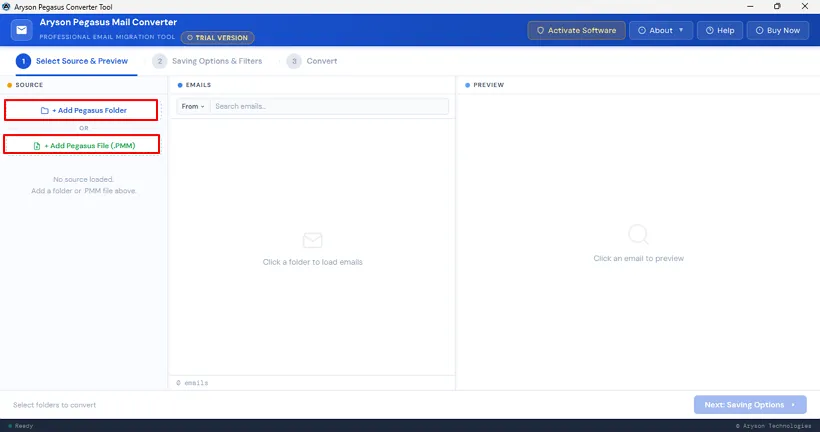
Step 3: Browse your system to locate the Pegasus Mail file or folder, select it, and click Open to import the data into the software.

Step 4: Preview the added mailbox items and verify that all emails, attachments, and folder structures are properly loaded, and hit Next: Saving Options.

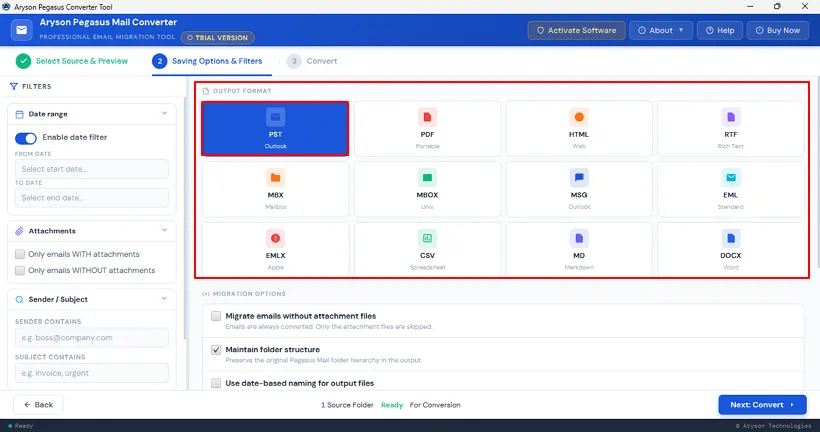
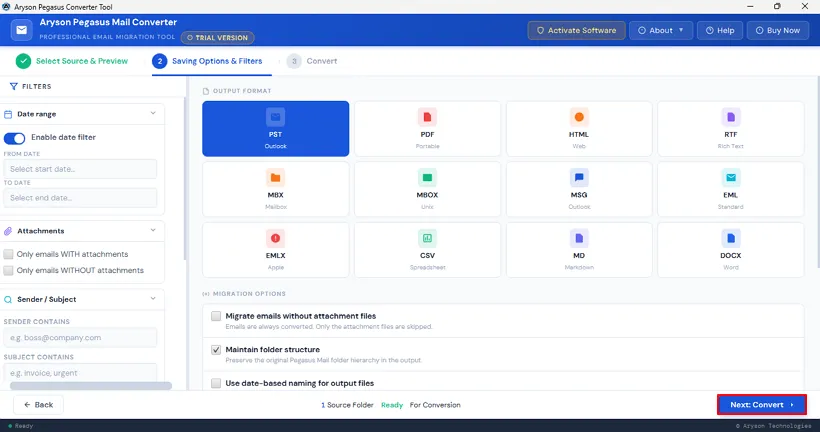
Step 5: From the available saving options, select PST as the desired output file format.
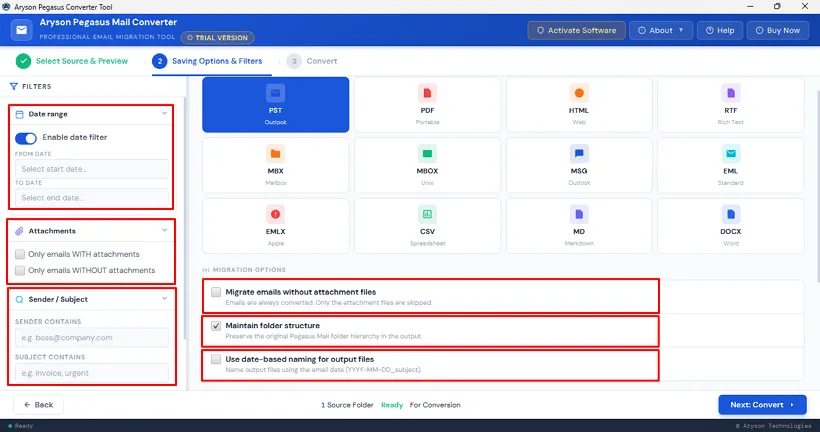
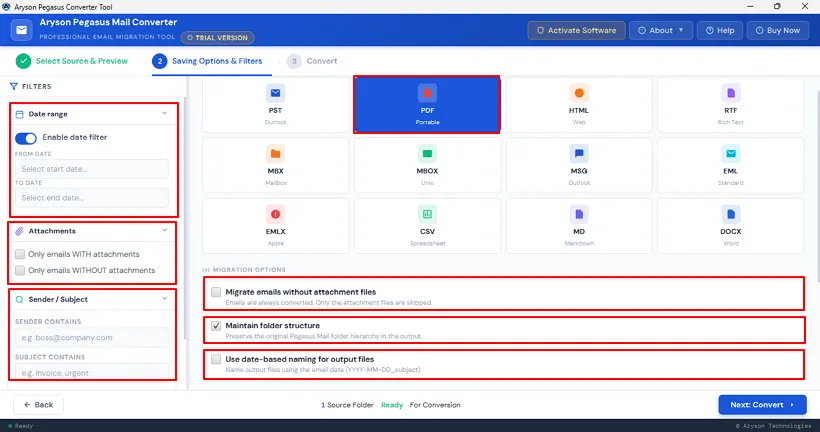
Step 6: Apply Filters: After selecting PST as the output format, apply the following filters to refine the conversion:
- Date Range Filter: Select a specific date range to convert only required emails.
- Attachment Filter Options: Choose to export emails with attachments or without attachments.
- Sender / Subject Filter: Filter emails based on sender or subject keywords.
- Migrate Emails Without Attachment Files: Exclude attachments and convert only email content.
- Maintain Folder Structure: Preserve the original folder hierarchy.
- Use Date-Based Naming for Output Files: Save emails with date-based filenames for easy organization.
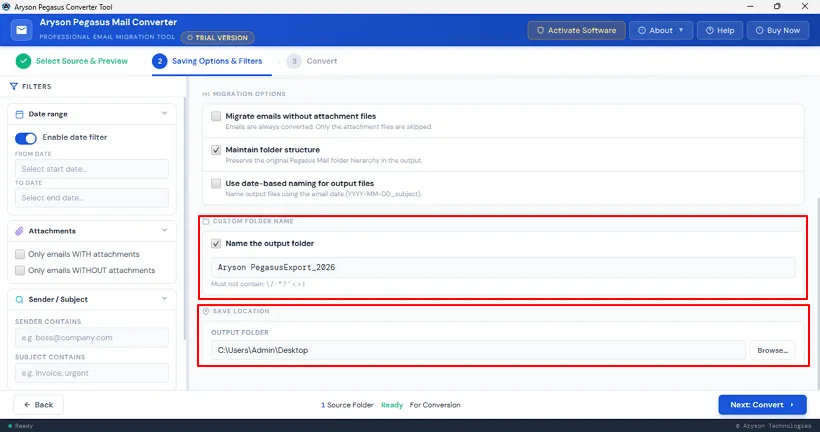
Step 7: Configure Output Settings: After applying filters, set the output preferences to organize and save the converted data efficiently:
- Custom Folder Name: Specify a name for the output folder to keep the converted files well-organized and easily identifiable.
- Save Location (Select Destination Path): Choose the desired location on your system where the converted PST file will be stored securely.
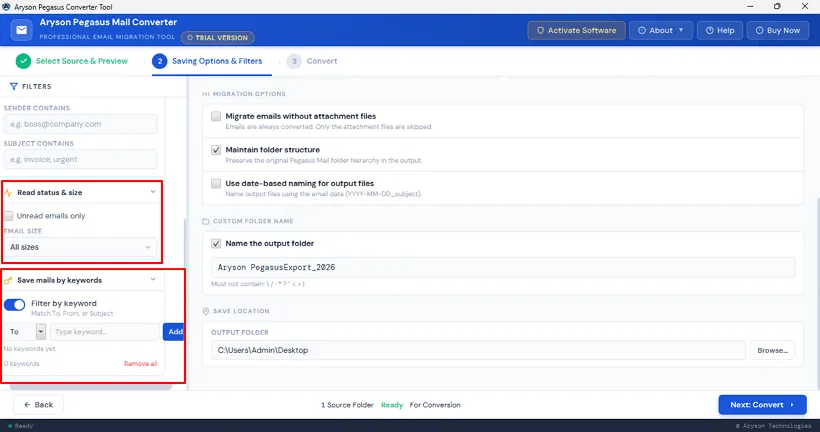
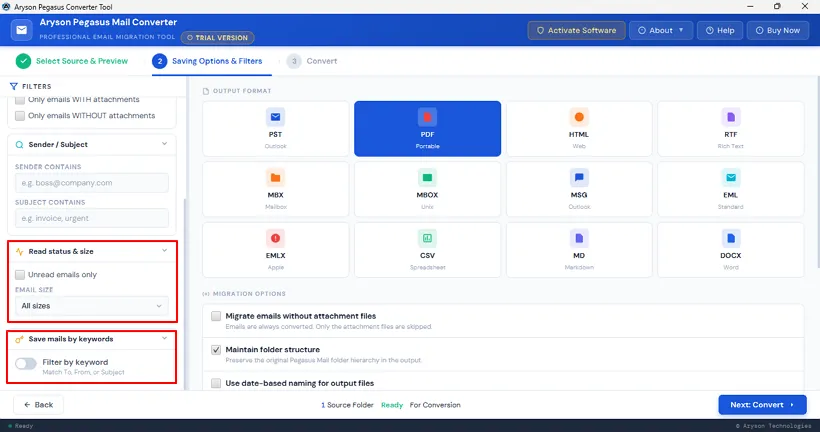
Step 8: Use Additional Filters: In this step, apply additional filtering options to define specific conditions and ensure accurate data selection during the conversion process.
- Read Status Filter (Unread Emails Only) based on Email Size Filter: Enable this option to convert only unread emails and further refine results those unread emails by selecting email size (All, Small <100 KB, Medium 100 KB–1 MB, or Large >1 MB) as per your requirement.
- Keyword-Based Email Filtering: Filter emails using keywords in To, From, or Subject.
Step 9: Start Conversion Process. After completing all configurations, click on the Next: Convert button to begin converting Pegasus Mail data into PST format and wait until the process completes successfully.
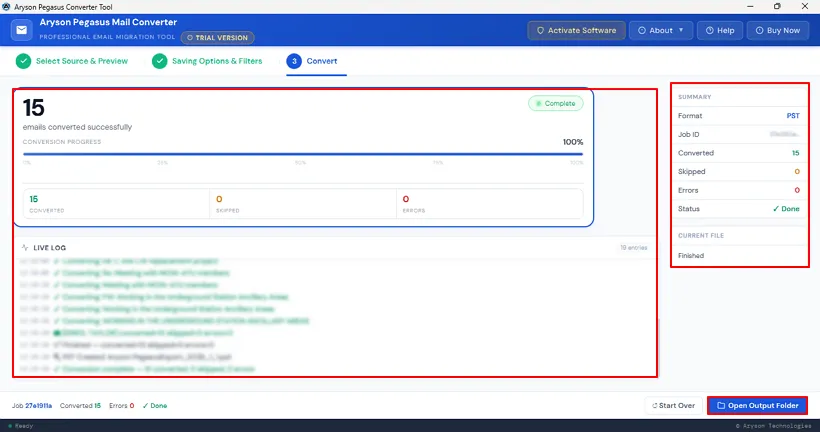
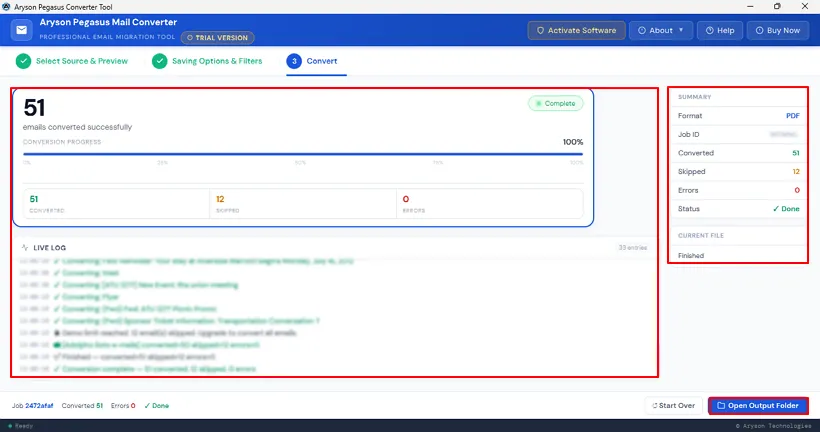
Step 10: View Conversion Report: After the conversion is completed, review the summary report to verify the process and ensure all data has been successfully converted.
- Check Completion Summary: View the number of converted, skipped, and failed emails along with the final status.
- Verify Process Details: Check details like output format and overall conversion status.
- Open Output Folder: Access the destination location to view the converted PST file.
Step 1: Download and install the Aryson Pegasus Mail Converter on your system.

Step 2: Launch the software and click on the Add Pegasus Folder/File(.PMM) option to load Pegasus Mail mailbox data into the tool.

Step 3: Browse your system to locate the Pegasus Mail file or folder, select it, and click Open to import the data into the software.
Step 4: Preview the added mailbox items and verify that all emails, attachments, and folder structures are properly loaded, and hit Next: Saving Options.

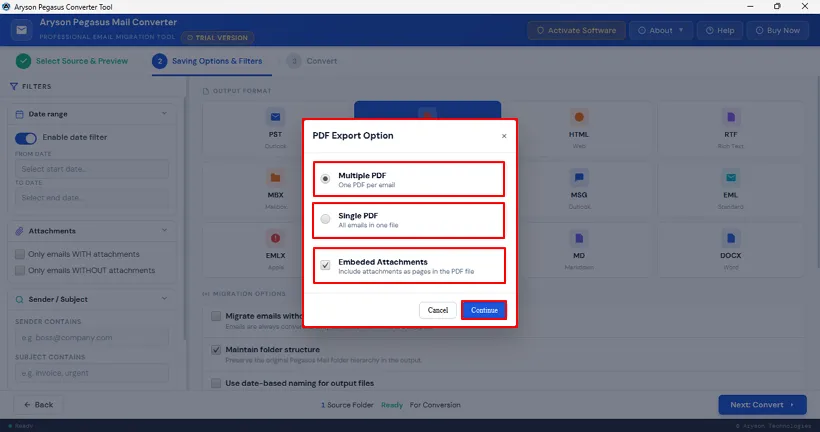
Step 5: Choose PDF from the list of available file formats to export Pegasus Mail data. After selecting PDF, a PDF Export Options pop-up window will appear. Configure the settings as needed:
- Multiple PDF (One per Email): Create a separate PDF file for each email.
- Single PDF (All in One): Merge all emails into a single PDF document.
- Embedded Attachments: Include attachments within the PDF file.
- Continue: Click Continue to confirm settings and proceed to the next step.
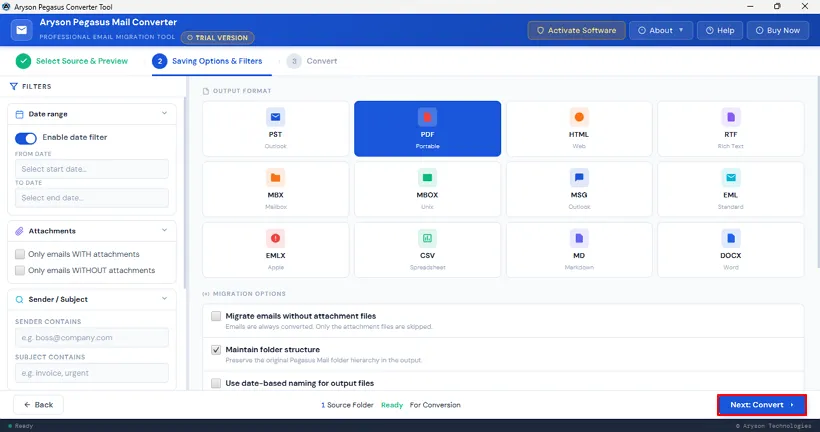
Step 6: Apply Filters: After selecting PDF as the output format, apply the following filters to refine the conversion:
- Date Range Filter: Select a specific date range to convert only required emails.
- Attachment Filter Options: Choose to export emails with attachments or without attachments.
- Sender / Subject Filter: Filter emails based on sender or subject keywords.
- Migrate Emails Without Attachment Files: Exclude attachments and convert only email content.
- Maintain Folder Structure: Preserve the original folder hierarchy.
- Use Date-Based Naming for Output Files: Save emails with date-based filenames for easy organization.
Step 7: Configure Output Settings: After applying filters, set the output preferences to organize and save the converted data efficiently:
- Custom Folder Name: Specify a name for the output folder to keep the converted files well-organized and easily identifiable.
- Save Location (Select Destination Path): Choose the desired location on your system where the converted PDF file will be stored securely.

Step 8: Use Additional Filters: In this step, apply additional filtering options to define specific conditions and ensure accurate data selection during the conversion process.
- Read Status Filter (Unread Emails Only) based on Email Size Filter: Enable this option to convert only unread emails and further refine results those unread emails by selecting email size (All, Small <100 KB, Medium 100 KB–1 MB, or Large >1 MB) as per your requirement.
- Keyword-Based Email Filtering: Filter emails using keywords in To, From, or Subject.
Step 9: Start Conversion Process: After completing all configurations, click on the Next: Convert button to begin converting Pegasus Mail data into PDF format and wait until the process completes successfully.
Step 10: View Conversion Report: After the conversion is completed, review the summary report to verify the process and ensure all data has been successfully converted.
- Check Completion Summary: View the number of converted, skipped, and failed emails along with the final status.
- Verify Process Details: Check details like output format and overall conversion status.
- Open Output Folder: Access the destination location to view the converted PDF file.
Activation Guide
Activate the Software
Installation & Uninstallation
Installation & Uninstallation of Software
User Interface
User Interface
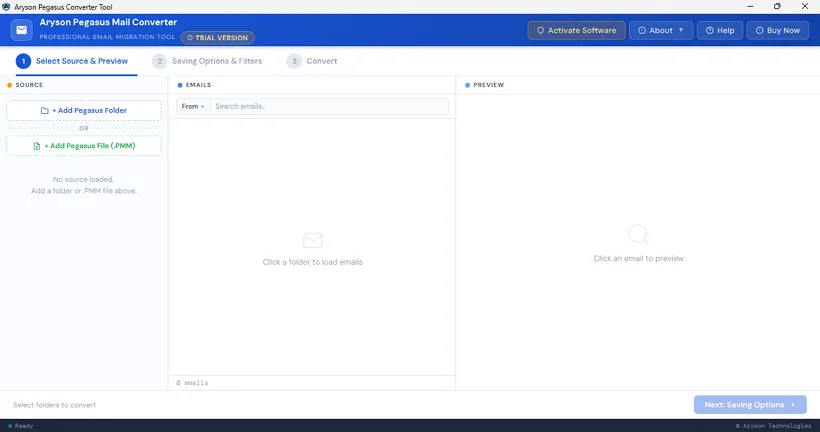
After downloading the Aryson Pegasus Mail Converter Tool, you will find the welcome screen as played below.