Complete Step-by-Step Guide for Aryson OST to Office 365 Migration Tool
Easily convert OST files, including emails, contacts, calendars, tasks, and notes, on Windows, Mac, and Linux. This software also allows users to convert OST file data from Outlook for Mac without requiring any email client installation.
-
Table of Content
- Software Working Process
- Activation Guide
- Installation & Uninstallation
Software Working Process
Software Working Process
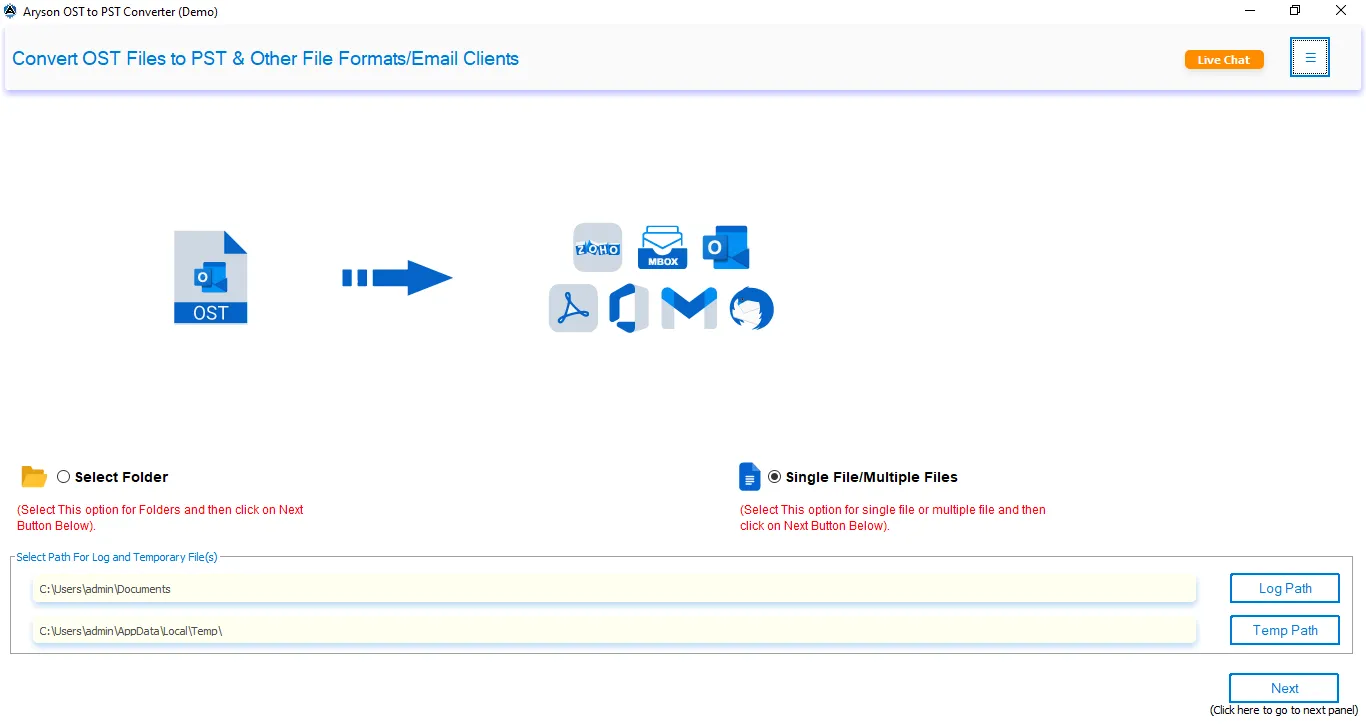
Step 1: Download and launch the Aryson OST Converter Tool on your system.
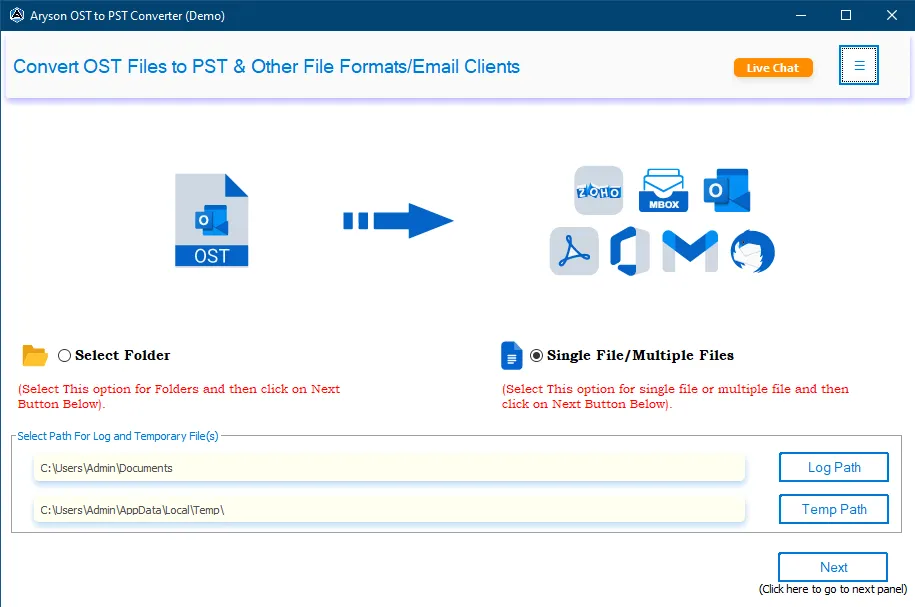
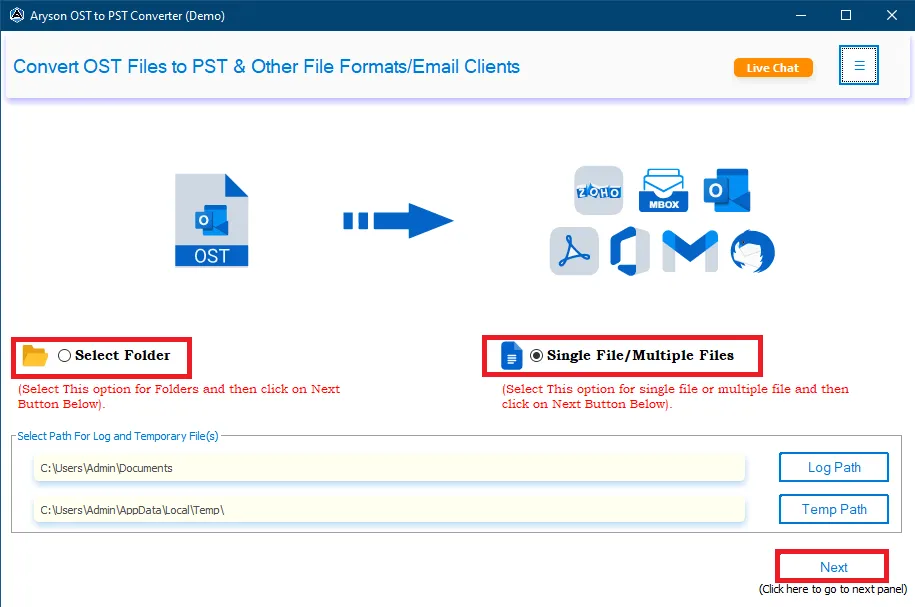
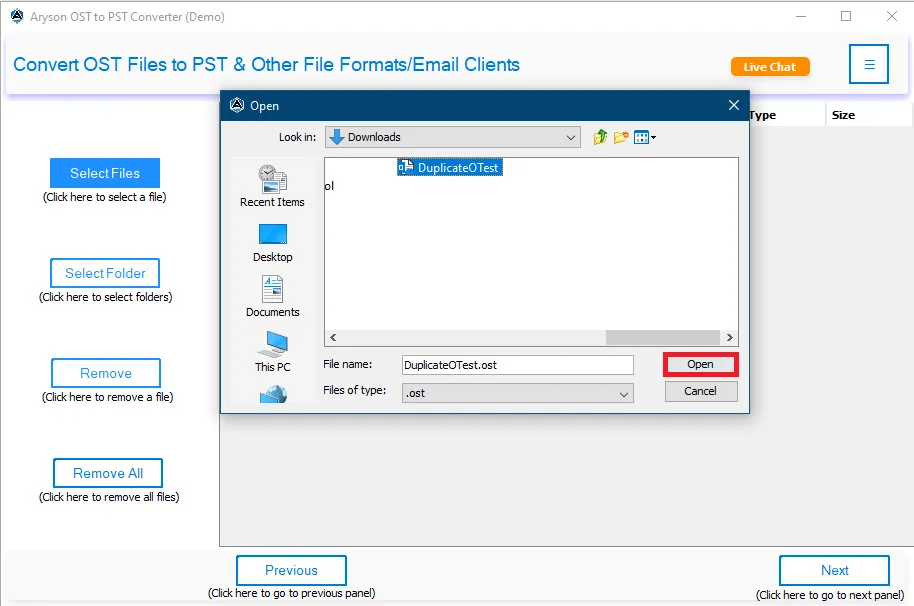
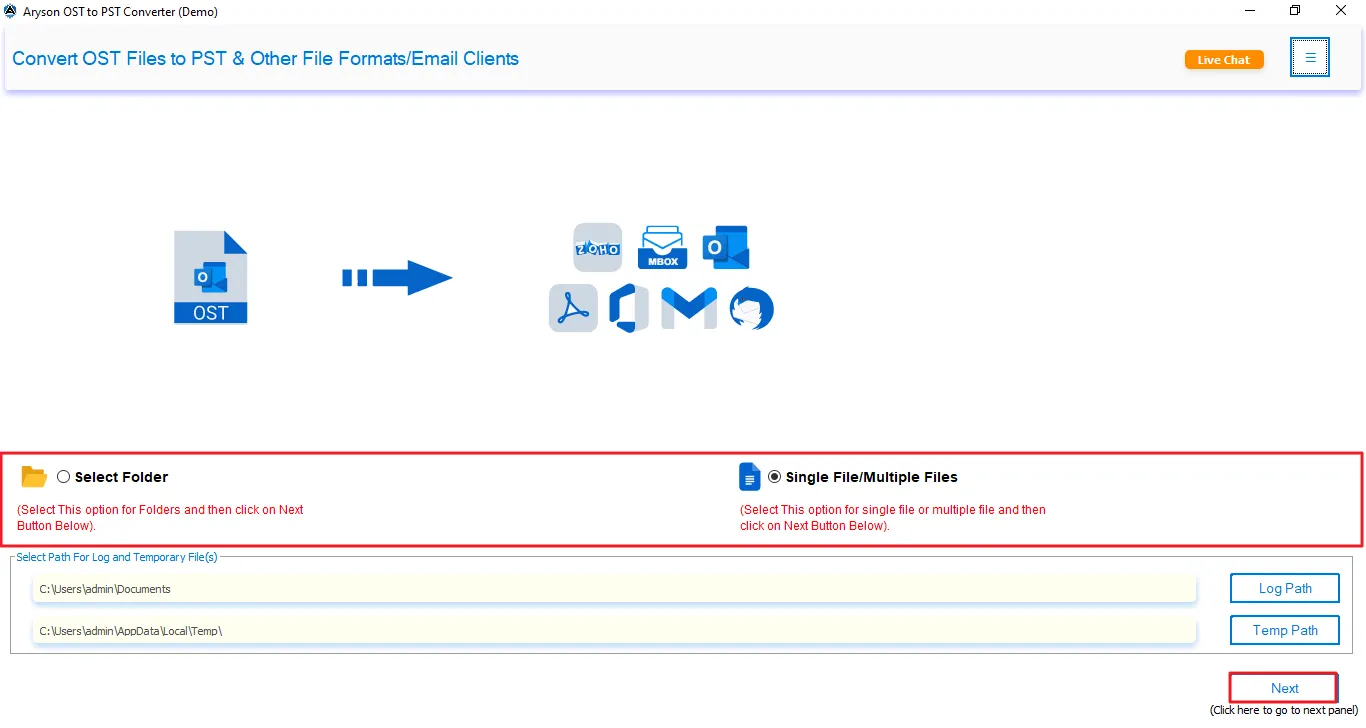
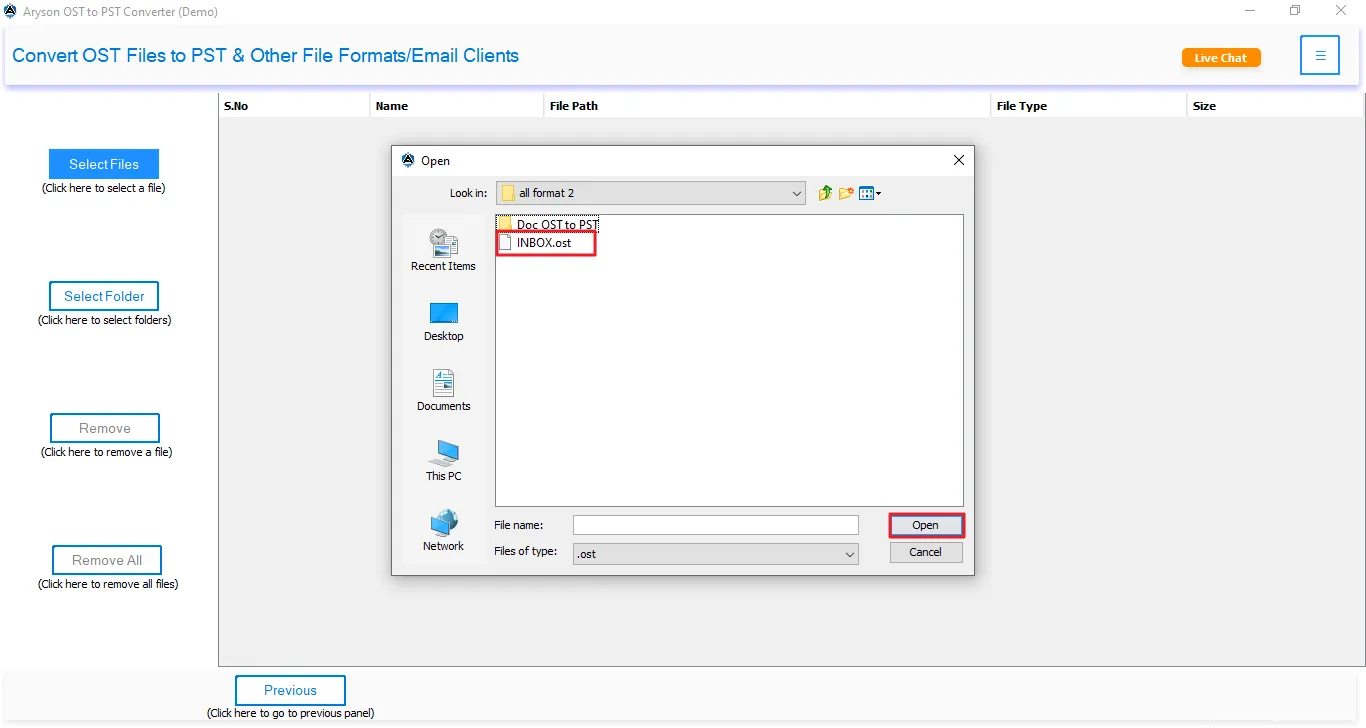
Step 2: Click the Select OST/PST File (s) or Select Folder button. Open the OST/PST file on your system.
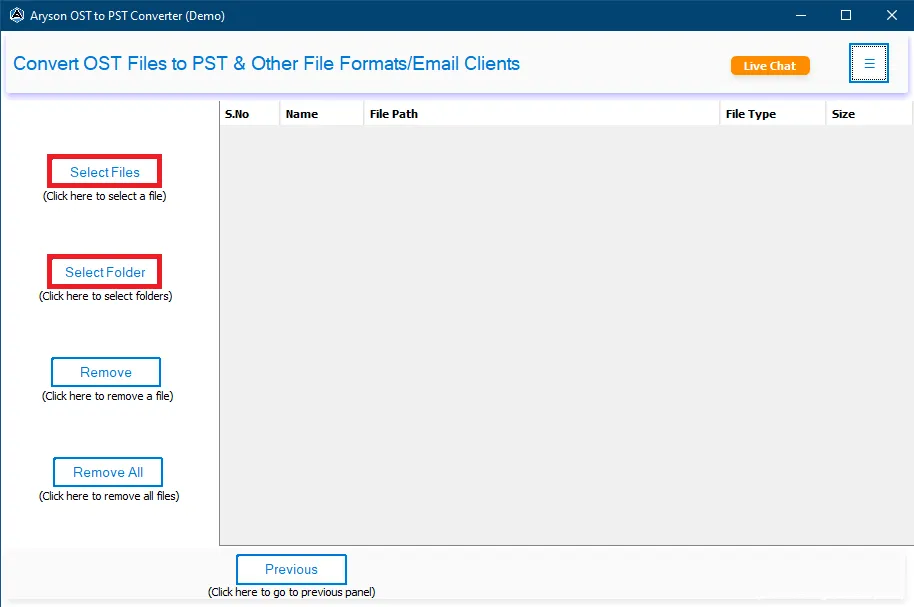
Step 3: To help users understand the software interface easily, below is a detailed explanation of all the buttons:
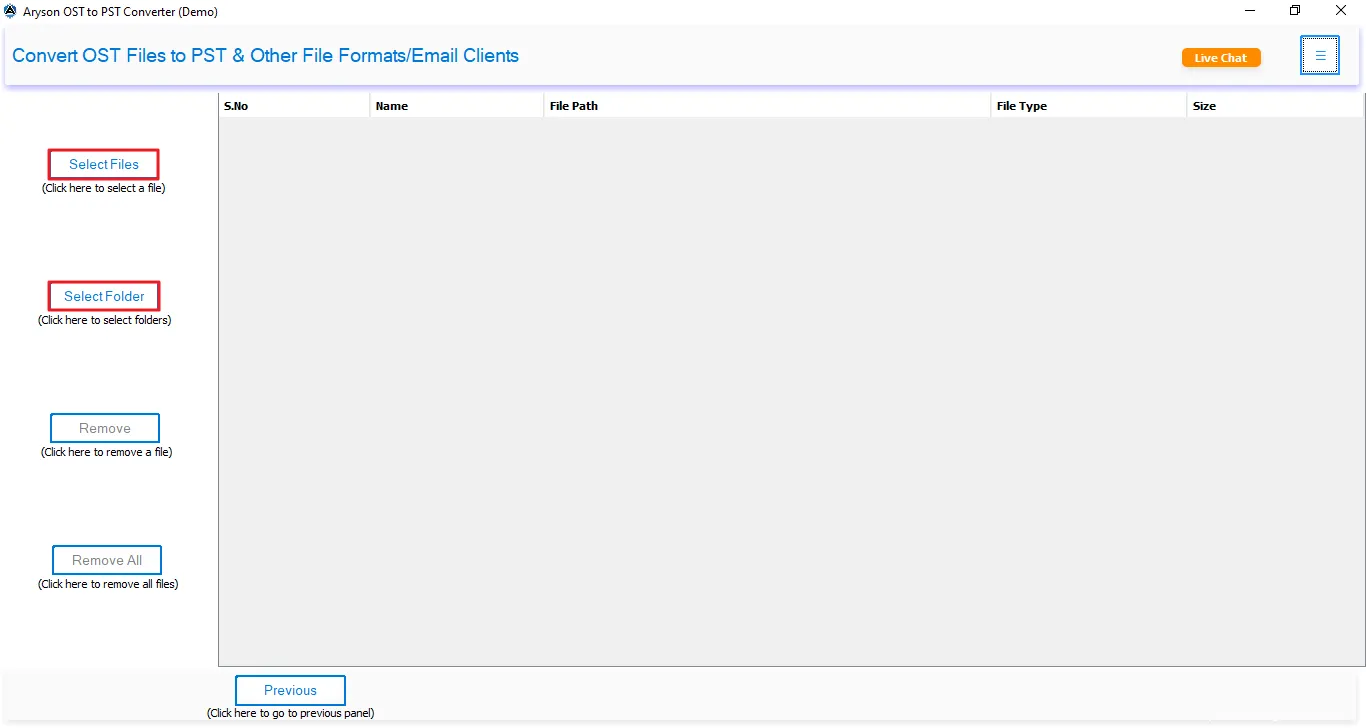
- Select Files: Press this button to add single or multiple OST/PST files.
- Select Folder: Use it to add an entire folder that contains OST/PST files.
- Remove Selected: Delete selected OST/PST files from the list.
- Clear List: Clear all added OST/PST files.
- Proceed: Click on the Proceed button to proceed further.
- Drag-and-drop functionality: The user may add the required OST/PST files using the drag-and-drop features of the software.
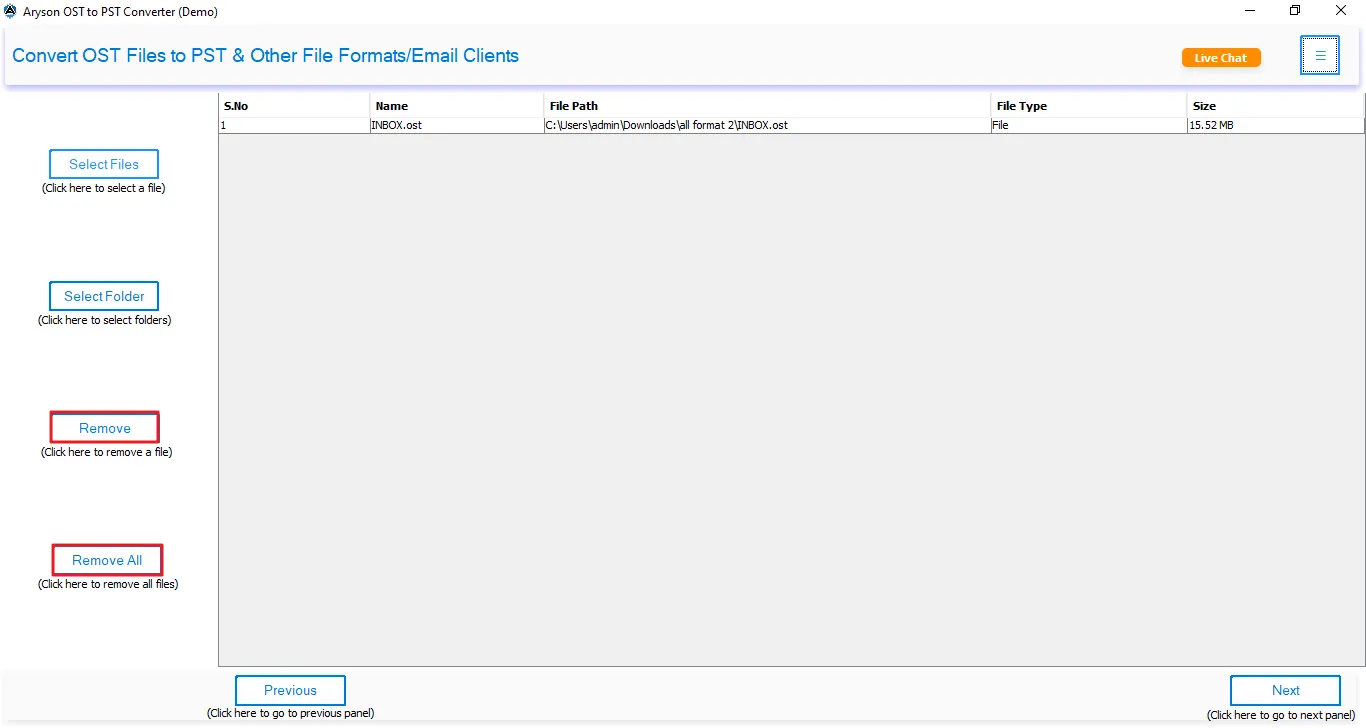
Step 4: Here, it displays the complete details of the OST/PST file that you have added to the software.
- S. No.: This shows the serial number of the added file.
- Name: This column displays the exact name of the selected OST/PST file.
- File Path: Shows the original location of the OST/PST file on your system.
- Size / No of Files: It helps you understand the file volume and estimate the loading time.
- Select (Checkbox Option): This option allows you to select or deselect the file. If multiple files are added, you can choose specific files for converting.
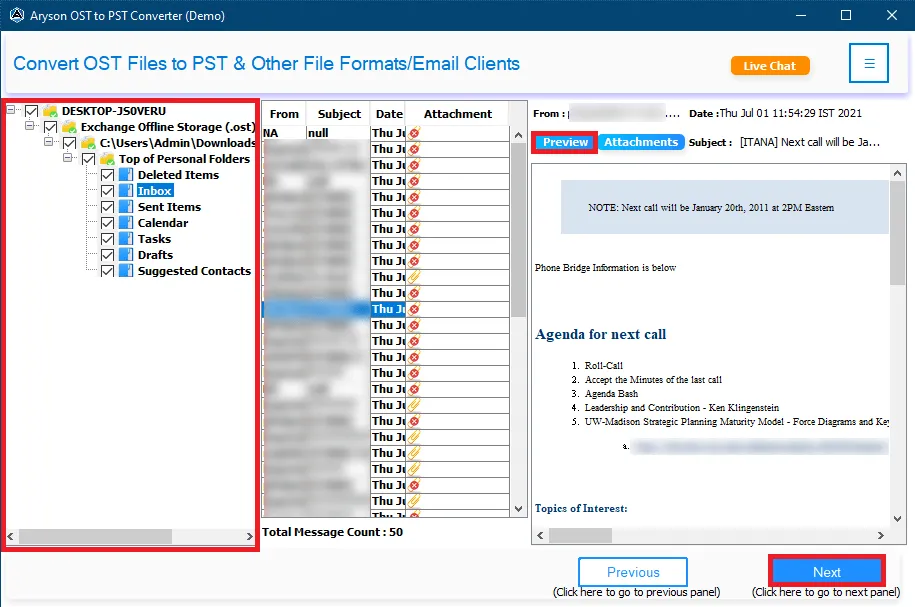
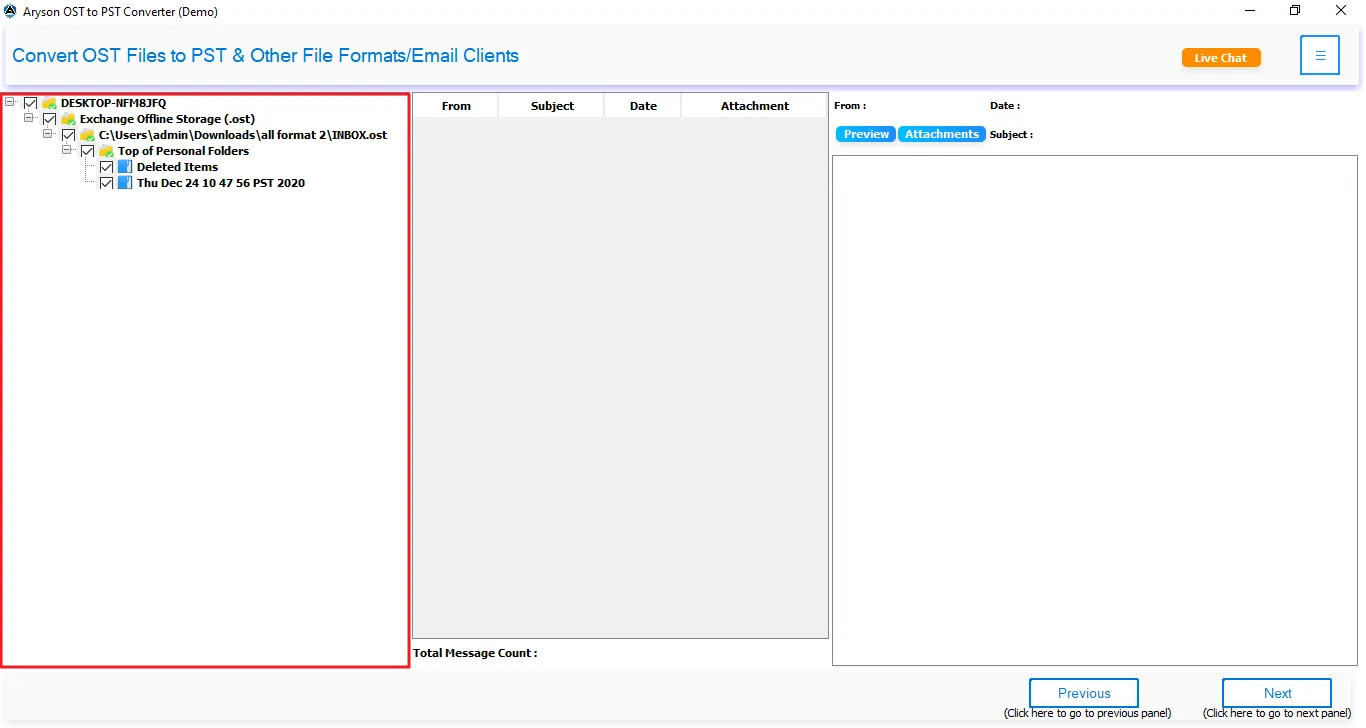
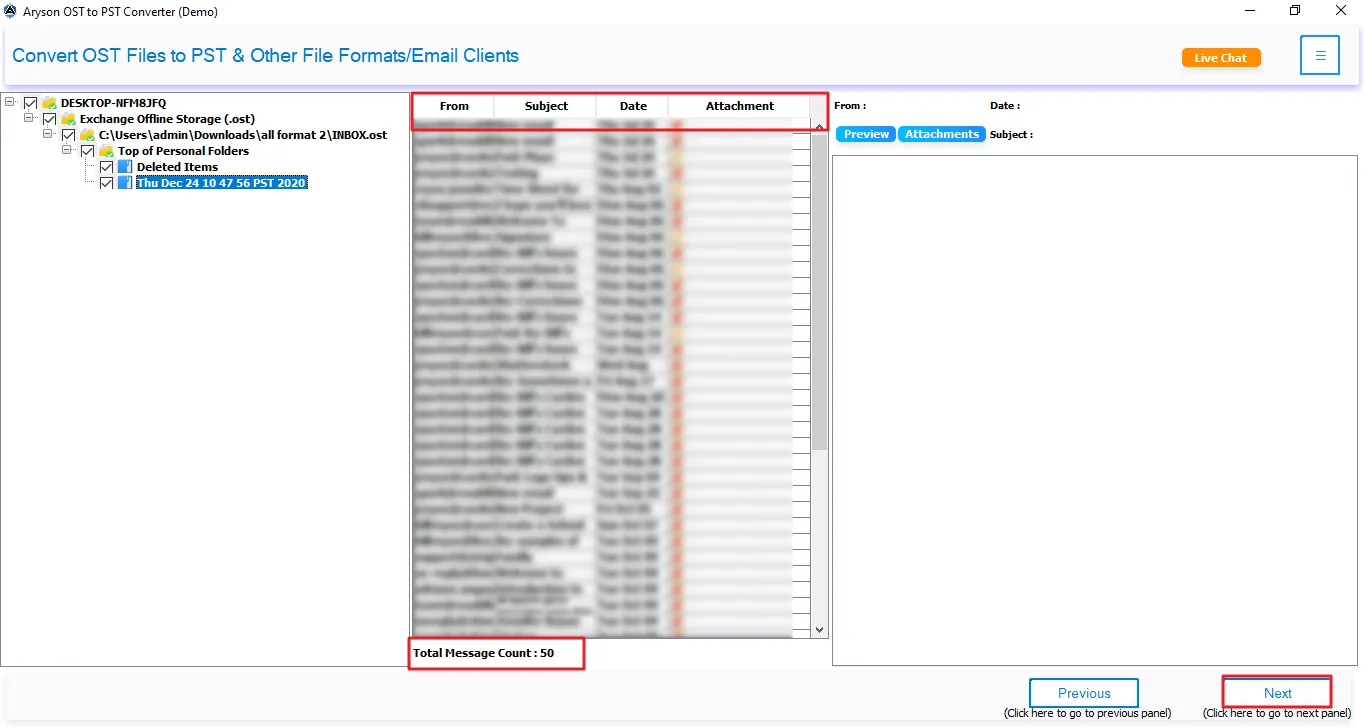
Step 5: At this stage, the software lets you convert mailbox data after loading. It properly displays all folders and subfolders to ensure nothing is missed.
- Search Folders: Quickly find specific folders in the loaded OST/PST file using keywords for easy navigation.
- Advanced Search: Locate emails, contacts, or calendar items using detailed search criteria. Search Filter (To / From / Subject): Filter results by sender, recipient, or subject for precise searching.
- Folder Tree Panel: Displays the complete OST/PST file structure in a hierarchical View for easy selection.
- Preview Panel: Shows detailed content of selected items before converting.
- Selected/Total Message Count: Displays the number of selected items compared to the total messages.
- Open in Browser: Opens emails in the default browser if the panel cannot display complex formatting.

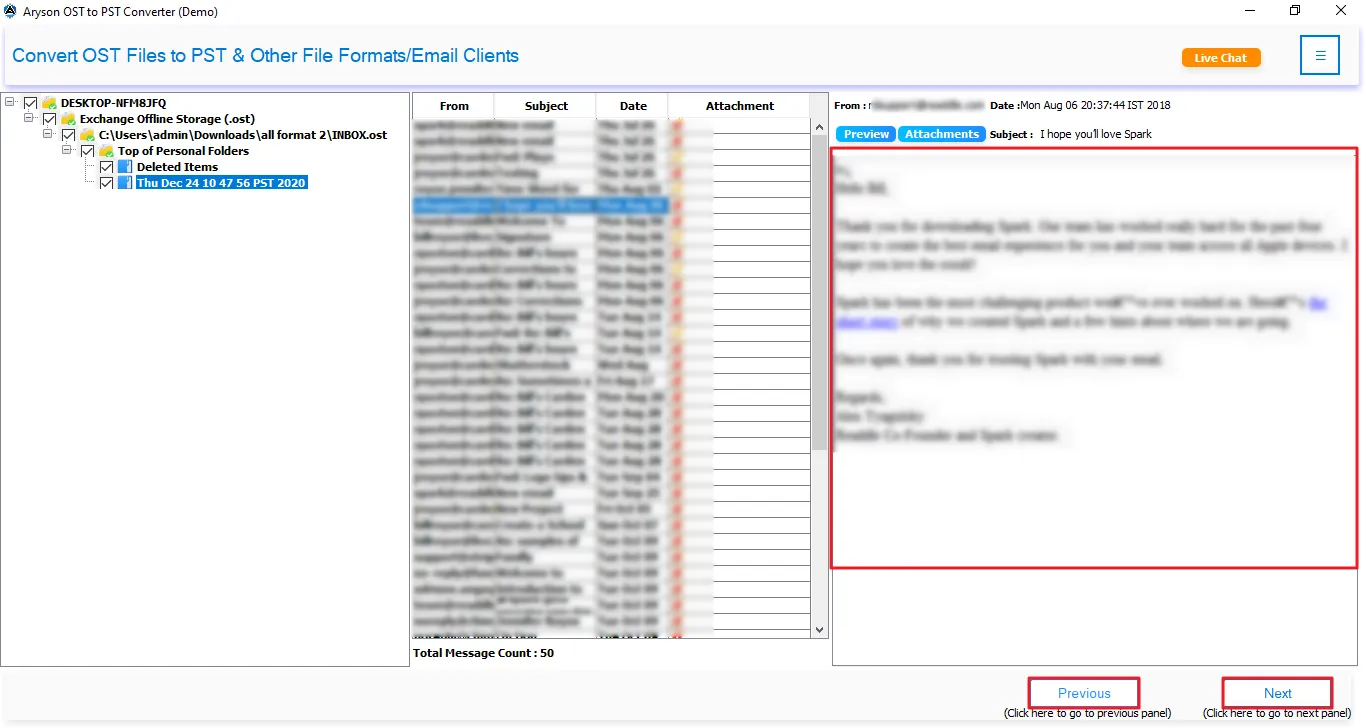
Step 6: Double-click any email to open it in a separate preview window. This helps you verify the complete message.
- HTML format: Displays the email with its original formatting, including fonts, colors, and images.
- Plain text: Shows the email content in simple text without any formatting.
- Headers: Displays detailed technical header information of the email.
- MIME: Shows the MIME structure and encoding details of the message.
- Calendars: Displays the calendars' associated fields.
- Tasks: Displays the fields like start date, end date, due date, and sensitivity.
- Notes: To preview the notes' content and their creation date.
- Raw HTML: Displays the original HTML source code of the email message.
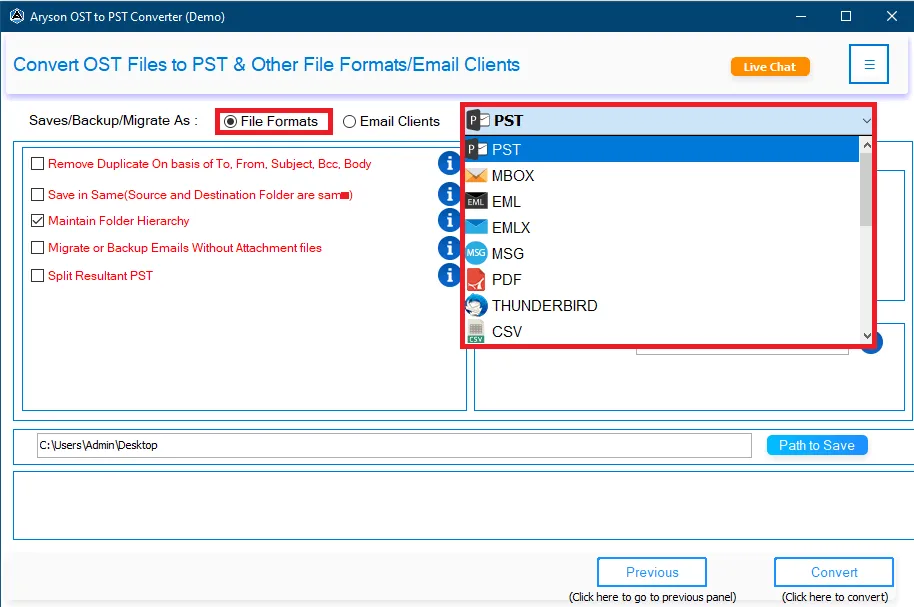
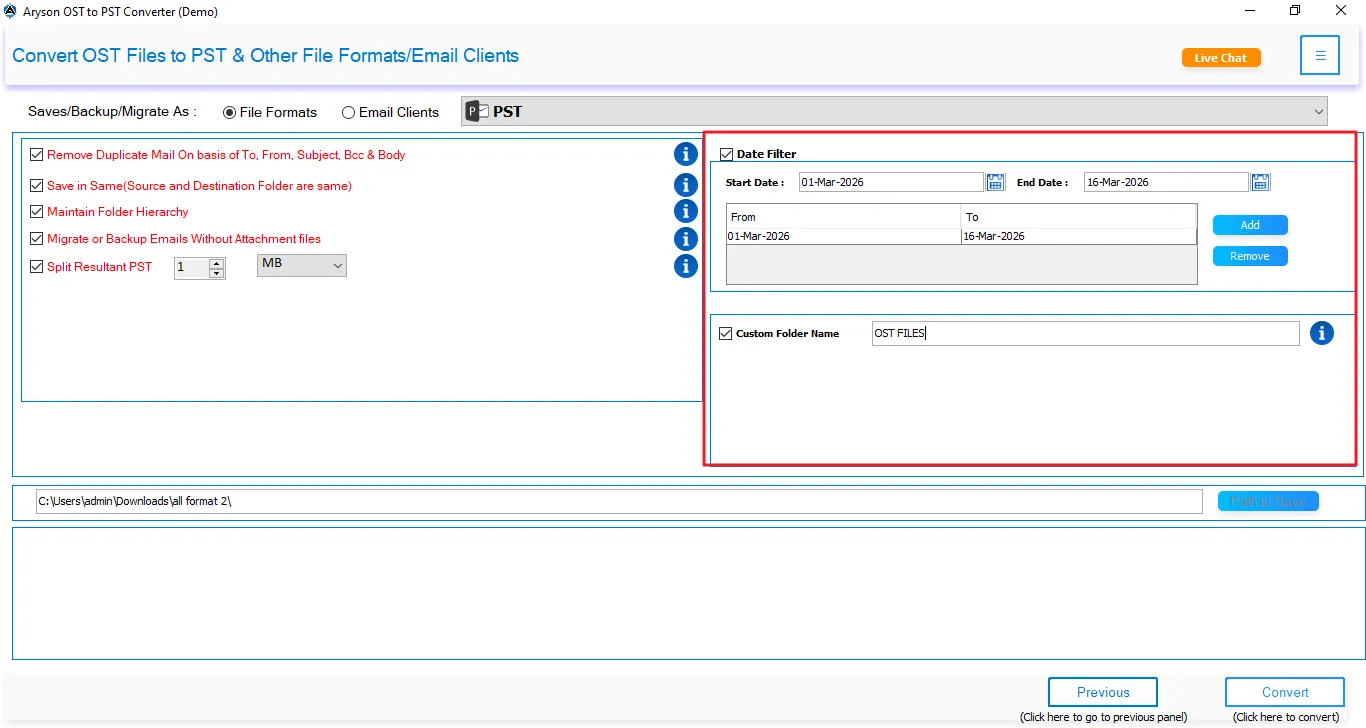
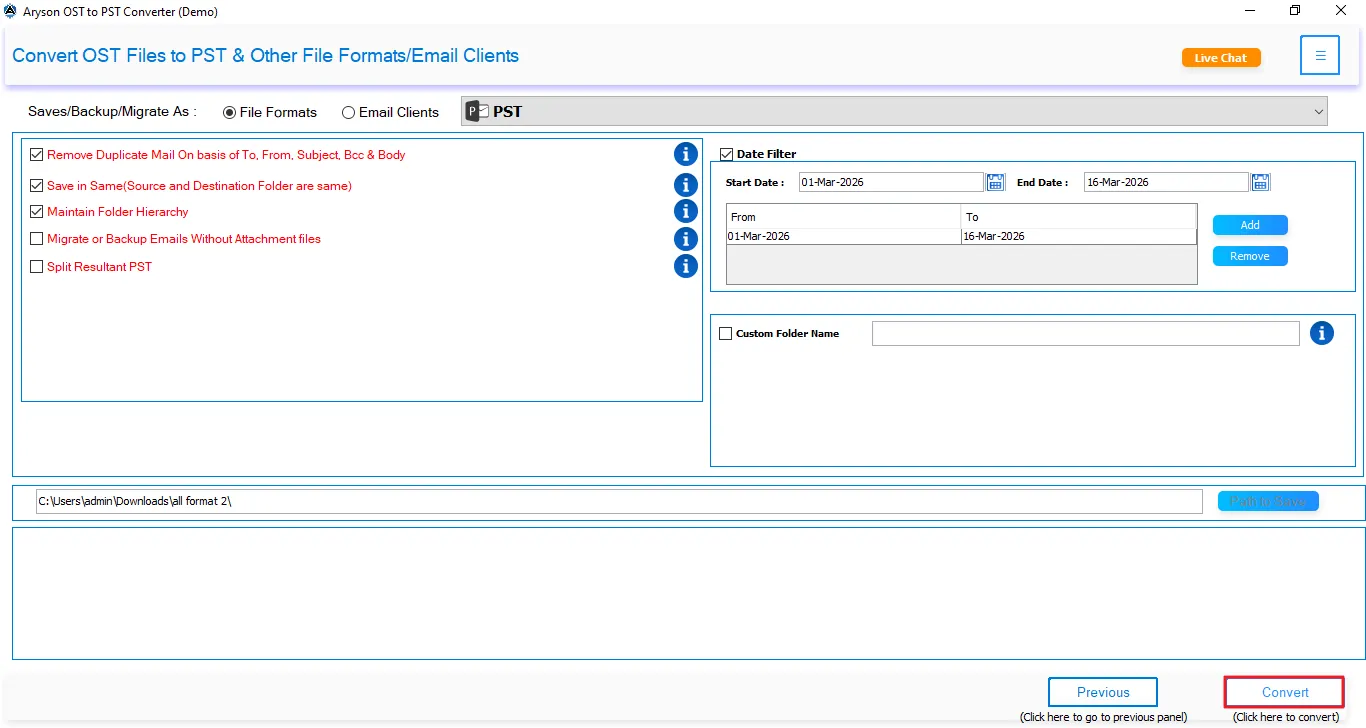
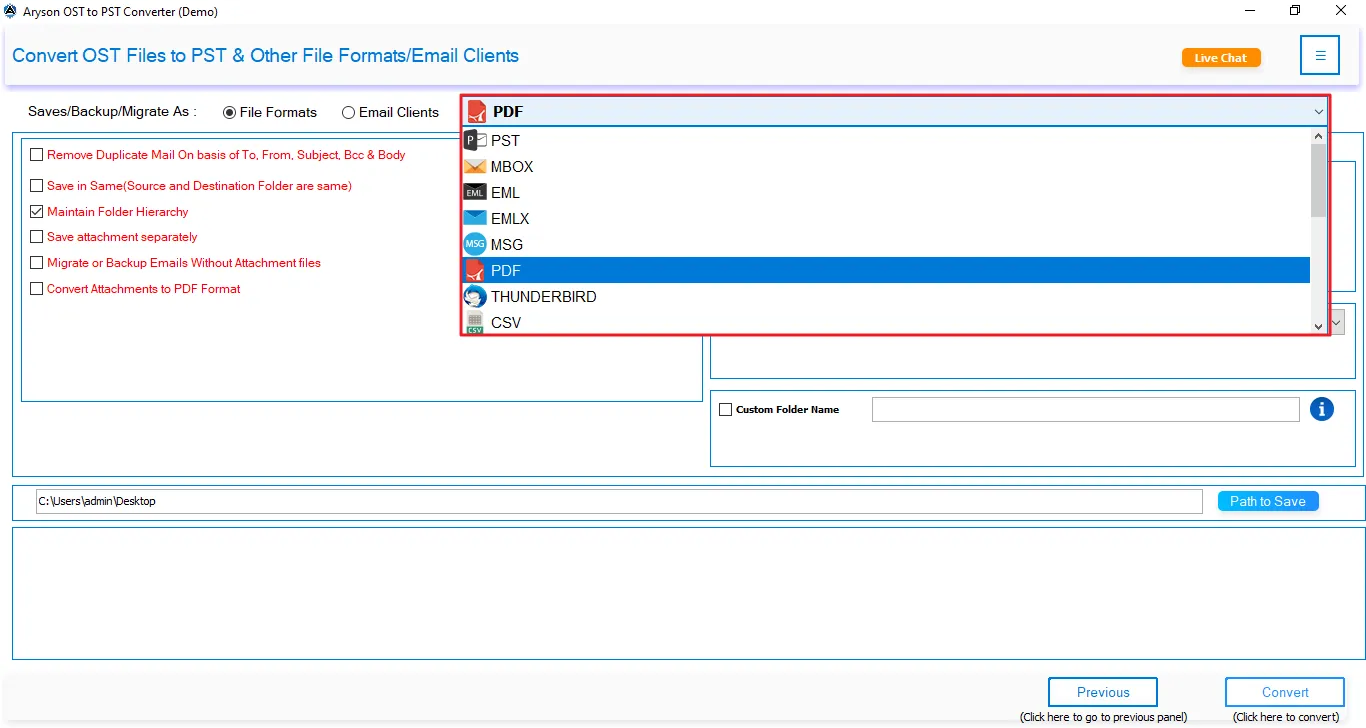
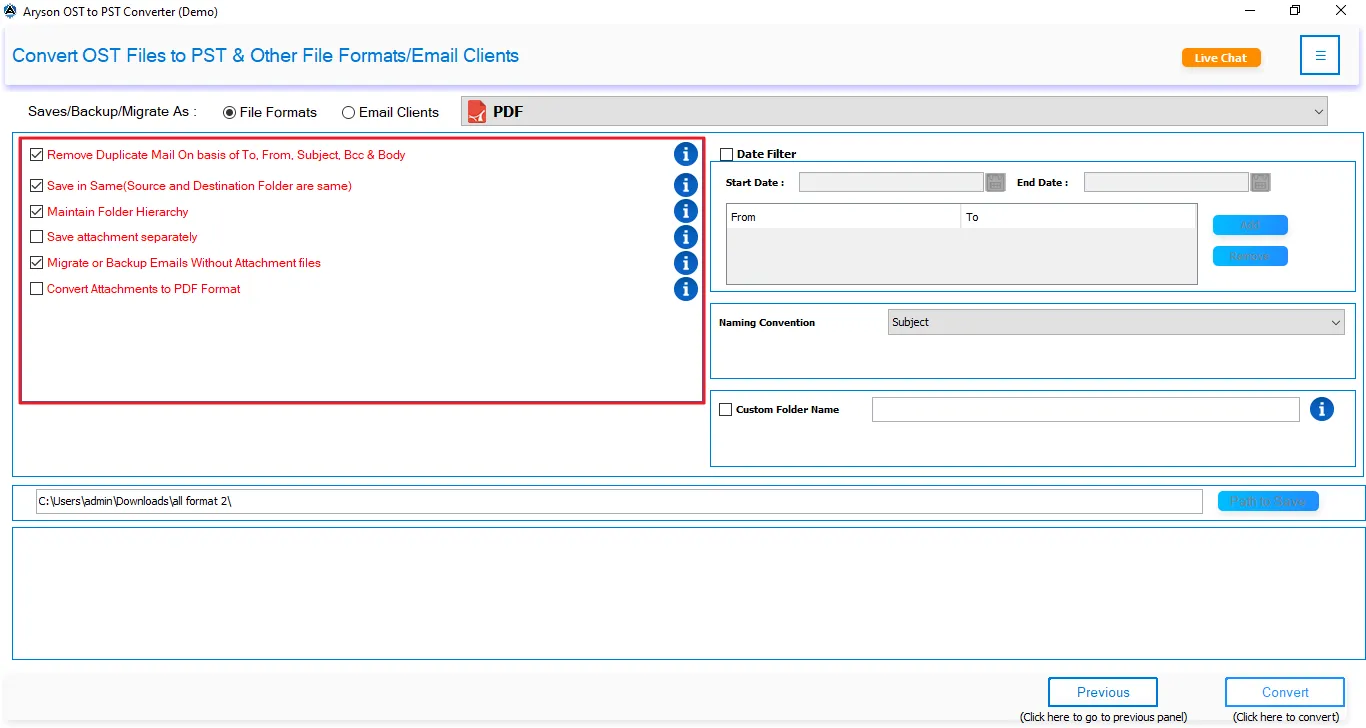
Step 7: Now, select PST as the output format under the File Formats dropdown menu.
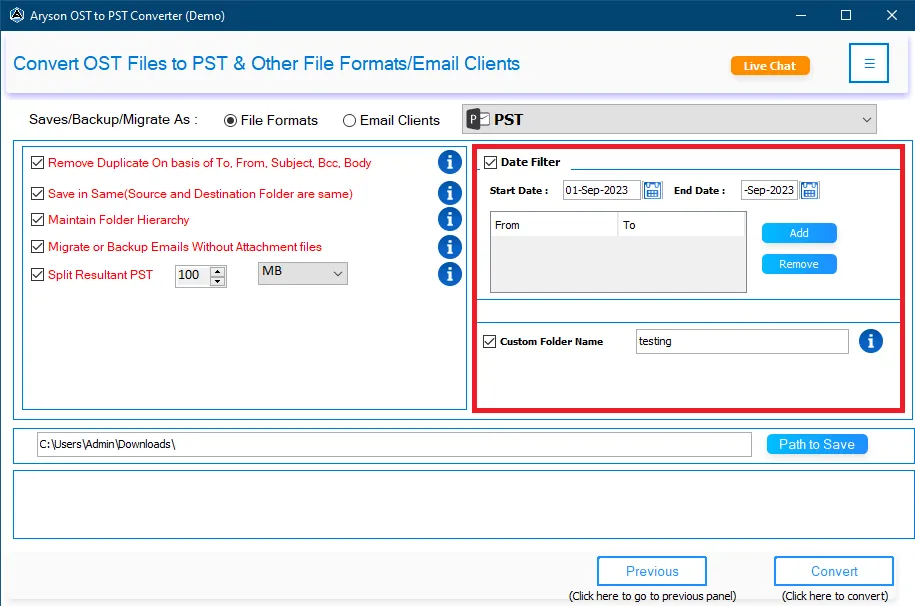
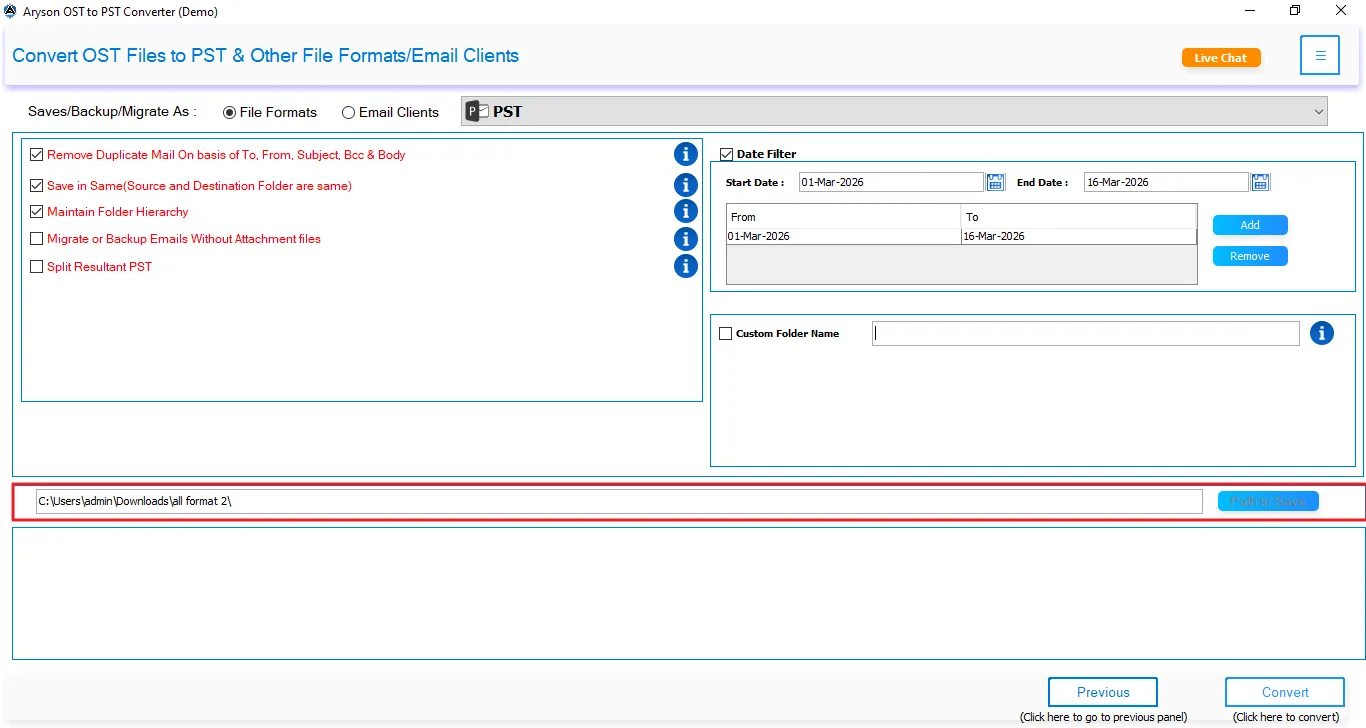
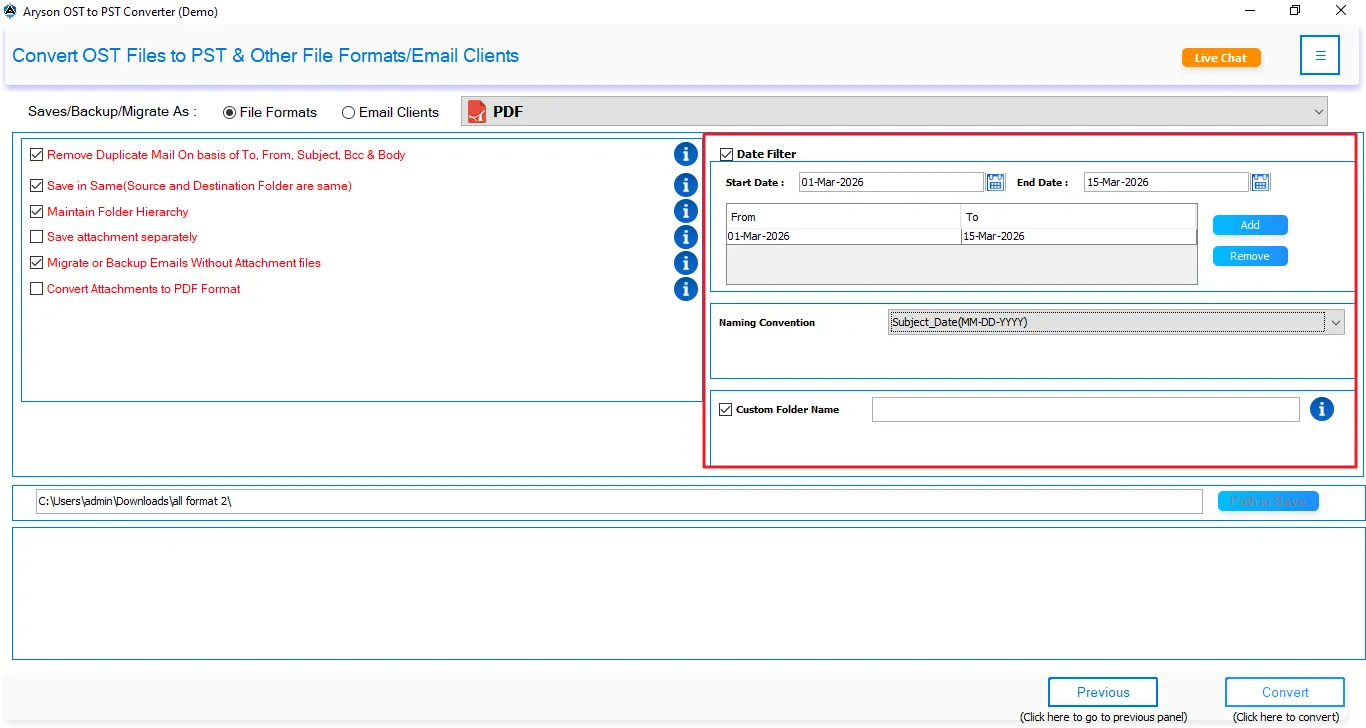
Step 8: Apply the general filters as per your need and convenience.
- Date Range Filter – Exports only the emails that fall within the selected start and end date range.
- File Naming Policy – Allows users to save exported files using a preferred naming convention for better organization.
- Custom Output Folder – Lets users choose a specific destination folder to store the converted files.
- Skip Existing Exports – Prevents duplicate exports by automatically ignoring files that have already been exported.
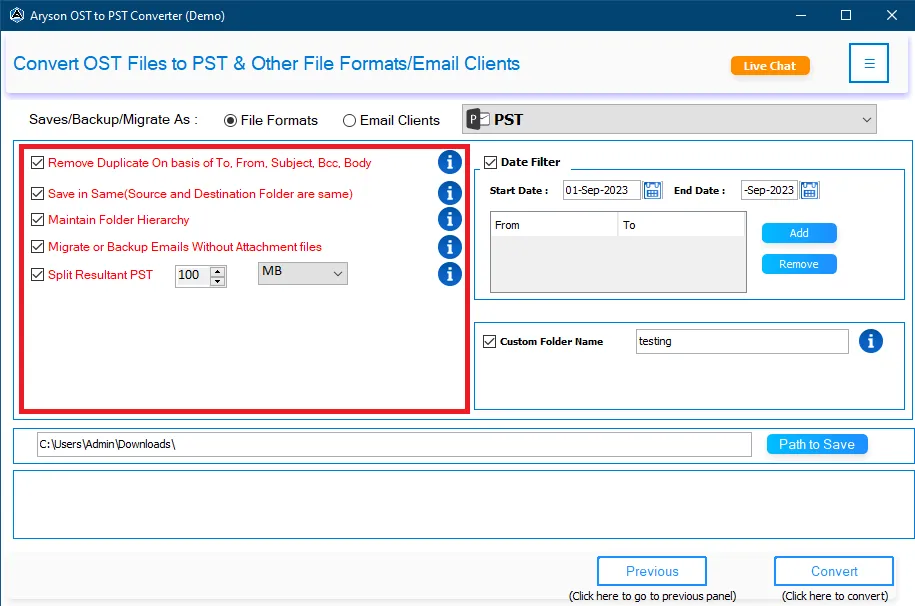
Step 9: You may apply the following Advanced filters if required.
- Attachment Handling – Provides options to export attachments separately, merge them, or exclude them from the output.
- Duplicate Detection – Identifies and skips duplicate emails based on selected criteria such as To, From, Subject, Body, or CC.
- PST Segmentation – Divides large PST files into smaller PSTs based on a user-defined file size limit.
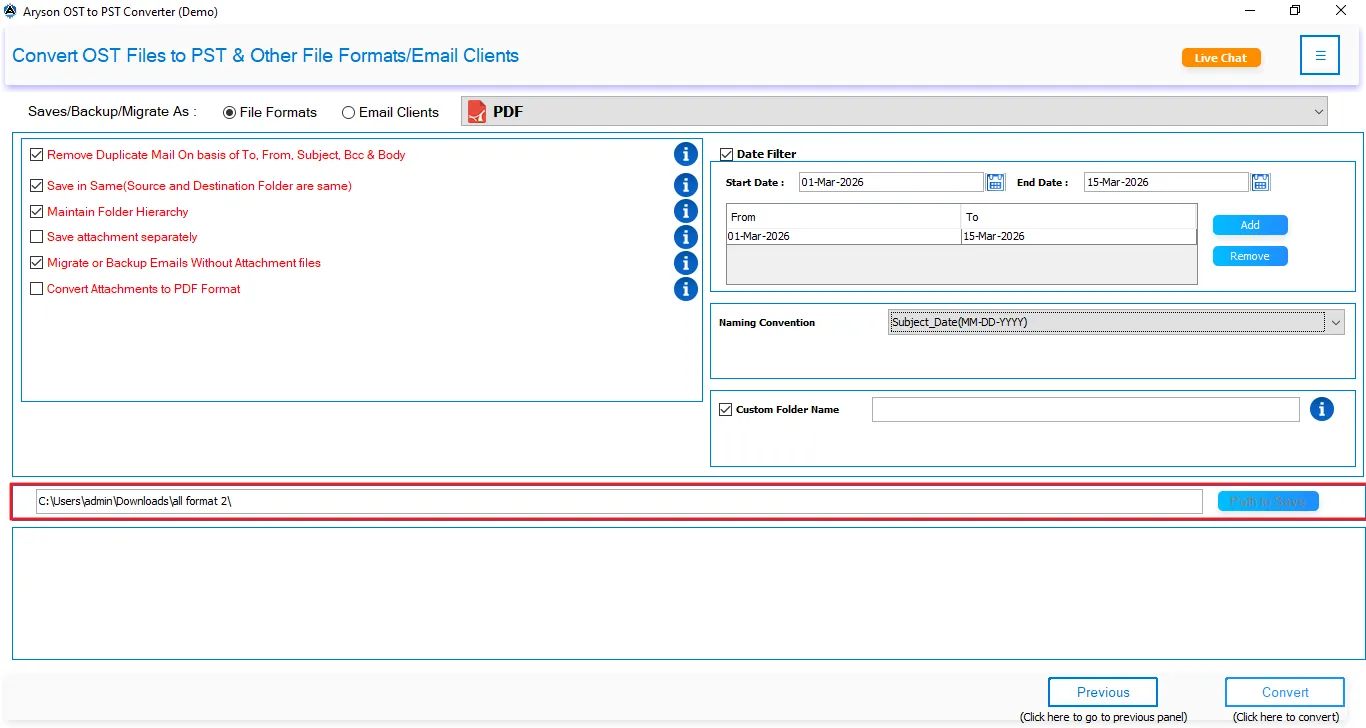
Step 10: Specify the path to save the resultant PST file locally on your system.
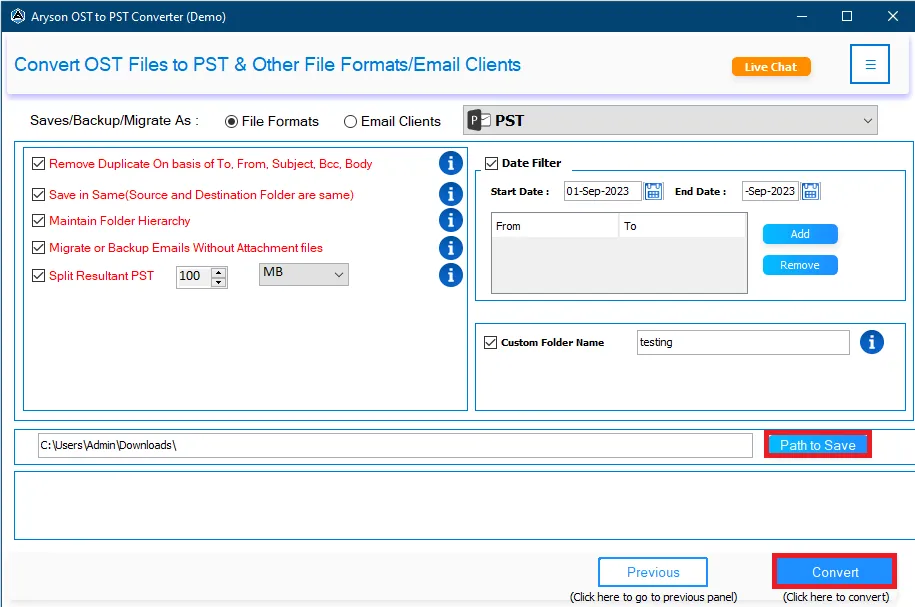
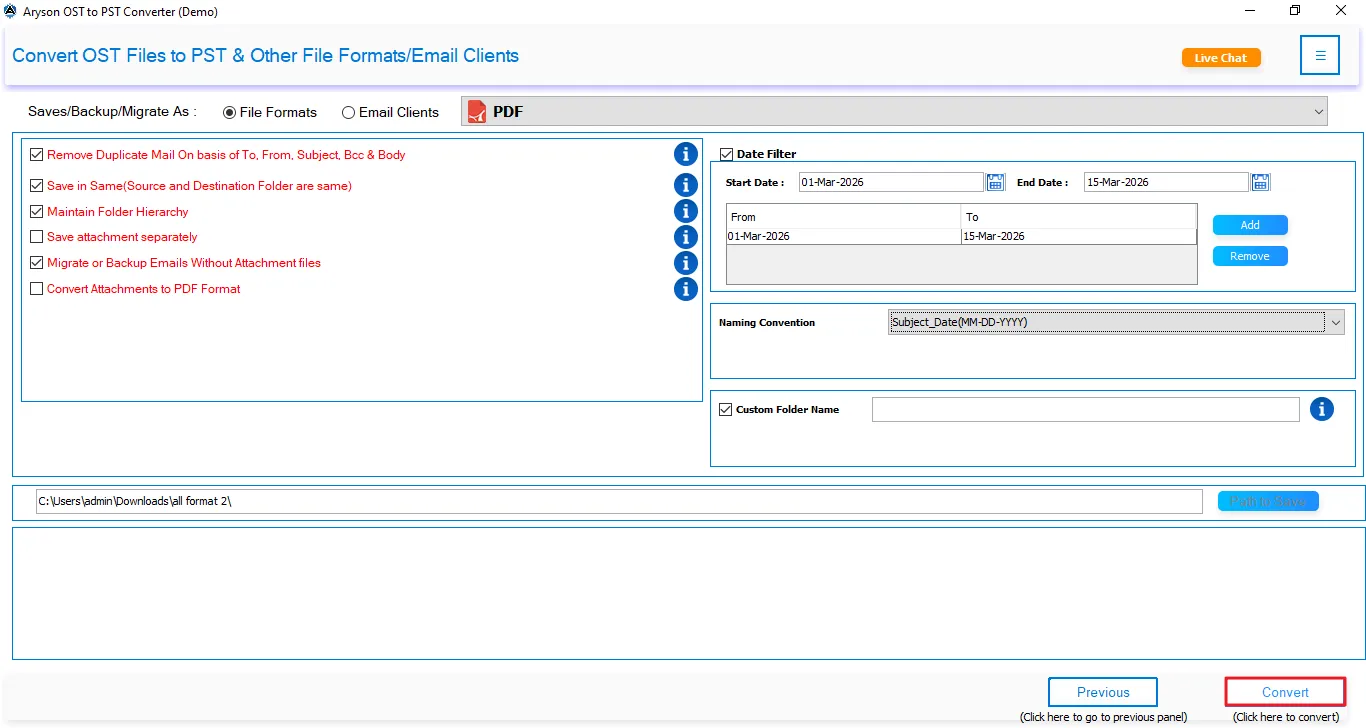
Step 11: Finally, click on the Start Export button to begin the OST to PST conversion.
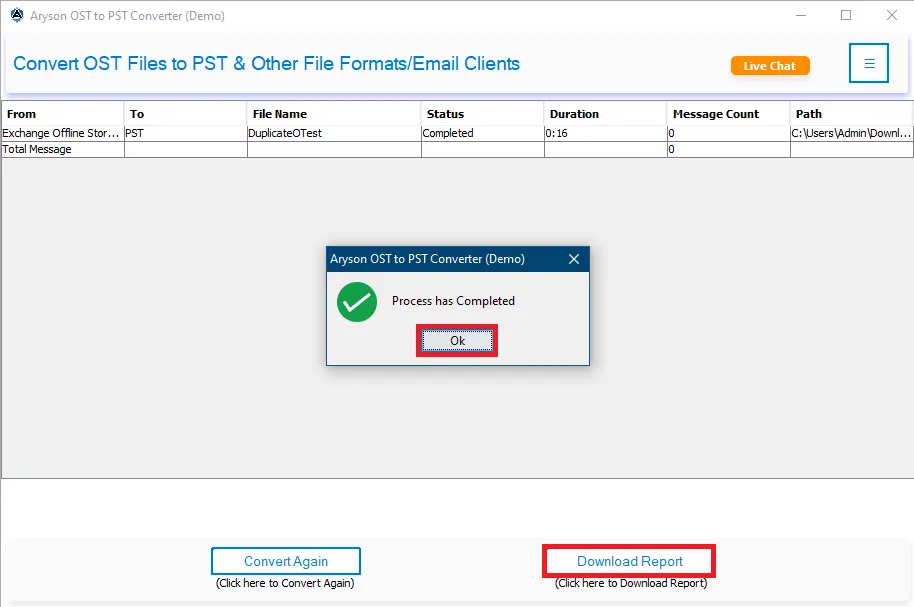
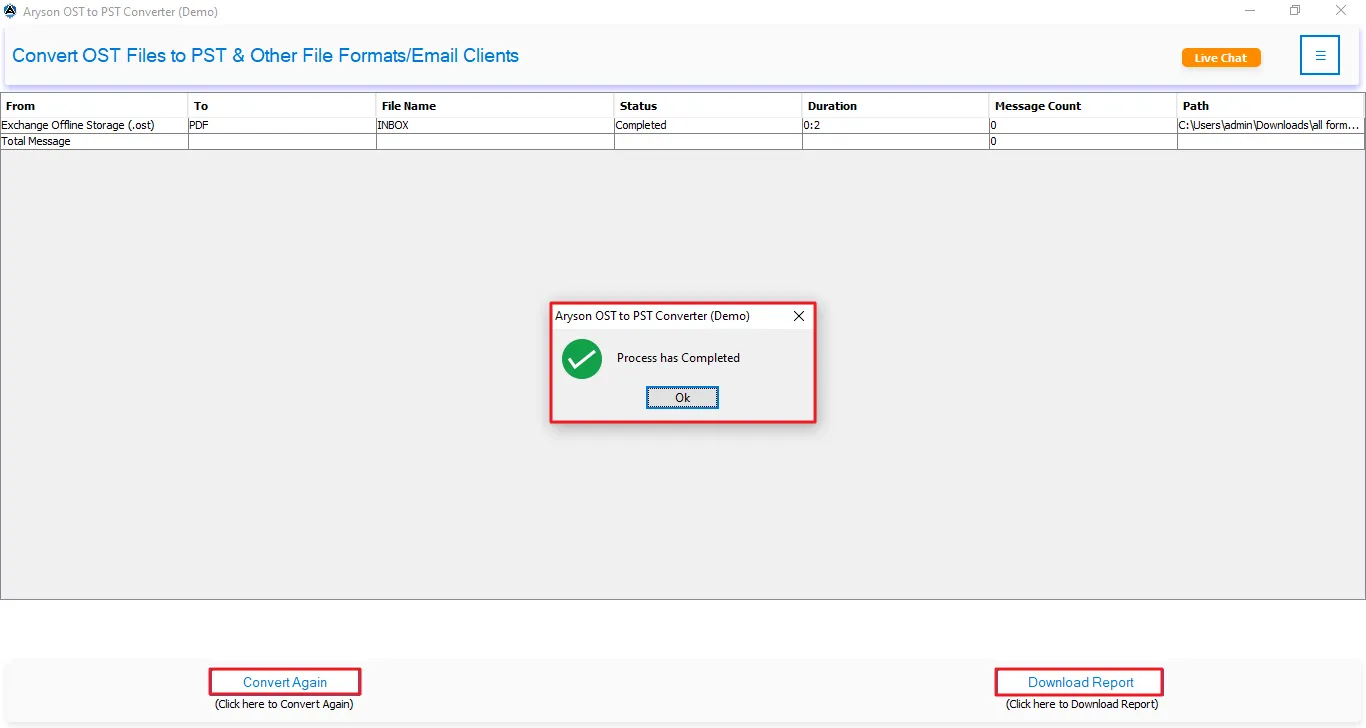
Step 12: After completion, the software displays Source, Destination, File Count, Processing Status , Execution Time, Total Messages, and Output Location.
Step 13: After conversion, a pop-up appears “All selected data has been exported successfully” and provides the following options.
- Start New Export: Start another conversion
- Export Log: Save the conversion report in CSV format.
Step 1: Download and launch the Aryson OST Converter Tool on your system.
Step 2: Click the Select OST File (s) or Select Folder button. Open the OST/PST file on your system.

Step 3: To help users understand the software interface easily, below is a detailed explanation of all the buttons:
- Select Files: Press this button to add single or multiple OST/PST files.
- Select Folder: Use it to add an entire folder that contains OST/PST files.
- Remove Selected: Delete selected OST/PST files from the list
- Clear List: Clear all added OST/PST files.
- Proceed: Click on the Proceed button to proceed further.
- Drag and Drop functionality: The user may add the required OST/PST files using the drag-and-drop features of the software.
Step 4: Here, it displays the complete details of the OST/PST file that you have added to the software.
- S. No.: This shows the serial number of the added file.
- Name: This column displays the exact name of the selected OST/PST file.
- File Path: Shows the original location of the OST/PST file on your system.
- Size / No. of Files: It helps you understand the file volume and estimate the loading time.
- Select (Checkbox Option): This option allows you to select or deselect the file. If multiple files are added, you can choose specific files for converting.

Step 5: At this stage, the software lets you convert mailbox data after loading. It properly displays all folders and subfolders to ensure nothing is missed.
- Search Folders: Quickly find specific folders in the loaded OST/PST file using keywords for easy navigation.
- Advanced Search: Locate emails, contacts, or calendar items using detailed search criteria. Search Filter (To / From / Subject): Filter results by sender, recipient, or subject for precise searching.
- Folder Tree Panel: Displays the complete OST/PST file structure in a hierarchical View for easy selection.
- Preview Panel: Shows detailed content of selected items before converting.
- Selected/Total Message Count: Displays the number of selected items compared to the total messages.
- Open in Browser: Opens emails in the default browser if the panel cannot display complex formatting.
Step 6: Double-click any email to open it in a separate preview window. This helps you verify the complete message.
- HTML format: Displays the email with its original formatting, including fonts, colors, and images.
- Plain text: Shows the email content in simple text without any formatting.
- Headers: Display detailed technical header information of the email.
- MIME: Shows the MIME structure and encoding details of the message.
- Calendars: Displays the calendars' associated fields.
- Contacts: Shows information like phone numbers, emails, etc.
- Tasks: Displays the fields like start date, end date, due date, and sensitivity.
- Notes: To preview the notes' content and their creation date.
- Raw HTML: Displays the original HTML source code of the email message.

Step 7: Under the Export to Email Clients dropdown list, choose Microsoft 365.
Step 7(A): Log in via Modern Auth 2.0:
- Enter your Microsoft admin account email address and click Authenticate.

- In the Pick an account window, select your Microsoft account or click Use another account to sign in with a different account.
- Enter your Microsoft account password and click Sign in.
- If Multi-Factor Authentication (MFA) is enabled, approve the sign-in request in the Microsoft Authenticator app and enter the displayed matching number if prompted.
- After successful verification, a confirmation message will appear indicating that authentication is complete.
- Close the browser window and return to the application, which will automatically use the authenticated account to complete the login process.
Step 7(B): Log in via Impersonation:
- Uncheck Use OAuth 2.0 Authentication to disable OAuth-based sign-in.
-
Enter the required Azure application details:
- Microsoft 365 Admin Account – Admin email address
- Application (Client) ID – Azure App Client ID
- Client Secret – Secret generated in Azure App Registration
- Tenant ID – Microsoft Entra ID (Azure AD) Tenant ID
-
Before using this authentication method, create an Azure App Registration and assign the required API permissions in Microsoft Entra ID (Azure AD).
- Follow the Create Azure Active Directory and Enable API Permission Guide to configure the application and permissions.
- Ensure all required API permissions listed in the guide are added for successful authentication and migration.
- After entering the credentials, click Authenticate to verify and connect the Microsoft 365 account.
Step 7(B): 1: Map Destination Microsoft 365 Mailboxes
- Automatic Fetch Users
- Select Automatic Fetch Users from the Admin ID to retrieve all mailboxes associated with the authenticated Microsoft 365 tenant.
- Use the Search User option to locate specific mailboxes quickly.
- Review mailbox details such as Name, User ID, Mailbox Type, and Validation Status.
- Select the required mailbox(es) using the corresponding checkboxes or click Select All to choose every available mailbox.
- Ensure the selected mailboxes display the Allowed validation status before proceeding.
- Click Next >> to continue with the migration process.
Alternatively, choose the CSV import option.
-
CSV Import
- Select the CSV Import option to import specific Microsoft 365 user accounts using a CSV file.
- Click Sample CSV to download the template and enter the required mailbox details in the prescribed format.
- Save the updated CSV file and click Import CSV to upload it.
- The software will validate and load the imported user details automatically.
- Review the imported mailbox information, including Name, User ID, Mailbox Type, and Validation Status.
- Select the required users for migration or use Select All to choose every imported mailbox.
- Verify that the selected mailboxes show the Allowed validation status.
- Click Next >> to proceed with mailbox mapping and migration.

Note: The software marks licensed and eligible users as Allowed and unavailable users as Denied. Only mailboxes with Allowed status can be used as migration destinations.
Step 8: Configure the Basic Migration Settings
- Date Range Filter: Enable this option and specify the Start Date and End Date to migrate/export only emails within the selected period.
- File Naming Policy: Choose a naming convention (such as Subject) to organize migrated items systematically.
- Custom Output Folder: Select this option and enter a custom folder name for storing the migrated/exported data.
- Skip Existing Exports: Enable this feature to avoid processing items that have already been exported, preventing duplicates.
- Follow Tree Hierarchy: Preserves the original folder structure of the source mailbox in the destination.
- Mapped with Default Mailboxes: Maps mailbox data to the destination account’s default folders, such as Inbox, Sent Items, Drafts, and Deleted Items, for proper organization after migration.
Step 9: Configure Advanced Export Options
- Exclude Attachments: Select this option to migrate or export emails without their attachments, reducing the overall file size and speeding up the conversion or migration process. Only the email content and metadata are transferred.
- Duplicate Detection: Removes duplicate emails by comparing selected fields such as To, From, Body, Subject, and CC, ensuring only unique messages are migrated or exported.

Step 10: Click on the Start Export button to begin the conversion process.
Step 11: After completion, the Conversion Report displays Source, Destination, File Count, Processing Status, Execution Time, Total Messages, and Output Location.

Step 12: After conversion, details:
- Start New Export: Start another conversion
- Export Log: Save the conversion report in CSV format.
