Software Overview
Welcome to the Aryson MSG Converter, an all-in-one and intelligent solution designed to convert, migrate, and back up MSG files into multiple file formats and email clients without needing Microsoft Outlook. It ensures a secure and effortless migration across various authenticated platforms like Microsoft Office 365, Google Workspace, Yahoo Mail, and other MSG-supported email clients. It also supports single as well as batch file conversion, and previews their email content before the actual export. Its advanced functionalities include date range selection, duplicate removal, and attachment management, making the whole process convenient for the user. All Thanks to Aryson MSG Converter, now users can efficiently transform MSG files into a wide range of file formats like PST, MBOX, PDF, DOC, etc..

Supported Microsoft Outlook & Windows Versions
MSG is a Microsoft Outlook file format that stores a single email message, including its sender, recipients, subject, body, attachments, and metadata. The Aryson MSG Converter Tool is compatible with all major Microsoft Outlook editions and their respective Windows environments. It supports both ANSI and UNICODE MSG file formats, ensuring effortless processing of email data across legacy and modern Outlook versions. They are fully compatible with:
- Microsoft Outlook
- Exchange Server environments
| Outlook Version | MSG Type Supported | Compatible Windows Versions | Description |
|---|---|---|---|
| Outlook 97–2002 | ANSI MSG | Windows Server 2013 | Legacy format with limited size, character, and language support |
| Outlook 2003–2007 | UNICODE MSG | Windows Server 2022 / Windows 7 | Improved structure with global character support |
| Outlook 2010 | UNICODE MSG | Windows 8.1 Pro | Enhanced performance and larger data file support. |
| Outlook 2013 | UNICODE MSG | Windows 7 | Stable performance with modern encoding compatibility. |
| Outlook 2016 | UNICODE MSG | Windows 8 | Supports large MSG data and attachments. |
| Outlook 2019 | UNICODE MSG | Windows 10 | Advanced Outlook version supporting secure authentication. |
| Outlook 2021 / Office 365 | UNICODE MSG | Windows 11 | Latest format supporting high data volume and a modern Office 365 environment. |
Important Note: The newer Outlook versions can open older MSG files, but older versions might not support the modern UNICODE MSG files.
Exclusive Features of Aryson MSG Converter
| Primary Features | Enhanced Features | |
|---|---|---|
|
Conversion to Various File Formats Converts MSG files to a wide range of file formats like PST, MBOX, MSG, PDF, DOC, EMLX, CSV, XLSX, WDSEML, OFT, Thunderbird. |
Split PST Feature While converting MSG to PST file format, split your large PST files into small/manageable chunks using the Split PST File feature. The user can specify the file size (MB/GB) of each PST segment. |
|
|
Multiple Email Clients Supported Export your MSG files to different email clients such as Office 365, Gmail, G Suite, Hotmail, Yahoo, IMAP, iCloud, GoDaddy mail, and HostGator email. The folder hierarchy will remain the same during the export process. |
Remove Duplicates In order to remove any duplication while exporting your MSG files, use the Remove Duplicate Mail feature. It will remove any email with more than one occurrence among the files selected based on To, From, Body, Subject, and cc of an email. |
|
|
Outlook Versions Supported Convert your Outlook (software supports Outlook versions) to MSG File Formats. Both ANSI MSG and the UNICODE MSG files are supported by this software. |
Skip Previous Migration This feature allows the user to skip the already migrated MSG files to avoid duplication and enhance the processing efficiency. |
|
|
Batch Conversion Performs secure Batch conversion or export of multiple MSG files at once. Irrespective of the file size, the software will securely convert the files without affecting the data integrity. |
Naming Convention Feature Set your own naming pattern for the resultant PDF, EML, MSG files (e.g., Subject_Date(DD-MM-YYYY)). This allows users to easily browse and filter their resultant file on the basis of Dates and the subject of the file. |
|
|
Preview & Metadata Display Software displays listed and associated metadata (From, To, Date, Attachments) before processing. The preview is properly managed as a J-Table with all these properties. |
Custom Folder Naming Saves the resultant folder with a specific name provided by the user. Users just have to tick the associated checkbox and provide a preferred name as the resultant folder. |
|
|
Attachment Handling Save your attachments separately or convert them into PDF Format using the Extract Email from MSG feature under PDF File Format. |
Date Range Filter This feature allows businesses and professionals to convert/migrate MSG files within a specific date range (Start Date - End Date), saving time by skipping unnecessary files. |
|
|
Maintain Folder Hierarchy Keep all the data, attachments, and directory structure intact as it was originally during the conversion/export process using this utility. |
Extract Data Elements Use the Extract Email from MSG feature to extract all Email, Contacts, URL, and Attachments from a particular MSG file, and save them in CSV/XLSX format accordingly. |
|
|
Free Demo provided Demo version supports the conversion of up to 50 emails absolutely for free. In order to convert more files, users can buy the licensed version. |
Save Path Selection This option lets users save their resultant file to a specific destination path. It makes it easy for the user to browse that file in the future. |
|
|
No Microsoft Outlook Installation Required Directly view/convert/migrate your MSG files using this software, instead of first installing Microsoft Outlook on your system. |
Migrate/backup without Attachments Use this filter to migrate/backup your selected emails without attachments. This will save processing time and increase efficiency. |
|
|
User-friendly GUI & User Interface Along with an advanced GUI, this software offers an intuitive and clean interface to allow users to easily perform conversion/export of required MSG files. |
Save All Attachments in a Separate Folder This feature allows users to put together all their attachments of an MSG file in a PDF Format. |
Supported Output File Formats
| Output File Formats | When to Pick? |
|---|---|
| PST | For accessing emails in Microsoft Outlook. |
| MBOX | For Thunderbird, Apple Mail, or similar email clients. |
| MSG | To save each email separately for backup or sharing. |
| For readable, printable, and shareable email copies. | |
| DOC | To edit email content in Microsoft Word. |
| EML | For importing single emails into various mail clients. |
| EMLX | For Apple Mail users on macOS. |
| CSV | To export contact lists or structured email data. |
| XLSX | To review and analyze data in Excel format. |
| WDSEM | For saving messages in Windows Mail format. |
| OFT | For creating reusable email templates in Outlook. |
| Thunderbird | For direct migration to Mozilla Thunderbird. |
Supported Email Clients
| Email Clients | When to choose? |
|---|---|
| Office 365 | For cloud-based Outlook access and enterprise email management. |
| Gmail | For secure, accessible email across all devices. |
| G-suite | For business users needing custom domain emails. |
| Hotmail | For users of Microsoft’s personal webmail service. |
| IMAP | For accessing emails directly from the mail server on any device. |
| I-cloud | For Apple users, syncing emails across macOS and iOS. |
| Yahoo Mail | For personal use with large free storage and easy setup. |
| GoDaddy mail | For professionals managing business domains. |
| Hostgator email | For website owners hosting mail on HostGator servers. |
System Requirements
| Recommended Specifications | Software Prerequisites | |
|---|---|---|
| Processor: Intel® Core™ 2 Duo CPU E4600 @ 2.40GHz 2.39GHz | • If you are operating Windows OS 11, 10, 8, or 7 (32-bit or 64-bit), then | |
|
Hard Disk Space: 500 MB of free hard disk space required RAM: 4 GB of RAM (4 GB is recommended) for efficient performance |
you must launch the tool as an Administrator. • Turn off the Windows Firewall for proper installation. • Disable the Antivirus programs. |
Software Working Steps - Complete Guide to Export MSG Files
The Aryson MSG Converter provides advanced detection, compatibility to ensure an efficient and secure conversion. Its various advanced functionalities and intuitive interface make the whole process even more convenient to perform. Data integrity is maintained as the software keeps all data and attachments intact, as in the original ones.
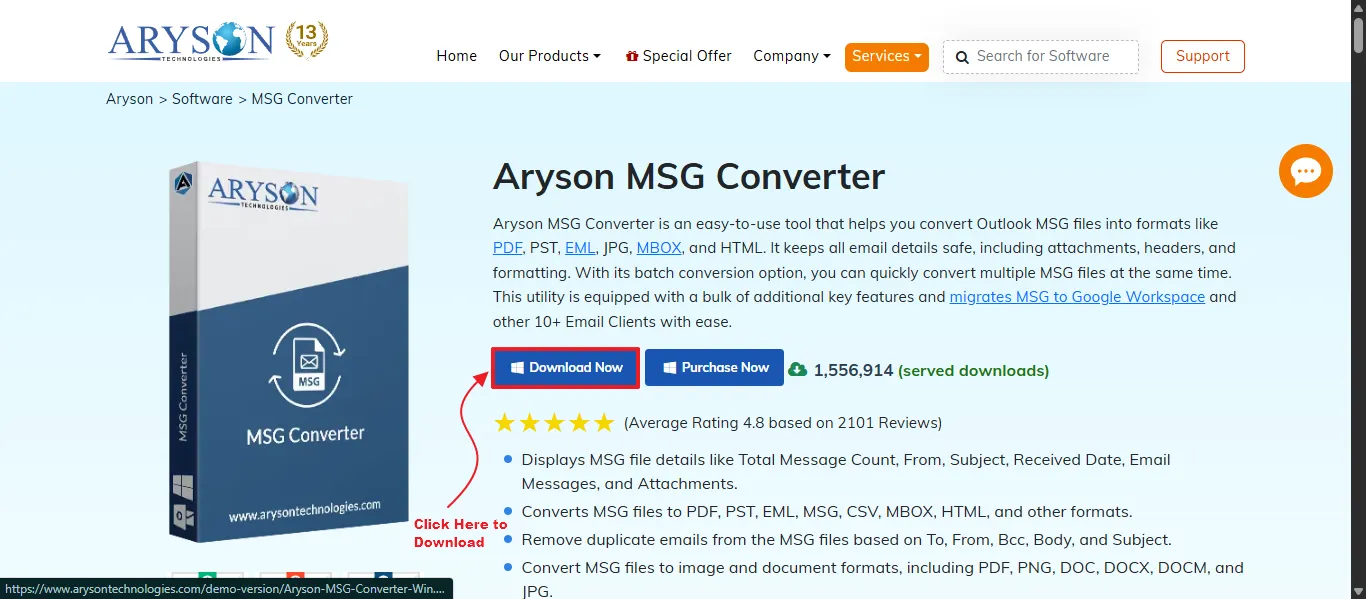
Step 01: Download and Launch the Aryson MSG Converter
To use the MSG Converter effortlessly on your desired operating System, follow the steps provided below:
- Navigate to the official Site: Visit the official website of Aryson Technologies, and download the MSG Converter tool for Windows/Mac devices accordingly.
- Set up and Run Tool: Open the downloads folder, find the setup file, right-click on it & select “Run as Administrator”.
- Launch Tool: Follow the Setup Wizard appearing on screen; select the destination directory, and a desktop icon for the software will be provided.
- Activate the Software:
- To use the Demo version, click on the demo version option on-screen.
- If you have purchased the licensed version, then activate the software first using the licence key provided, and continue to follow the guide below.

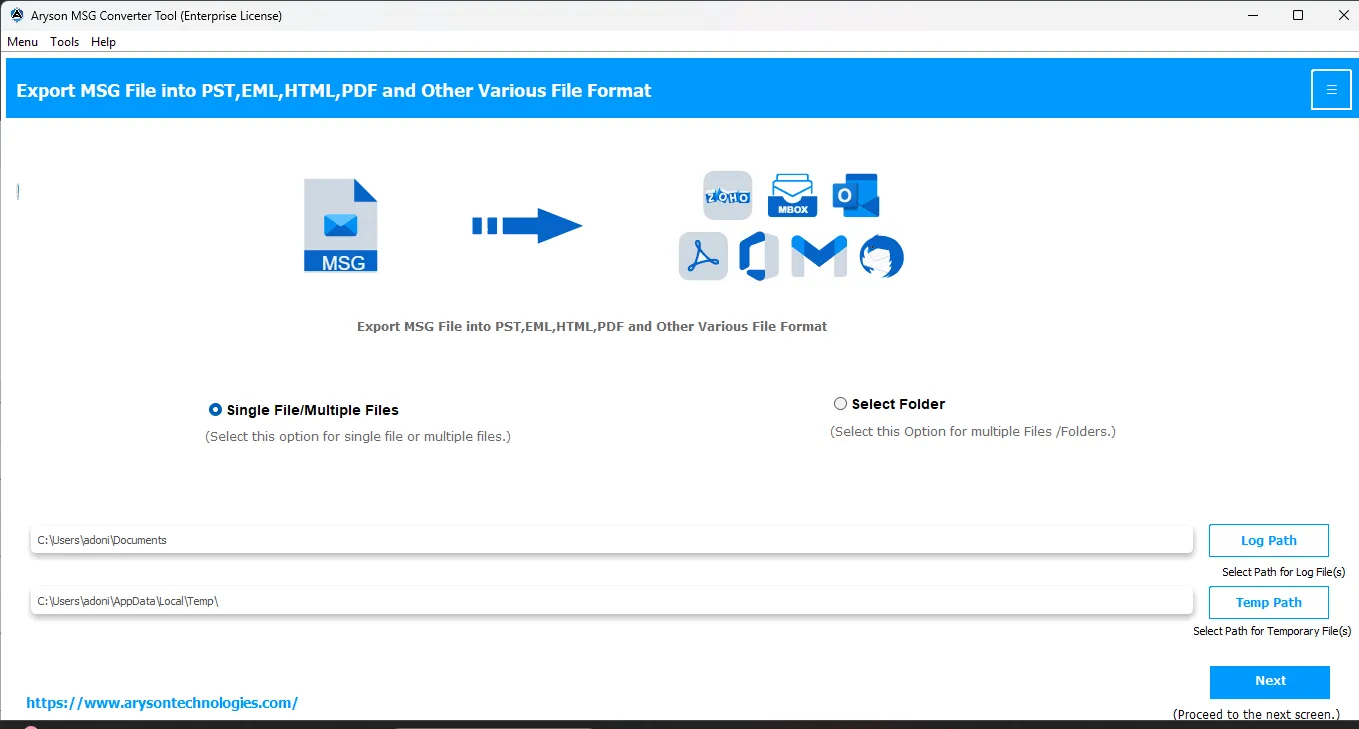
Step 02: Select Single File/Multiple Files or Select Folders
On launching the MSG Converter, this interface will appear. You can select Single/multiple files or Select Folder the entire folder that contains MSG files. After opening your desired file, click Next to proceed further.
- Single File/Multiple Files: Click on this button to select one or more MSG files to process(convert/migrate).
- Select Folder: Use this option to batch convert all MSG files present in a specific folder
- Log Path: This option specifies the path of the log file, which contains information about all actions performed by the user.
- Temp Path: Specify the path of the temporary files created during the conversion/export process.
- Next: Click on this button to proceed further with the conversion.
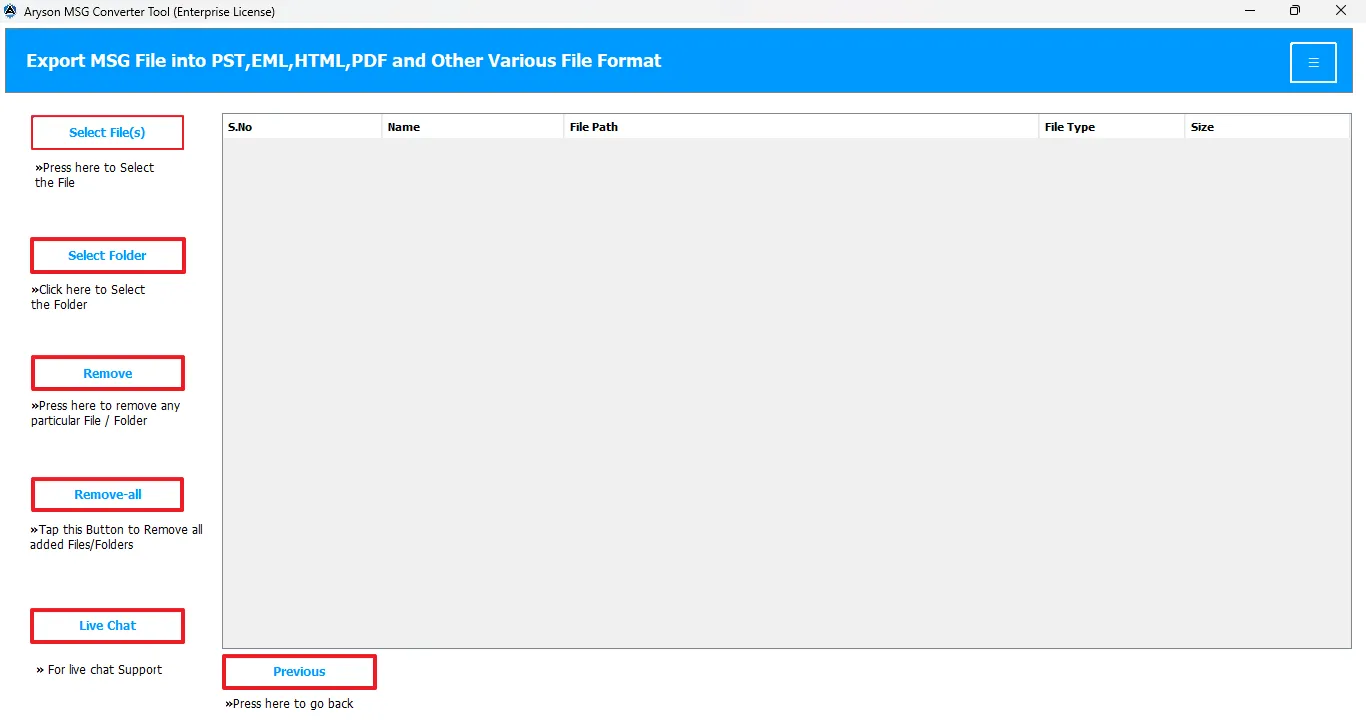
Step 03: Open MSG Files to Convert
This panel of the software allows users to open a single/multiple files or an entire folder containing MSG files to convert them into other file formats or export to a different email platform.
- Select File(s): Click on this button to open one or more MSG files.
- Select Folder: To batch convert/migrate all files of a particular folder.
- Remove: To remove any particular file/ folder added, use this option.
- Remove All: Click this button to remove all files/folders added.
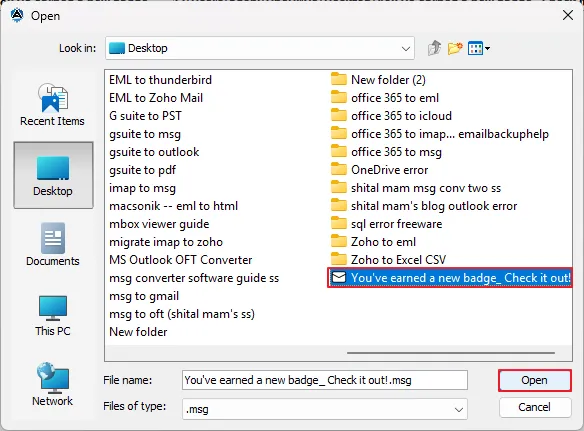
- Clicking on the Select File/Folder option, an Open dialog box will appear on the screen. From there, you can browse and select the desired MSG files to open and click on the Open Button.
- All your selected MSG Files with their associated Name, Filepath will now appear on the screen.
- Previous: If you have to reset the Log Path/Temp Path, tap this button to navigate to the previous panel.
Quick Addition of Files/Folders -Drag and Drop Feature
To eliminate the time of browsing and adding single or multiple files via the buttons provided, the user can access the Drag and Drop feature to add single or Multiple Files in seconds.
- Open the minimized window of File Explorer in your system.
- Drag the desired MSG files and drop them on the Software Panel.
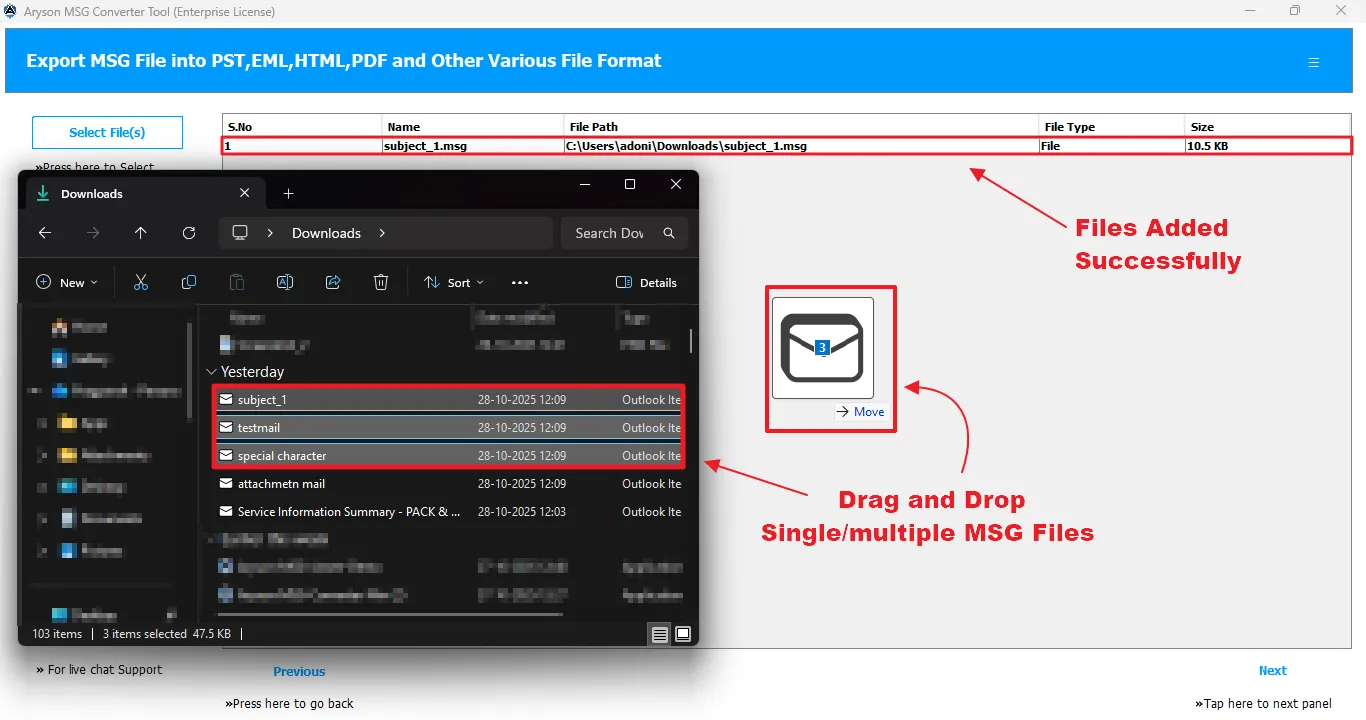
- After adding all desired MSG Files, click Next to move further.
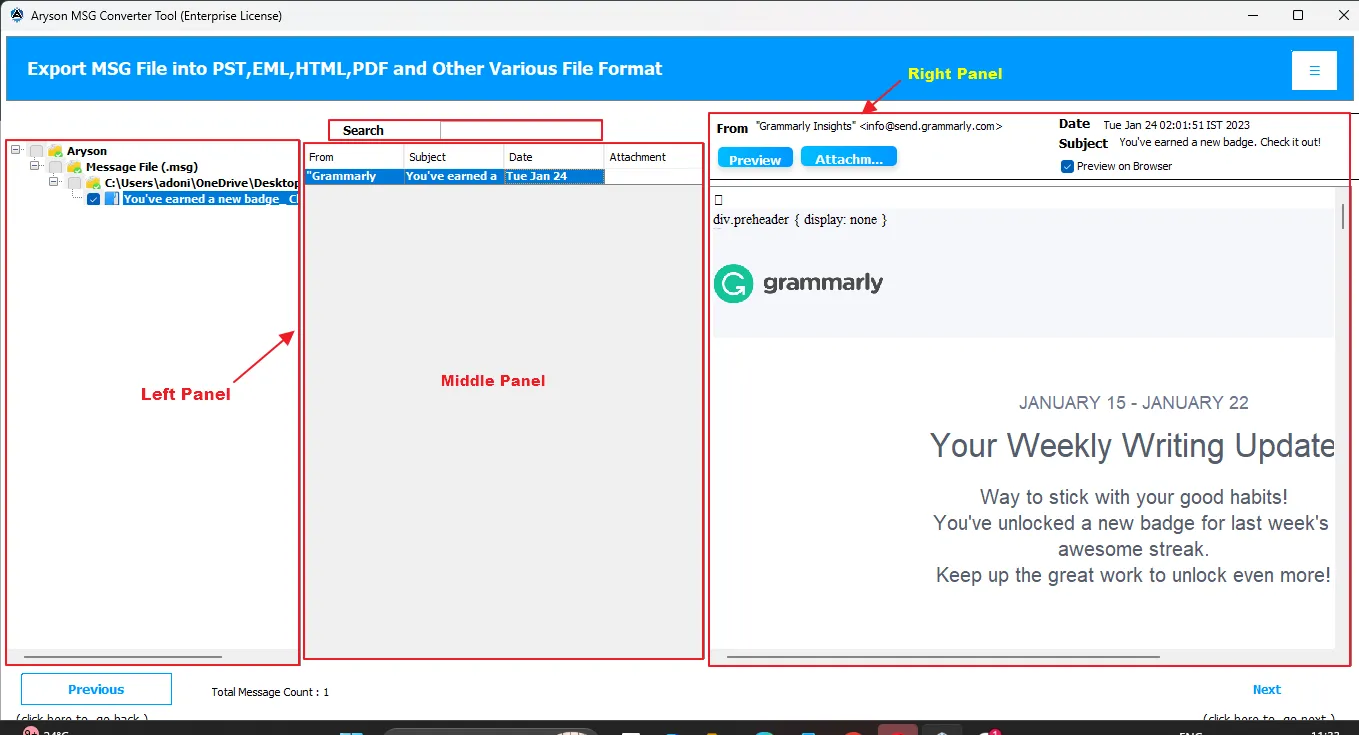
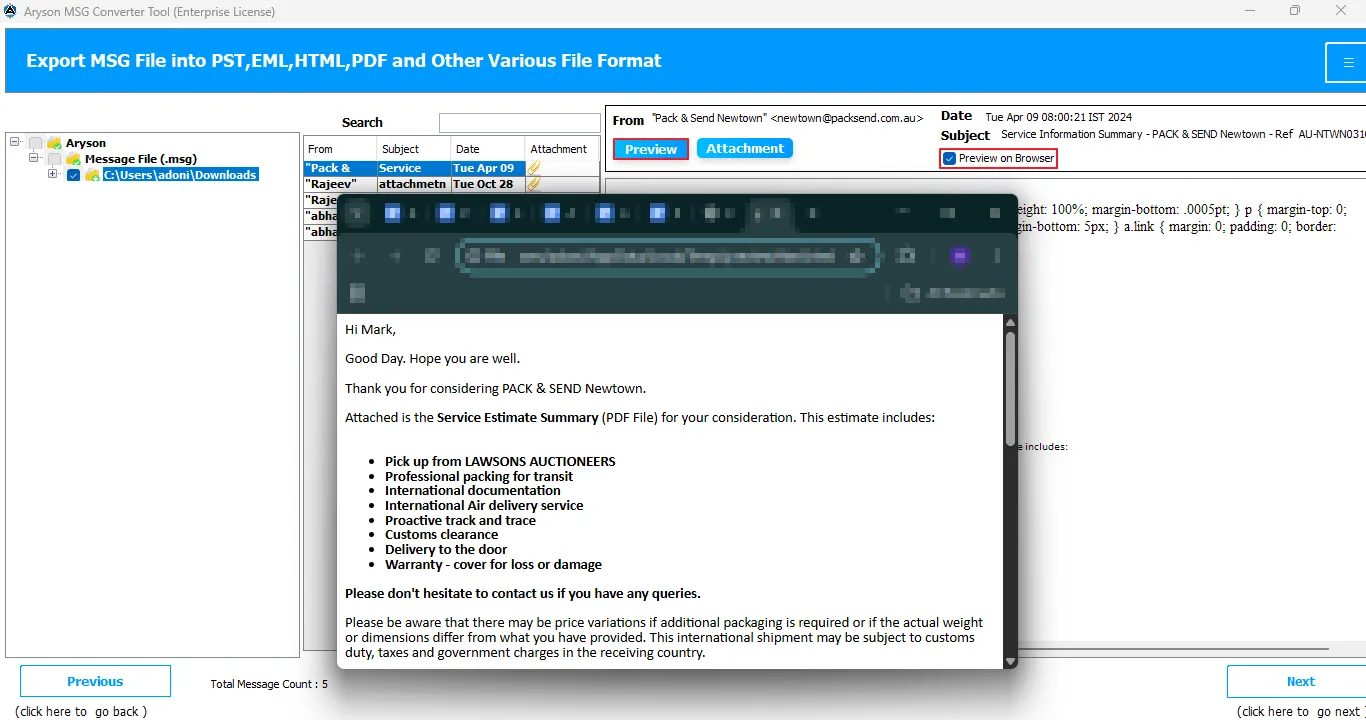
Step 04: Select and Preview Files and Attachments
This panel allows the user to select one or multiple files for conversion/exporting and preview the attachments associated with them.
- Left Panel: This panel displays a tree-like hierarchy of files and folders.
- Middle Panel: Here, all the essential details ( From, Subject, Date, Attachment ) of the selected MSG files will appear.
- Right Panel: Preview your selected MSG file and its attachments here, along with its properties (From, To, Subject).
- Preview your MSG files in the browser if needed.
Steps to Follow for previewing your MSG files:
1. Select your desired MSG Files:
- Expand the Folder Hierarchy displayed in the left panel
- Select your desired MSG File
- Double-click on it to open it in the Middle Panel.
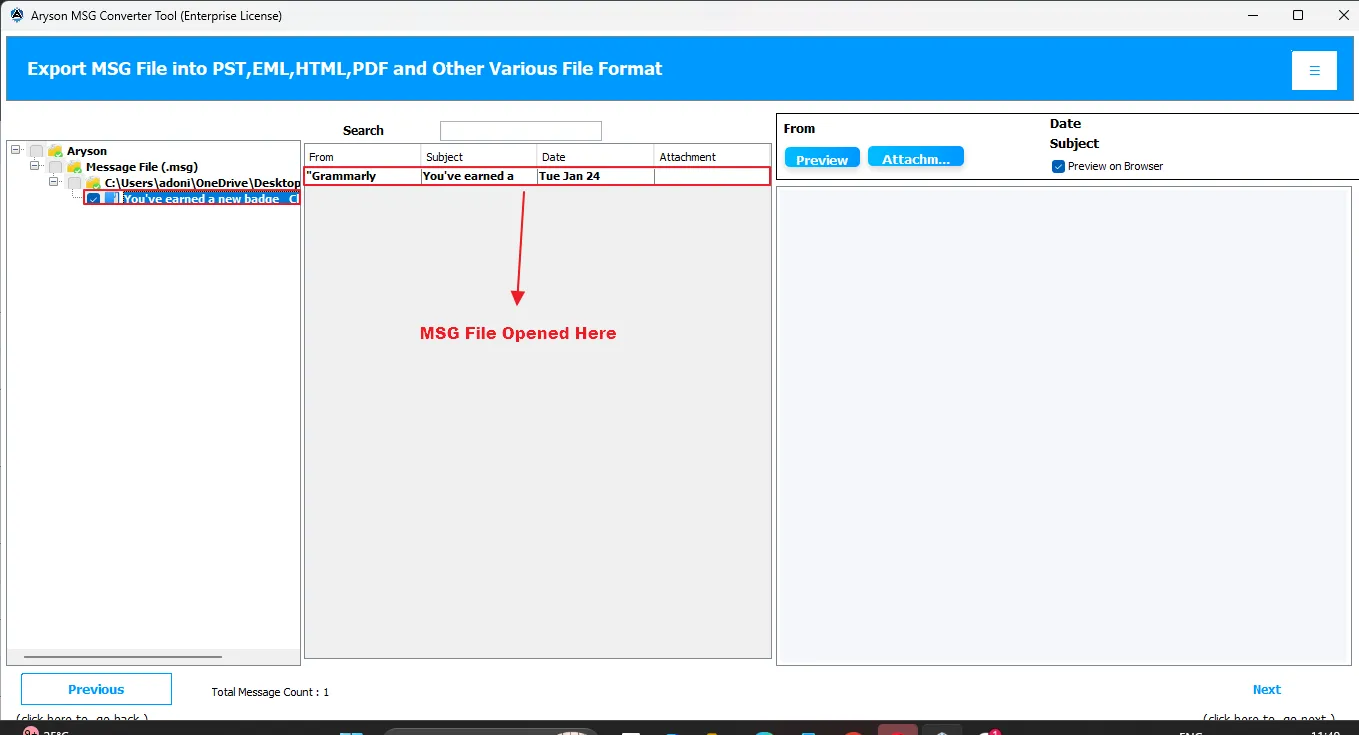
2. Access the File details( J-Table) :
In the middle panel, a J-Table will appear, which will contain all file properties:
- From: The source of your files will be displayed here.
- Subject: Subject of your files will appear under this column
- Date: The date of creation of the selected MSG Files will appear here.
- Attachments: In case your selected File contains an attachment, a Pin icon will appear.
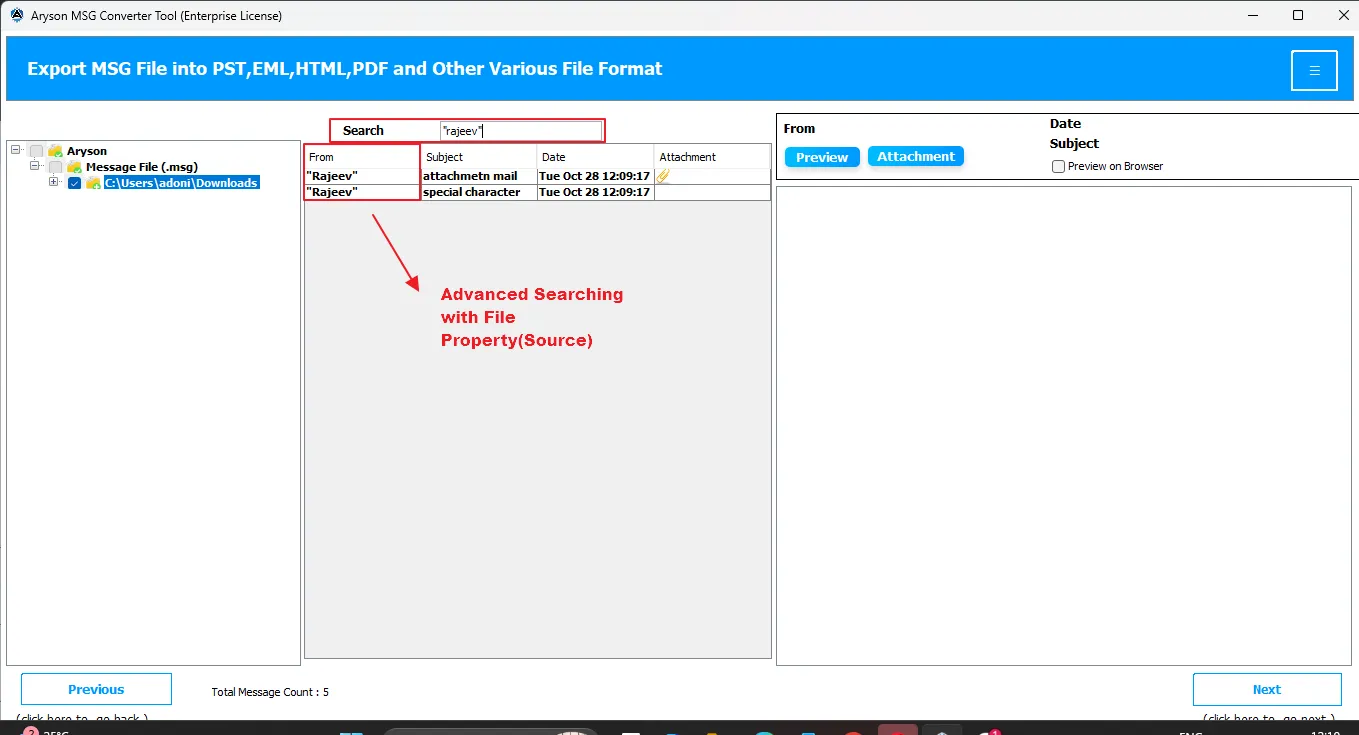
3. For Enhanced Searching: The user can use the search to find their required MSG Files based on their properties ( From, Subject, Date, Attachments ). E.g., write the File Source( From) of the MSG file you require, and all files belonging to that Source will appear in the J-Table.
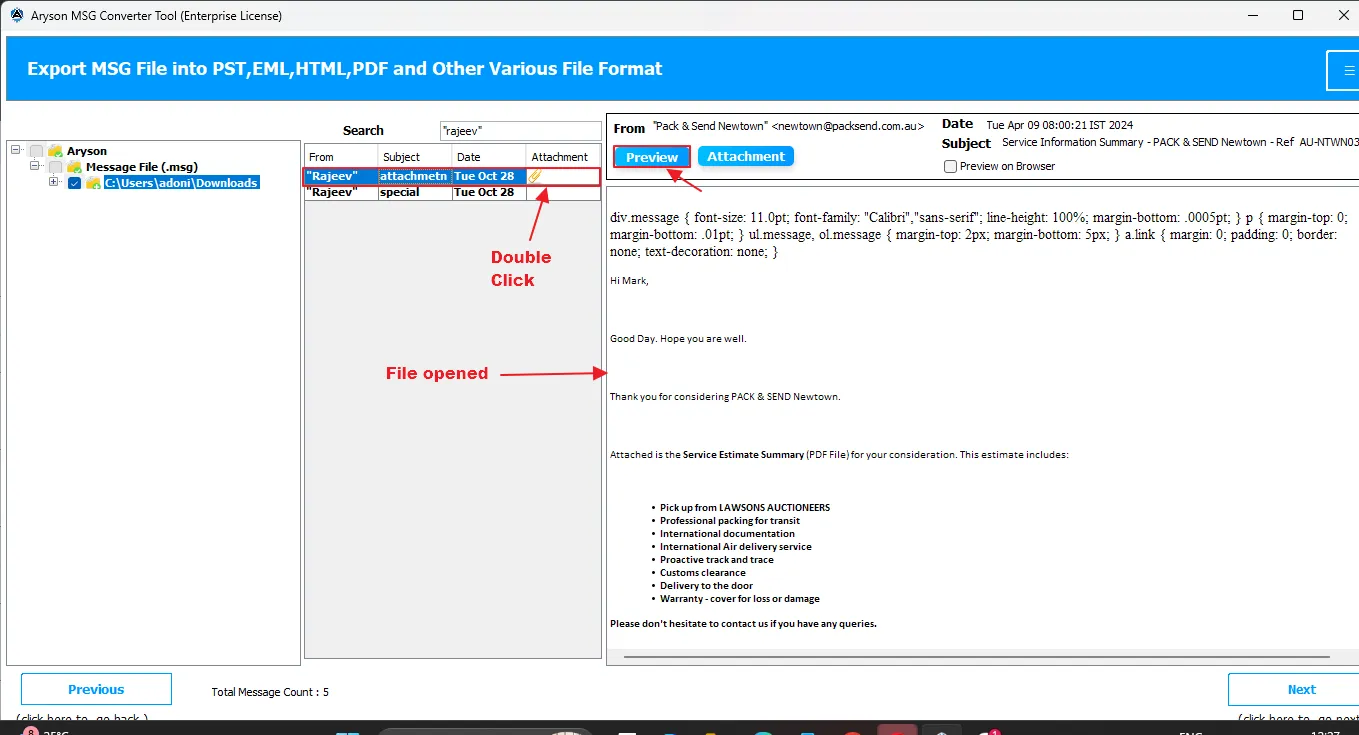
4. To preview your MSG Files:
- Double-click on the desired MSG File to preview.
- Click on the Preview Button in the right panel.
- It will be displayed in the Right Panel along with its properties (From, Subject, Date).
5. Preview in Browser Feature:
To preview your selected MSG in the browser:
- Tick the preview in browser checkbox.
- Select the Preview Button.
- This will redirect you to the browser view of MSG.
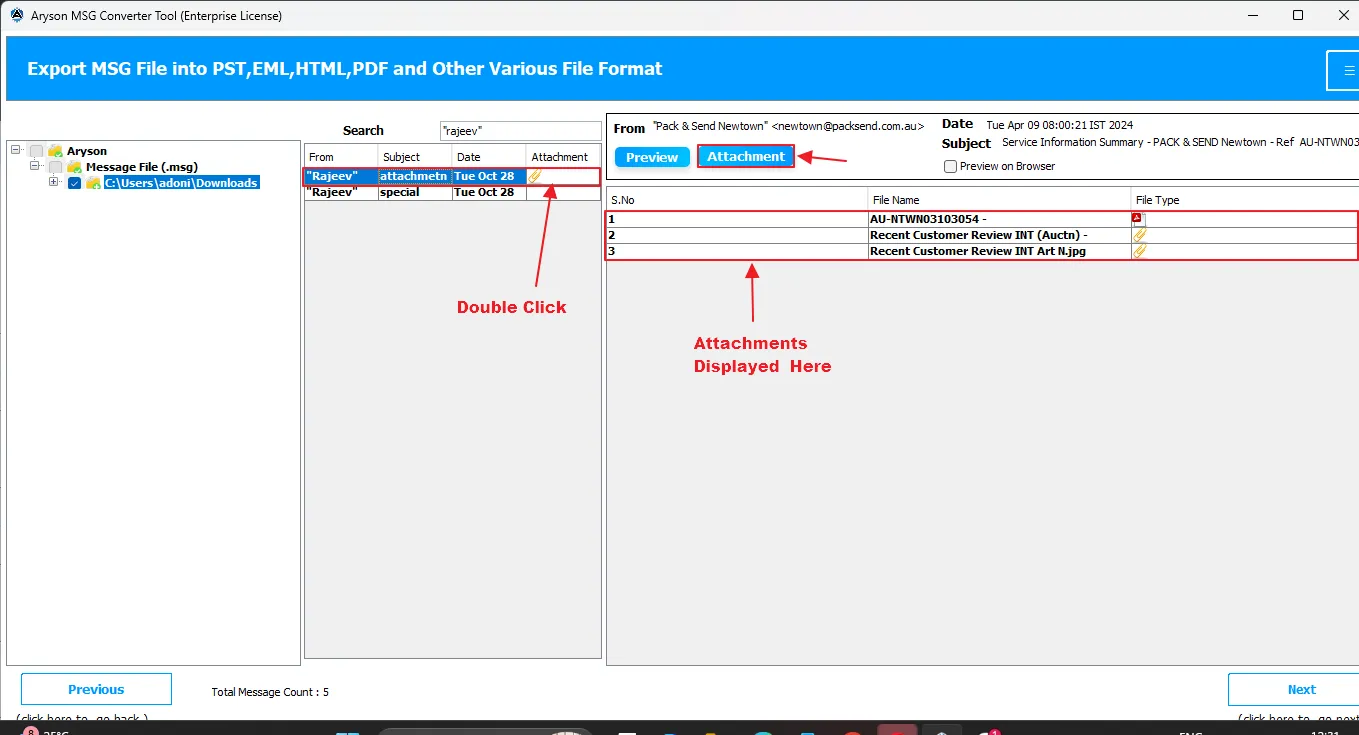
6. View your Attachments in the Right Panel:
- Double-click on a particular MSG.
- Then, click on the Attachments option to view all the attachments associated with that particular MSG in the right panel.
Step 05: Convert MSG File to Other File Formats
Choose the desired file format to convert your MSG files. Aryson MSG Converter Tool offers over 10+ output file formats, including PST, MBOX, MSG, PDF, DOC, EMLX, CSV, XLSX, WDSEML, OFT, Thunderbird, based on your license type.
Let’s understand the purpose of these file formats:
- PST(Personal Storage Table): It is an Outlook data file used to store emails, contacts, calendars, and other mailbox items.
- MBOX: A mailbox format used by email clients like Thunderbird and Apple Mail to store messages collectively.
- MSG: A single Outlook email file containing message data, attachments, and metadata.
- PDF: A portable document format used to save emails as readable, shareable documents.
- DOC: A Microsoft Word document format for editing and storing email content.
- EML: It is a standard email message file used by various mail clients for single messages.
- EMLX: An Apple Mail email file format used to store individual messages.
- CSV(Comma-Separated Value): A CSV file is used to store tabular data for analysis.
- XLSX: An Excel spreadsheet format for organizing and reviewing exported email data.
- OFT: An Outlook Template File used to create and reuse standardized email layouts.
- WDSEML: It is a file format created by Windows Mail to save individual emails.
- Thunderbird: An open-source email client format used to import and manage mailbox data.
All the above File Formats serve different purposes. Based on your usage of the MSG File, you can choose any File Format among the listed ones. Let’s discover the conversion process in detail.
Complete Guide to Convert MSG File to PST Format

- Under Saves/Backup/Migrate: Allows users to convert their MSG to an output file format or export them to a specific Email client.
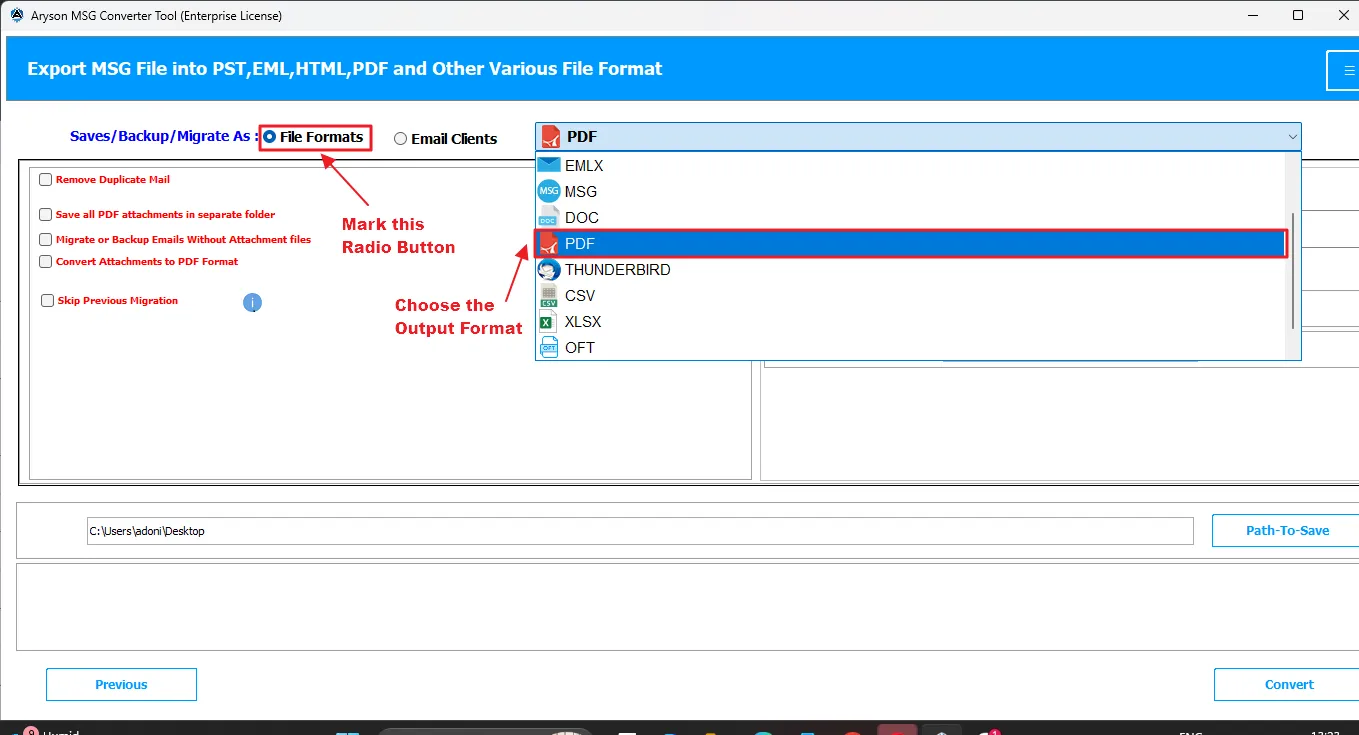
- File Formats Radio Button: On marking this radio button, a drop-down list of File Formats will appear. From there, choose the PST File format.
Step 06: Apply Advanced Built-In Features
Aryson MSG Converter provides various advanced features to offer convenience to individuals as well as organizations that deal with large Data Sets.
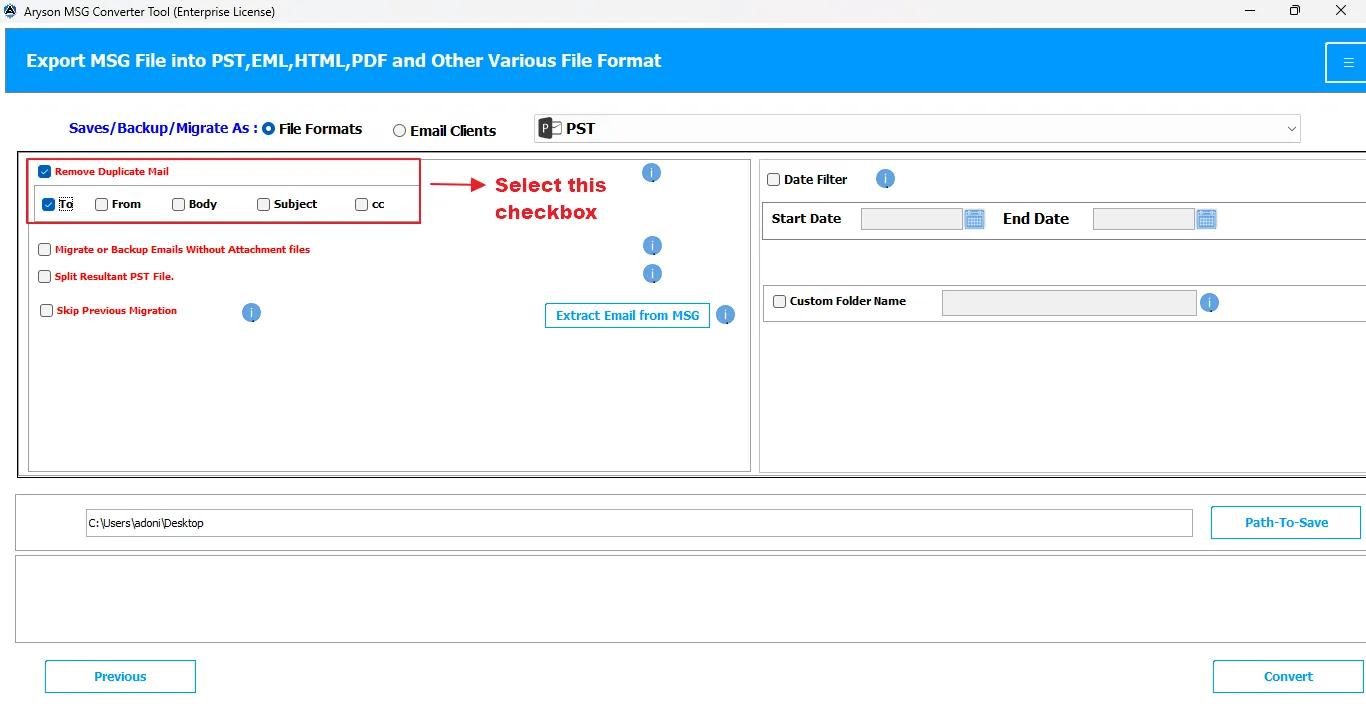
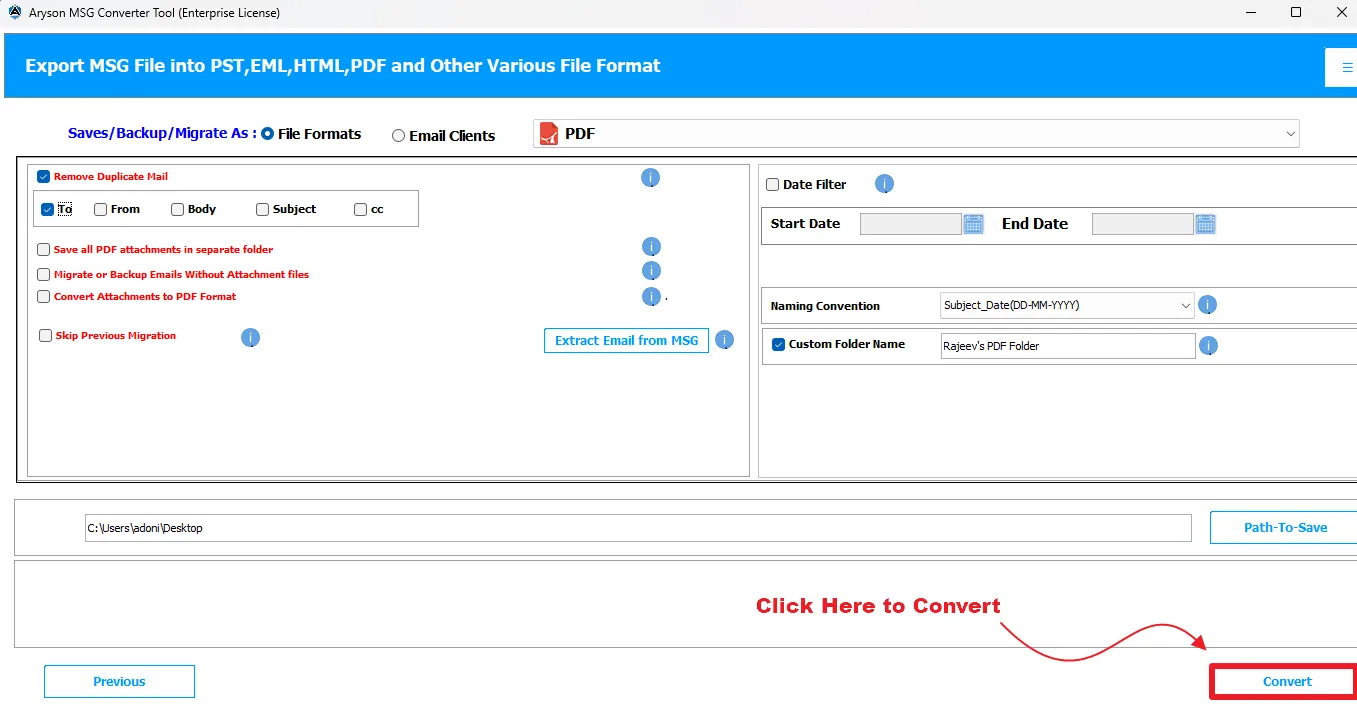
Remove Duplicate Mail:
This feature allows users to eliminate duplicate emails during the conversion or export process. Duplicates can be filtered based on specific email fields, such as:
- To: Remove emails sent to the same recipient.
- From Skips duplicate emails received from the same sender.
- Body: Detects and removes messages with identical body content.
- Subject: Excludes messages with the same subject line.
- CC: Filters out duplicates found in the CC field.
Selecting these filters saves both processing time and storage space.
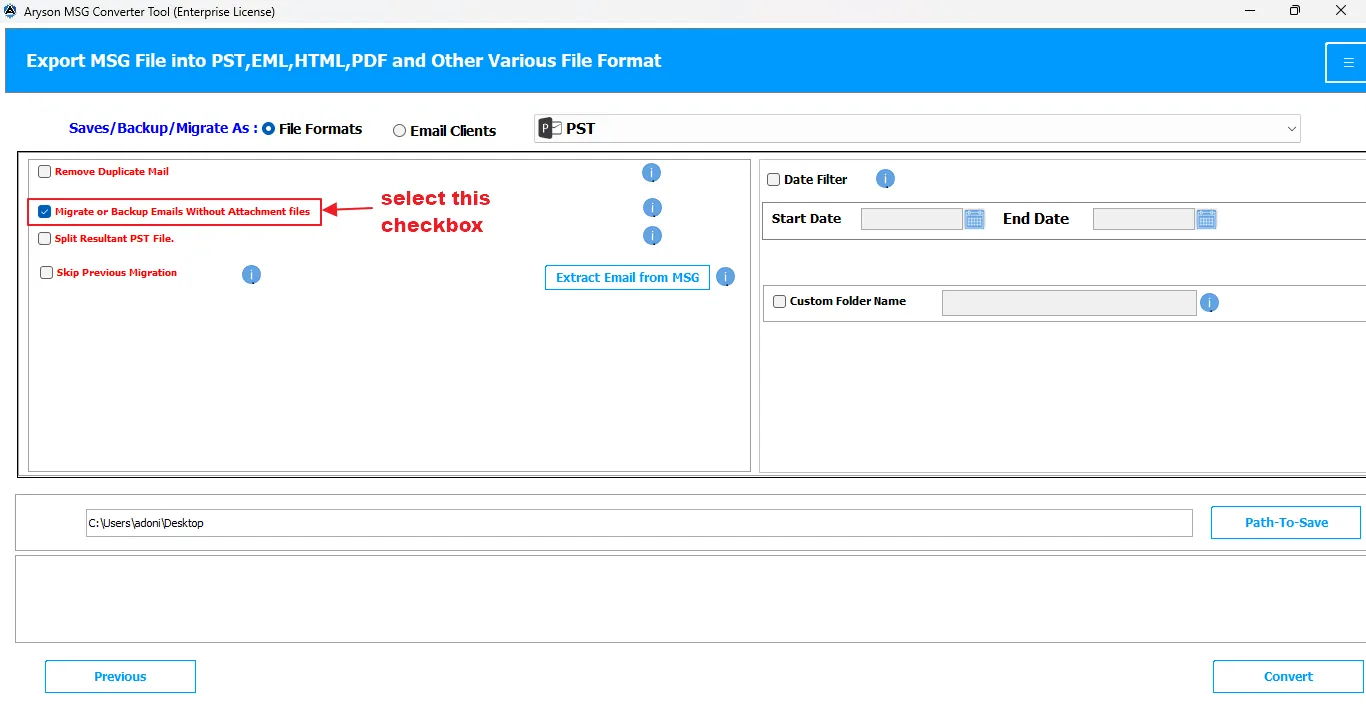
Migrate or Backup Emails Without Attachment Files:
Selecting this option enables users to convert or migrate only the email body content, excluding the attachments. This filter is extremely useful if you want to preserve the textual data and don’t need attachments in the backup.
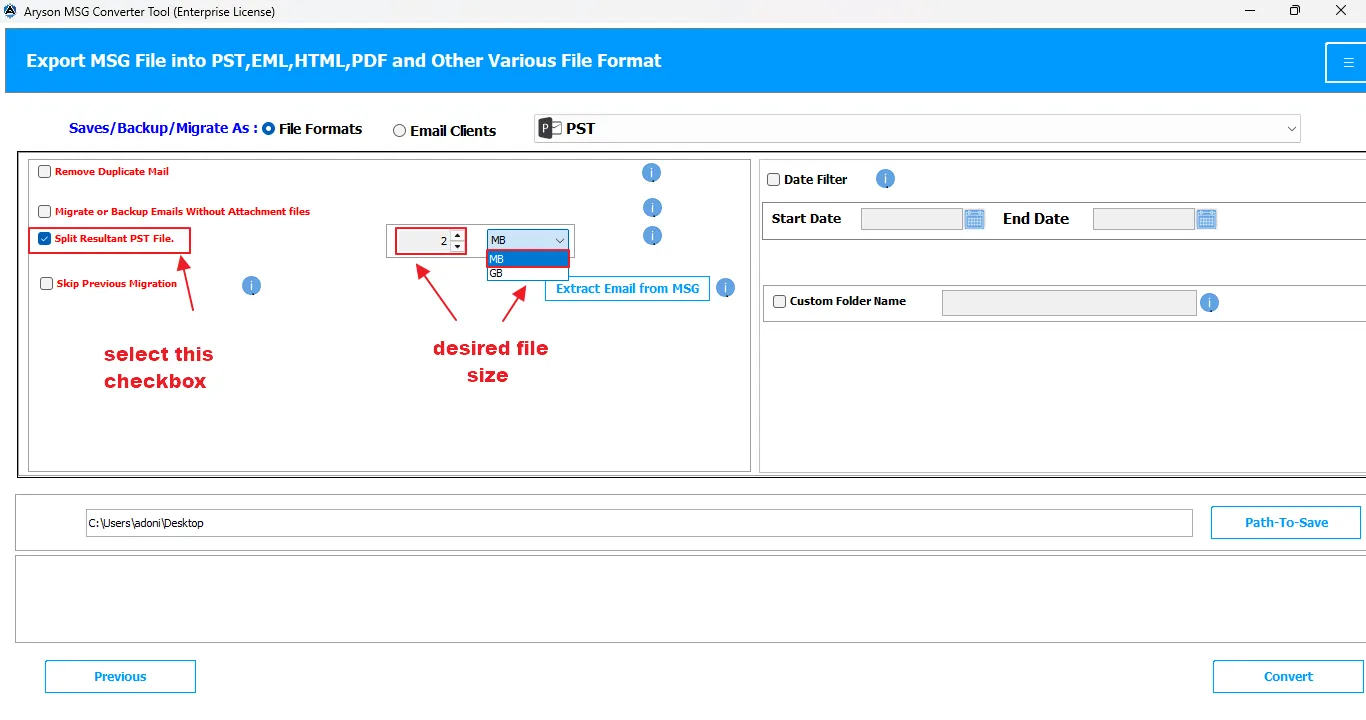
Split Resultant PST File Feature:
During MSG to PST conversion, you can break down the large resultant PST files into smaller and more manageable parts using the Split PST File Feature. Users can define the maximum size (in MB or GB ) for each resulting PST segment.
Skip Previous Migration:
This feature of the software allows users to skip already migrated MSG files at the time of conversion/exporting. Use this option to avoid duplication and increase the overall processing efficiency

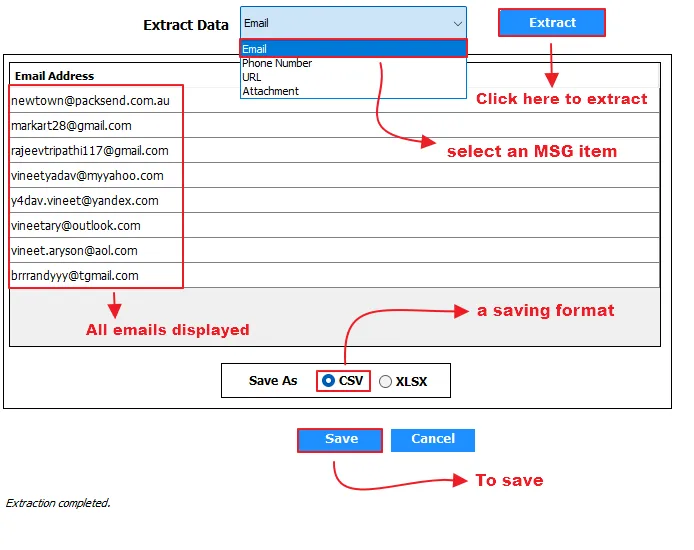
Extract Email From MSG:
This filter of the software lets the user extract data from the MSG file and save it as a CSV/XLSX File. This software can extract:
- Emails
- URLS
- Attachments
- Phone Numbers
Extract Email From MSG:
- Extract Email Label: Click on the Extract Email From MSG option.
- A dialog box with different options will appear on the screen.
- Under the Extract Data drop-down menu, select your desired MSG item.
- Choose one of the two radio buttons(CSV or XLSX).
- Select the Save button to save the MSG items in the provided format.
Note: This feature is available for all output file formats.
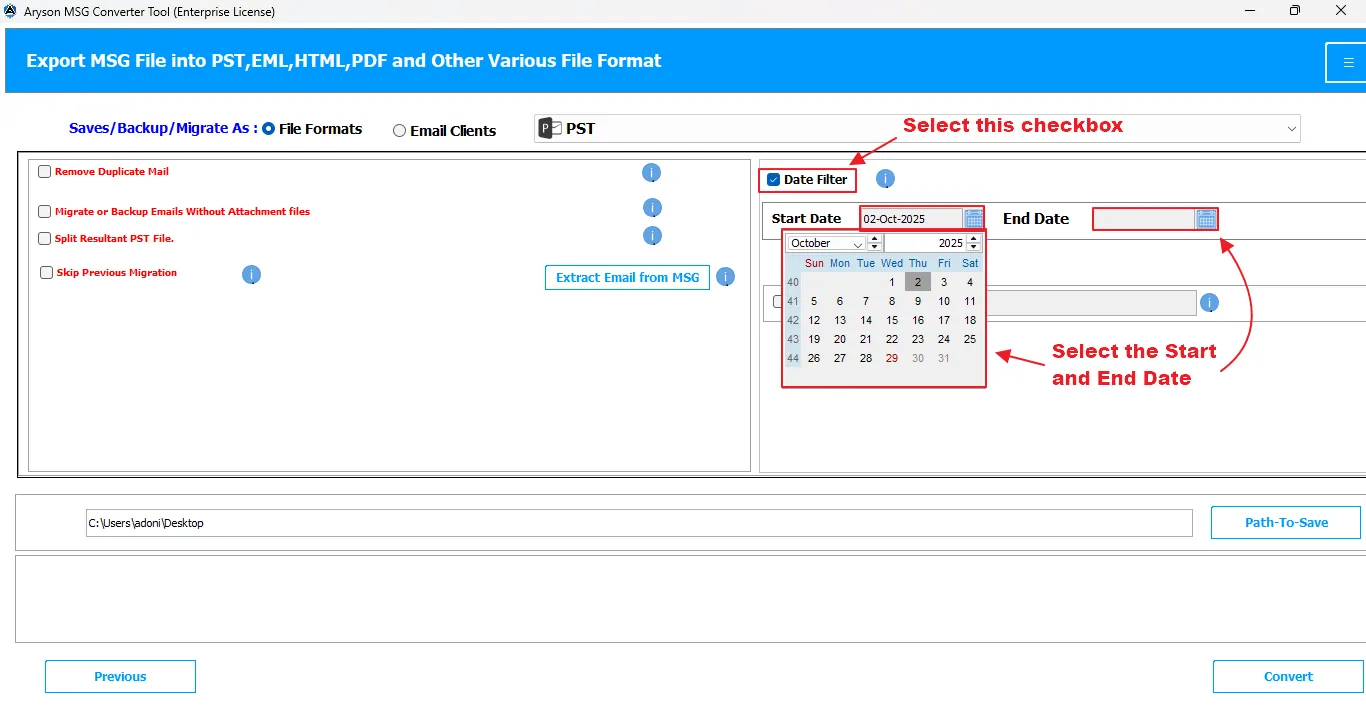
Date Range Filter:
Use this filter to export or convert MSG files within a specific Date Range. Users can define the Start Date and End Date to include only those emails that fall within the selected range, minimizing the manual selection efforts.
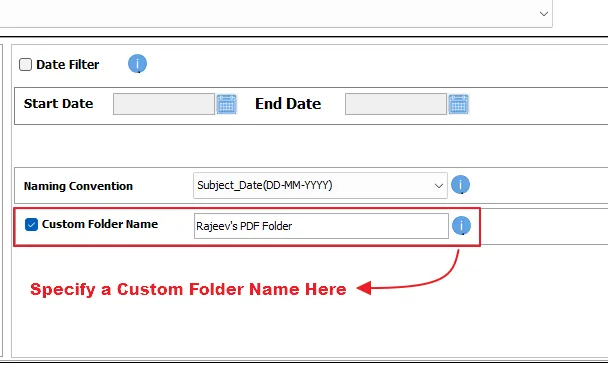
Custom Folder Name:
Users can provide a custom name to their resultant folder. They just have to:
- Tick the associated checkbox.
- Provide a preferred name to the resultant folder.
- Location of resultant folder: the resultant folder will get saved with the same name at the location they specified in Path-To-Save
MSG to PDF Conversion – Step-by-Step Tutorial
Select the File Formats option under the Saves/Backup/Migrate As label. Select PDF as the output File Format.
Apply Additional Filters & Features Offered For PDF Format
Apart from the features above, this software provides some additional features for MSG to PDF Format :
Naming Convention Feature:
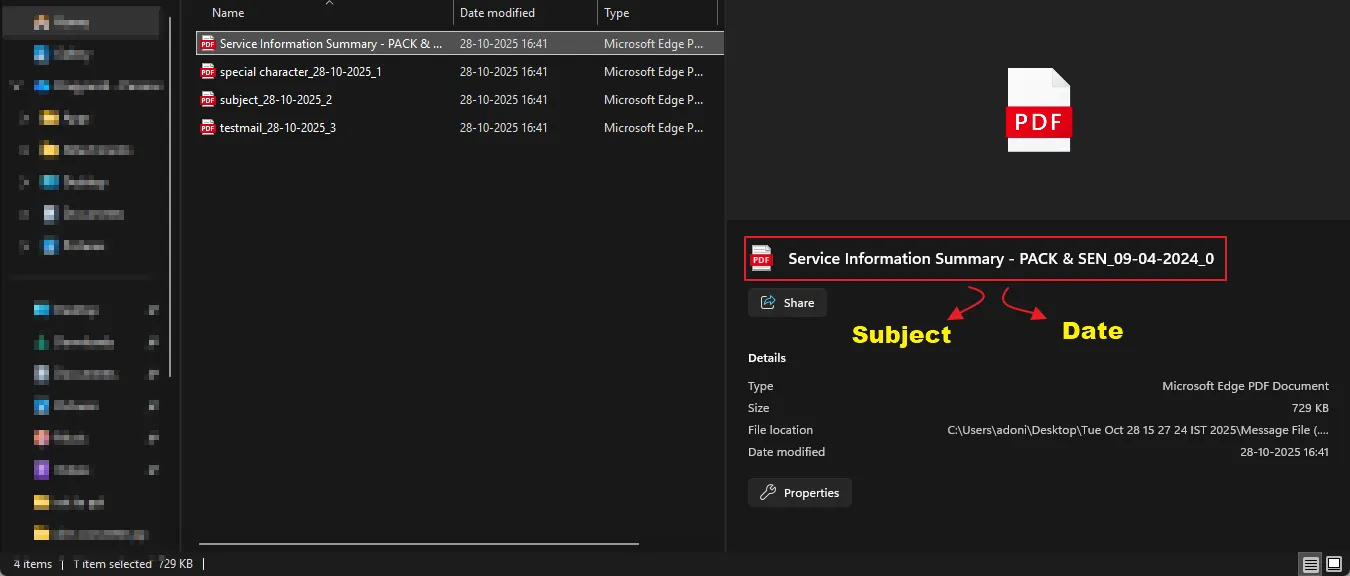
This feature of Aryson MSG Converter lets the user set their own naming pattern for the resultant PDF file ( eg, Subject_Date(DD-MM-YYYY) ). The resultant PDF file will get saved with this specified naming pattern in their system. This allows them to easily browse and filter their PDF file on the basis of Dates and the subject of the file.
The Naming Pattern provided by the software, with examples:
- Subject_Date (DD-MM-YYYY): Grammarly 23-08-2024
- Date (MM-DD-YYYY) + From: 23-08-2024 Rajeev
- From + Subject + Date (YYYY-MM-DD): Rajeev Grammarly 2024-09-23
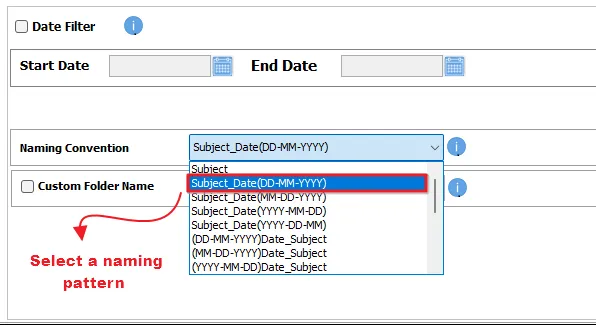
Note: This feature is available only for EML, PDF, and MSG resultant Formats.
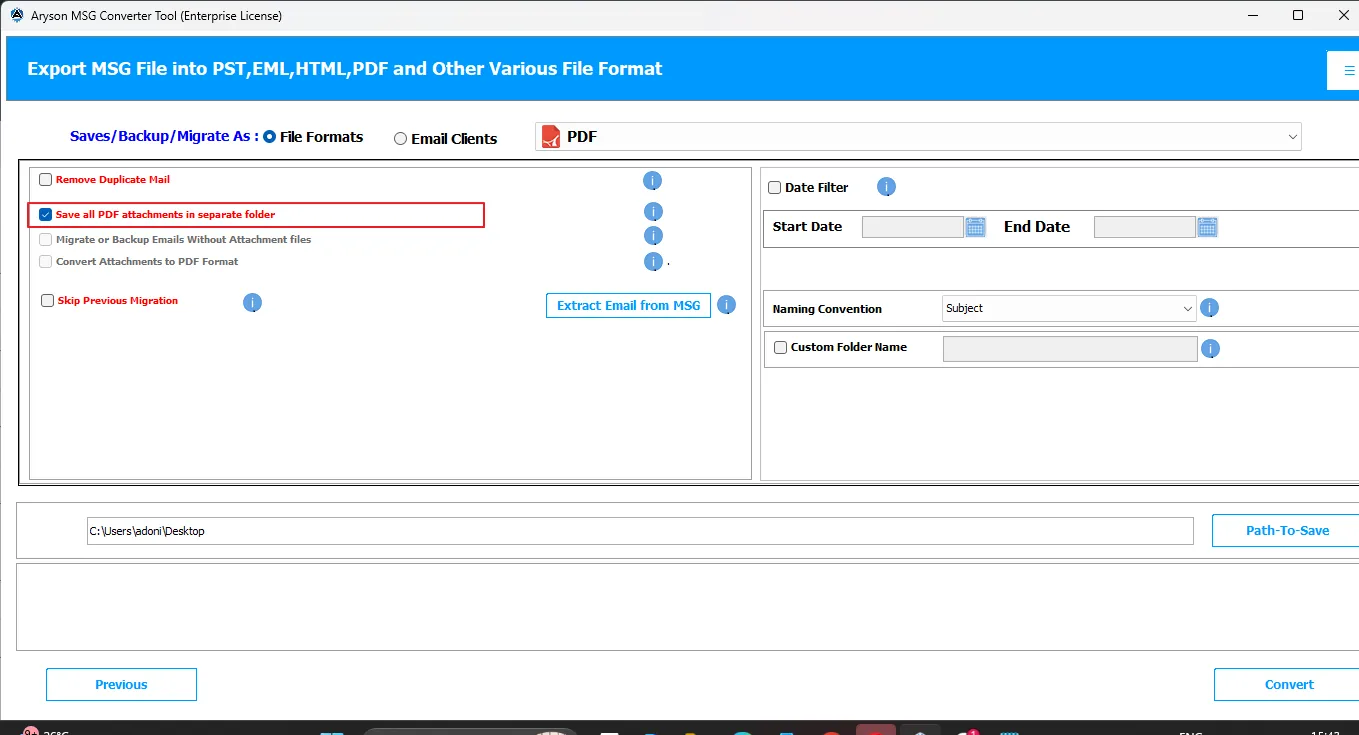
Save All PDF Attachments in a Separate Folder:
Select this filter to store all attachments in a dedicated folder in your system, rather than embedding them within the PDF. This ensures better organization and easy access to attachments post-conversion.
Convert Attachments to PDF Format:
Select this filter to put together all your email attachments in a PDF Format. When you select this filter and convert the MSG file to PDF, it will create a PDF with all attachments of the files and save it to the location you provide in the Path-To-Save option.
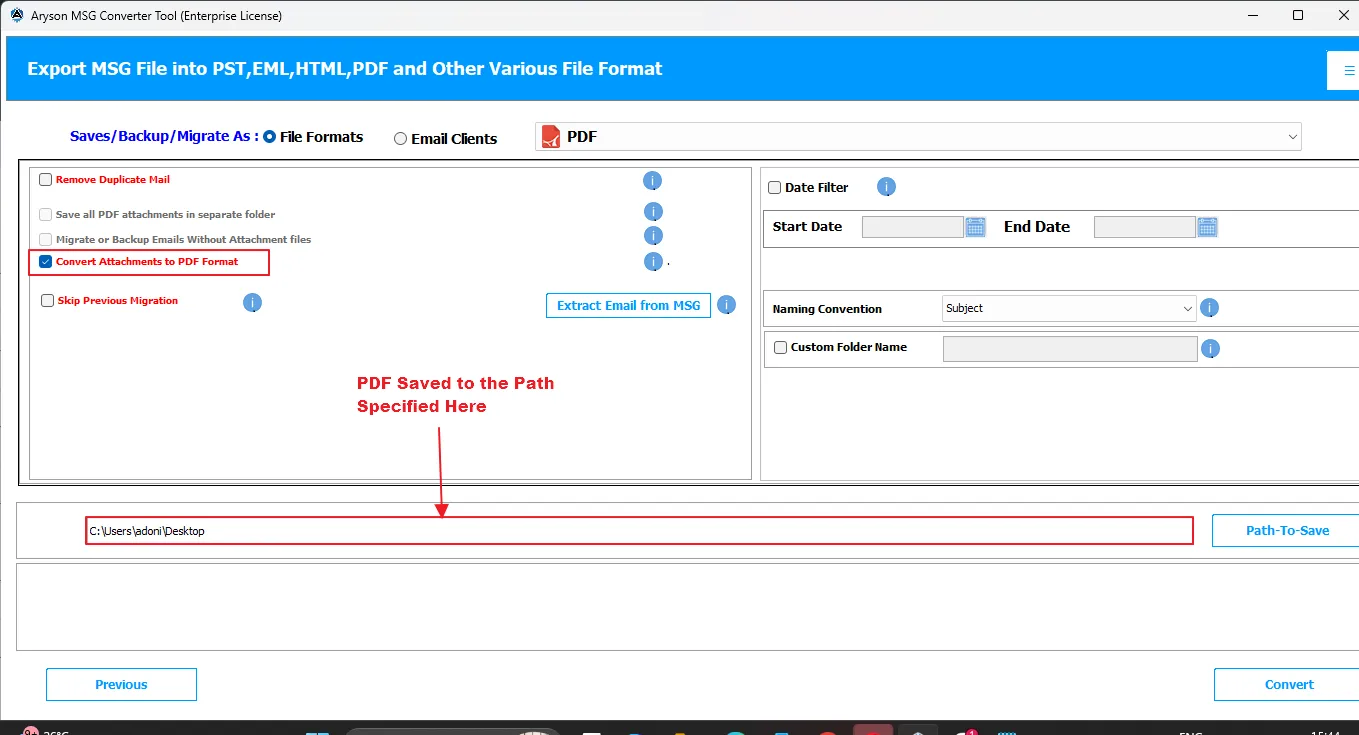
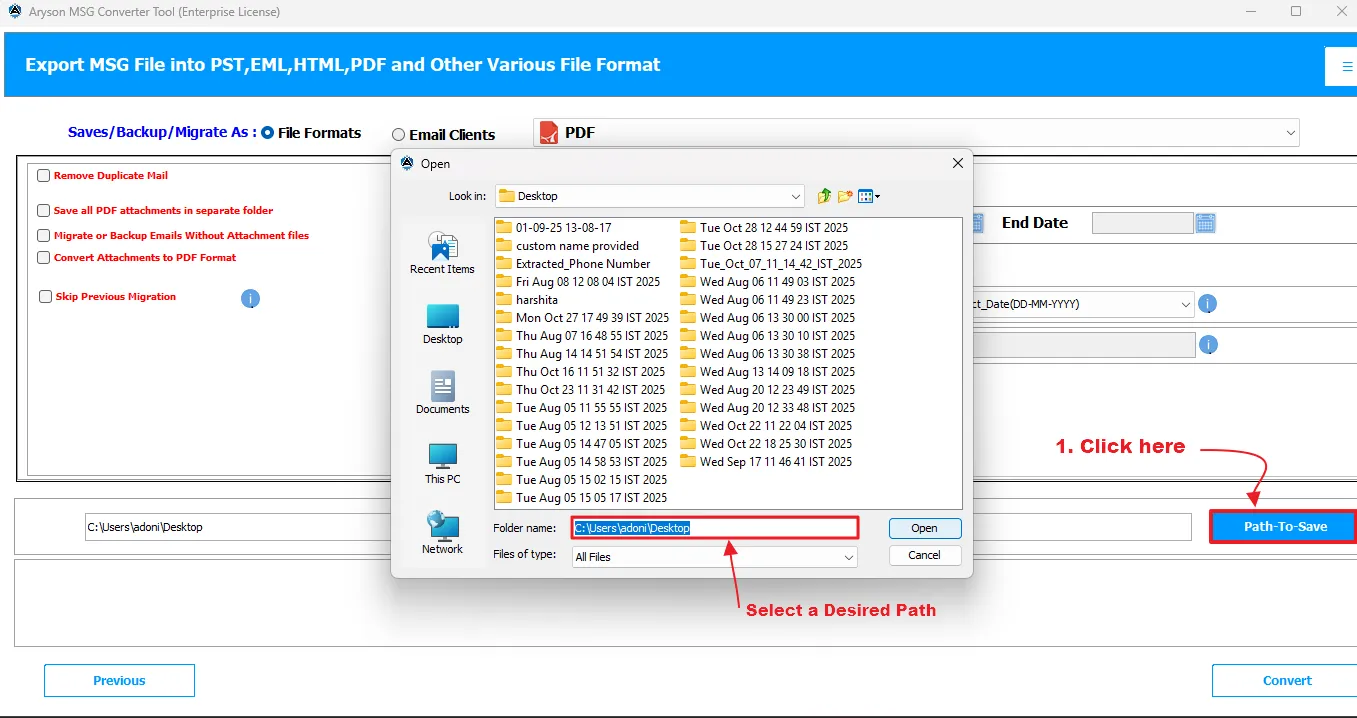
Step 07: Set the Path-To-Save:
This feature is the backbone of various other features we saw above. Here, the user provides a specific location to save the resultant files/ folders.
- Click on the Path-To-Save option.
- An Open pop-up window will appear to select a specific location to save files/folders.
Note: This feature is available for all file formats available in the software.
Step 08: Perform the Conversion
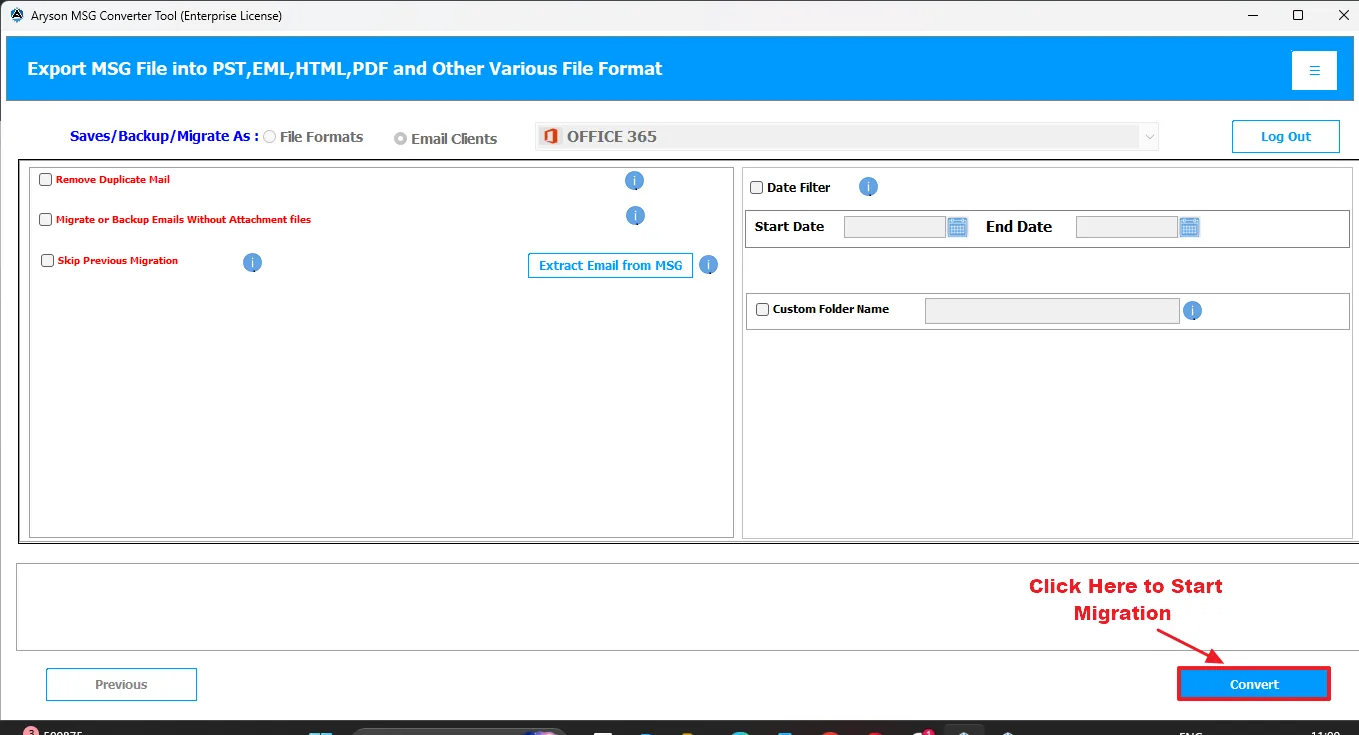
- Convert: Once the required filters are applied to the selected MSG files, click on the Convert Button present at the bottom-right corner of the screen.
Step 09: Acknowledge the Conversion
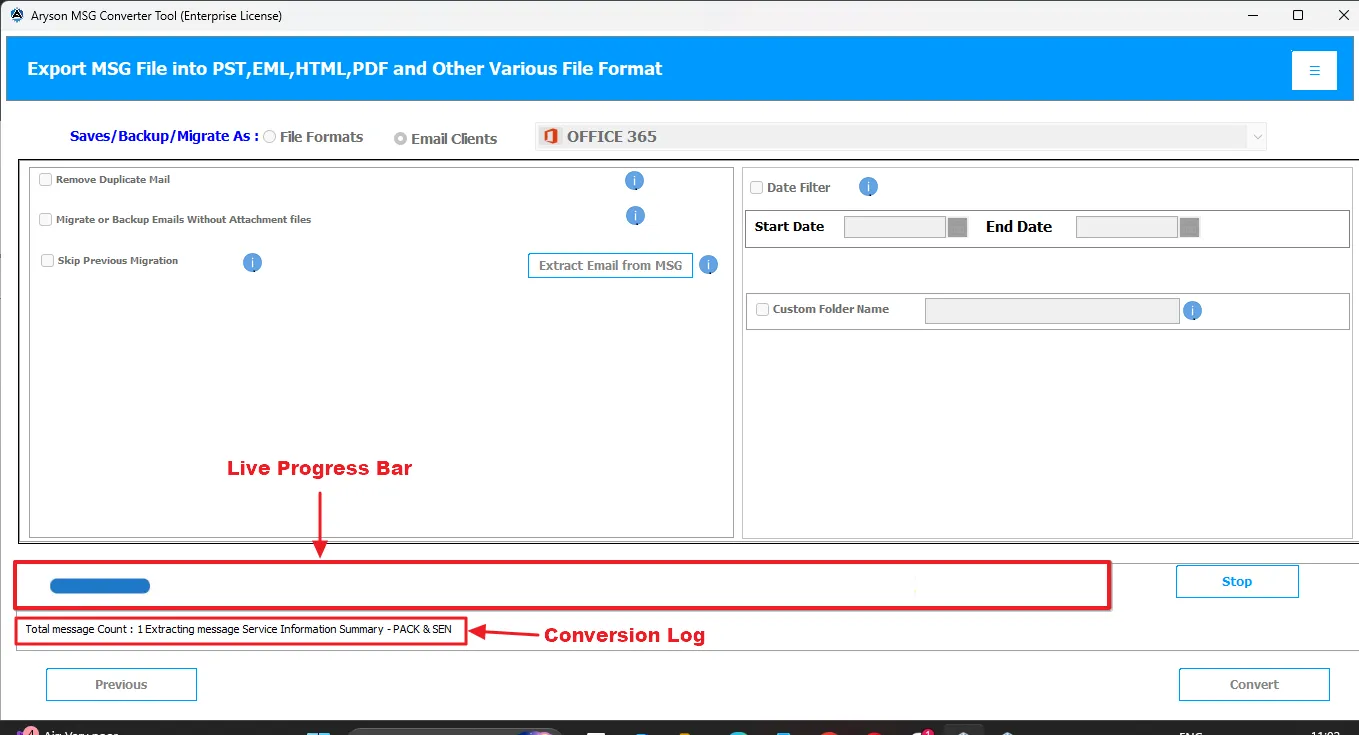
- Live Progress Bar:
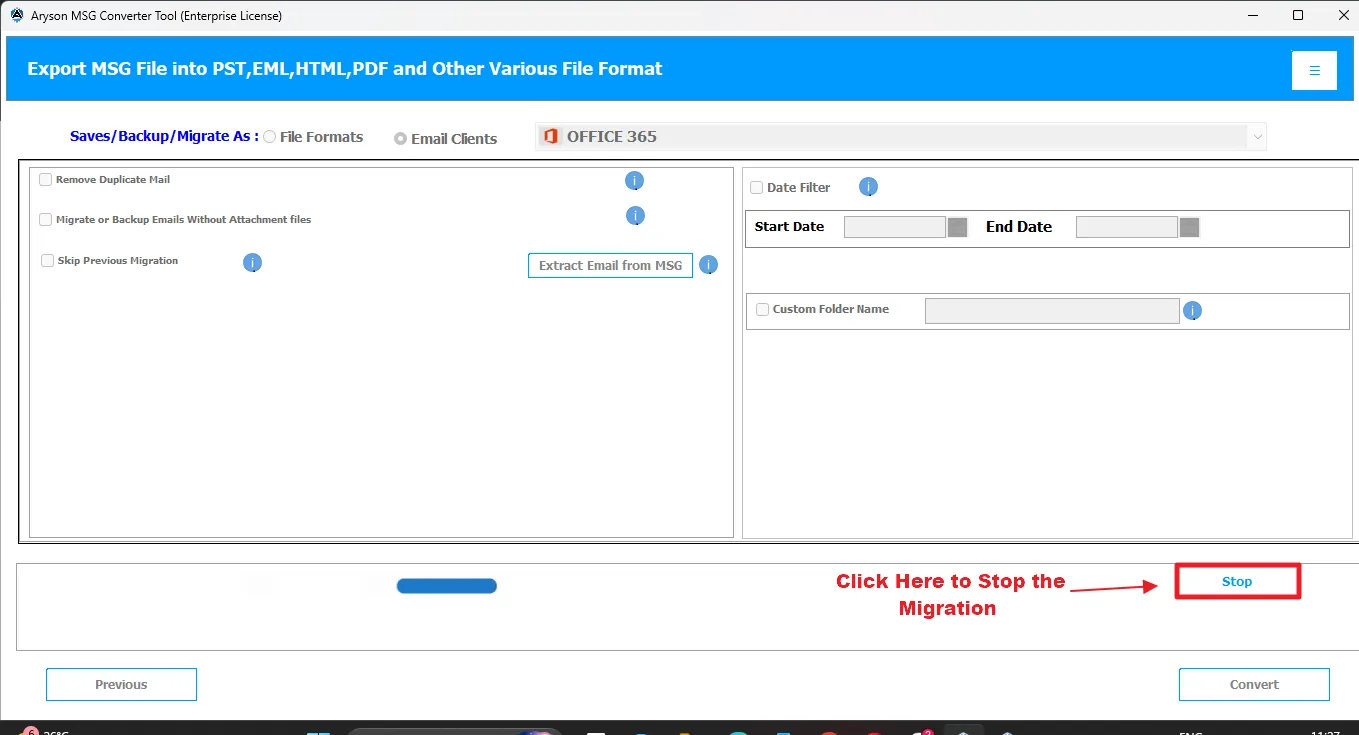
The blue line indicates the real-time progress of the conversion. As the tool processes MSG files, the bar fills up to show the percentage of completion. Once the bar reaches 100%, it confirms that the selected files have been successfully converted or exported. - Stop Conversion( if required): In case the user wants to stop the conversion in between, they can click the Stop Button appearing at the right side of the Live Progress Bar.
- Conversion Progress Log: The conversion process log allows the user to keep track of the total number of MSG files, along with their names.
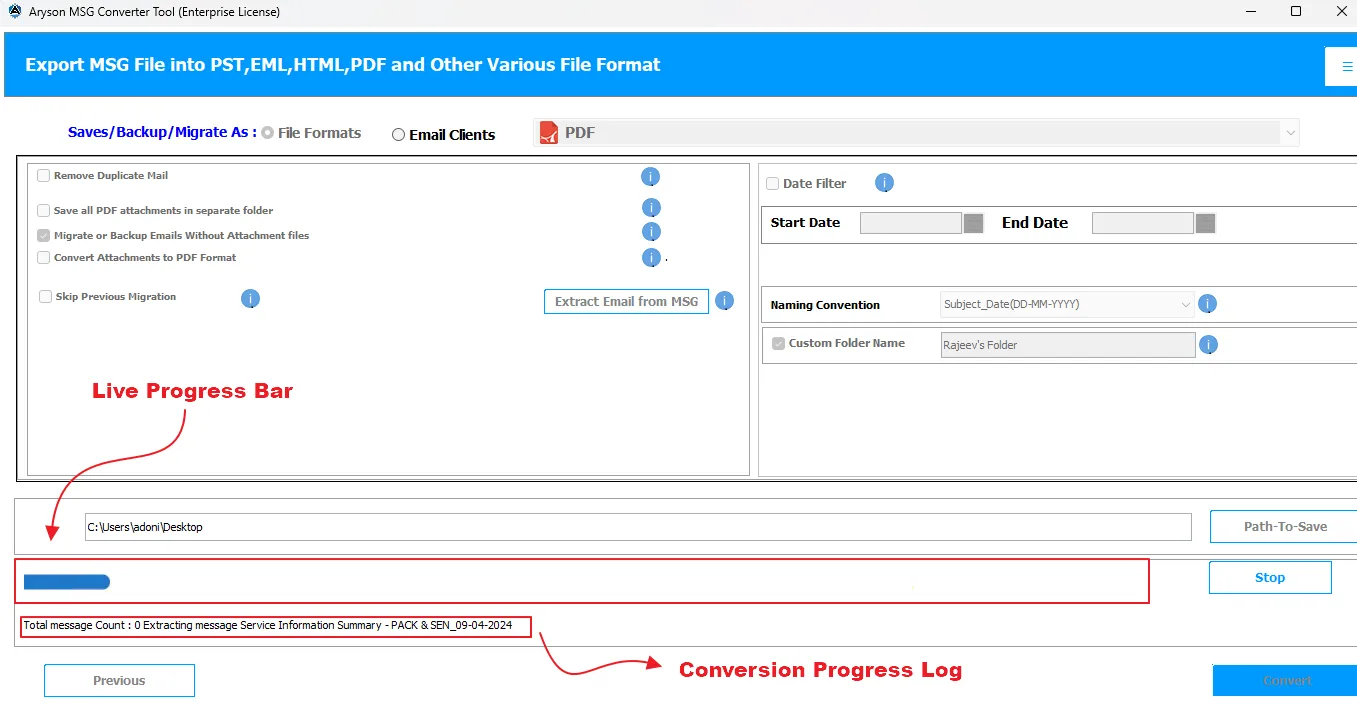
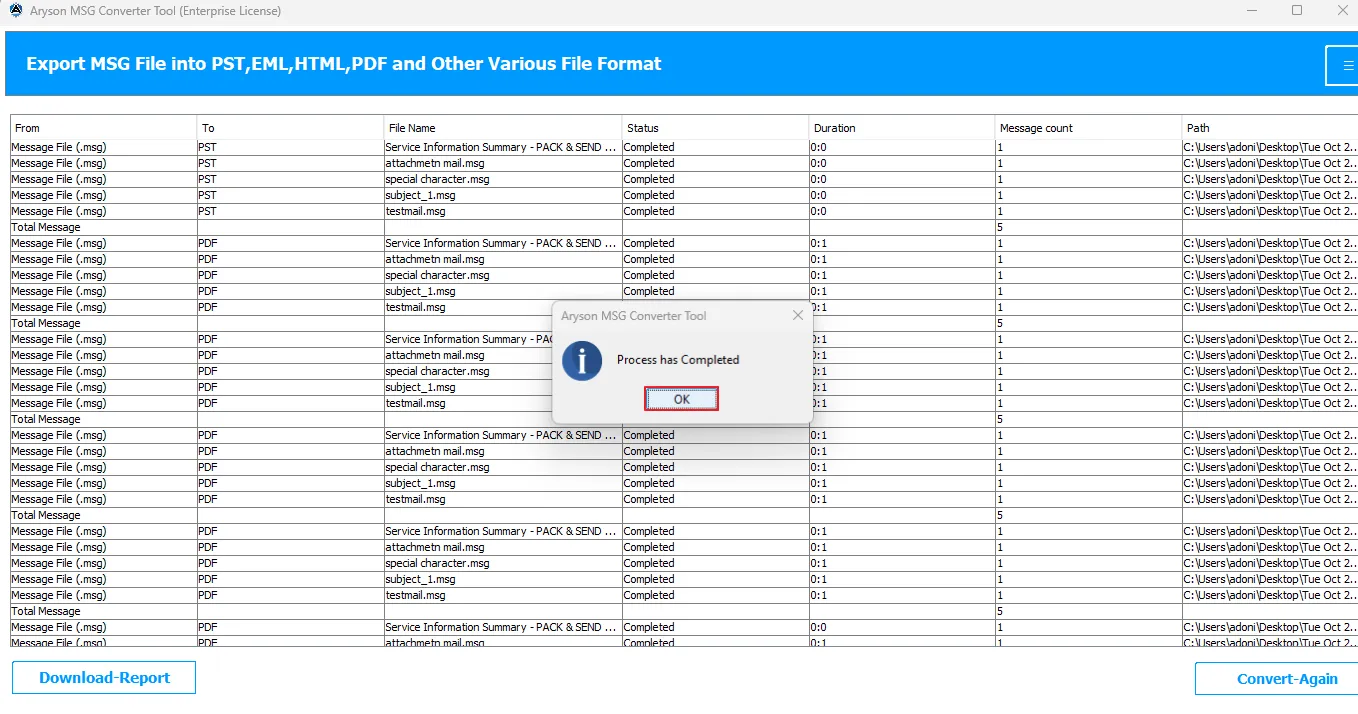
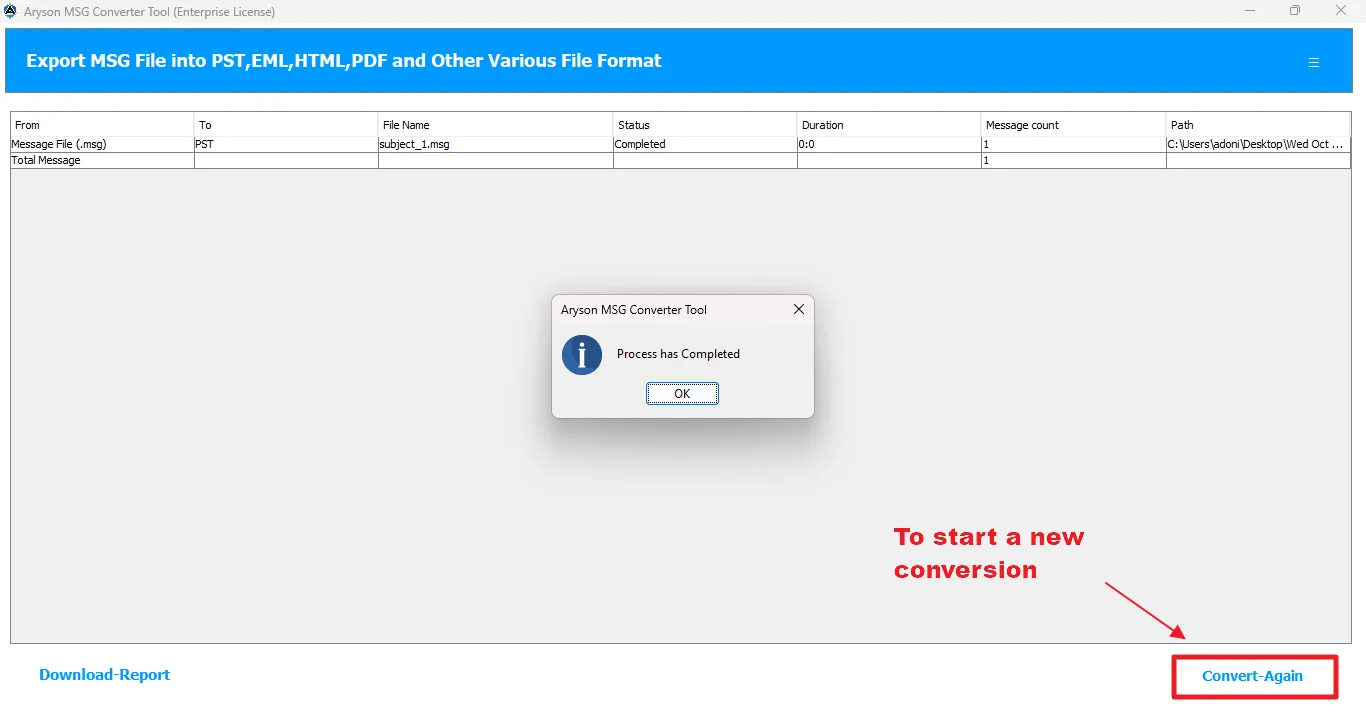
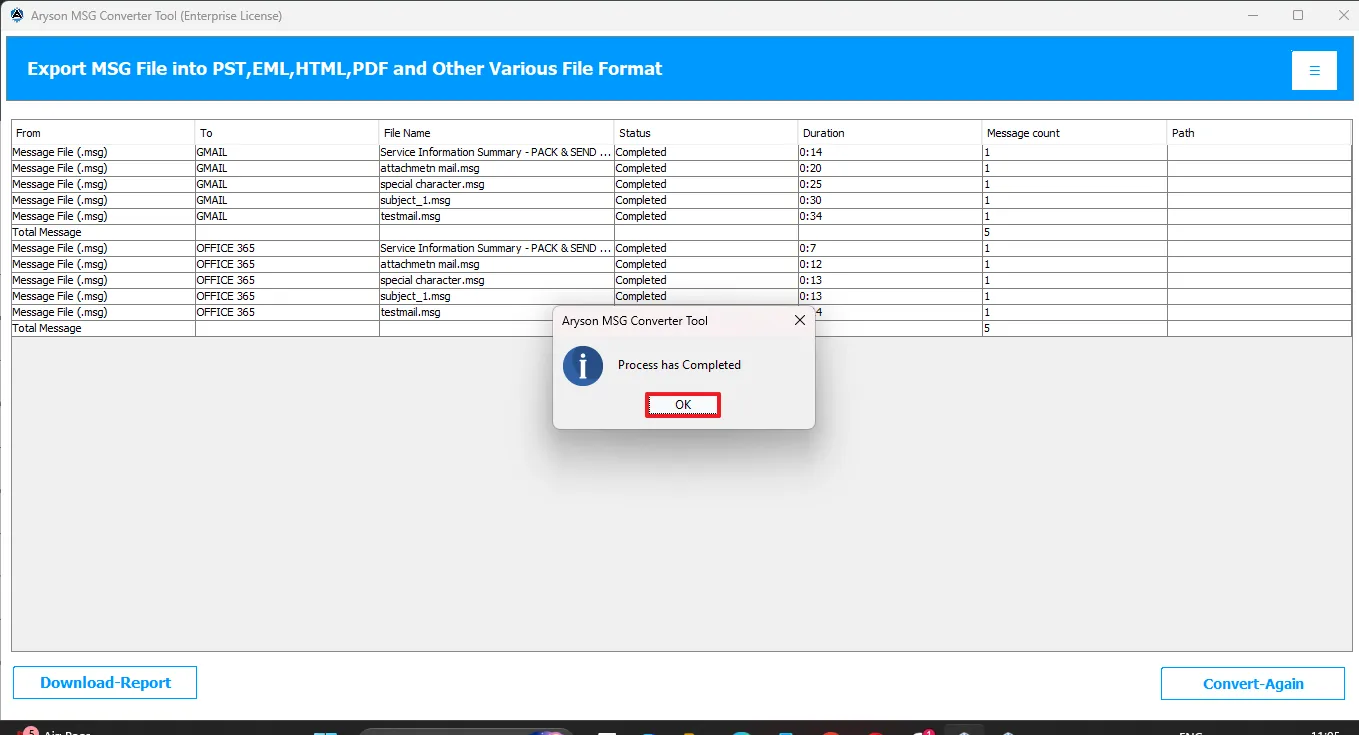
- Process Completed: Once the processing completes, a pop-up saying “process has completed” will appear on the screen. Along with that, the details of all files are converted in the background.
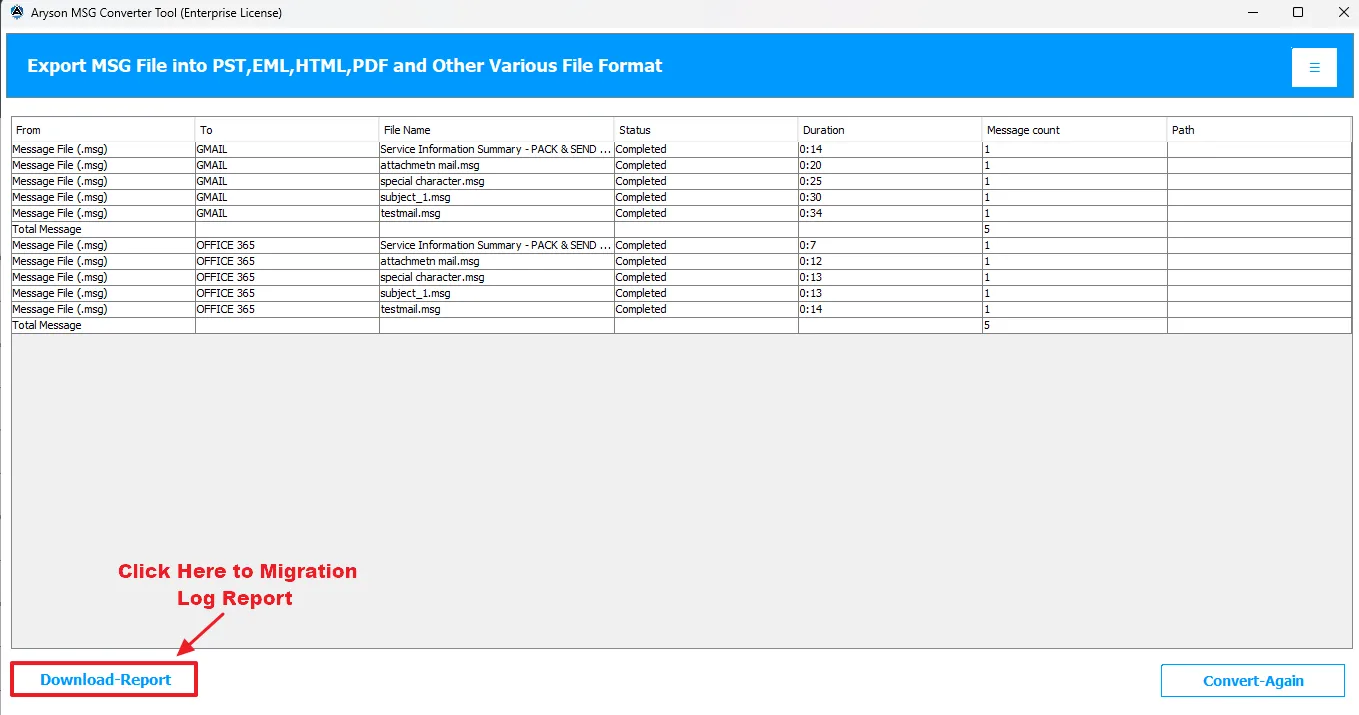
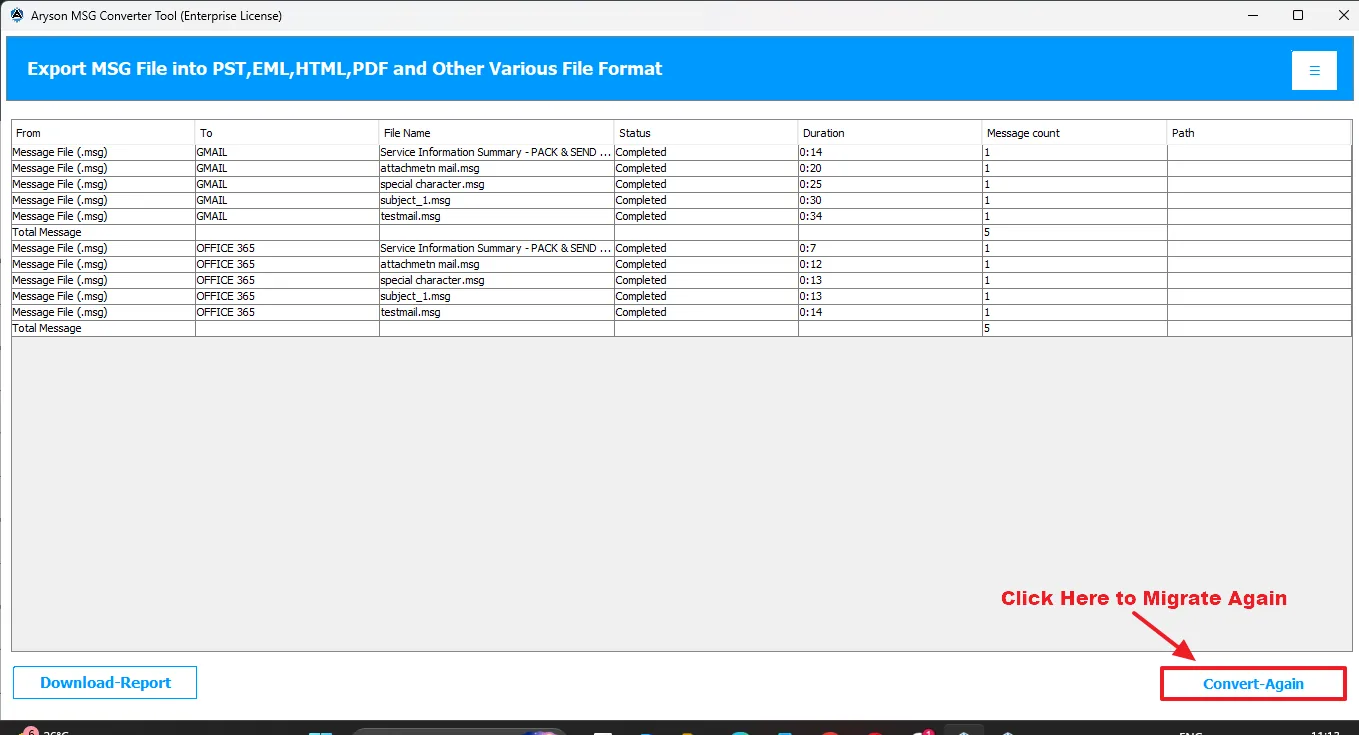
Step 10: Download Report
After conversion, the Aryson MSG Converter automatically generates a detailed log report that summarizes the entire operation. This report includes essential details such as From, To, File Name, Status, Duration, Message Count, Path, and Total Messages.
- Download Report: This button downloads the complete conversion log report to their system
Start a New Conversion
To start a new conversion, click on the Convert Again button displayed on-screen. It will automatically redirect you to the preview and selection panel.
Step-by-Step Tutorial to Export MSG Files to Email Clients
The Aryson MSG Converter Tool ensures precise and secure migration of MSG files to multiple email platforms with complete data integrity. The number of Email Clients enabled for a user depends on their license type.
Step 1: Select the Email Client:
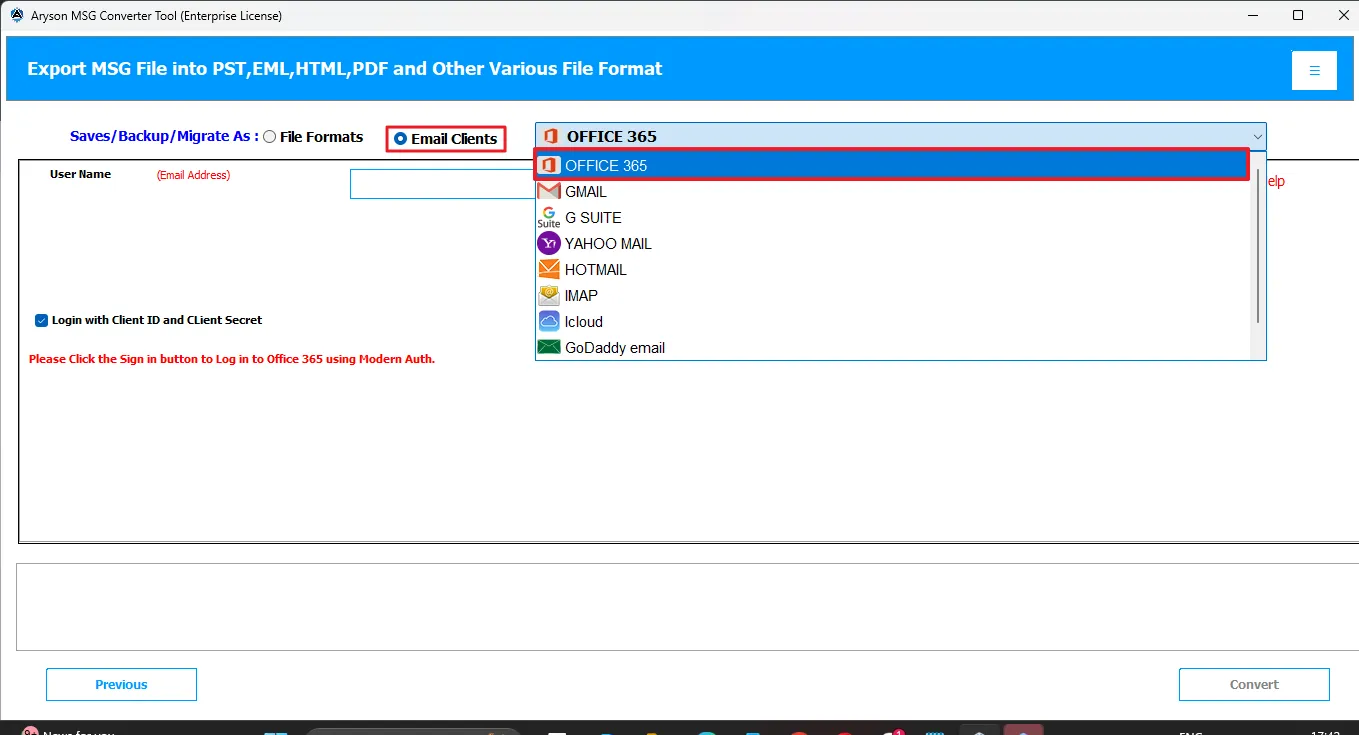
1. Mark the Email Clients radio button under the Saves/Backup/Migrate As label.
2. From the appearing drop-down list, select the desired Email Client.
- Supported Email Clients include:
- Office 365: Microsoft’s cloud-based productivity suite with Outlook, Word, Excel, Teams, and OneDrive.
- Gmail: Google’s widely used email service with 15 GB free storage and powerful search features.
- G Suite (Google Workspace): Business-focused Gmail version supporting custom domains and collaboration tools.
- Hotmail (Outlook.com): Microsoft’s legacy webmail service, now integrated with Outlook.com.
- IMAP: Email protocol that allows users to access and manage emails directly on the server.
- iCloud Mail: Apple’s default email service for macOS and iOS users with seamless device integration.
- Yahoo Mail: Free email service with up to 1 TB of storage and a user-friendly interface.
- GoDaddy Mail: Business email solution from GoDaddy offers custom domain email hosting.
- HostGator Email: Email hosting service by HostGator, ideal for domain-based business emails.
Step 2: Log in to Your Email Client
After selecting the destination email client, sign in using your account credentials. For demonstration, migrate MSG to Microsoft Office 365.
How to Export MSG Files to Office 365: Complete Guide
Follow the same steps for other email platforms as well. Log in through either of the two Login Methods:
| Login via Modern Authentication | Client Id, Secret Value, and Tenant Id |
|---|---|
|
Description: The Office 365 Login with Modern Authentication feature enables users to securely access their accounts through Microsoft’s OAuth 2.0 authentication system. |
Description: The Login via Client ID, Secret Value, and Tenant ID Option allows users to connect to their Office 365 account using admin credentials. |
|
Authentication Method Used: Microsoft’s OAuth 2.0 method |
Authentication Method Used: Microsoft’s Azure App Registration |
|
Credentials Required: Office 365 Email ID |
Credentials Required: Client ID, Secret Value, and Tenant ID from the Azure portal (User can generate from the official Microsoft Azure portal). |
|
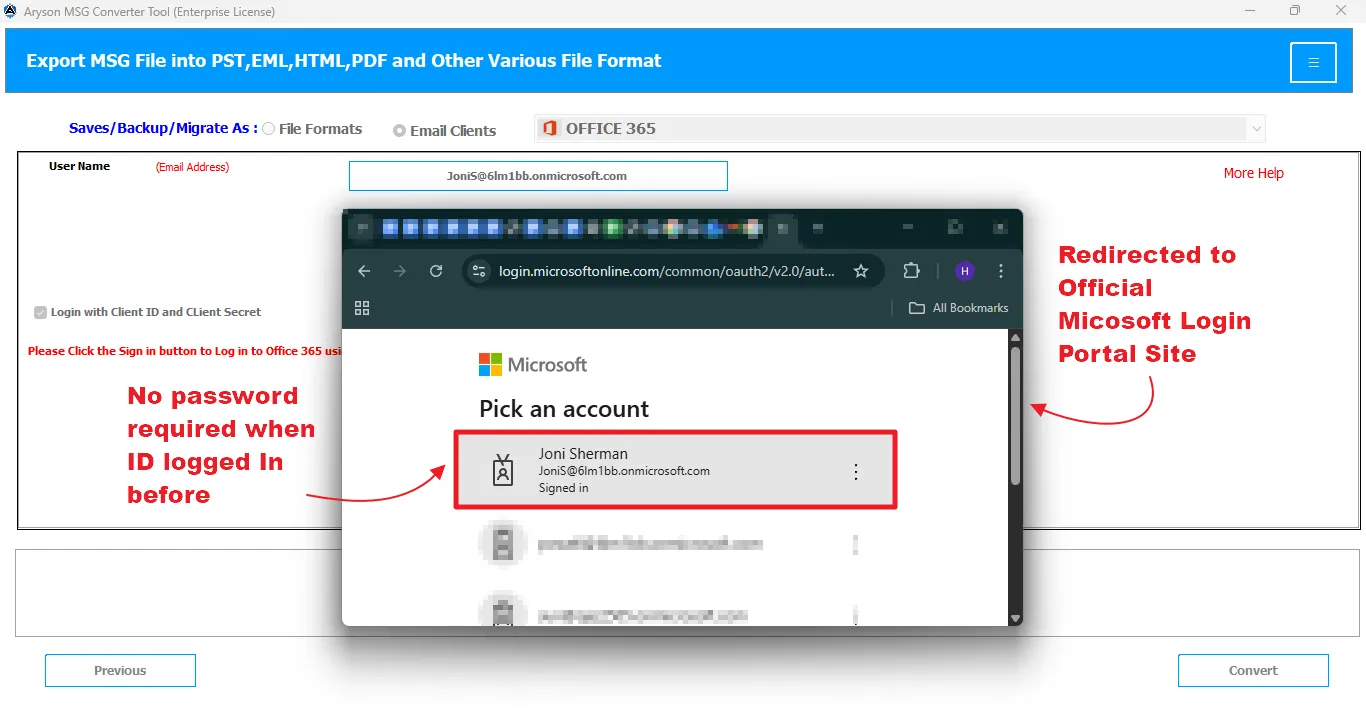
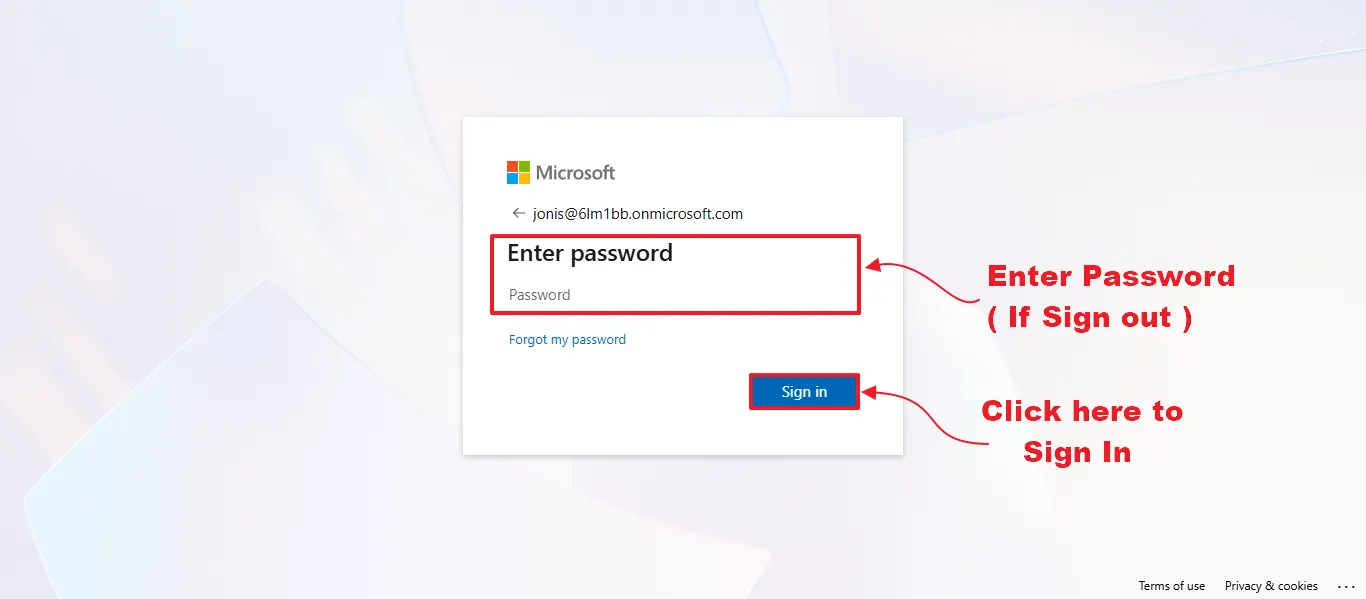
MFA (Multi-Factor Authentication): * Requires a password also if the ID is not already logged in the browser. It supports MFA enabled accounts to ensure data safety and compliance with Microsoft’s latest security standards. |
MFA (Multi-Factor Authentication): Works for admin based access without separate MFA prompts. |
|
Login Process: User is redirected to Microsoft’s official login page to authenticate manually. |
Login Process: Connection established automatically once Azure credentials are provided. |
|
Best For: Individual users or small setups who need a one-time login. |
Best For: Admins managing multiple users/mailboxes for bulk migration. |
|
Security Level: As it is ideal for individual users and small setups, it offers high security. Doesn’t allow the user to access the mailbox data of other users belonging to a particular admin ID. |
Security Level: Whereas this method provides admin level connectivity via Azure authorization. This allows administrators to manage and migrate multiple mailboxes efficiently using pre-approved app permissions, without needing individual admin login. |
|
Use Case: Ideal for personal or single account migrations. |
Use Case: Ideal for organizational or multi-user migrations requiring admin-level access. |
Steps to log in via Modern Authentication :
- On selecting Office 365 as the email client, the Modern authentication method will appear by default on the screen.
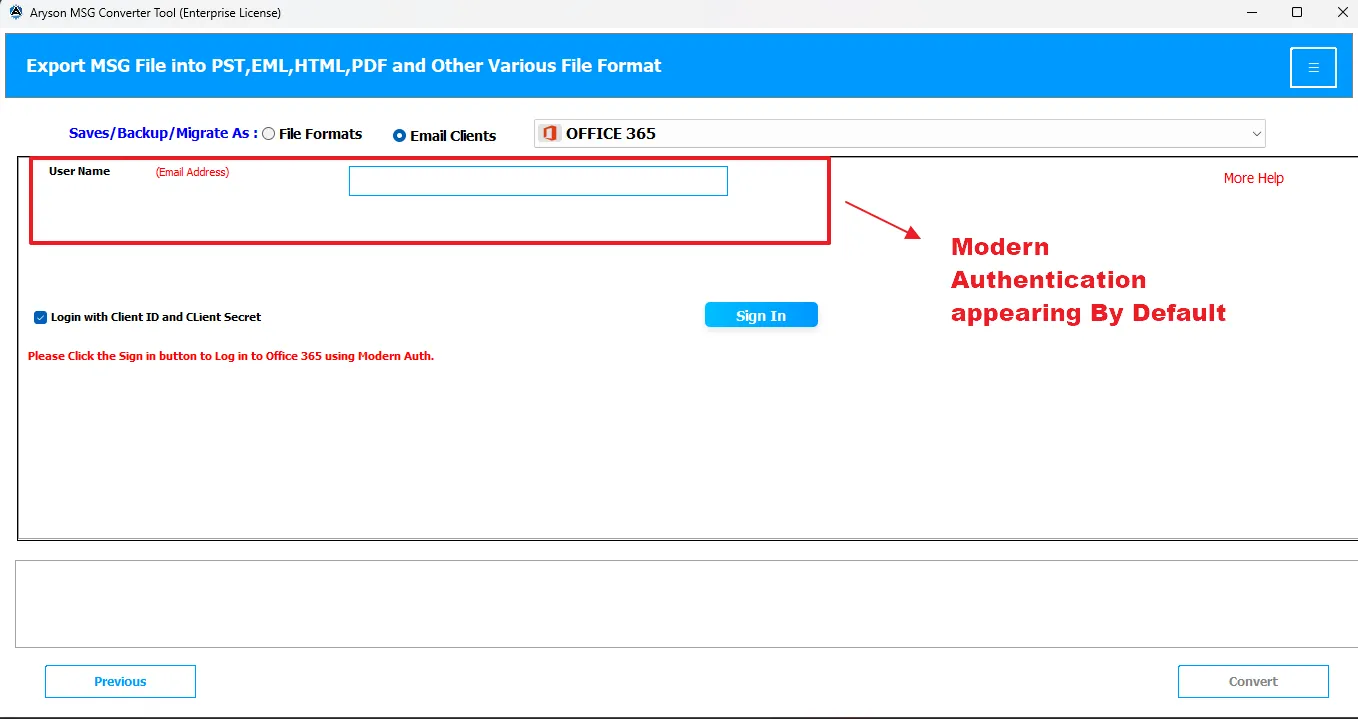
- Enter your Office 365 email address(Username) & click Sign In.

- This will redirect you to Microsoft’s official login portal.
- Enter the password to complete authentication.
- After authentication, the software establishes a secure connection with the Office 365 account & retrieves mailbox data.
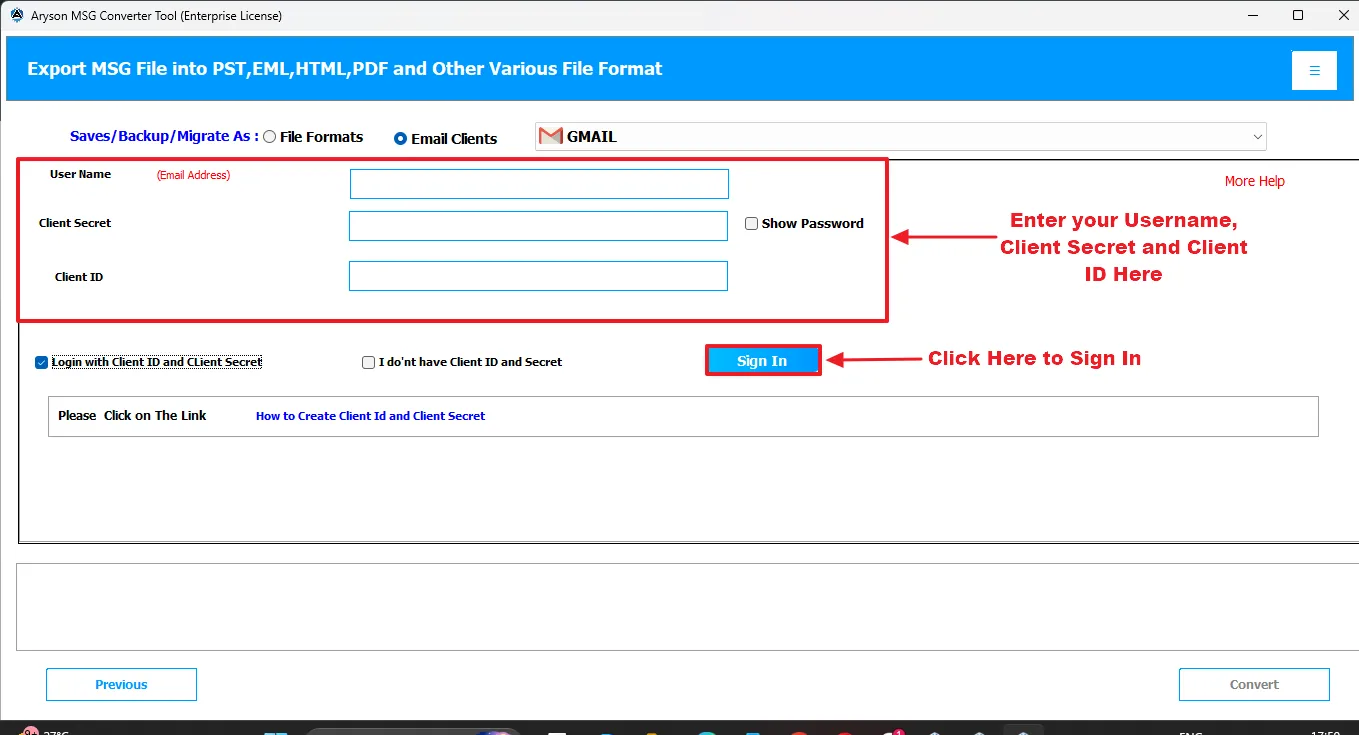
Steps to Login via Client Id, Secret Value, and Tenant Id:
- Select the Login via Client ID and Client Secret checkbox.
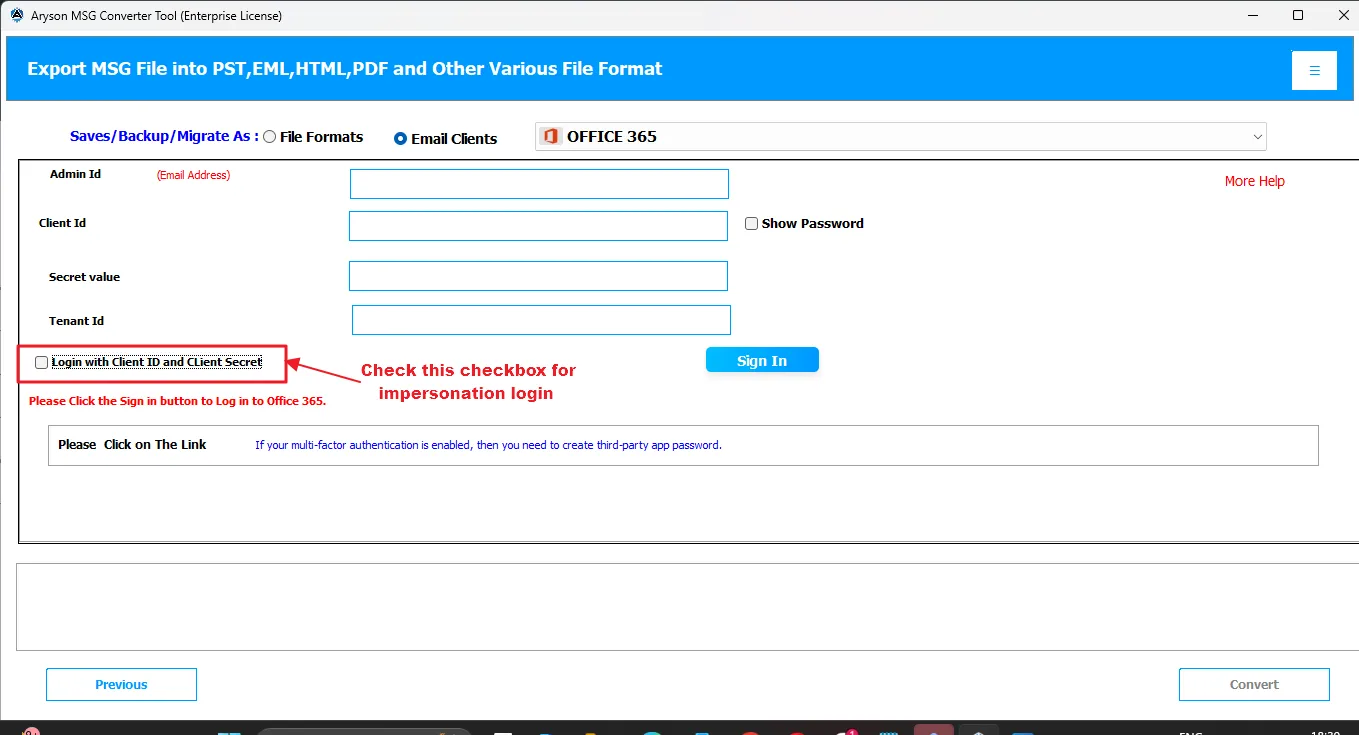
- Generate the Client ID, Secret Value, and Tenant ID via Microsoft’s Azure Registration Portal.
- Enter the generated Admin ID, Client ID, Secret Value, and Tenant ID, and click Sign In.
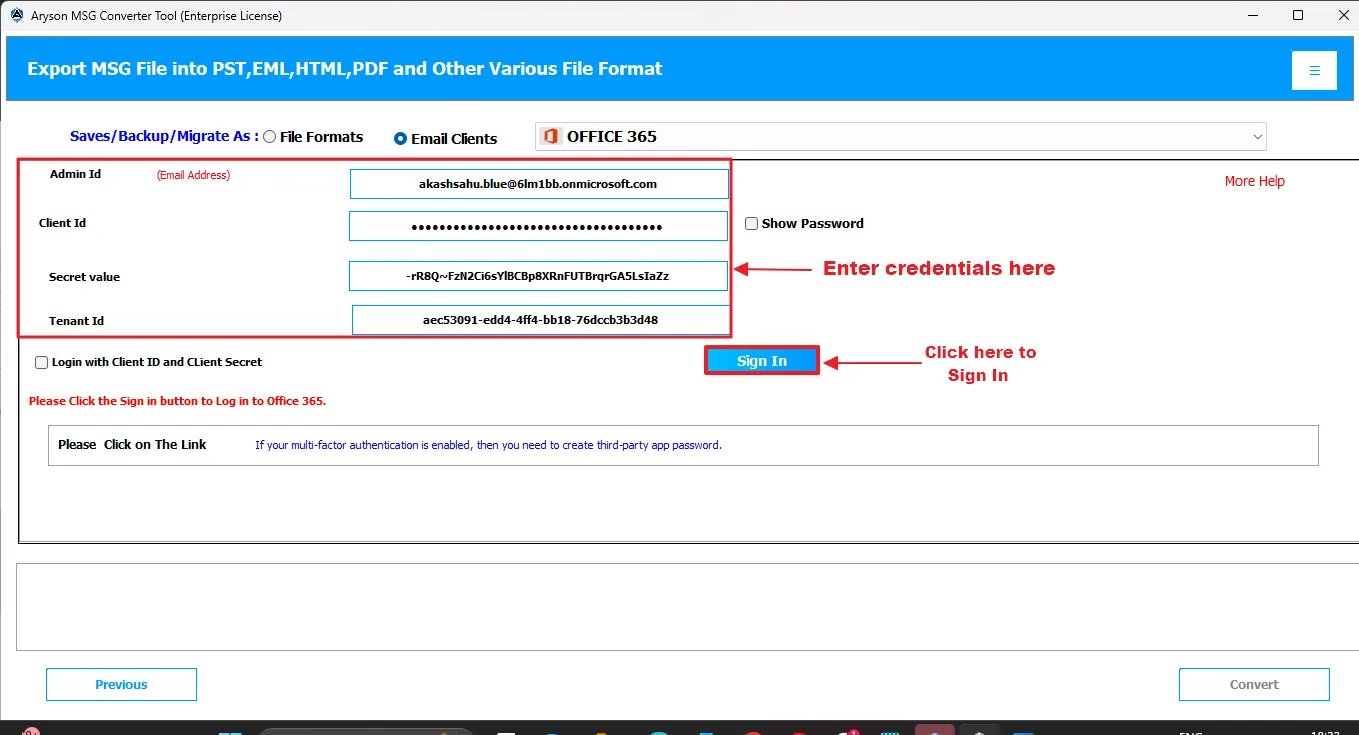
- The software connects to Office 365 securely using Modern Authentication (OAuth 2.0) & grants permission to access and migrate mailboxes without manual sign-in for each user.
Step 03: Apply Filters and Features
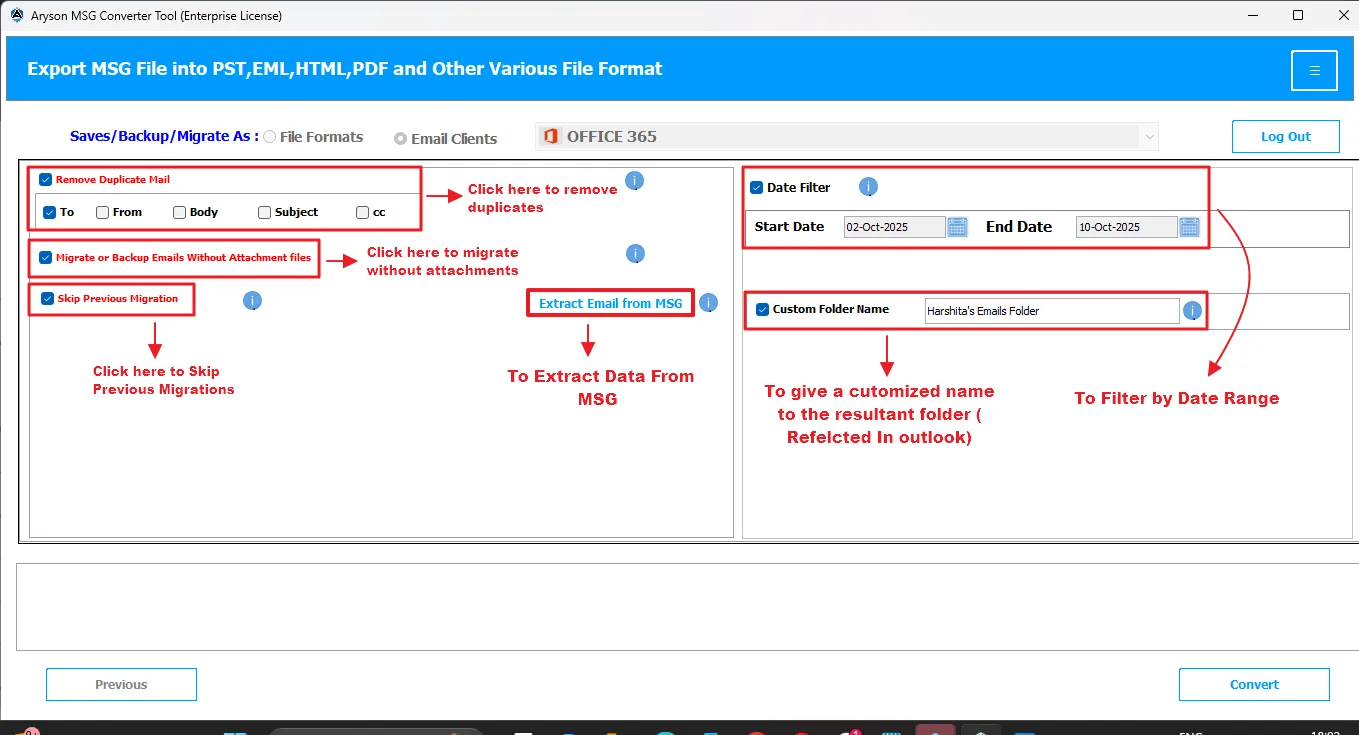
- Remove Duplicate Mail: Eliminate duplicate emails during conversion/export based on fields like To, From, Subject, Body, and CC. Helps save time and storage space.
- Migrate or Backup Without Attachments: Convert or back up only the email body while excluding attachments—ideal for text-only data preservation.
- Skip Previously Migrated Files: Automatically skip MSG files already migrated to avoid duplication and improve overall processing speed.
- Extract Email from MSG: Extract specific data (Emails, URLs, Attachments, Phone Numbers) from MSG files and save them in CSV or XLSX format for easy analysis. Available for all output file formats.
- Date Range Filter: Export or convert only those MSG files that fall within a defined date range (Start Date -End Date), minimizing manual selection
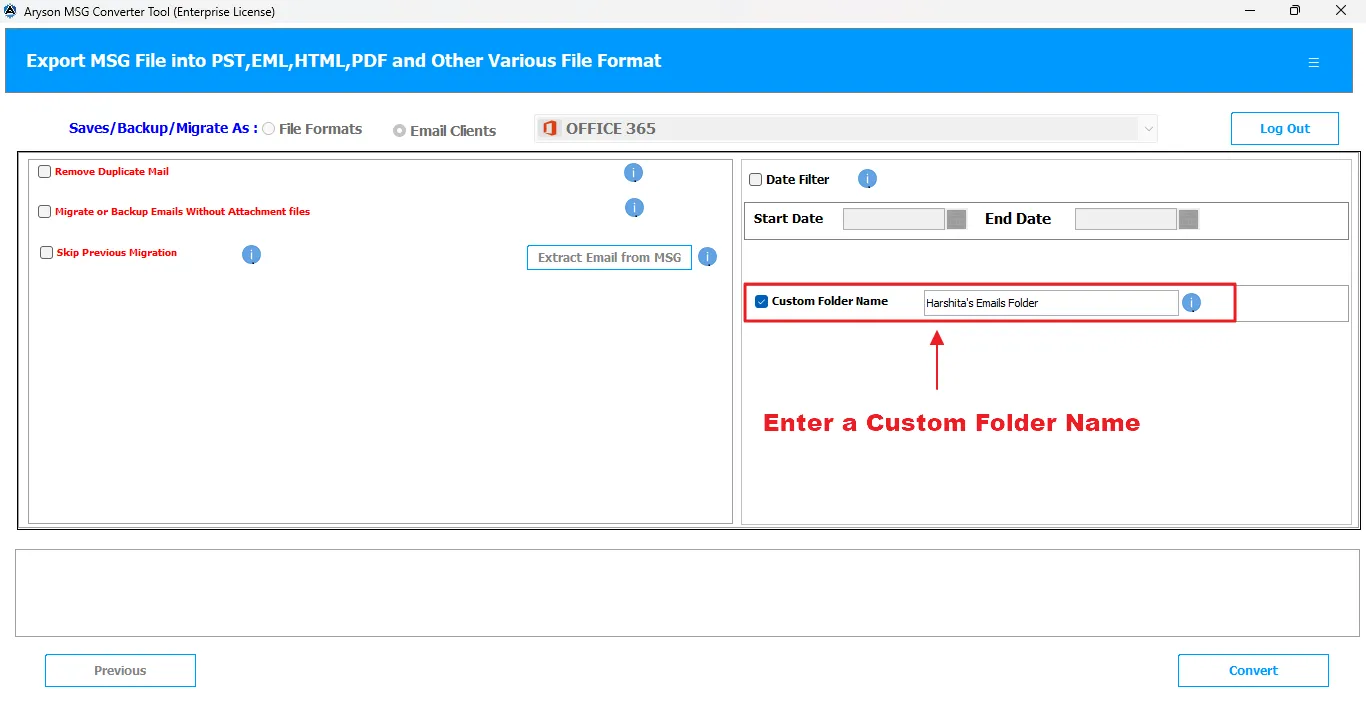
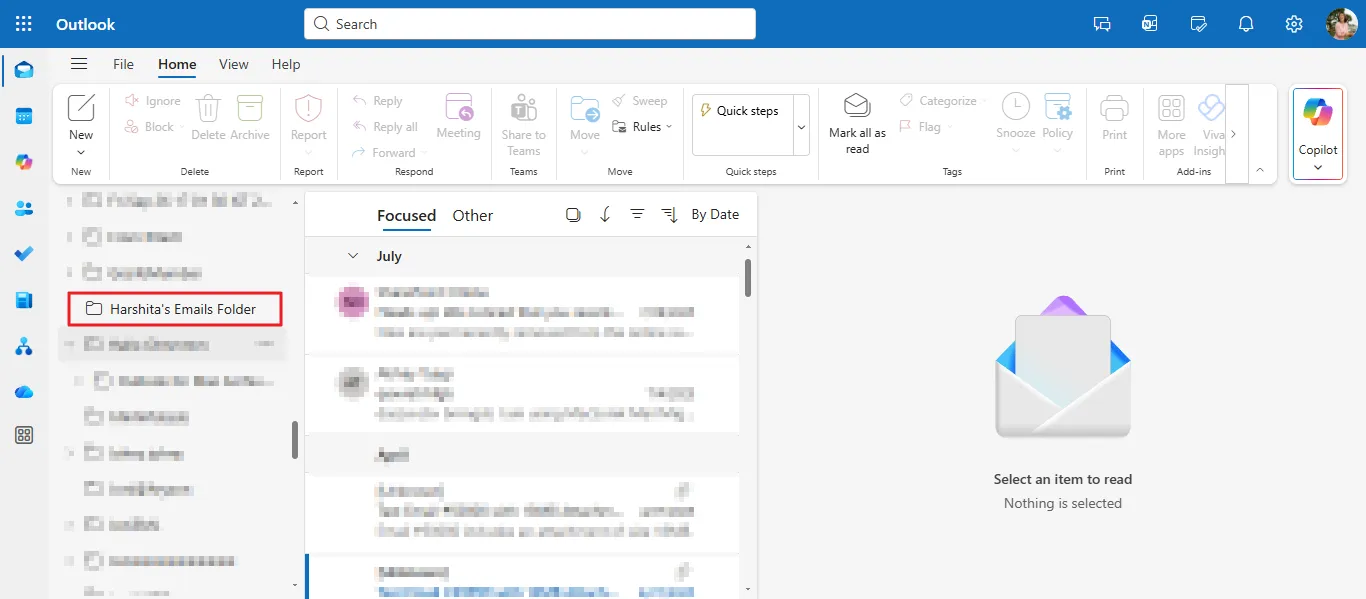
- Custom Folder Name: Provide a customized name to the resultant folder. When you migrate MSG to other email platforms, the custom folder will appear with the same name in the new folder hierarchy in Outlook.
Note: Do not include Special characters like /, * , (, ), | in the custom folder name.
Step 04: Start Migration
After applying the required filters, click the Convert button at the bottom-right corner to start the conversion process.
Step 05: Monitor and Complete the Migration
- Live Progress Bar:
Displays real-time progress as MSG files are processed. The bar reaches 100% once all files are successfully converted or exported. - Conversion Log:
Shows the total number of MSG files processed along with their names for easy tracking.
- Stop Conversion( if required): In case the user wants to stop the migration in between, they can click the Stop Button appearing at the right side of the Live Progress Bar.
- Completion Message:
A confirmation pop-up appears once the process is complete, displaying the details of the converted files.
Note: Do not close the software or shut down your system during migration. Wait until the progress bar reaches 100% and the log confirms successful completion.
Step 06: Download Report
Once the migration is complete, this software automatically creates a comprehensive log report that outlines the entire process. The report contains key information such as Sender, Recipient, File Name, Status, Duration, Message Count, File Path, and Total Messages processed.
- Download Report: Click this button to save the detailed conversion report to your system for future reference.
Start a New Conversion
To perform another migration, click the Convert Again button. You will be redirected back to the preview and selection screen, allowing you to begin a new process seamlessly.
How to Authenticate Gmail when Migrating MSG Files to Gmail
The Aryson MSG Converter allows users to seamlessly export MSG files directly to their Gmail account through Google’s secure OAuth-based authentication. This feature ensures that all your emails, attachments, and metadata are safely migrated without any risk to your account credentials. The software uses Google’s verified login methods to guarantee authorized access and complete data privacy during migration.
There are three login methods for migrating MSG to Gmail:
- Gmail Login Using App Password:
This method allows users to sign in securely to their Gmail account using a 16-digit App Password instead of the regular Gmail password.
Some points to know before logging in:
- This method secretly connects to 2-Step Verification-enabled accounts.
- It appears by default on the screen when the user selects the Gmail Option.
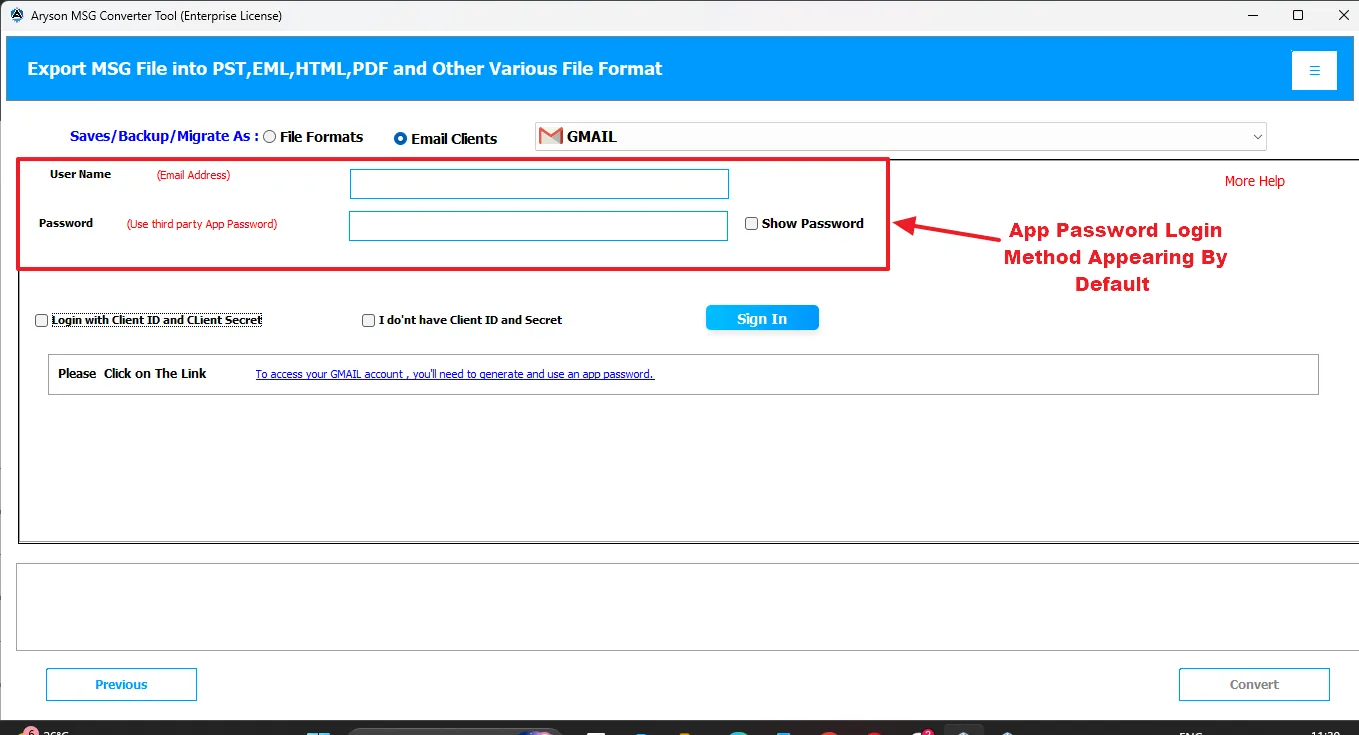
Steps to Login Via App Password
- Enter your Gmail ID and App Password.
- Click Sign In to authorize the tool for migration or backup.
Click Here: Learn how to enable Two-Step Verification and create an App Password in Gmail.
Important Note: The software provides this login method when users migrate MSG to Gmail, G Suite, Yahoo Mail, iCloud, and IMAP.
How to Generate an App Password?
To generate an app password while migrating MSG to Gmail, GSuite, Yahoo Mail, or iCloud, refer to the following links:
Note: To use any other login method, tick the associated checkboxes.
- Login with Client ID and Client Secret: Tick this checkbox for the impersonation login method.
- I don’t have Client ID and Client Secret: Tick this checkbox for modern authentication.
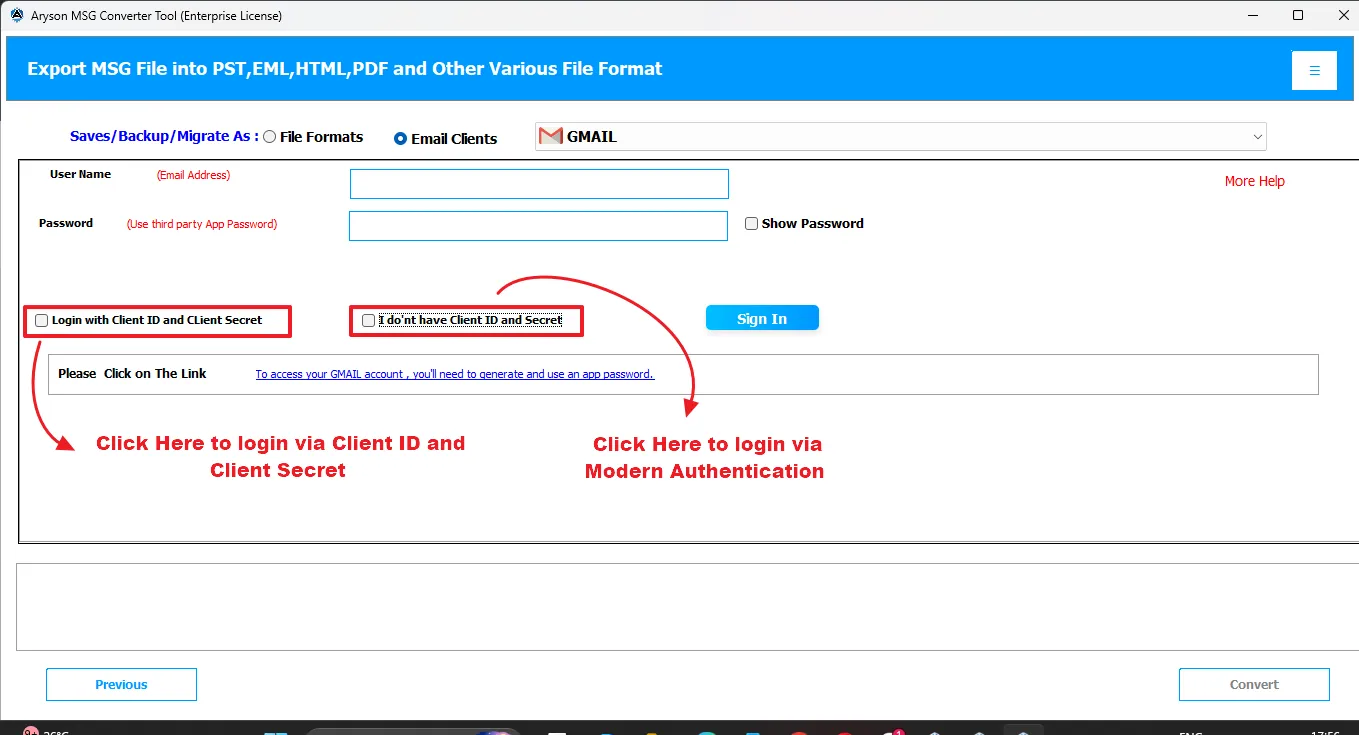
- Login via Client ID and Client Secret
This login method allows users to securely access their Google accounts using OAuth 2.0 authentication with a Client ID and Client Secret. It is ideal for admin accounts or multiple-user migrations, ensuring secure and authorized access while fully complying with Google’s Modern Authentication standards.
Steps to Log in via Client ID and Client Secret:
- Enter the valid Username, Client ID, and Client Secret
- Click the Sign In button to log in.
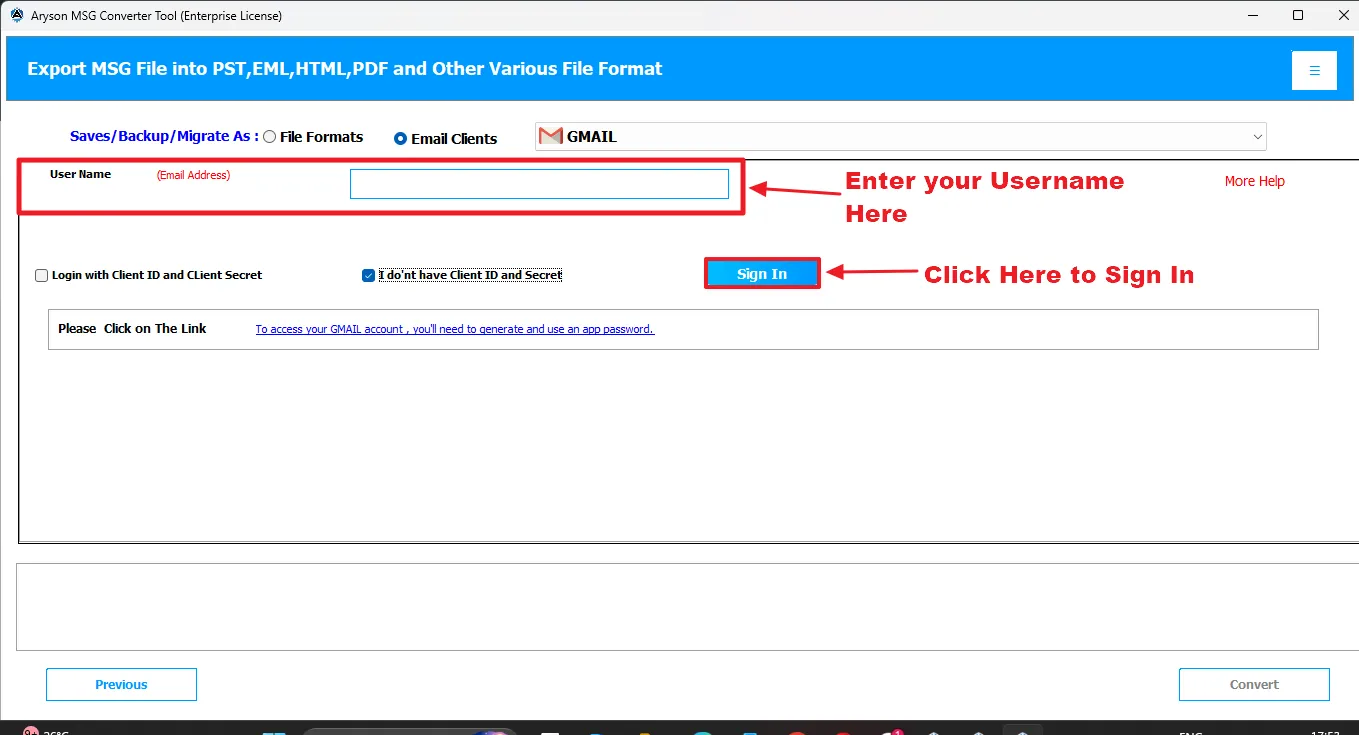
- Login via Modern Authentication
This method allows users to securely log in using Google’s OAuth 2.0 authentication without requiring a Client ID or Client Secret. To use it, select the checkbox “I don’t have Client ID and Client Secret”, enter your Gmail ID, and click Sign In. You will then be redirected to Google’s secure sign-in page, which ensures full data safety and supports Multi-Factor Authentication (MFA) for enhanced account security.
Steps to Modern Authentication:
- Enter the valid Username.
- Click the Sign In button.
- Similarly, you can migrate MSG to other email clients using the same process.
- For IMAP and Hostgator email, use Username, App password, Port no, and host to log in.
Important Note: Now, perform the above given step to complete the MSG to Gmail migration [ From Step 3 to Step 6]
Additional Features Offered When Migrating MSG To Gmail
Our software provides an additional feature when users migrate MSG to Gmail:
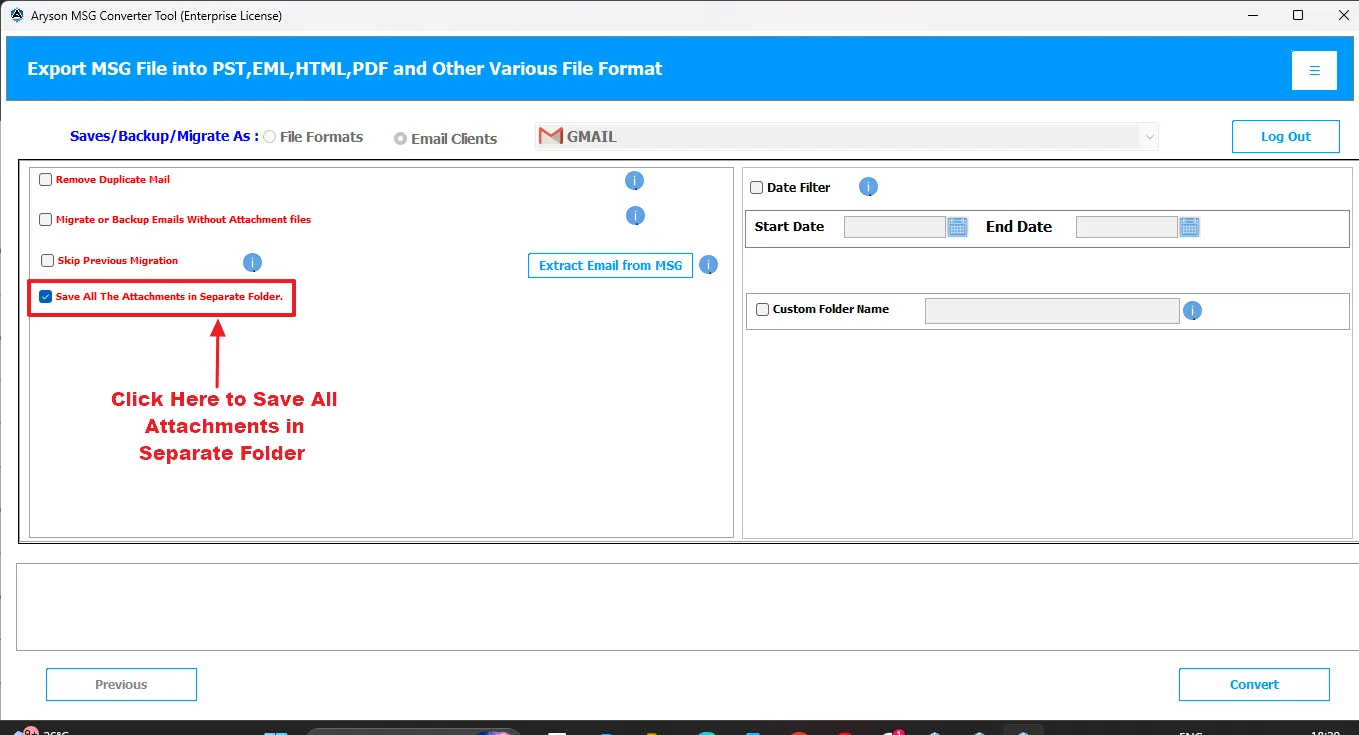
Save All Attachments in a Separate Folder
Enable this option to save all attachments from your MSG files in a dedicated folder instead of keeping them within the emails. This helps keep attachments organized and makes it easier to access them after migration to Gmail.
Menu Options
The Menu panel offers a centralized hub for managing and maintaining the Aryson MSG Converter Tool. It helps users quickly access important utilities, perform updates, and troubleshoot without navigating through multiple windows. This ensures smoother workflow and improved user experience.
- Click on the horizontal bars icon appearing on the top right corner of the software.
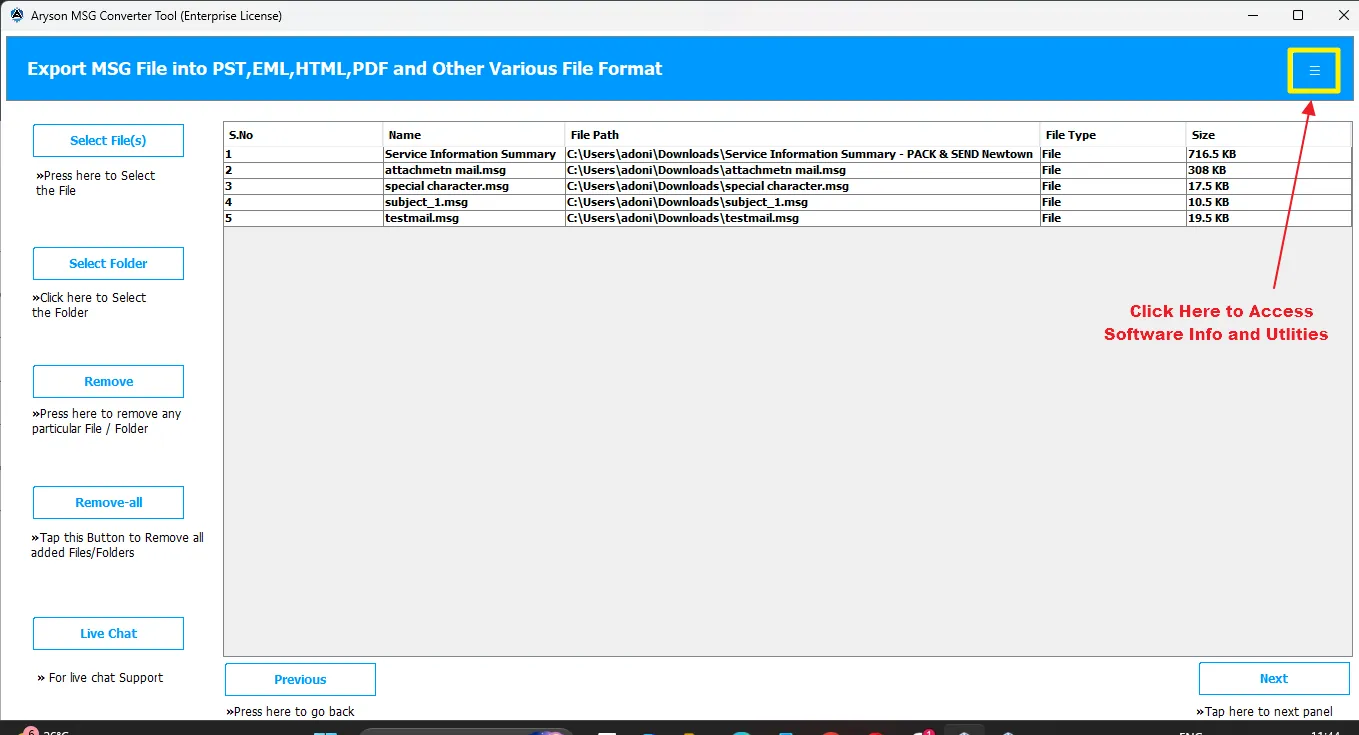
- Access the software's important information or utilities as per your needs.
Software Menu Functions:
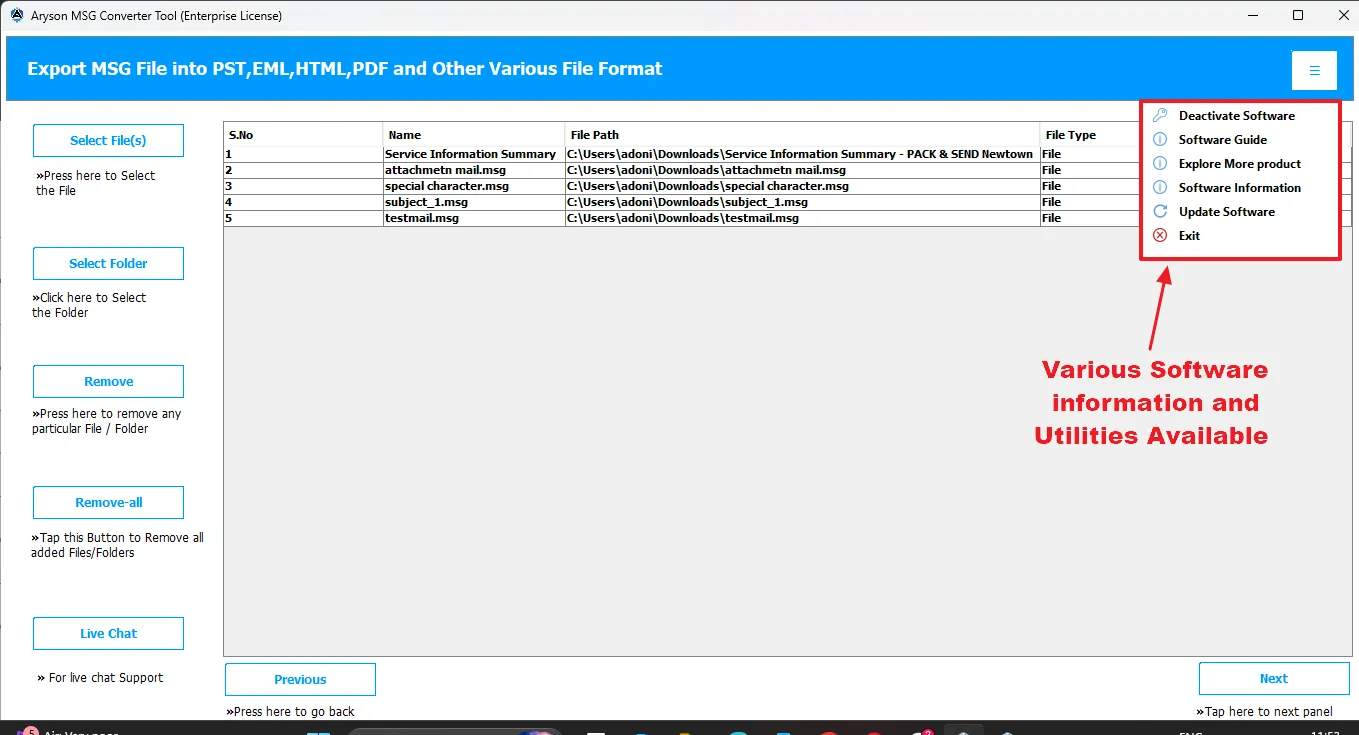
- Deactivate Software: Easily transfer your license to another system when needed.
- Explore More Products: Discover additional Aryson tools that complement your data management needs at the Aryson Official Site
- Software Guide: Instantly access detailed documentation for assistance at any stage of conversion.
- Software Information: View version details and licensing info to stay informed about your setup.
- Update Software: Keep your software up to date with the latest improvements and features.
- Exit: Safely close the application when your tasks are complete.
Live Chat Support:
In case of any doubts or queries about the conversion/export process, click on the Live Chat option provided at the bottom left corner. Our Technical Support Team will provide real-time assistance and support to the user.

Why do Professionals Prefer Aryson MSG Converter
- Accurate Conversion: Converts MSG files to multiple formats without affecting the email structure, metadata, or attachments.
- Data Integrity: Ensures every email, attachment, contact, and embedded item is safely preserved during the conversion.
- Data Privacy Guaranteed: All operations are performed locally on your system — no data is uploaded or stored externally.
- Secure Transactions: Provides reliable and encrypted payment gateways to ensure safe license purchases.
- Free Demo Provided: Users can convert/migrate up to 50 emails, absolutely free of cost.
- Flexible Licensing Options: Available in Personal, Business, and Enterprise editions to meet diverse user and organizational needs.
- Duplicate Email Handling: Detects and removes duplicate MSG items to maintain a clean and optimized mailbox.
- Advanced Filter Options: Allows selective export of MSG files by date range, subject, or other parameters to save time.
- Broad Compatibility: Supports multiple saving formats and seamless migration to platforms like Outlook, Office 365, Gmail, Yahoo, and more.
- Batch File Processing: Enables conversion of multiple MSG files simultaneously for enhanced productivity and efficiency.
Key Benefits of Using Aryson MSG Converter
| All-in-One Conversion and Migration Flexibility | Advanced Data Management and Filtering Options | Secure, Reliable, and User-Centric Design |
|---|---|---|
| Convert MSG files into multiple formats (PST, MBOX, PDF, DOC, CSV, XLSX) and migrate directly to email clients like Office 365, Gmail, Yahoo, IMAP, and iCloud. Maintain folder hierarchy, metadata, and attachments, performing all conversions, migrations, and backups in a single tool. | Use built-in filters like Date Range, Duplicate Removal, Skip Previously Migrated Files, and Attachment Exclusion for precise, efficient conversion. Supports Split PST for large files, Naming Conventions for easy organization, and Selective Conversion to save time and storage. | All operations are local, ensuring full data privacy with no external uploads. Supports Modern Authentication and OAuth 2.0 for cloud logins. Intuitive GUI, drag-and-drop, and real-time progress tracking make the process smooth, transparent, and beginner-friendly. |
Aryson MSG Converter – Complete Installation Guide
Step 01: Download the Software
Go to the official Aryson Technologies website and download the latest version of the Aryson MSG Converter for Windows/Mac accordingly. Using the latest release ensures access to all features, including secure conversion and batch processing.
Link To Download: Click Here
Step 02: Run the Installer
- Find the downloaded setup file.
- Right-click and select “Run as Administrator.”
- Follow the instructions provided by the installation wizard to proceed.
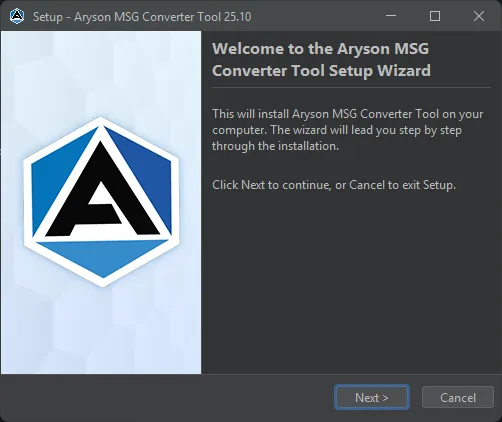
Step 03: Complete the Installation
- Choose your preferred installation folder
- Accept the license agreement and complete the setup.
- The installer will automatically create desktop and Start menu shortcuts for easy access.

Step 04:Launch the Application
- Open the software using the desktop icon or Start menu shortcut.
- Once initialized, the main interface will appear, and the software will be ready for use.
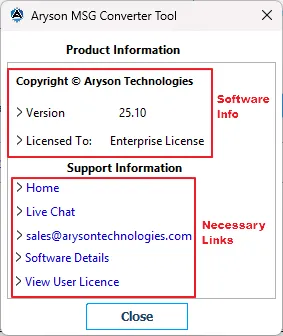
About The Software
| About the Software | Free Trial Version |
|---|---|
|
Copyright: © Aryson Technologies Version: 25.10 Licensed To: Enterprise License |
|
Comprehensive Troubleshooting Guide
| Basic Troubleshooting | Advanced Troubleshooting |
|---|---|
|
Authentication Issue:
|
OAuth token expired during migration.
|
|
Slow Conversion Performance:
|
Office 365 Throttling or Timeout:
|
|
Network Connection Problems:
|
Emergency Recovery:
|
|
Permission Errors:
|
|
Need Help? Contact Support
| Situations Requiring Urgent Support | Information to Be Shared |
|---|---|
|
|
Customer Support & Privacy Policy
| Professional Support Channels | Data Security and Privacy |
|---|---|
|
Email Support Get detailed assistance from our technical team via email. Email: support@arysontechnologies.com Response Time: 4–8 business hours |
Strict No-Storage Policy: Aryson MSG Converter ensures complete privacy by never storing your files, emails, or personal information during or after conversion, prioritizing user security at all times. |
|
Phone Support Speak directly with our experts for guidance and troubleshooting. Availability: Mon–Fri, 9:00 AM – 6:00 PM (EST) Visit our Customer Support Website: |
Privacy You Can Trust We safeguard your data by:
|
|
Live Chat Support Real-time chat support for quick resolutions. Availability: 24/7 for premium users |
|
|
Technical Expertise Our dedicated technical team makes MSG conversion and email migration seamless.
|
Audit & Compliance Aryson MSG Converter records all operational activities for auditing purposes while ensuring full user privacy. The logs capture only system and process metadata, excluding any personal information or file content. |
Customer Support Request Procedure
|
Contact Support Team Get in touch with the Aryson Support Team via email, phone, or live chat. Share the necessary details of your MSG files, including the issue faced or your desired conversion outcome. |
Technical Expert Assigned A dedicated technical specialist will be assigned based on your MSG file’s size, volume, and conversion type to ensure accurate and efficient assistance. |
Problem Resolution Our experts will analyze the reported issue and provide an appropriate solution, ensuring smooth and successful conversion of MSG files without any data loss. |
Final Review & Feedback After issue resolution, the results will be verified for accuracy. User have to share their feedback to ensure complete satisfaction and improved service experience. |
Sales Frequently Asked Questions
Ans: If the conversion process is interrupted, the tool automatically resumes the conversion from where it left off, ensuring no data is lost.
There are various payment methods available for purchasing Aryson products:
There are various payment methods available for purchasing Aryson products:
- Credit Card/Debit Card
- PayPal Account
- Share It
- Purchase Order
- We accept all major cards such as
- MasterCard, VISA, Maestro Card, American Express, etc.
Ans: To upgrade your existing license, you can contact our Support Team via email at sales@arysontechnologies.com or Live Chat with any of the following details:
- Order ID
- Email ID used for purchase
- Payment Receipt
- Transaction Number
- Activation Details
Ans: We have the following licenses for different software programs. :
- Single User License
- Administrator License
- Technician License
- Technician License
Ans: A Personal License of the software can be installed on two PC/laptops. The License is transferable from one machine to another.
Ans: Sometimes, due to network/connectivity issues if you may not get the requested license. In this case, please go to our Live Chat Support or email us at sales@arysontechnologies.com and quote your query. Our technical representative will connect with you instantly.
Ans: If you have any requirements regarding the Quotation or Invoice for the product purchase, please go to our Live Chat Support or email us at sales@arysontechnologies.com, and our technical representative will connect with you instantly.
Ans: You will get the license/activation details of the software via email as soon as you make the payment.
Ans: We continuously post about our new releases and product updates in the " News " section of the Aryson Technologies website. We request that you and all our customers keep checking that section from time to time
Ans: No, the product price is original and does not include any taxes or hidden charges. Tax deduction depends on country to country, as well as payment gateway policies.
Ans: No, our applications are valid for a limited time, depending upon the type of software and license you are purchasing.
Software Frequently Asked Questions
Ans: You can’t view your attachments in the browser view. Instead, you can open your PDF in Adobe Acrobat or Fox Reader to view your attachments.
Ans: After completing the purchase process, the user will receive an email at their registered email address from Aryson. This email will contain the software activation code. Use this activation code to activate the full version of the MSG converter.
Ans: All attachments, including images, documents, and embedded files, are preserved intact during the conversion process.
Ans: Yes, a user can export MSG files in bulk as well using this Aryson MSG converter software without any trouble.
Ans: Yes, the user can’t enter any special characters like (, ), *, /, |, while providing the custom folder Name.
Ans: The Aryson MSG Converter is designed to convert and migrate MSG files into multiple formats, including PST, MBOX, EML, PDF, DOC, CSV, XLSX, and more. It helps users transfer emails between platforms, including Outlook, Gmail, Office 365, Yahoo Mail, and other MSG-supported email clients.
Ans: Yes. The software allows you to add multiple MSG files or entire folders at once for batch conversion, saving time and effort.
Ans: Absolutely. The software provides a preview of all MSG emails, including attachments, metadata, and body content through a J-Table and advanced searching feature, so you can select only the emails you want to convert.
Ans: The software is compatible with all major Windows versions, including Windows 11, 10, 8, 7, and Windows Server editions
Ans: Yes. Aryson MSG Converter is independent and does not require Microsoft Outlook for conversion.