Complete Step-by-Step Guide for Aryson Email Backup Wizard
Easily back up emails from multiple email clients into various file formats, including PST, MBOX, EML, EMLX, MSG, PDF, CSV, XLSX, GIF, JPG, TIFF, HTML, MHTML, JSON, ICS, VCF, DOC, PNG, DOCX, and DOCM on Windows, Mac, and Linux. Aryson Email Backup Wizard also supports direct migration to Office 365 (Microsoft 365), Zoho Mail, iCloud, Yandex Mail, HostGator, Hotmail, Gmail, G Suite / Google Workspace, and IMAP servers. For any assistance, refer to the detailed user guide.
- Table of Content
- Software Working Process
- Activation Guide
- Installation & Uninstallation
- User Interface
Software Working Process
Software Working Process
Step 1: Download and install the Aryson Email Backup Wizard on your system.
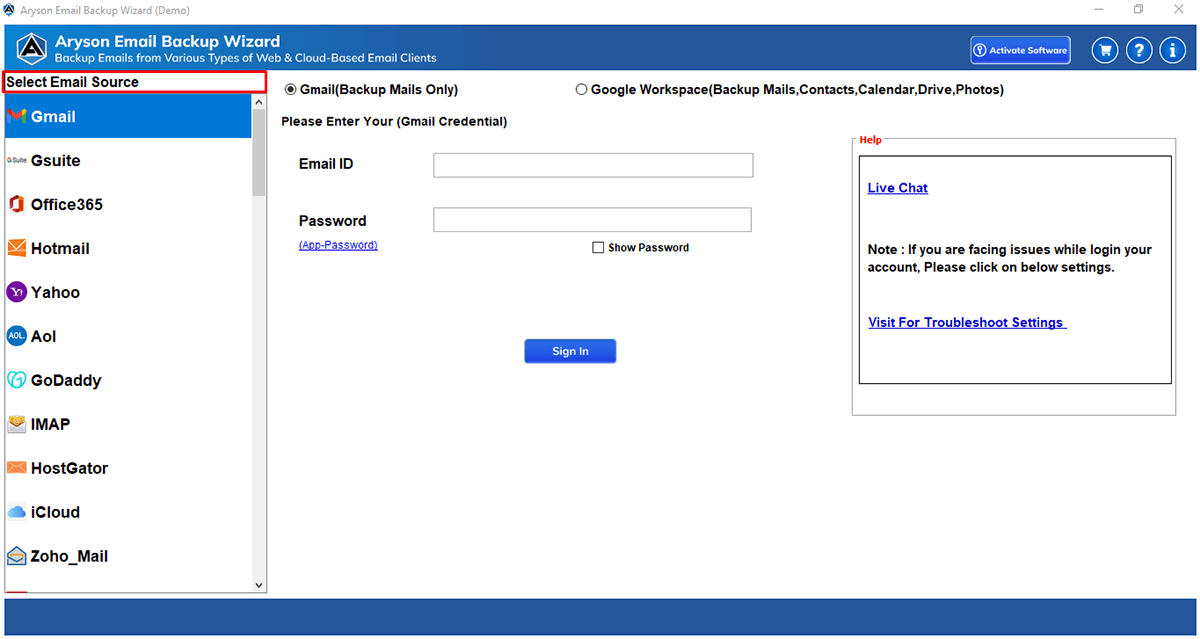
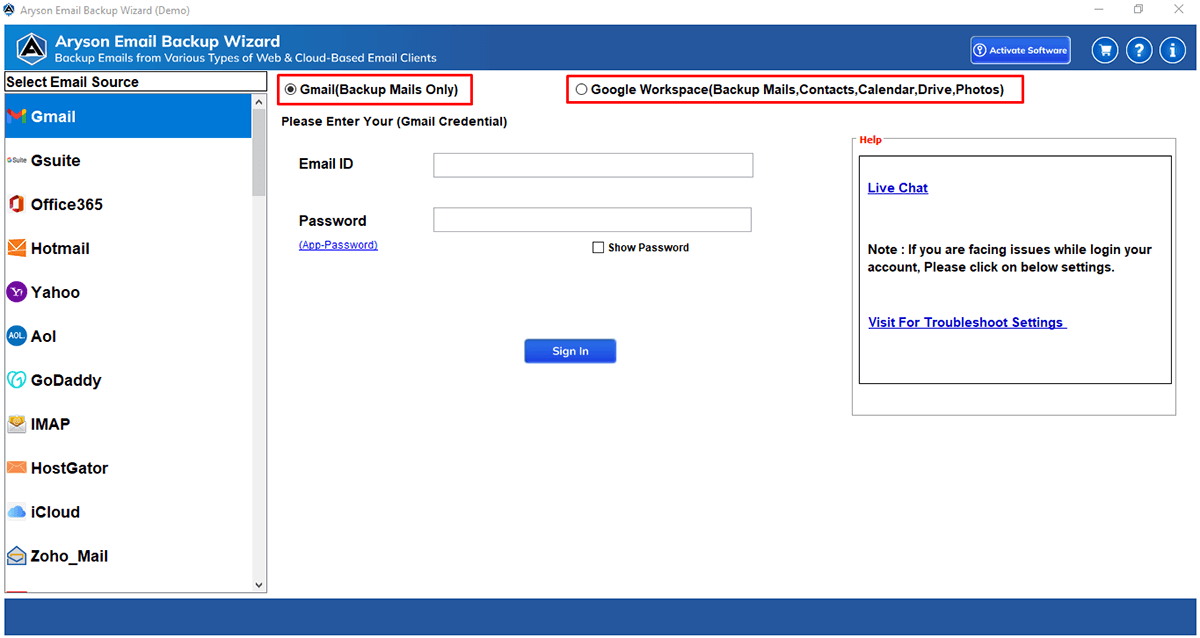
Step 2: Select Gmail from the email source panel and choose Single Mode to back up a single Gmail account.
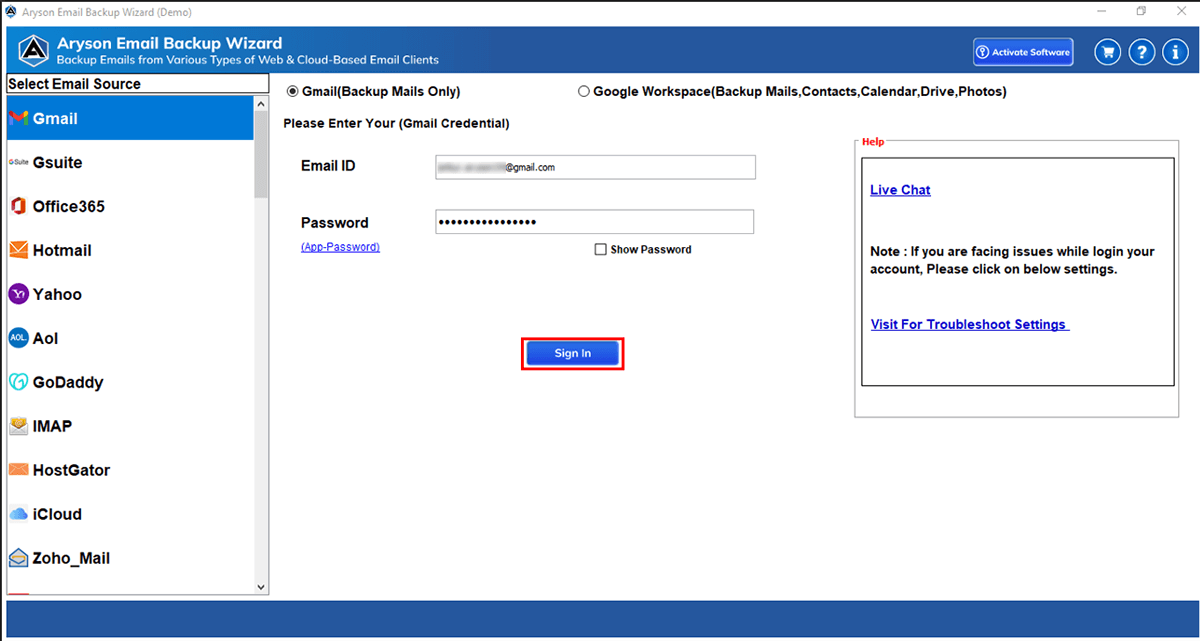
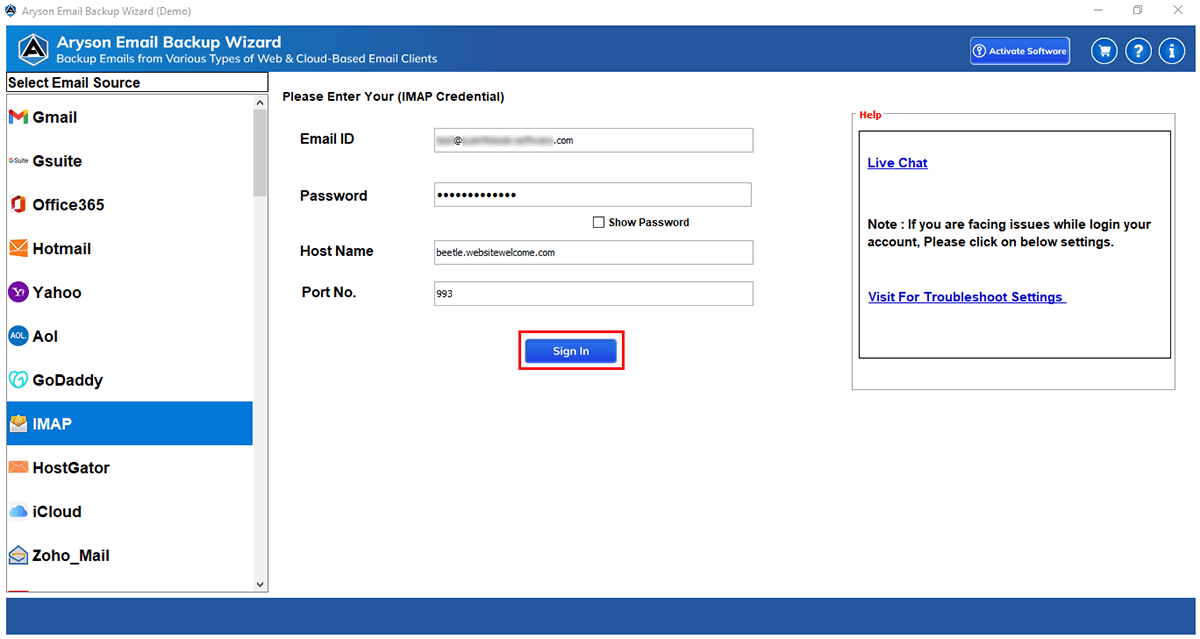
Step 3: Enter your Gmail email address and App Password, then click Sign In.
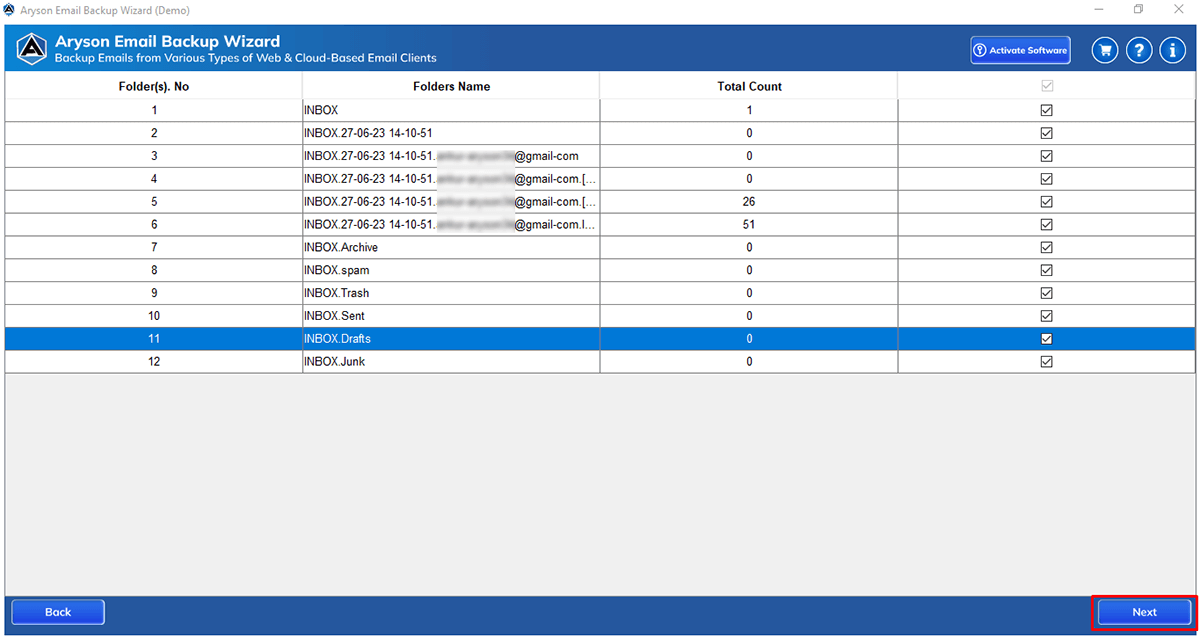
Step 4: After successful login, the software fetches and loads all mailbox folders. The folder listing table displays:
- Folder No. – Shows the serial number of each folder.
- Folder Name – Displays the name and path of the mailbox folder (Inbox, Sent, etc.).
- Total Count – Shows the number of emails in each folder.
- Selection Checkbox – Allows you to select or deselect folders for backup.
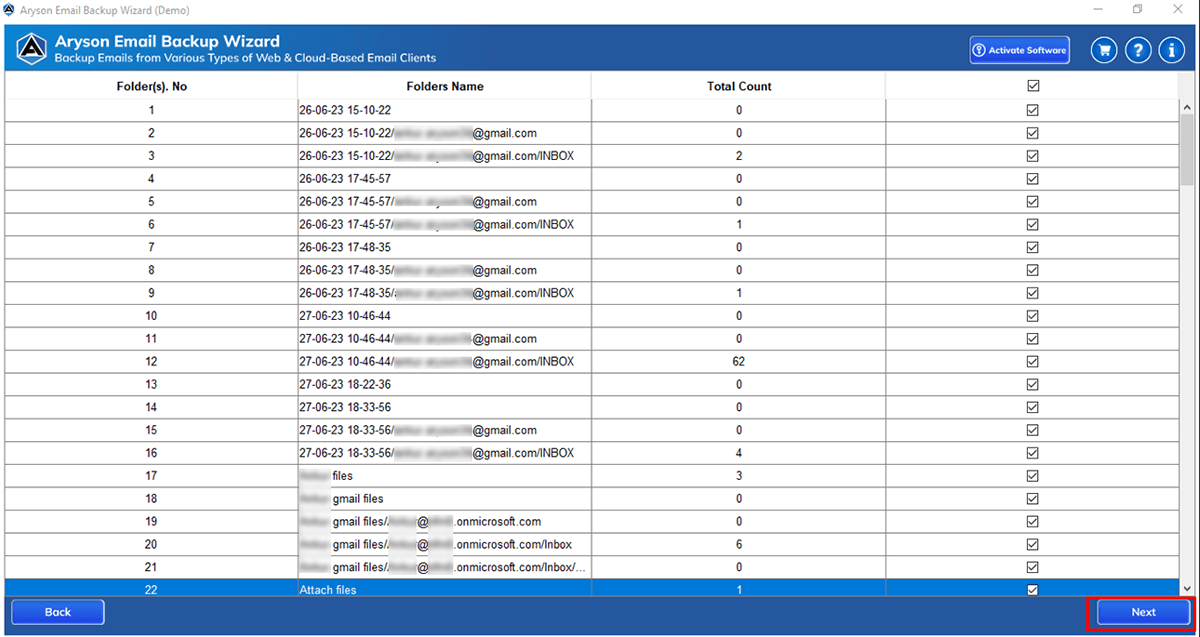
Step 5: Select the required folders you want to export and click Next.

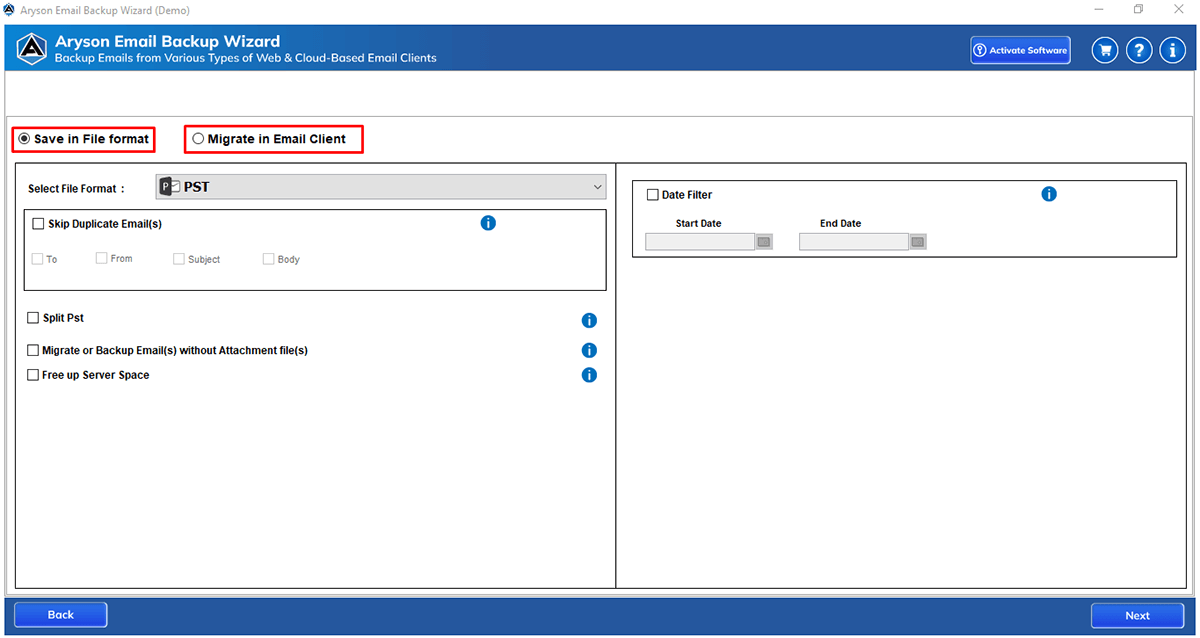
Step 6: Choose the file format and select PST as the output format.
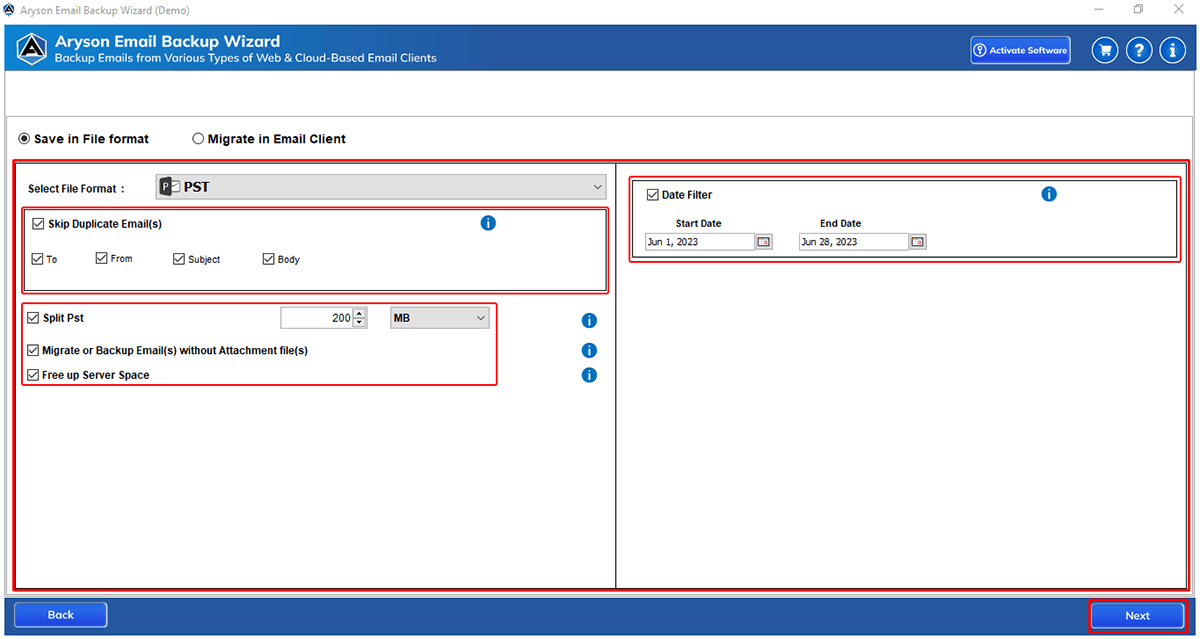
Step 7: Apply filters as needed:
- Skip Duplicate Email(s): Prevents saving or migrating duplicate emails based on selected criteria (To, From, Subject, Body).
- Split PST: Divides the output PST file into smaller parts based on the specified size (in MB).
- Migrate or Backup Email(s) without Attachment file(s): Excludes attachments and backs up only email content.
- Free up Server Space: Deletes emails from the server after successful backup to free storage.
- Incremental Backup: Backs up only new or modified emails since the last backup to save time and space.
Step 8: Use advanced options for selective backup:
- Date Filter: Set Start and End dates to convert emails from a specific period.
- Next: Click on the Next button to proceed further.
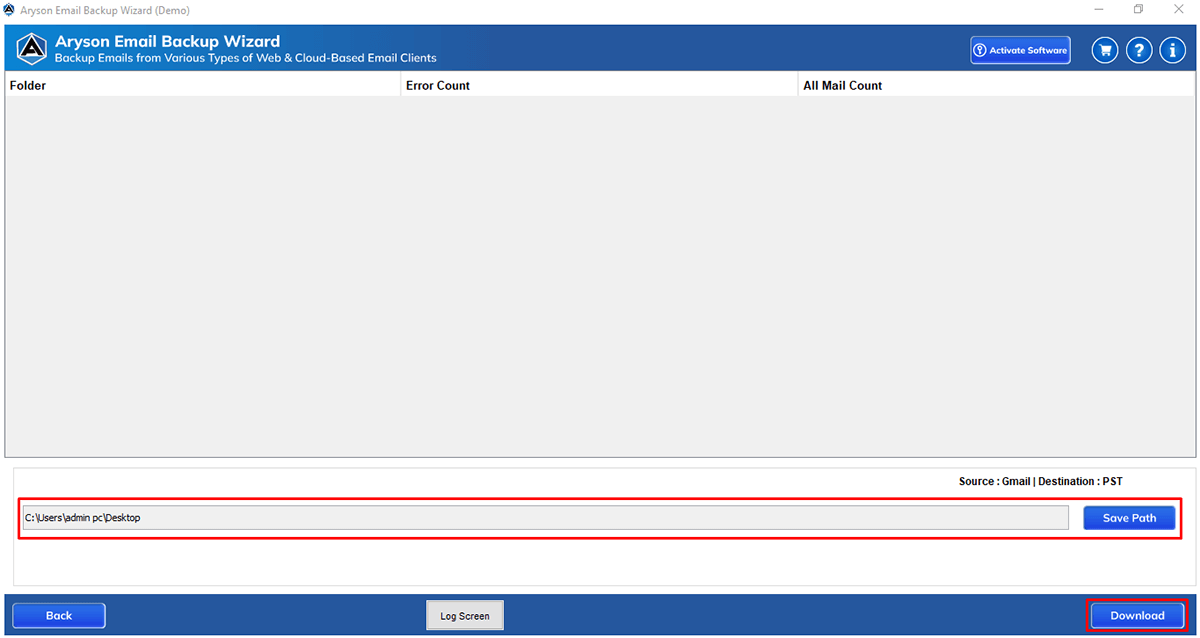
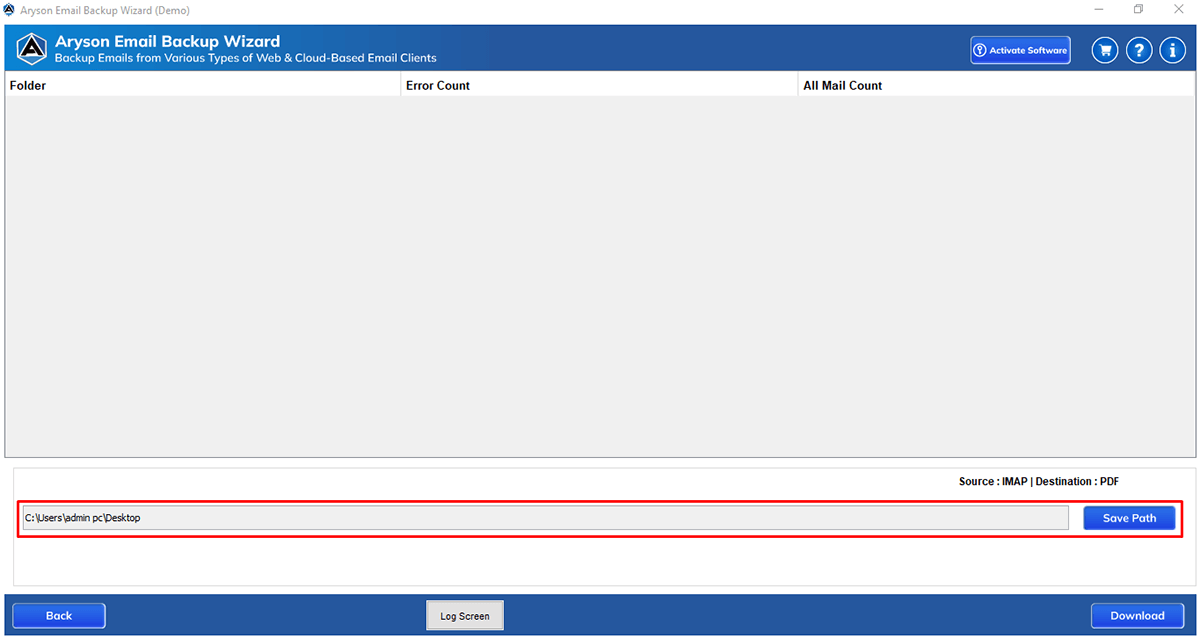
Step 9: Path to Save – Choose the destination location where the PST files will be saved.

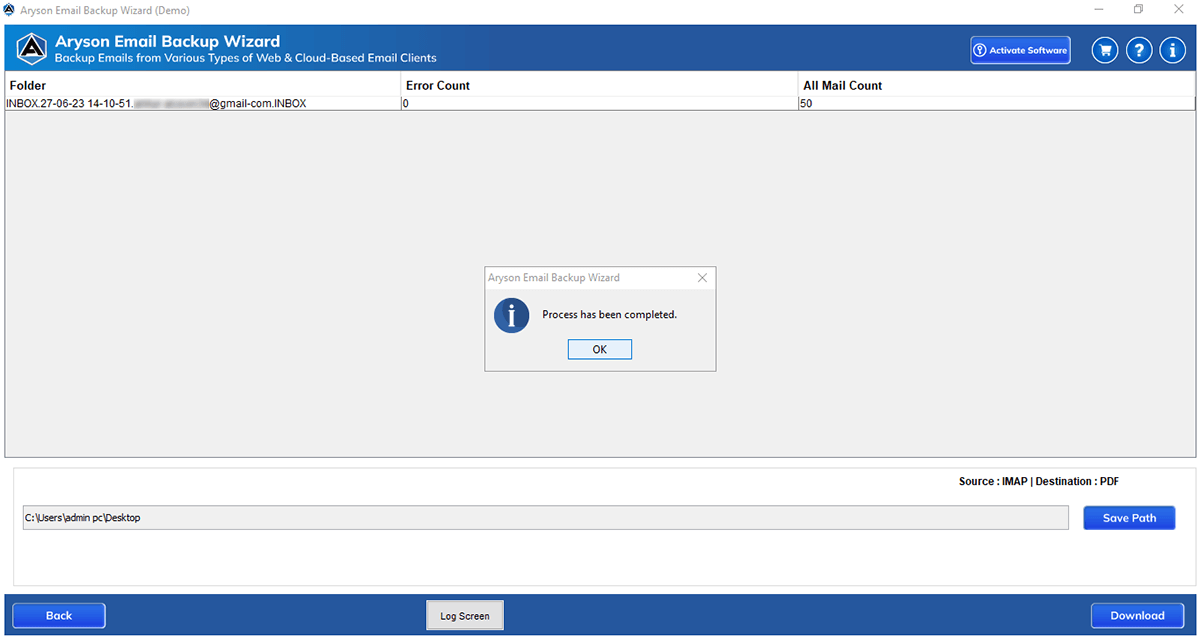
Step 10: The software begins converting Gmail emails to PST and displays the progress with folder name, email count, and error status.
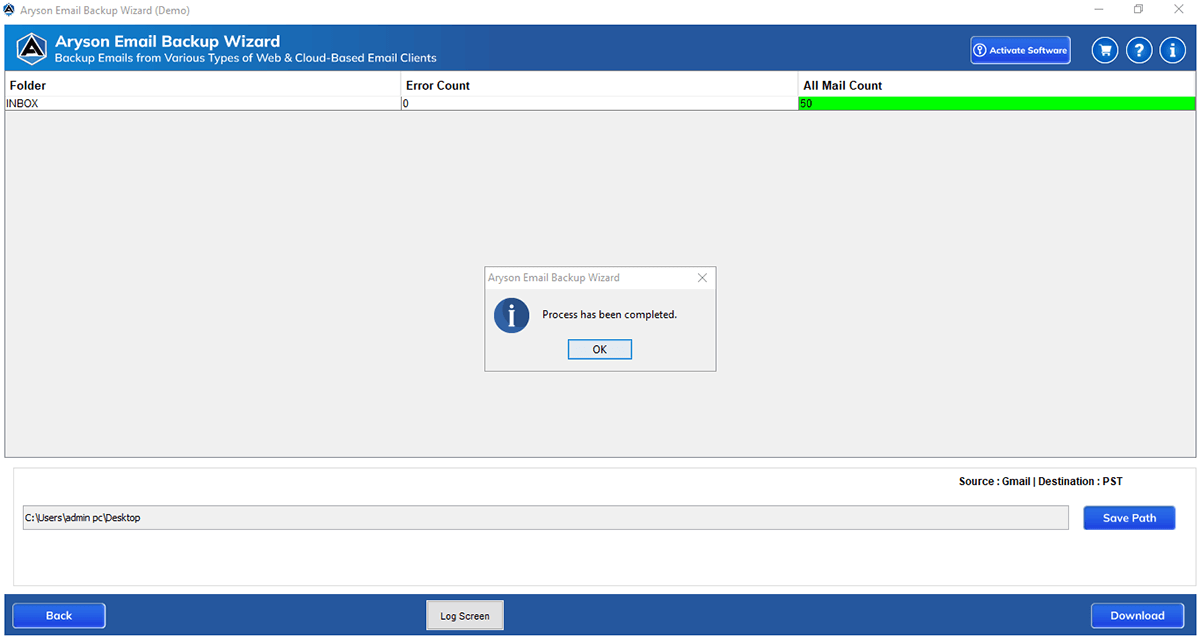
Step 11: After completion, a summary report shows source (Gmail), destination (PST), processed emails, status, and save location. A confirmation message indicates that the process has been completed successfully.
Step 1: Download and install the Aryson Email Backup Wizard on your system.
Step 2: Select Gmail from the email source panel and choose Single Mode to back up a single Gmail account.
Step 3: Enter your Gmail email address and App Password, then click Sign In.
Step 4: After successful login, the software fetches and loads all mailbox folders. The folder listing table displays:
- Folder No. – Shows the serial number of each folder.
- Folder Name – Displays the name and path of the mailbox folder (Inbox, Sent, etc.).
- Total Count – Shows the number of emails in each folder.
- Selection Checkbox – Allows you to select or deselect folders for backup.
Step 5: Select the required folders you want to export and click Next.
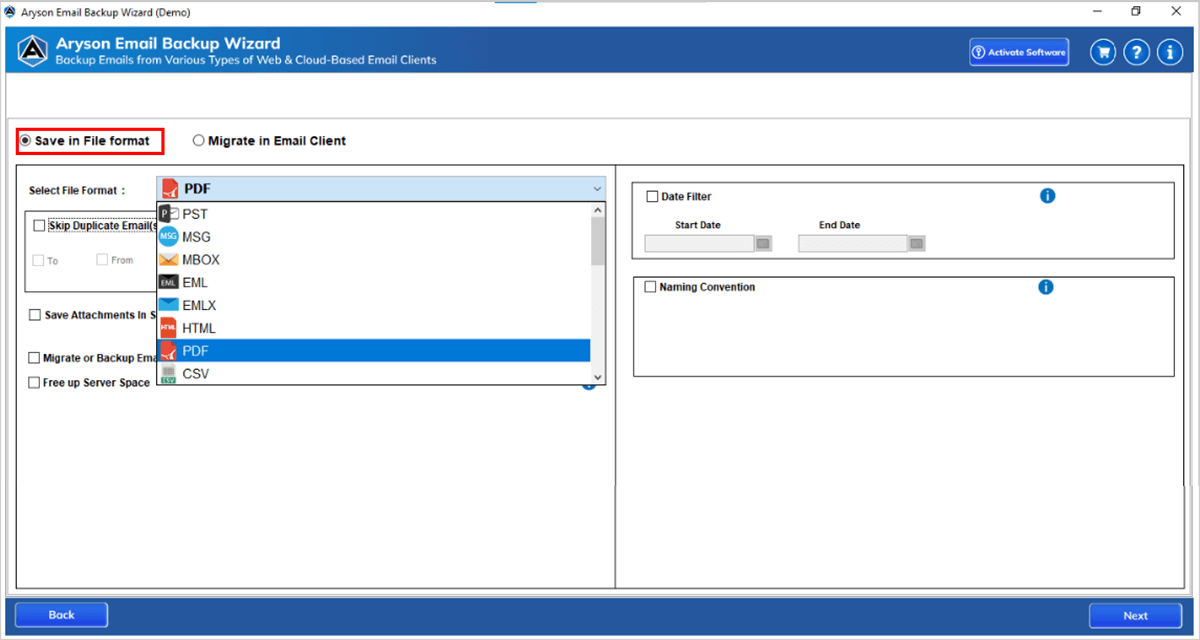
Step 6: Choose the file format and select PDF as the output format.
Step 7: Apply filters as needed:
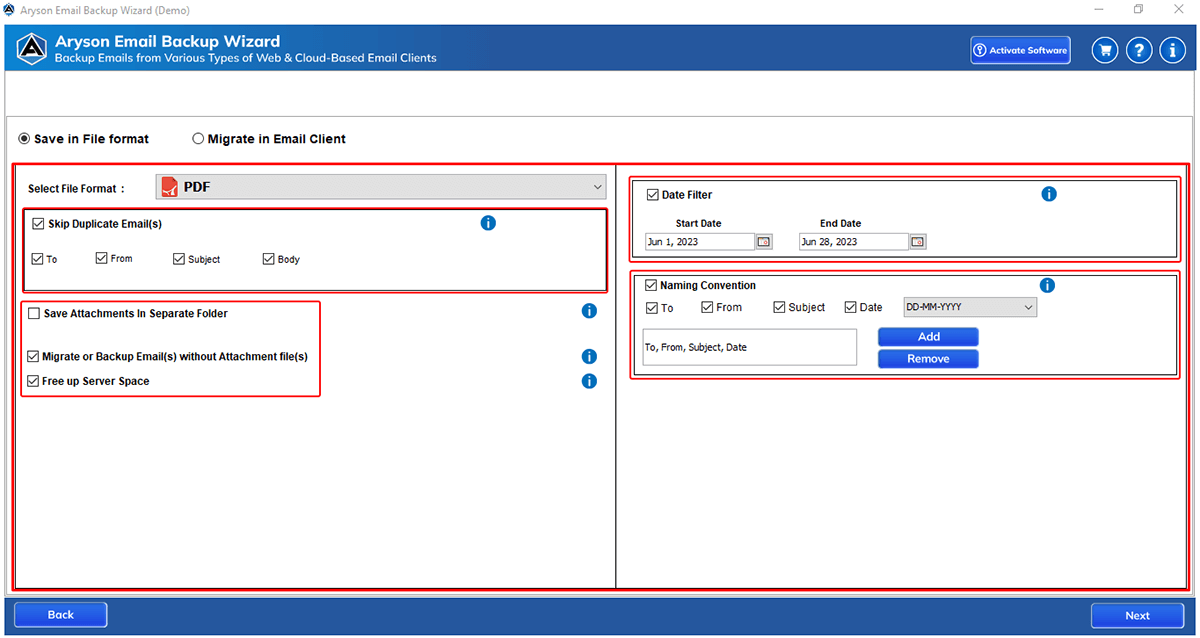
- Skip Duplicate Email(s): Prevents saving or migrating duplicate emails based on selected criteria (To, From, Subject, Body).
- Save Attachments in Separate Folder: Stores attachments separately.
- Migrate or Backup Email(s) without Attachment file(s): Excludes attachments and backs up only email content.
- Free up Server Space: Deletes emails from the server after successful backup to free storage.
- Incremental Backup: Backs up only new or modified emails since the last backup to save time and space.
Step 8: Use advanced options for selective backup:
- Date Filter: Allows you to select and back up emails within a specific date range.
- Naming Convention: Enables you to customize the naming pattern of the output files for better organization.
- Click Next to start the backup process.
Step 9: Path to Save – Choose the destination location where the PDF files will be saved.
Step 10: The software begins converting Gmail emails to PDF and displays the progress with folder name, email count, and error status.
Step 11: After completion, a summary report shows source (Gmail), destination (PDF), processed emails, status, and save location. A confirmation message indicates that the process has been completed successfully.

Step 1: Download and install the Aryson Email Backup Wizard on your system.

Step 2: Select Gmail from the email source panel and choose Single Mode to back up a single Gmail account.
Step 3: Enter your Gmail email address and App Password, then click Sign In.
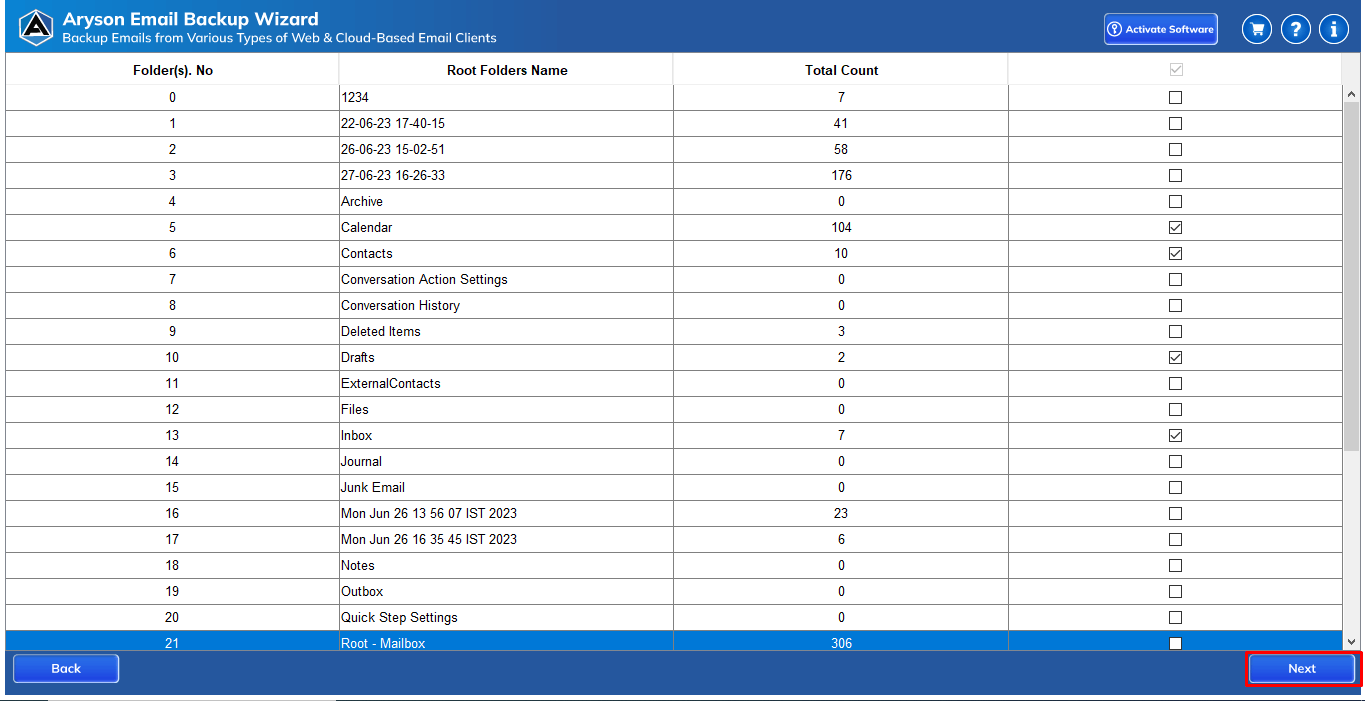
Step 4: After successful login, the software fetches and loads all mailbox folders. The folder listing table displays:
- Folder No. – Shows the serial number of each folder.
- Folder Name – Displays the name and path of the mailbox folder (Inbox, Sent, etc.).
- Total Count – Shows the number of emails in each folder.
- Selection Checkbox – Allows you to select or deselect folders for backup.
Step 5: Select the required folders you want to export and click Next.
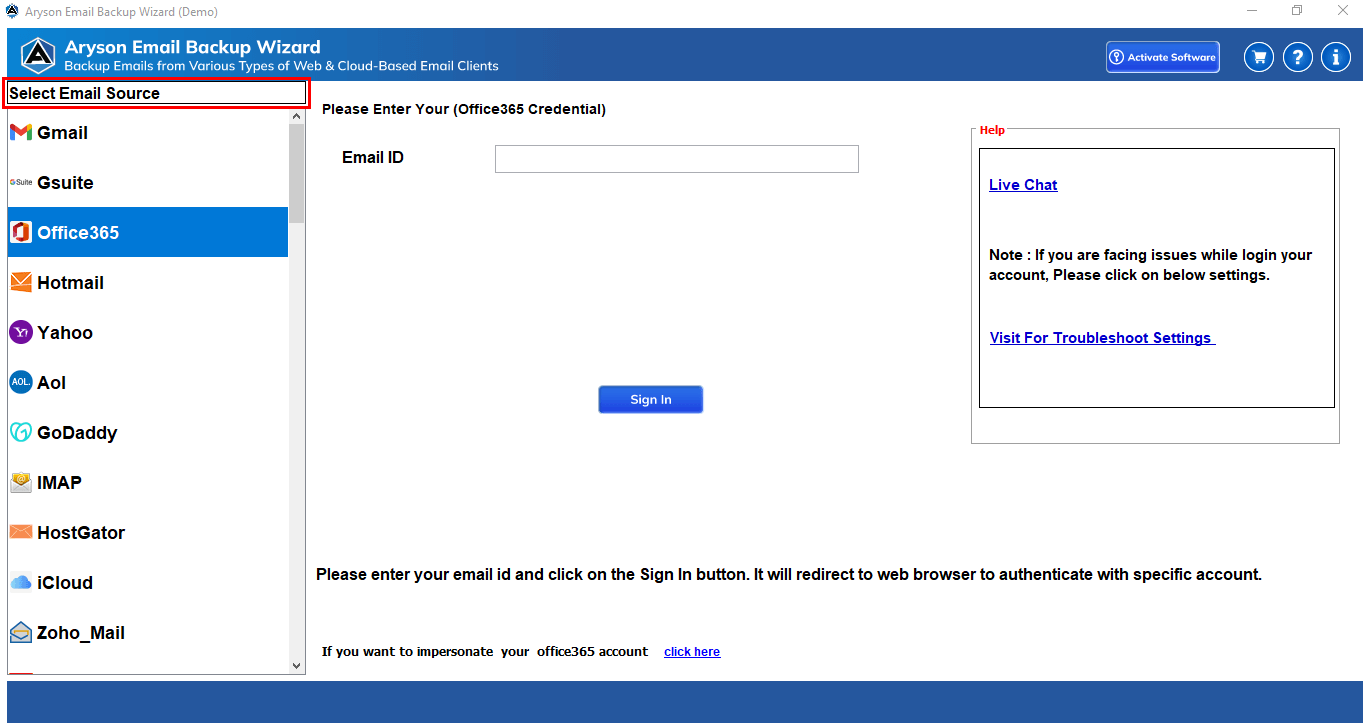
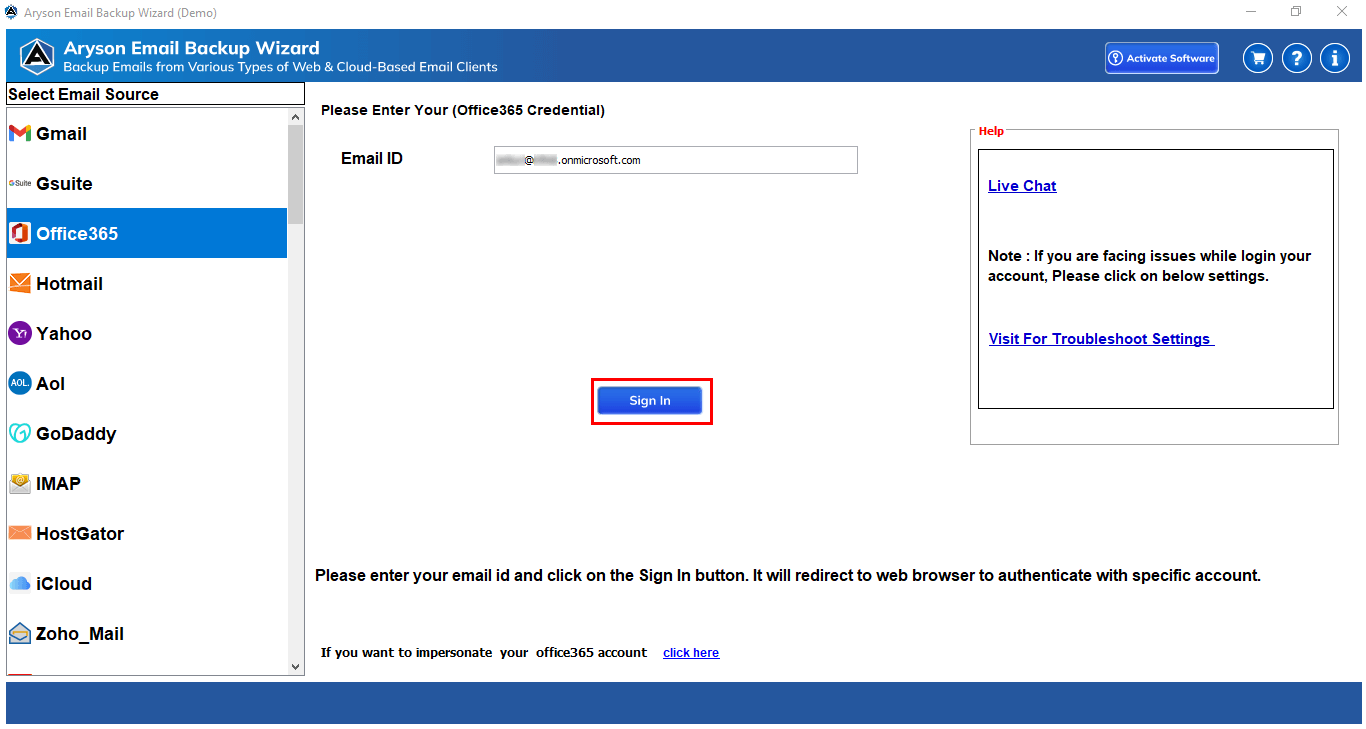
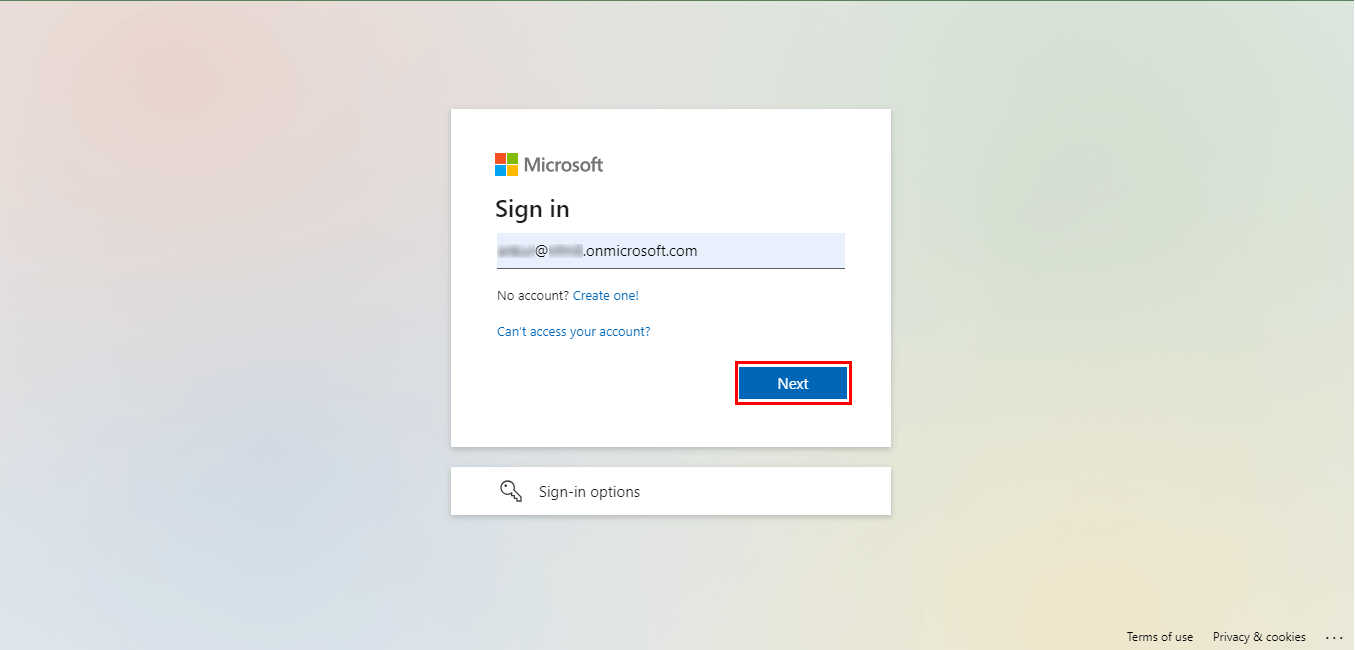
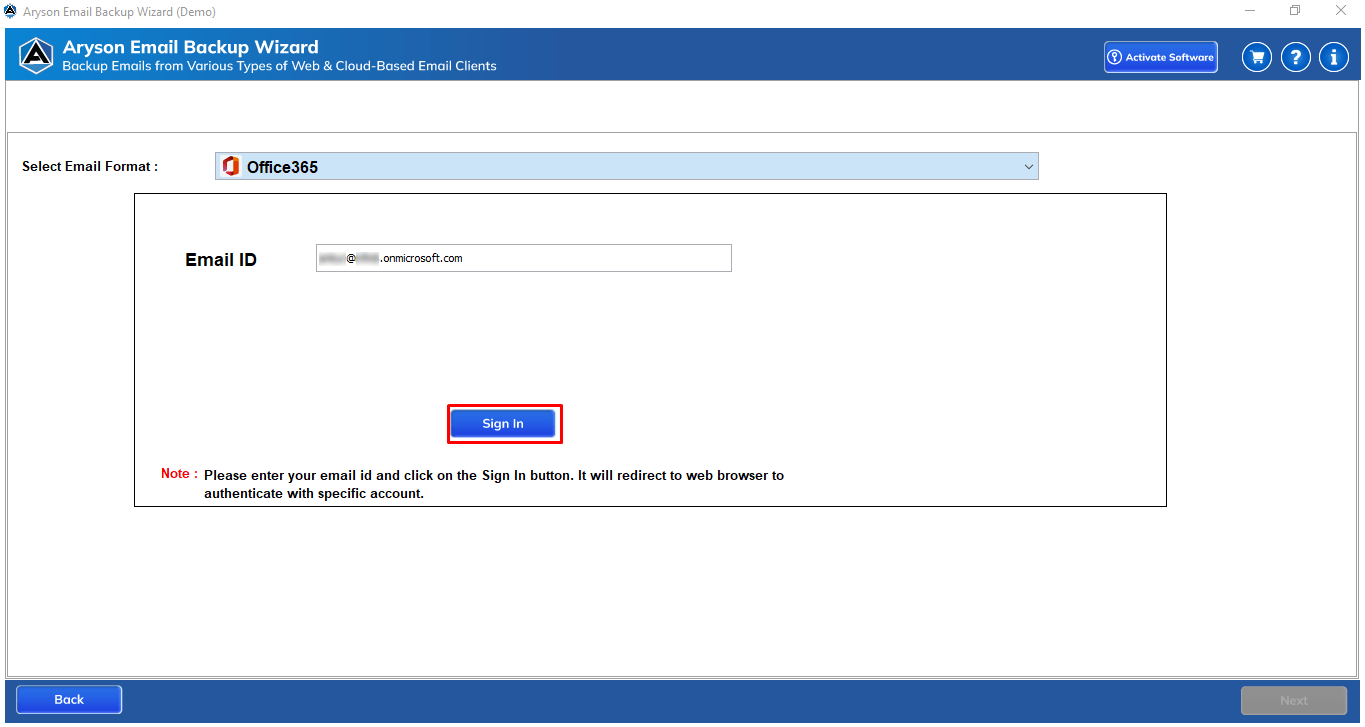
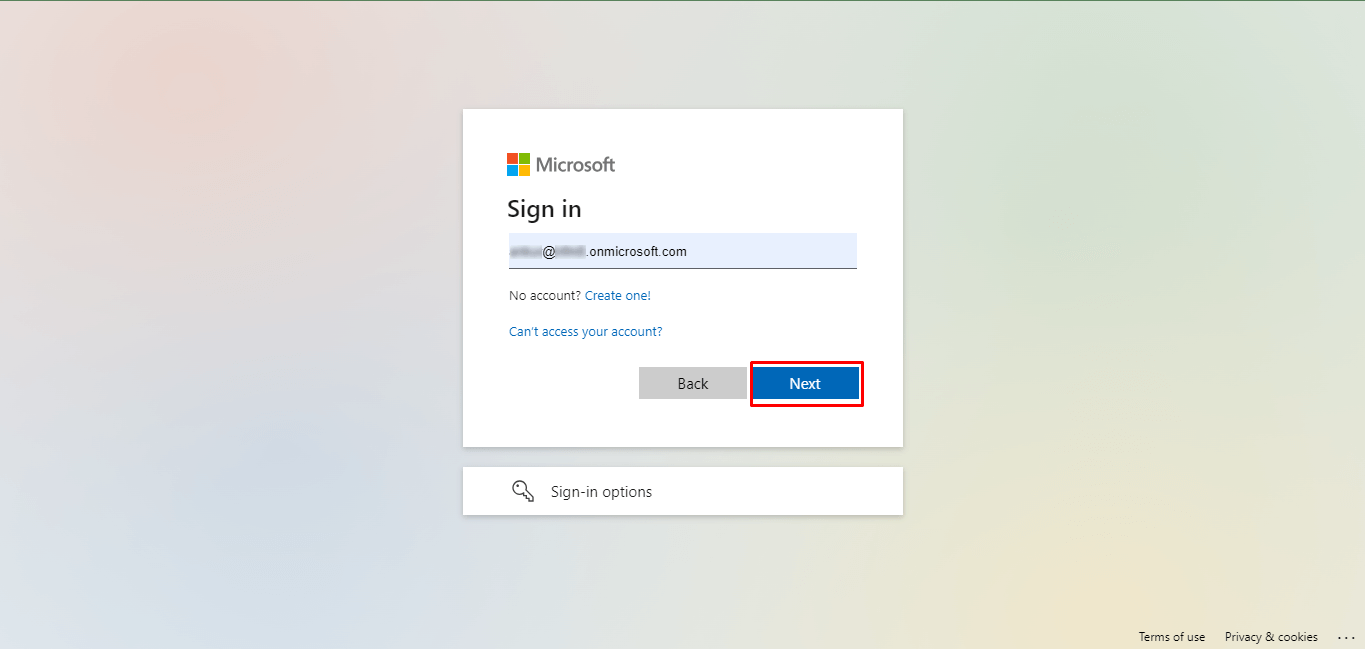
Step 6: Choose the email client and select Office 365 as the output format.
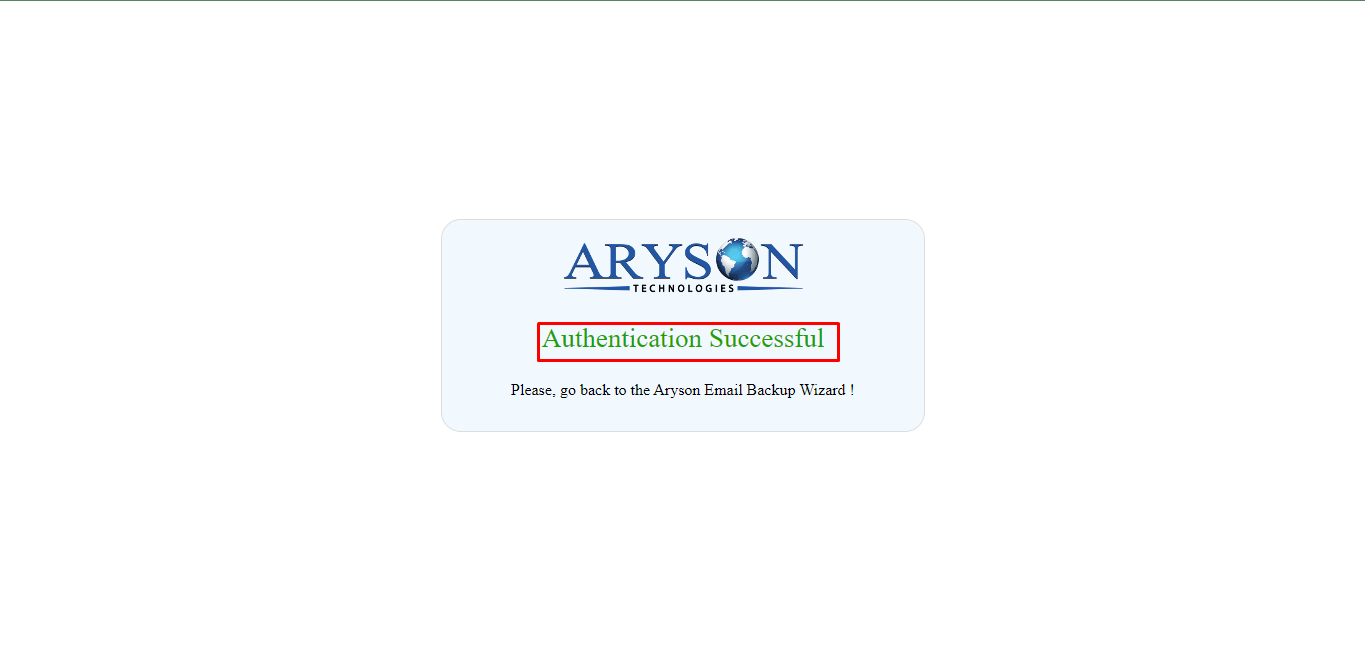
Step 7: It will redirect you to the verification, and after authentication, you can return to the application.
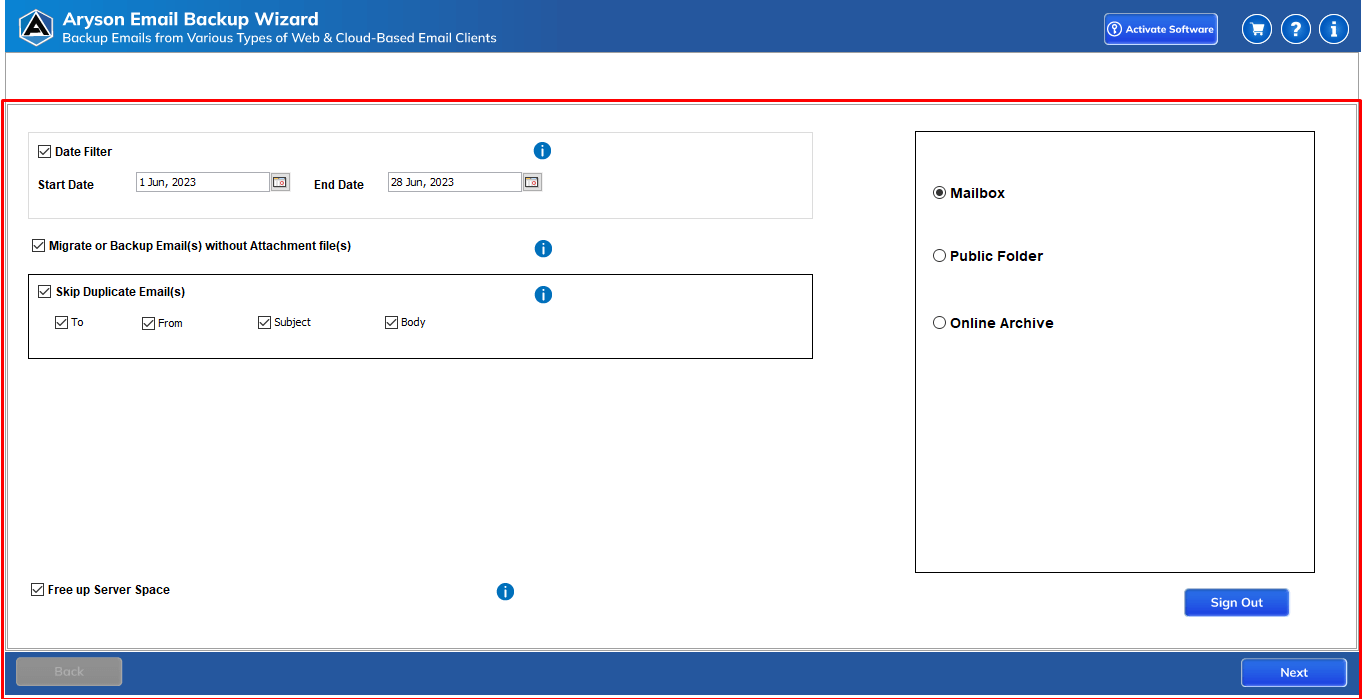
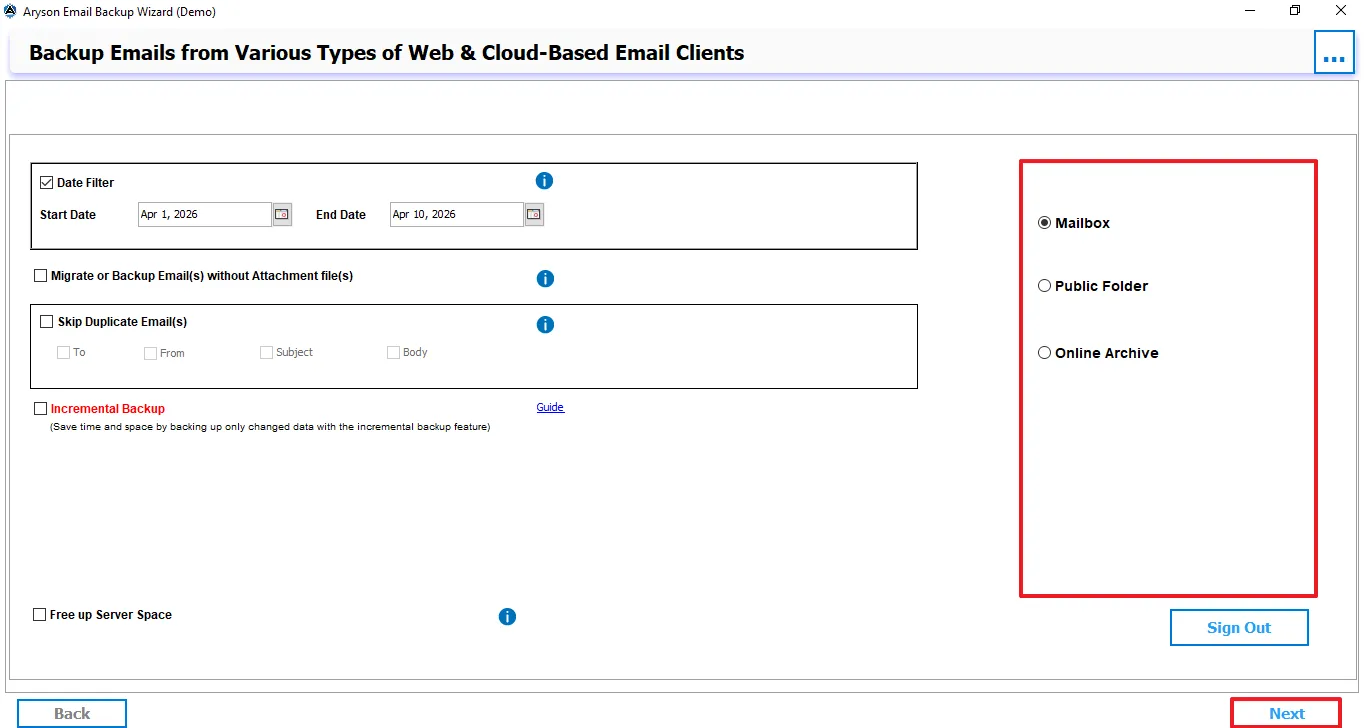
Step 8: Apply filters as needed:
- Date Filter: Allows you to select and back up emails within a specific date range.
- Migrate or Backup Email(s) without Attachment file(s): Excludes attachments and backs up only email content.
- Skip Duplicate Email(s): Prevents saving or migrating duplicate emails based on selected criteria (To, From, Subject, Body).
- Incremental Backup: Backs up only new or modified emails since the last backup to save time and space.
- Free up Server Space: Deletes emails from the server after successful backup to free storage.
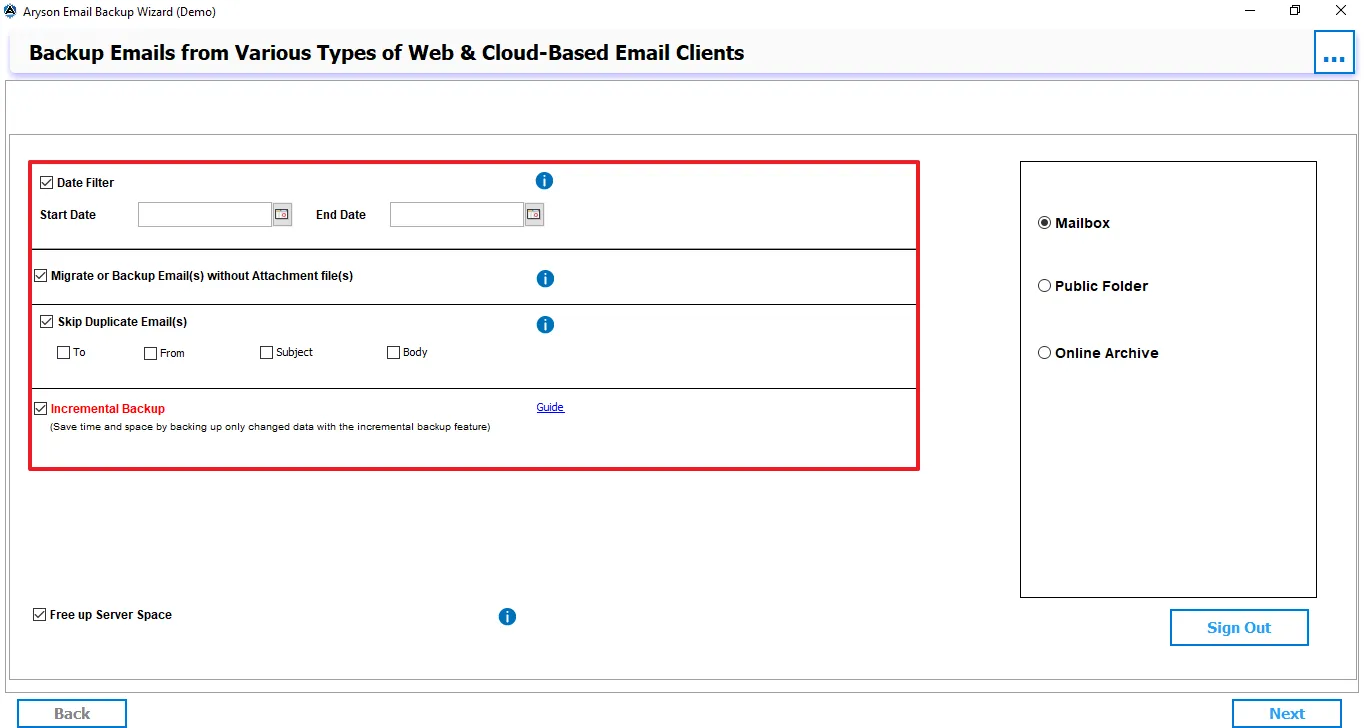
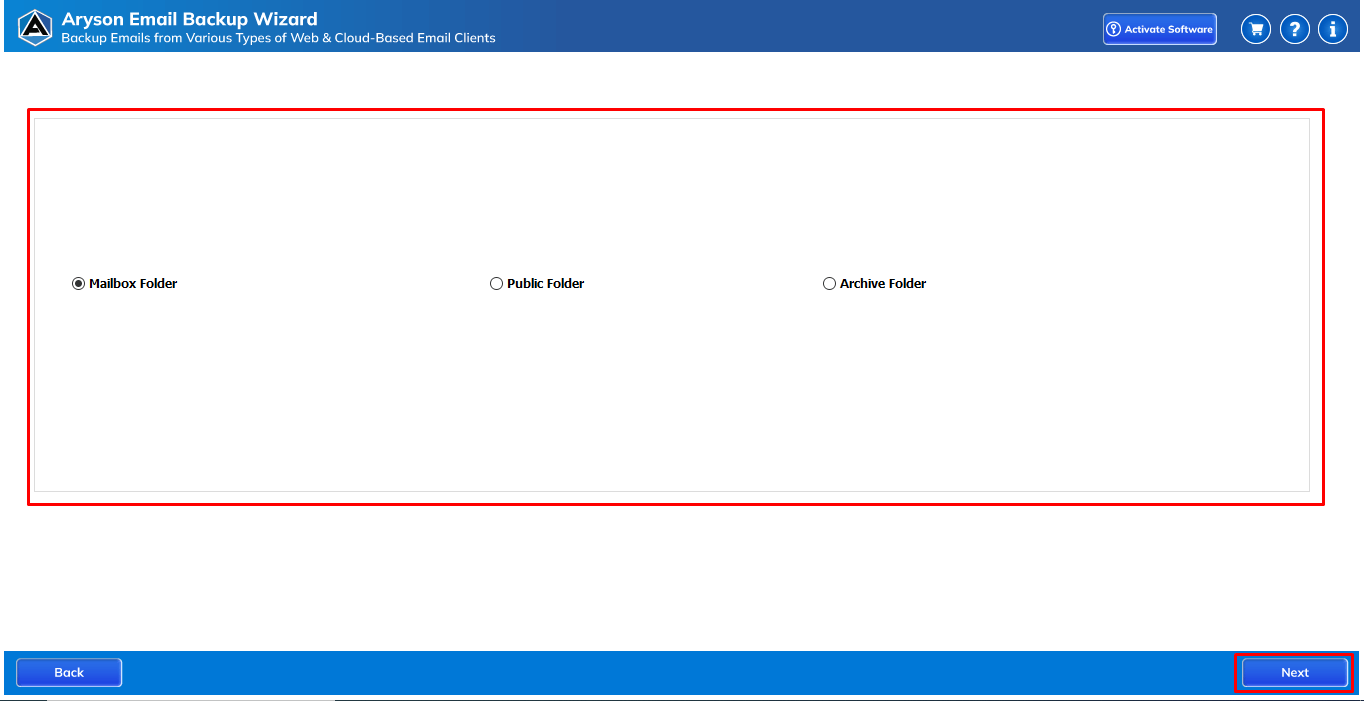
Step 9: This area allows users to define what type of email data source they want to back up or migrate.
- Choosing Mailbox → backs up active emails.
- Choosing Online Archive → backs up older stored emails.
- Choosing Public Folder → backs up shared organizational data.
- Click Next to start the backup process.
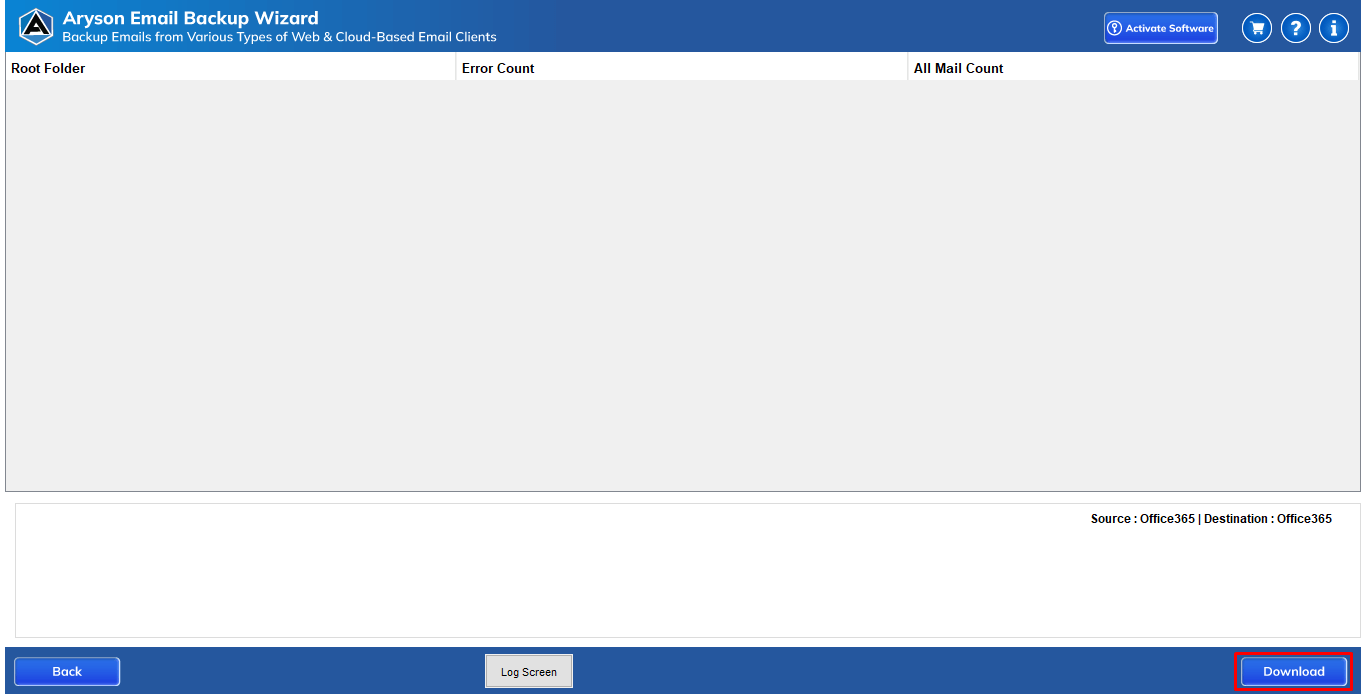
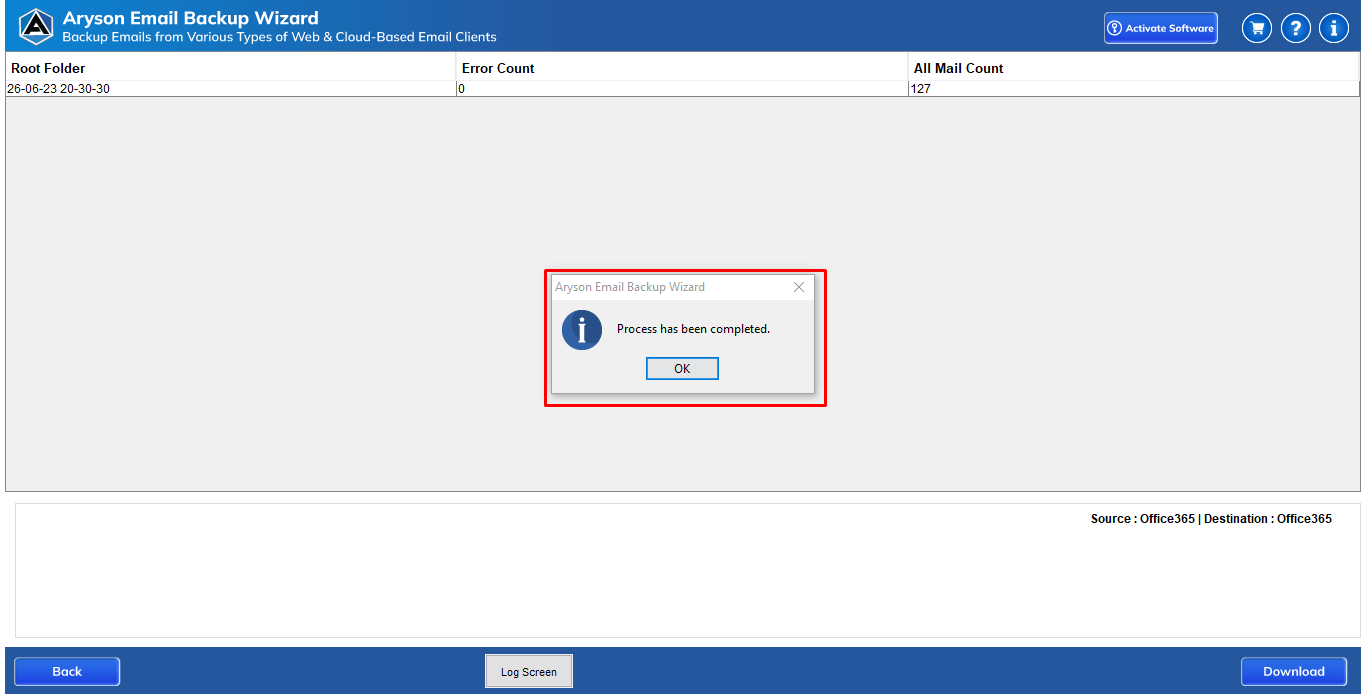
Step 10: The software begins converting Gmail emails to Office 365 and displays the progress with folder name, email count, and error status.
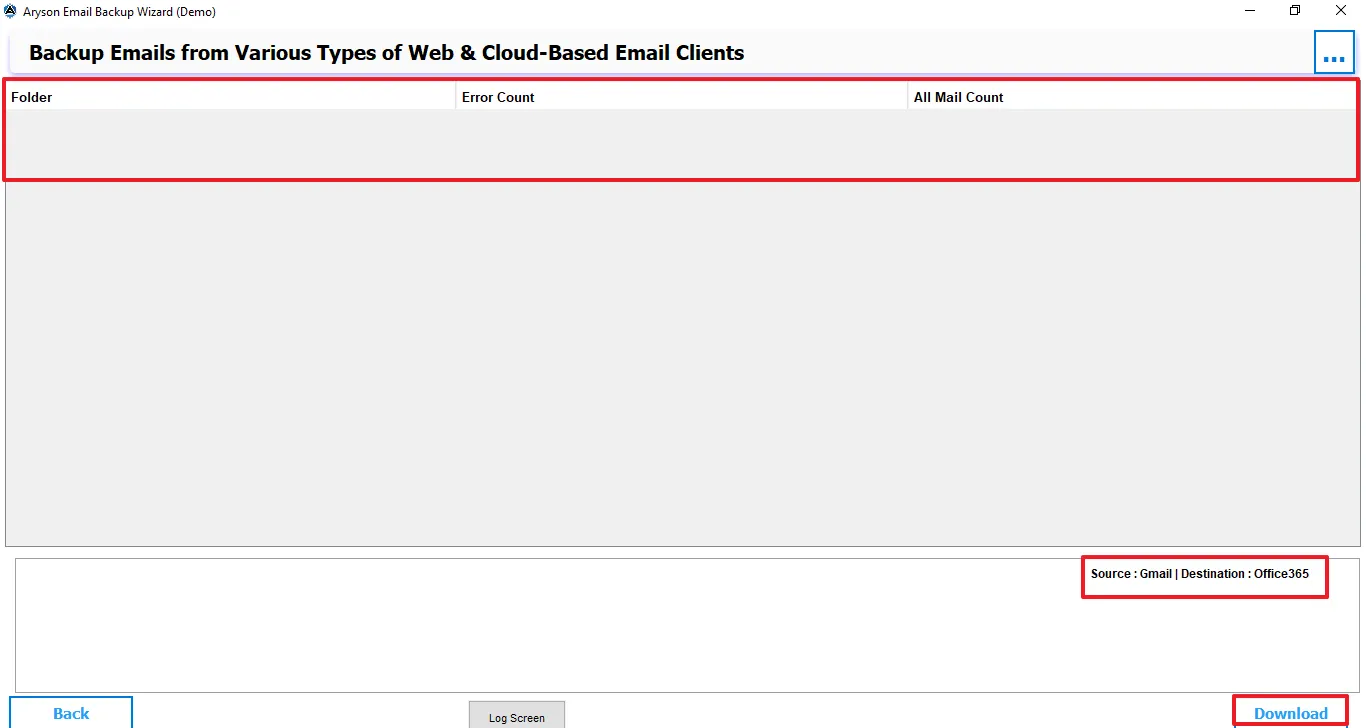
Step 11: After completion, a summary report shows source (Gmail), destination (Office 365), processed emails, status, and save location. A confirmation message indicates that the process has been completed successfully.

Activation Guide
Activate the Software
Installation & Uninstallation
Installation & Uninstallation of Software
User Interface
User Interface
After downloading the Aryson Microsoft 365 Migration Tool, you will find the welcome screen as played below.