Complete Step-by-Step Guide for Aryson AOL Inbox Migrator
Easily migrate AOL Inbox data into PST, MSG, PDF, EML, MBOX, DOC, DOCX, and Thunderbird on Windows, Mac, and Linux. This software also migrates AOL Inbox files to Gmail, IMAP-Enabled Email Account, and Google Workspace (Admin Accounts Only). For any issues, you can refer to the detailed software guide for complete assistance.
-
Table of Content
- Software Working Process
- Activation Guide
- Installation & Uninstallation
- User Interface
Software Working Process
Software Working Process
Step 1: Download the Aryson AOL Mail Migrator, run the setup, complete the installation, and launch the tool.

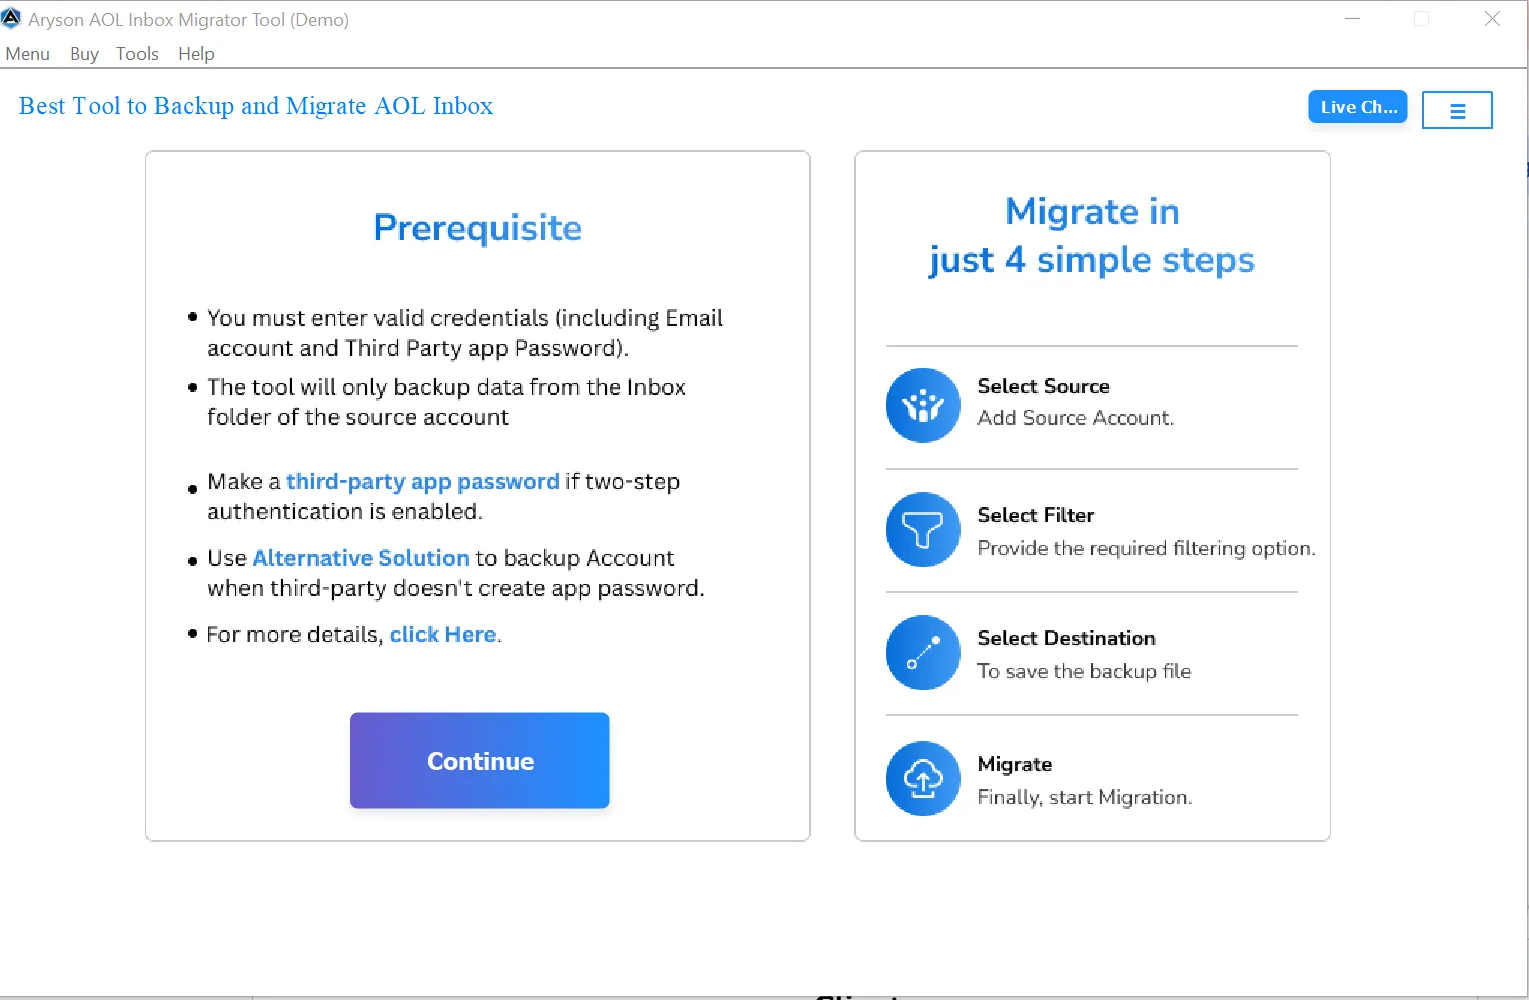
Step 2: After reading Prerequisite, click on the Continue button to proceed further.

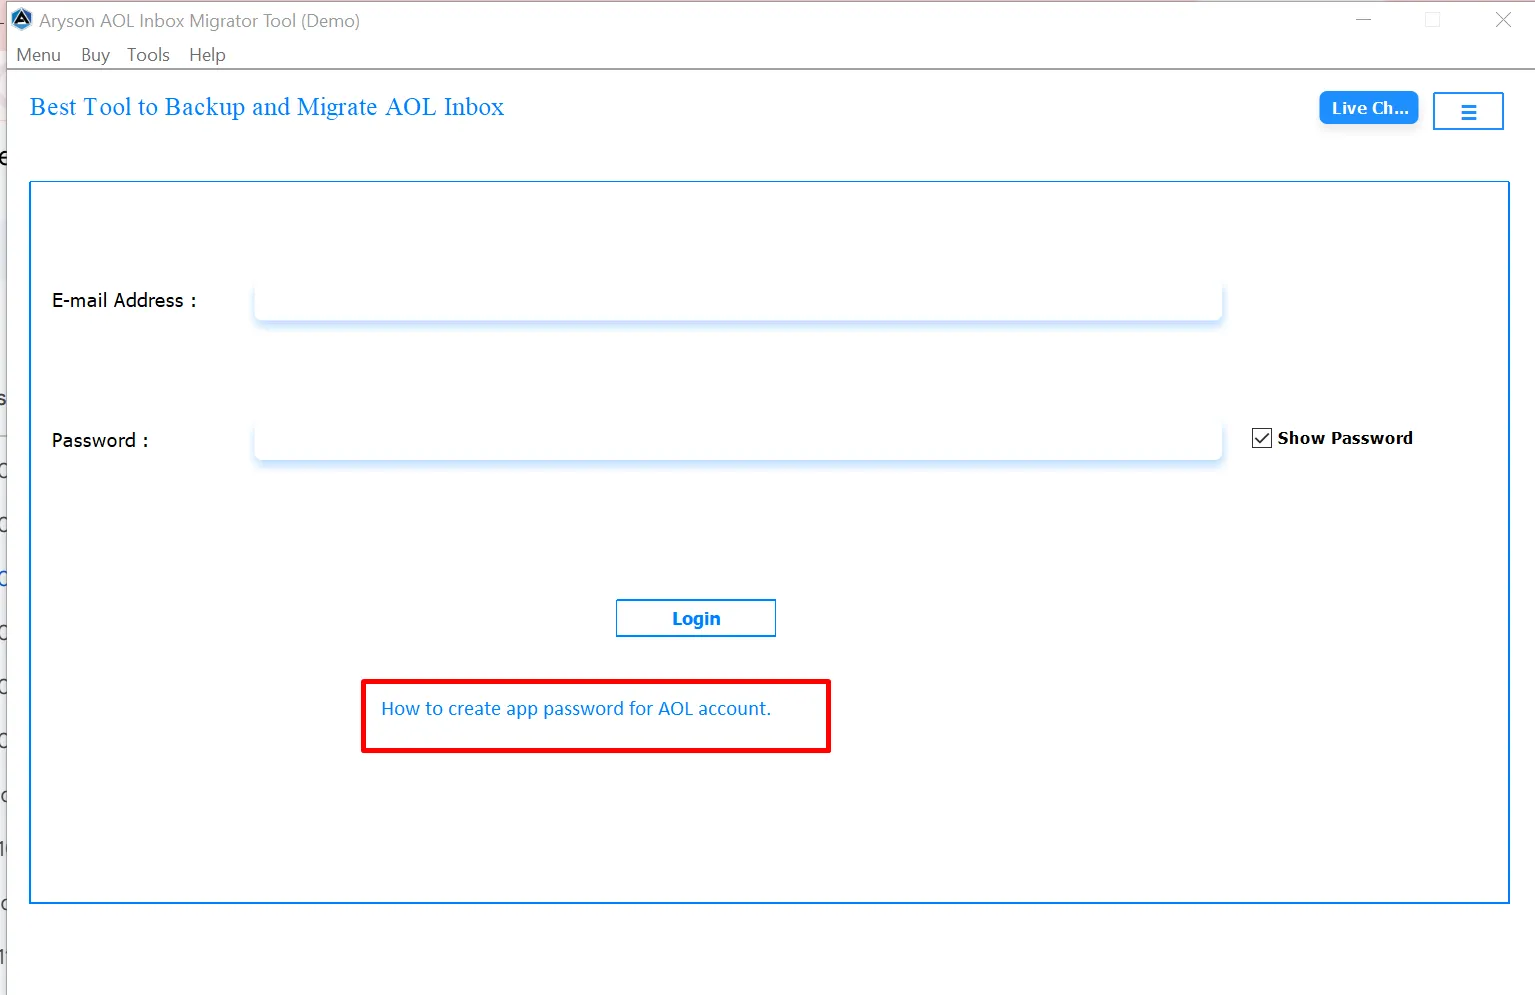
Step 3: Enter your AOL email address and app password, then click Login.
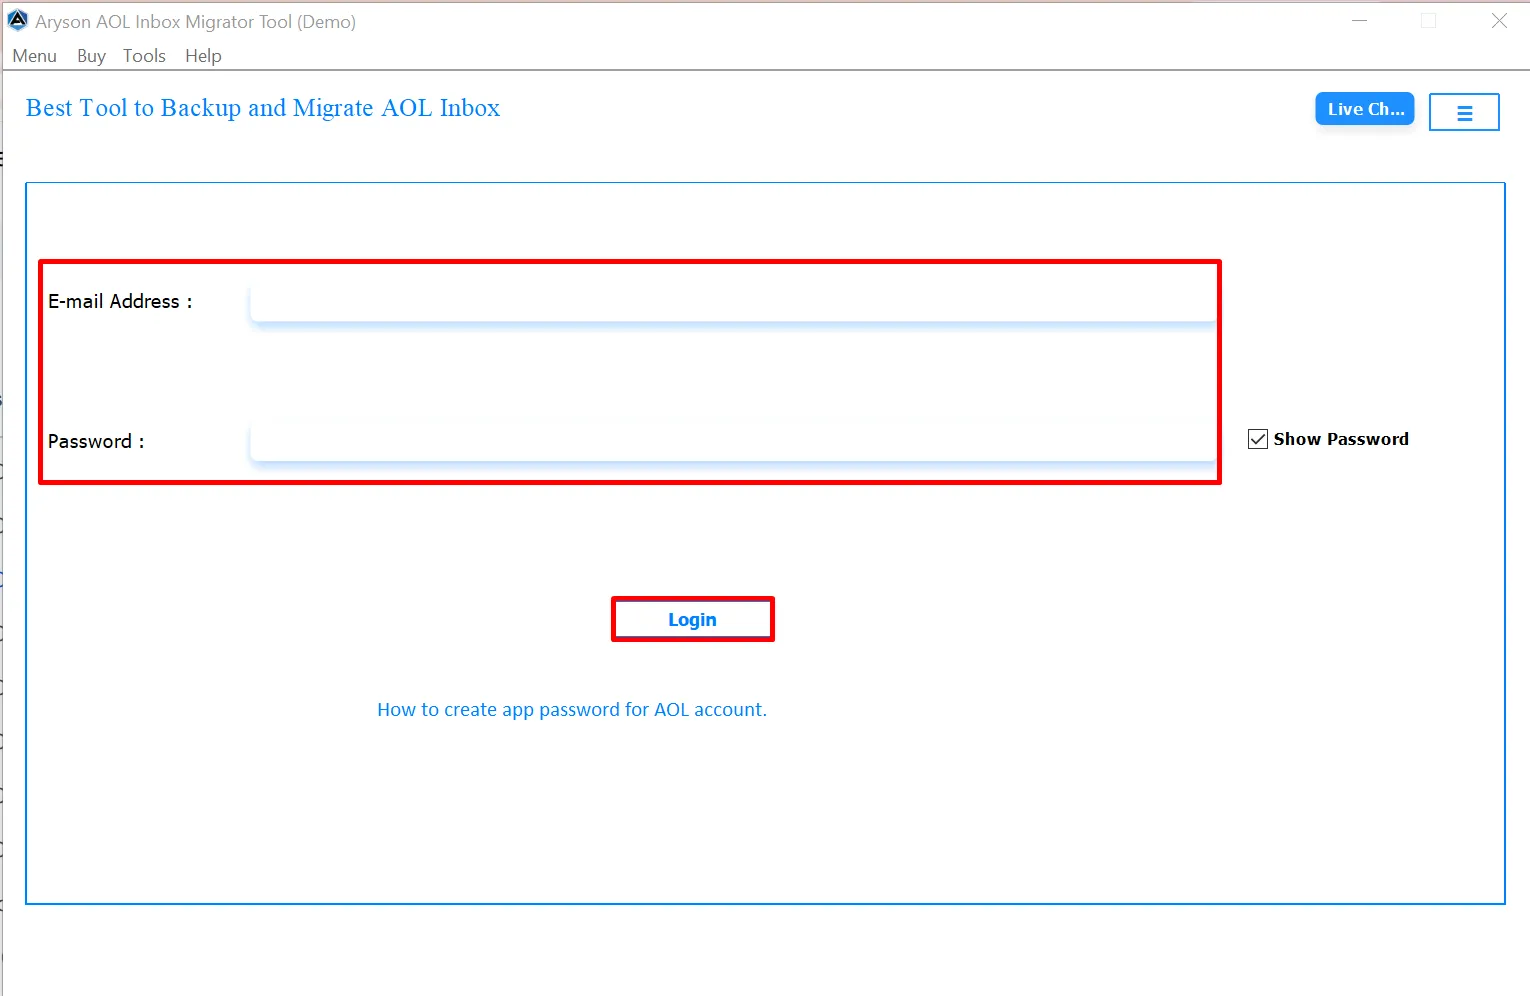
Step 4: If you face login issues or use two-step verification, click the “ How to create app password for AOL account ” link

Step 5: Once you have completed the login process, the tool begins processing your AOL mailbox.

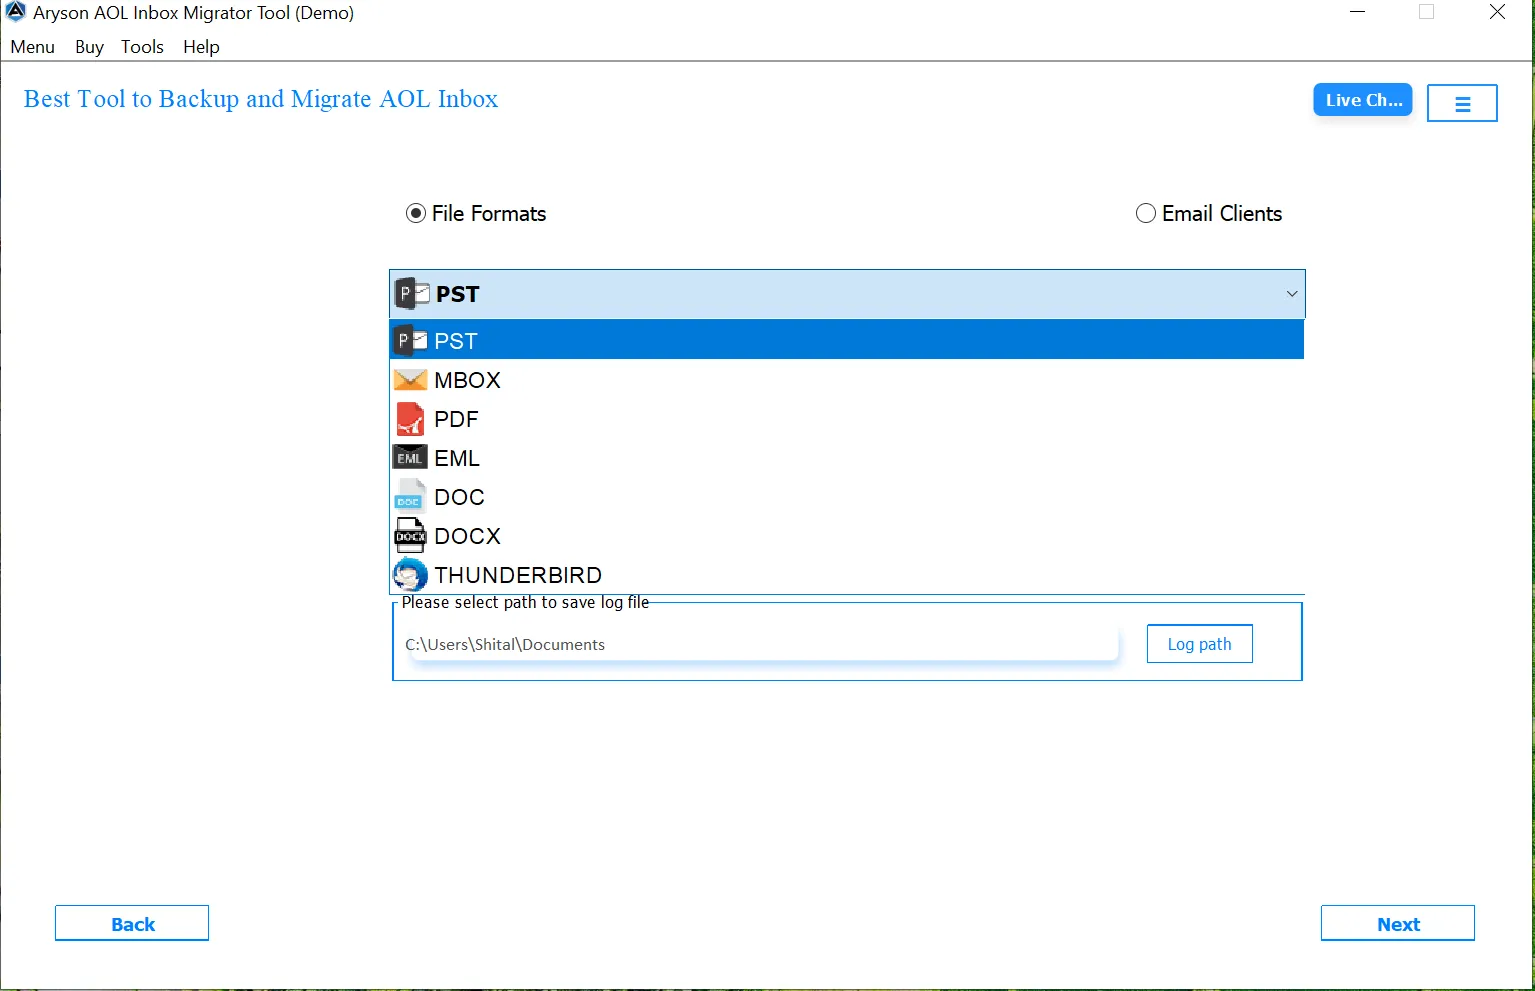
Step 6: Mark the File Format option, and choose the desired output format for migrating your AOL Inbox data.
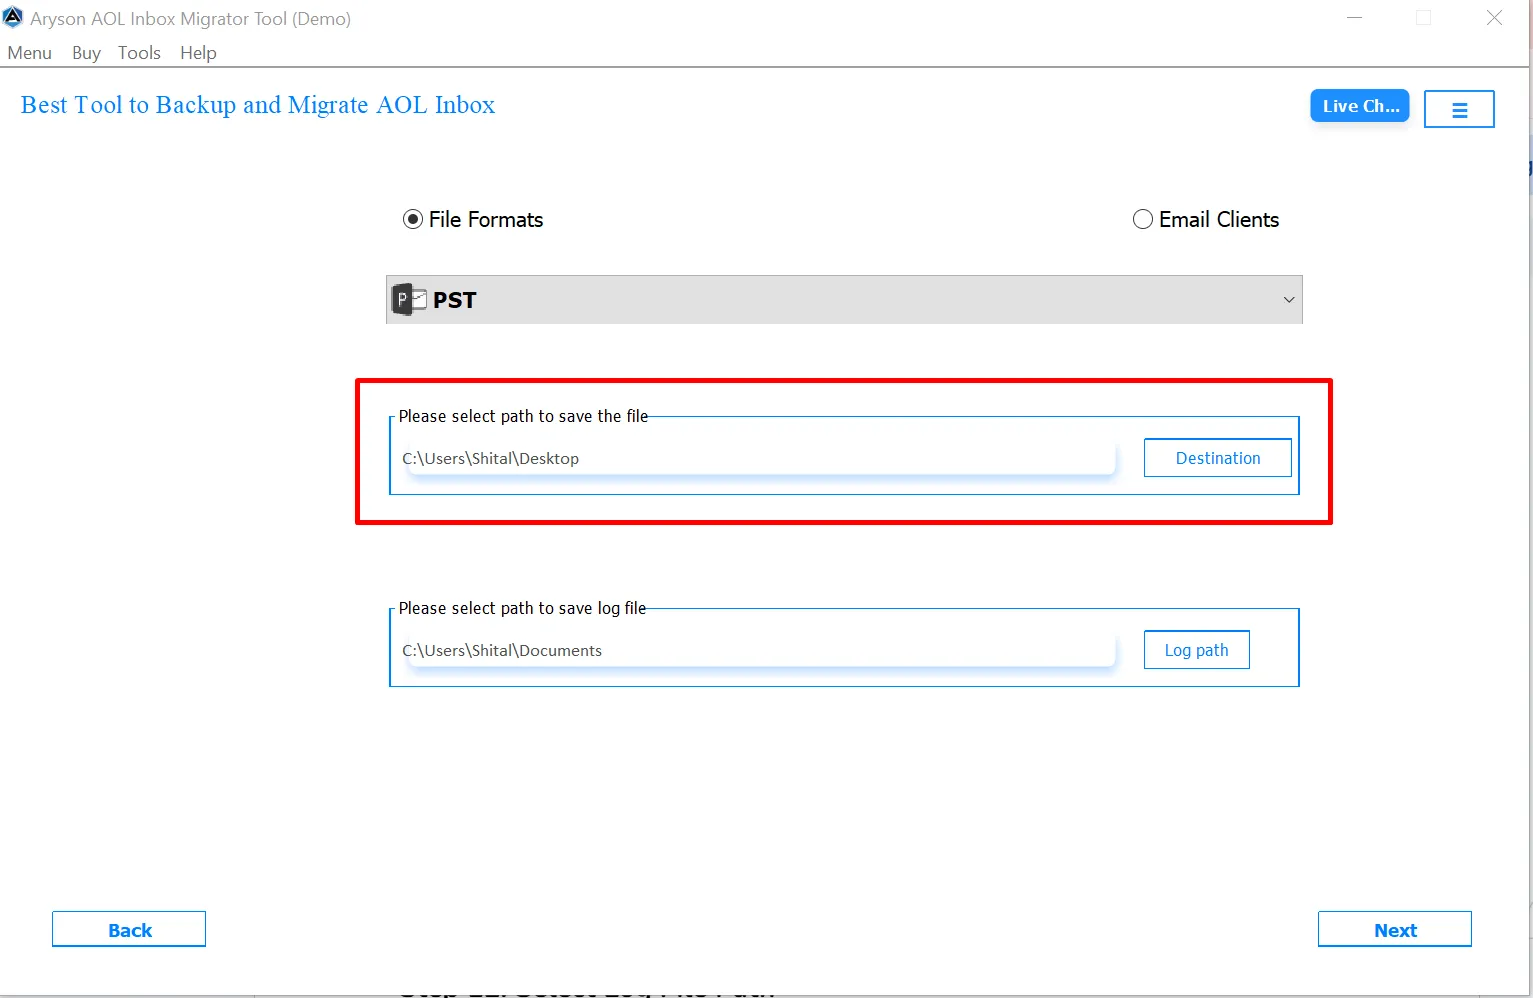
Step 7:Click the Destination Path option allows you to select where AOL Mail will save. Also, choose the location where the tool will save the log file for the migration process.
Step 8: Use the Remove Duplicate Mail on the basis option to avoid migrating or backing up duplicate emails.
- Enable the Remove Duplicate Mail on the basis checkbox.
- Choose one or more conditions to identify duplicates:
- Subject
- Body
- From
- To

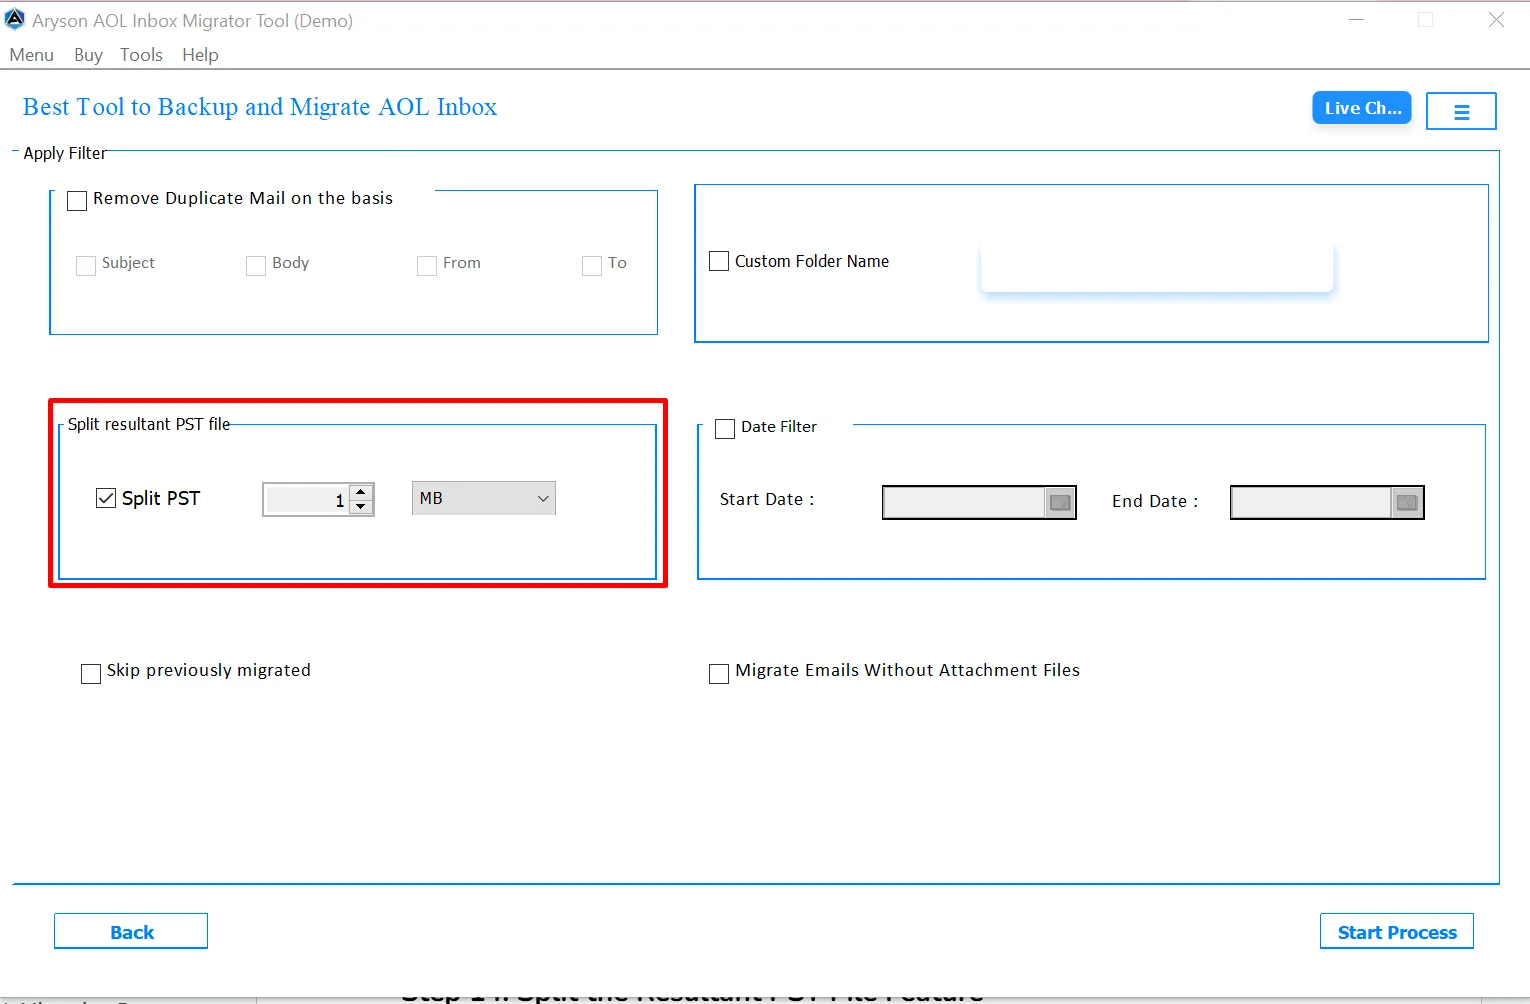
Step 9: When you enable the Split PST checkbox, the tool activates size controls that let you define the maximum file size for each PST file.
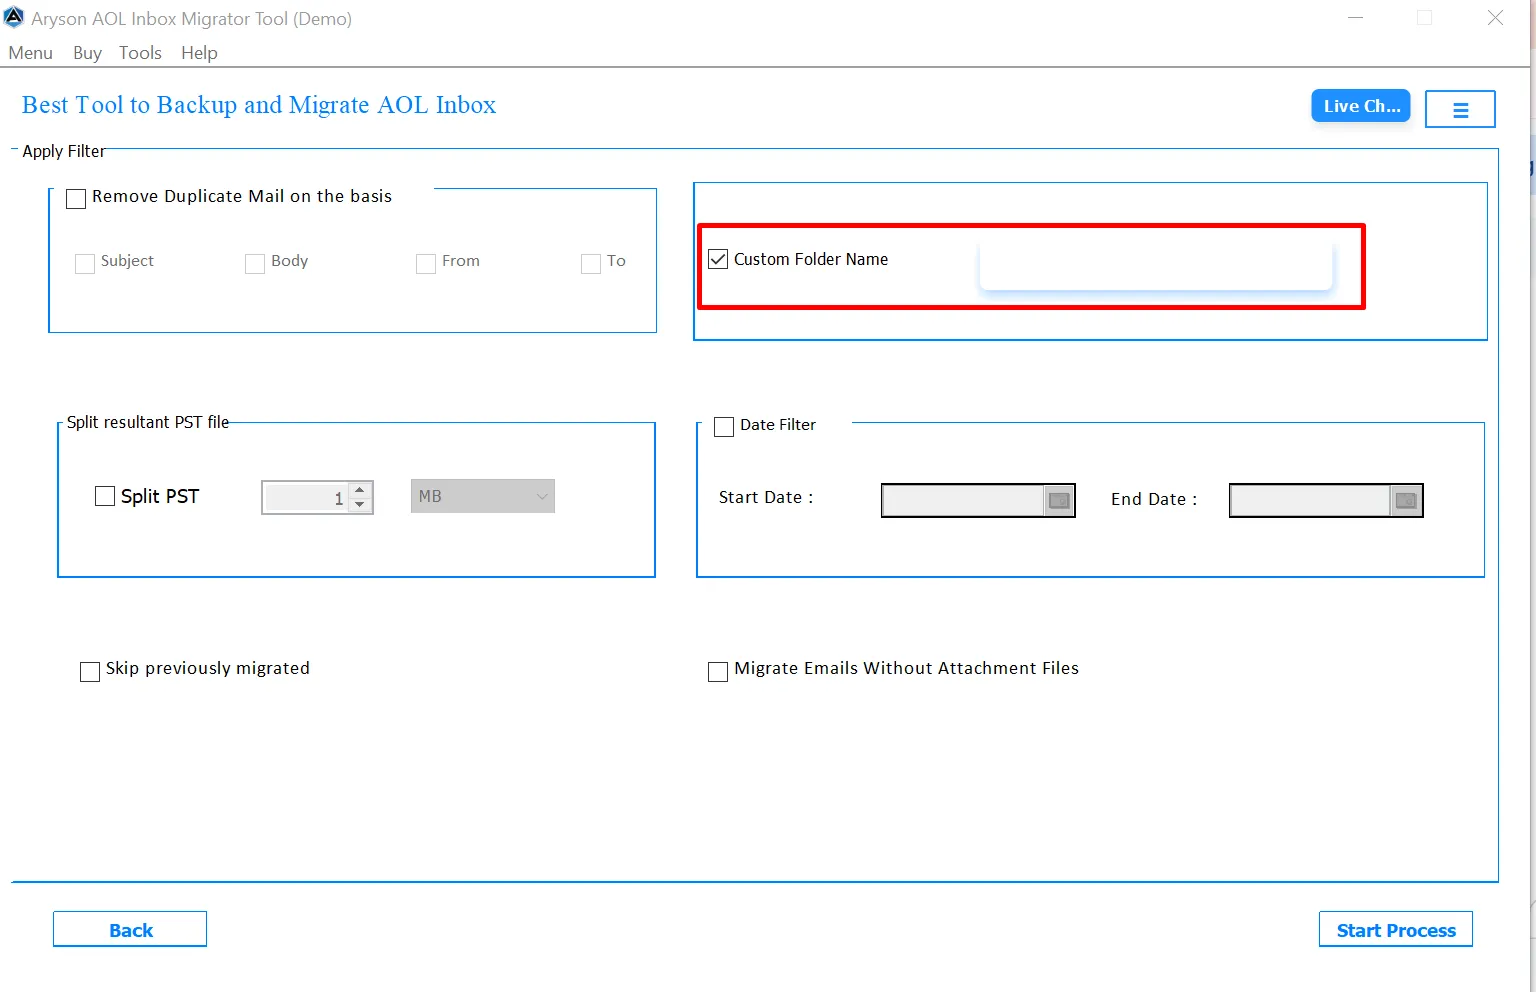
Step 10: The Custom Folder Name feature allows users to define a personalized folder name for storing migrated emails.

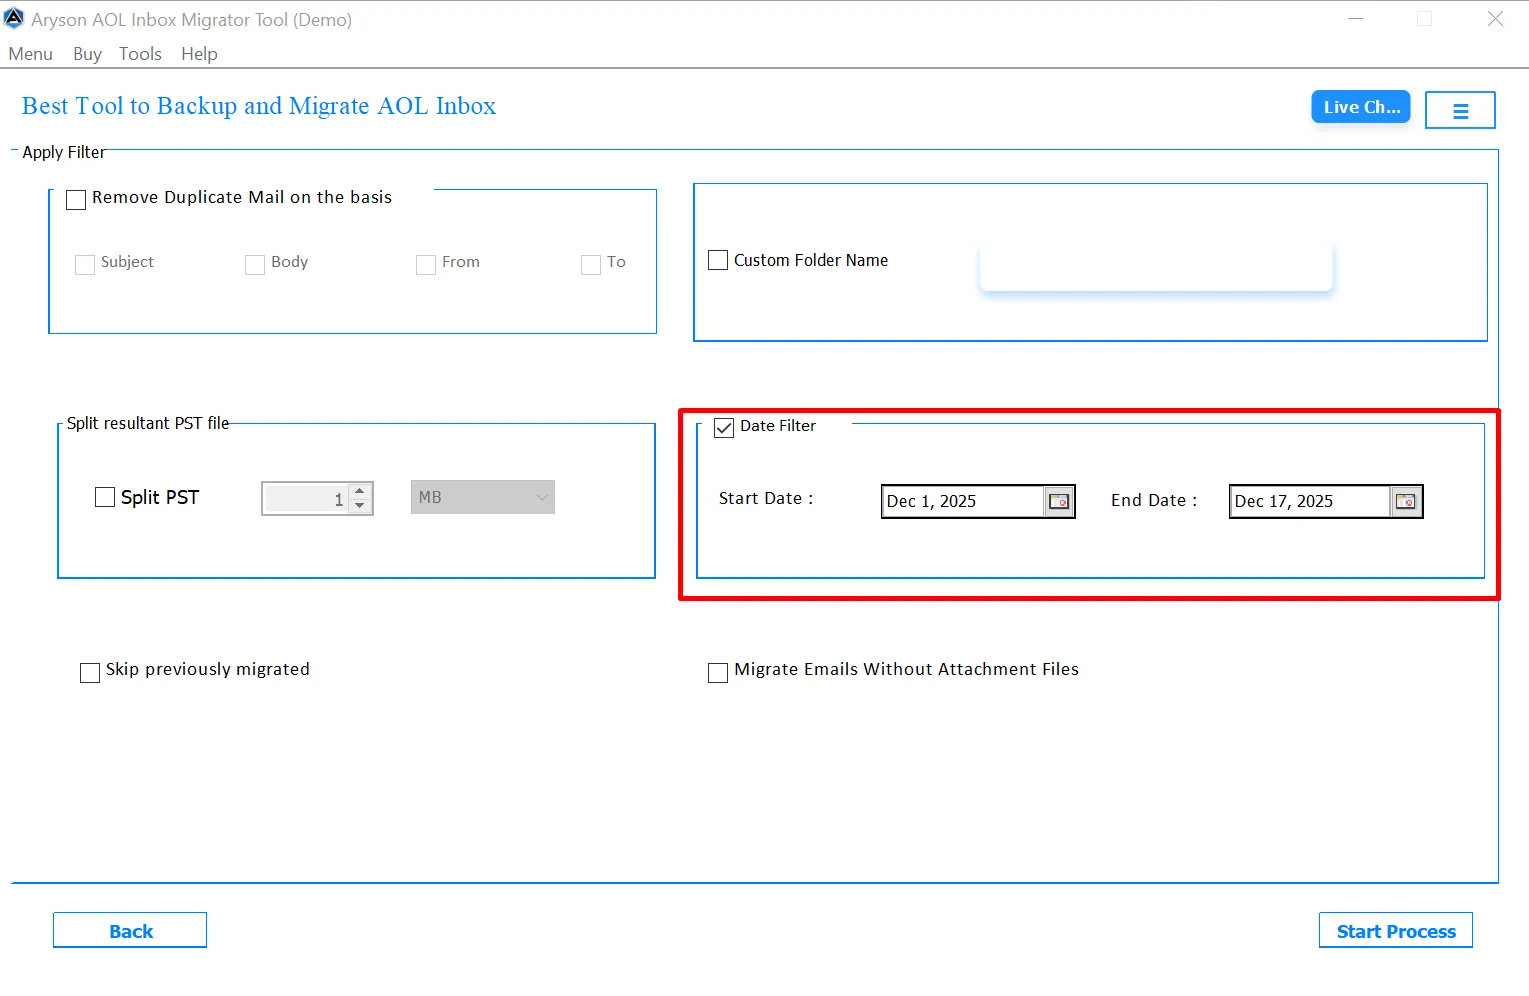
Step 11: The Date Filter option allows users to migrate emails within a specific time frame.
- Start Date Selection: Emails received or sent on or after the selected start date will be processed.
- End Date Selection: Users can define the ending date of the migration period. Emails beyond the selected date are excluded.
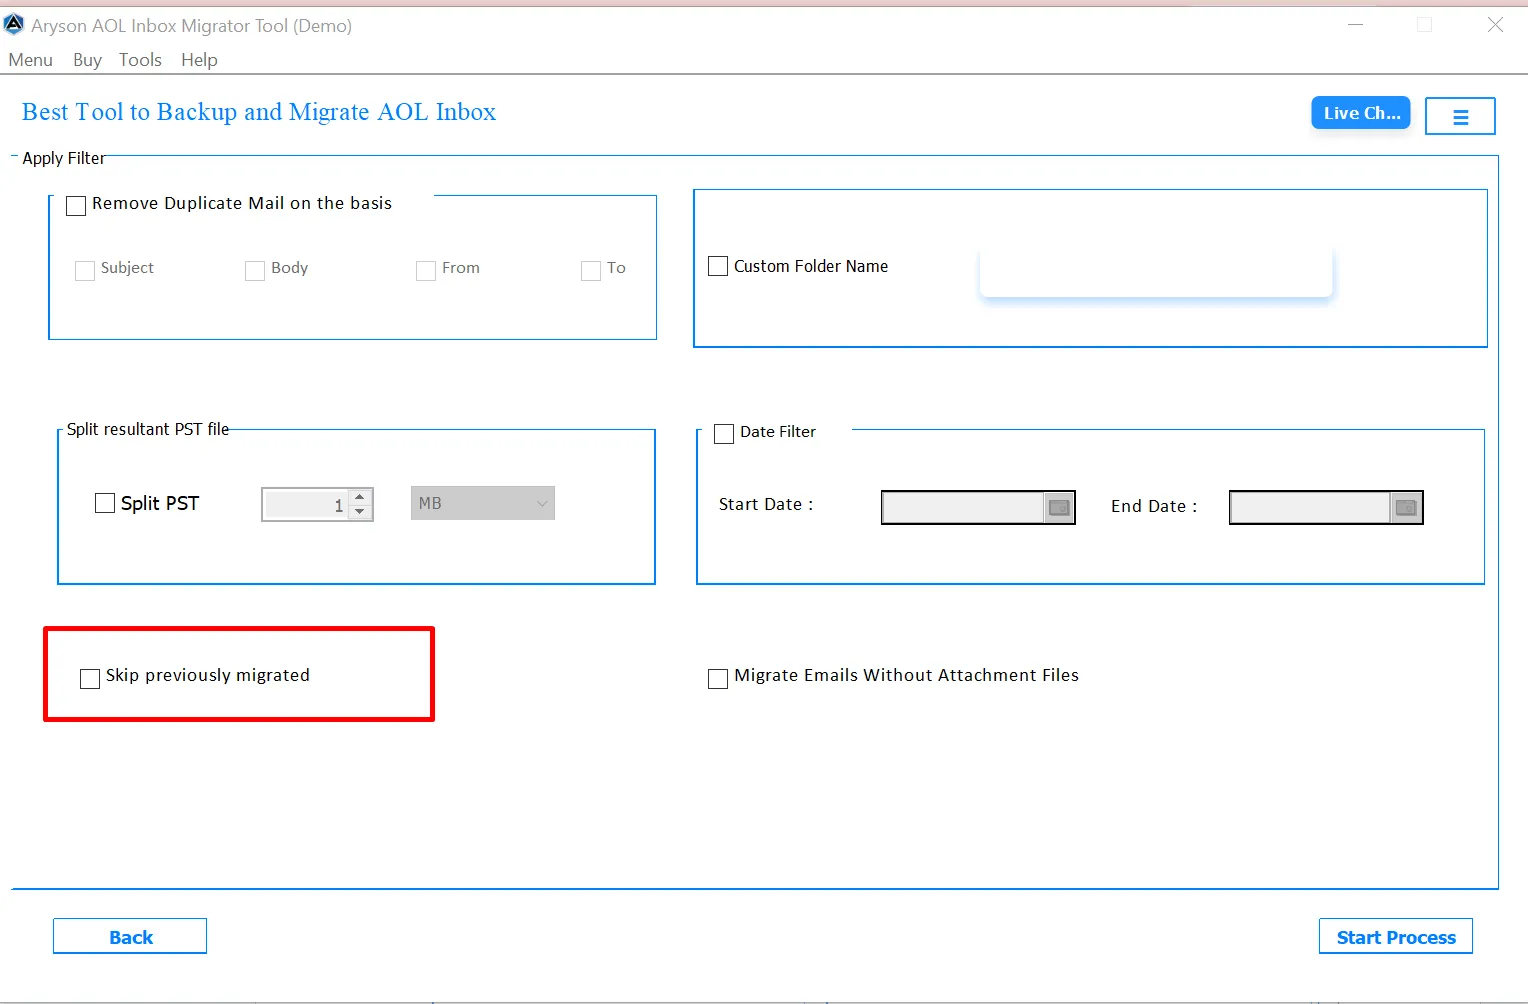
Step 12: When the user enables this feature, this feature prevents the re-migration of emails that were already transferred in earlier sessions.
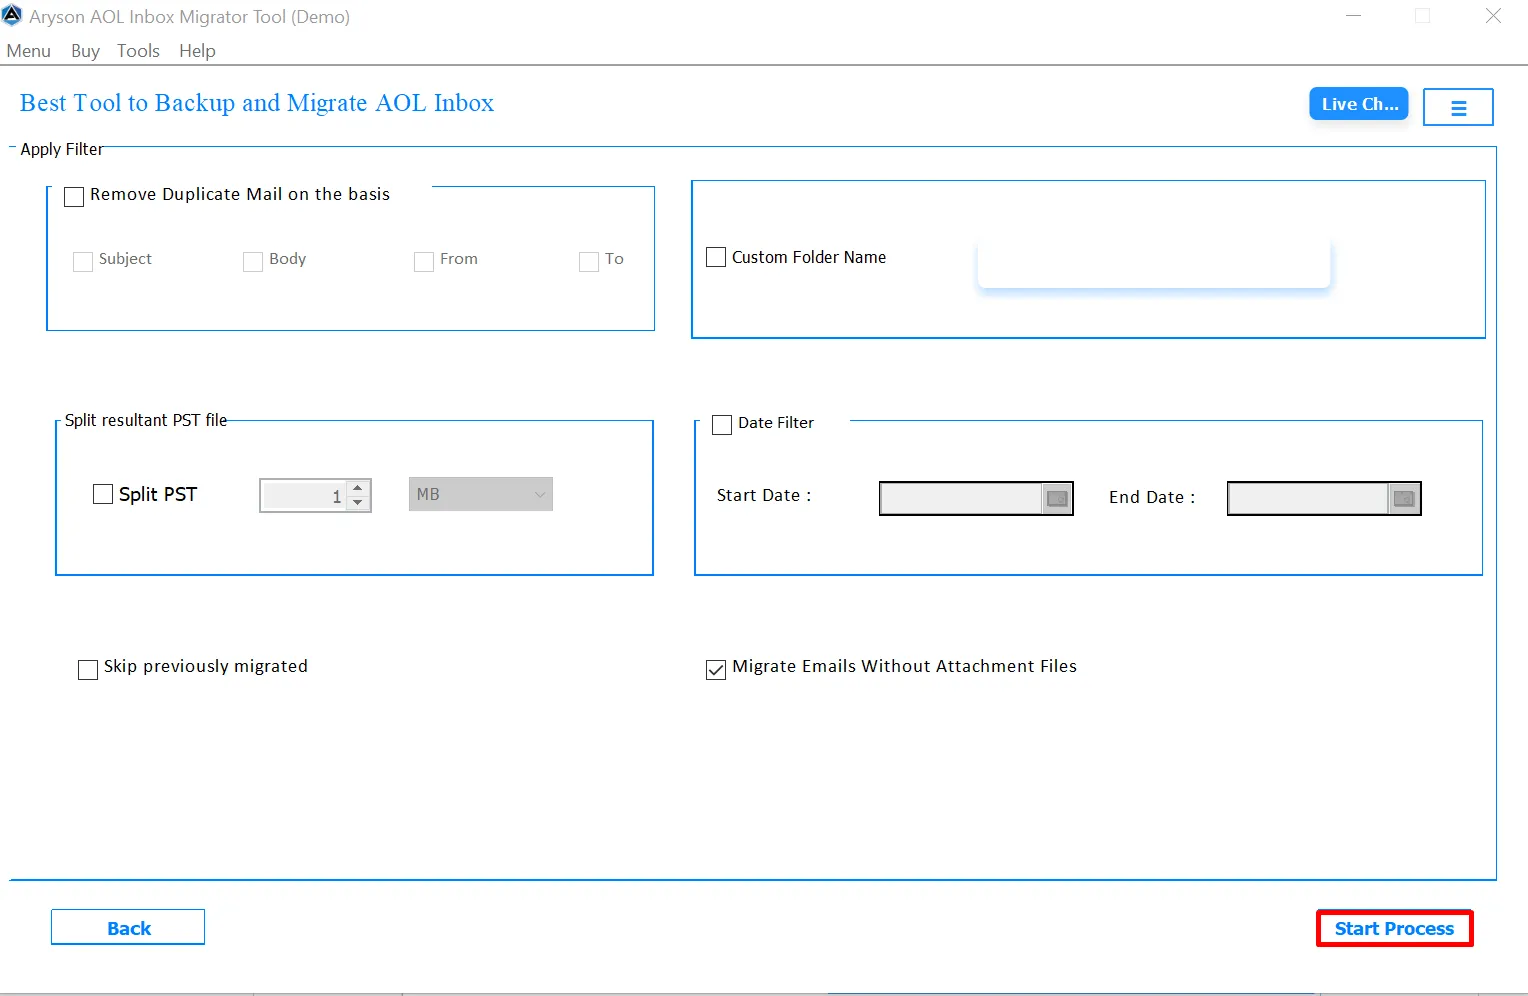
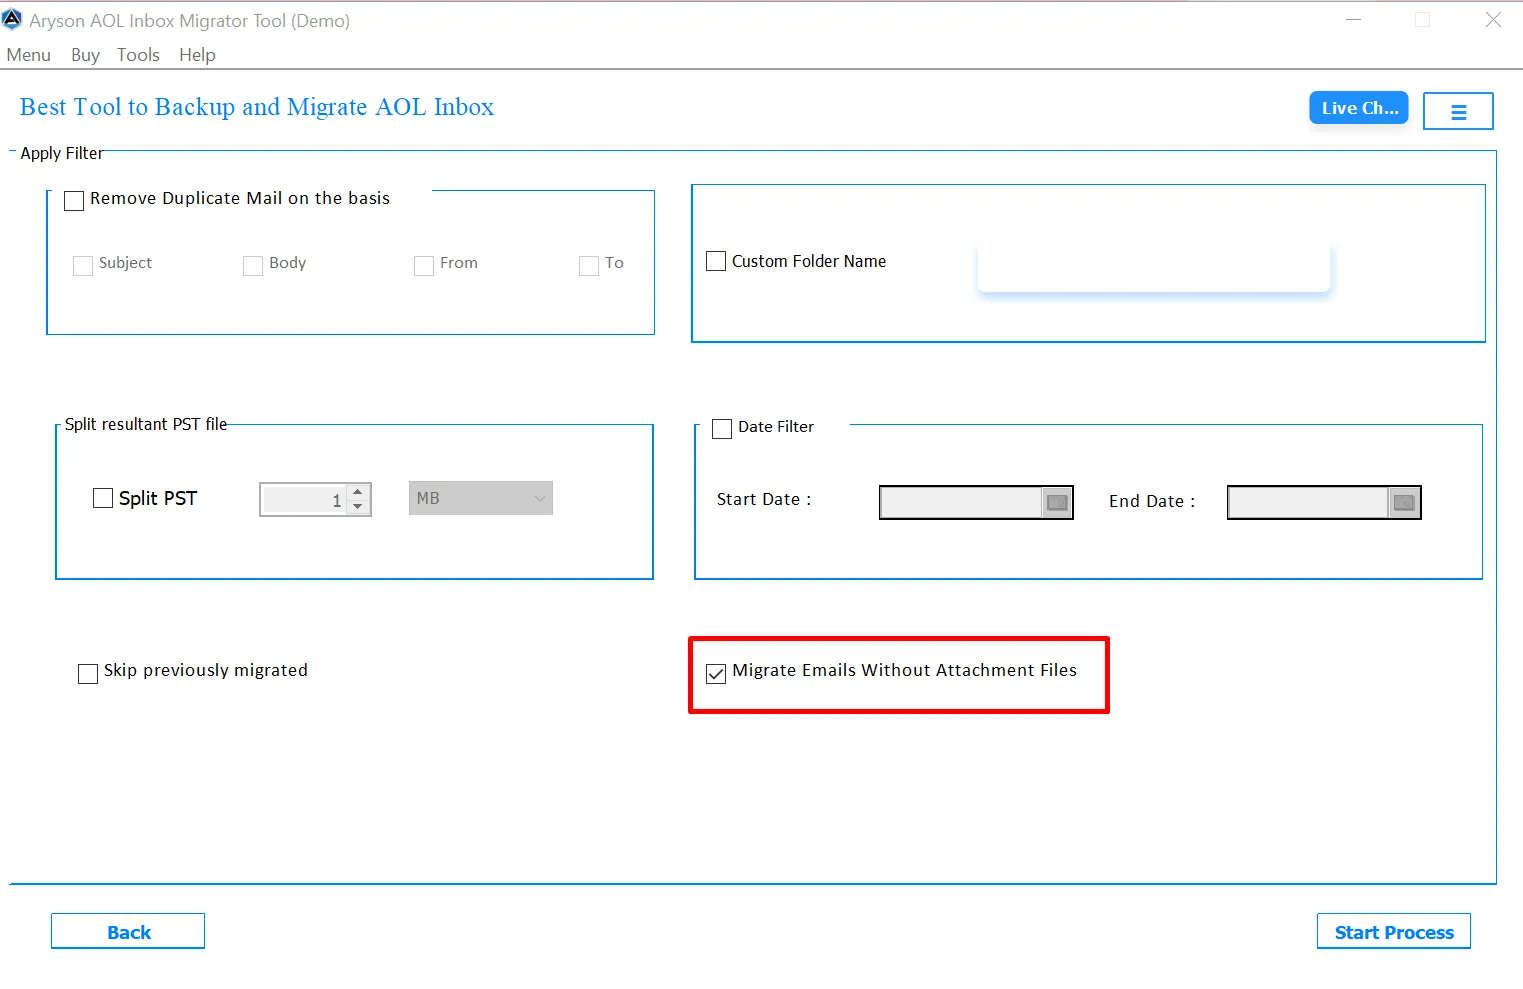
Step 13: This option allows users to migrate only email messages while excluding attachments. It is ideal when attachments are large or unnecessary.

Step 14: After completing all required selections and settings, click the Start Process button to start the process.
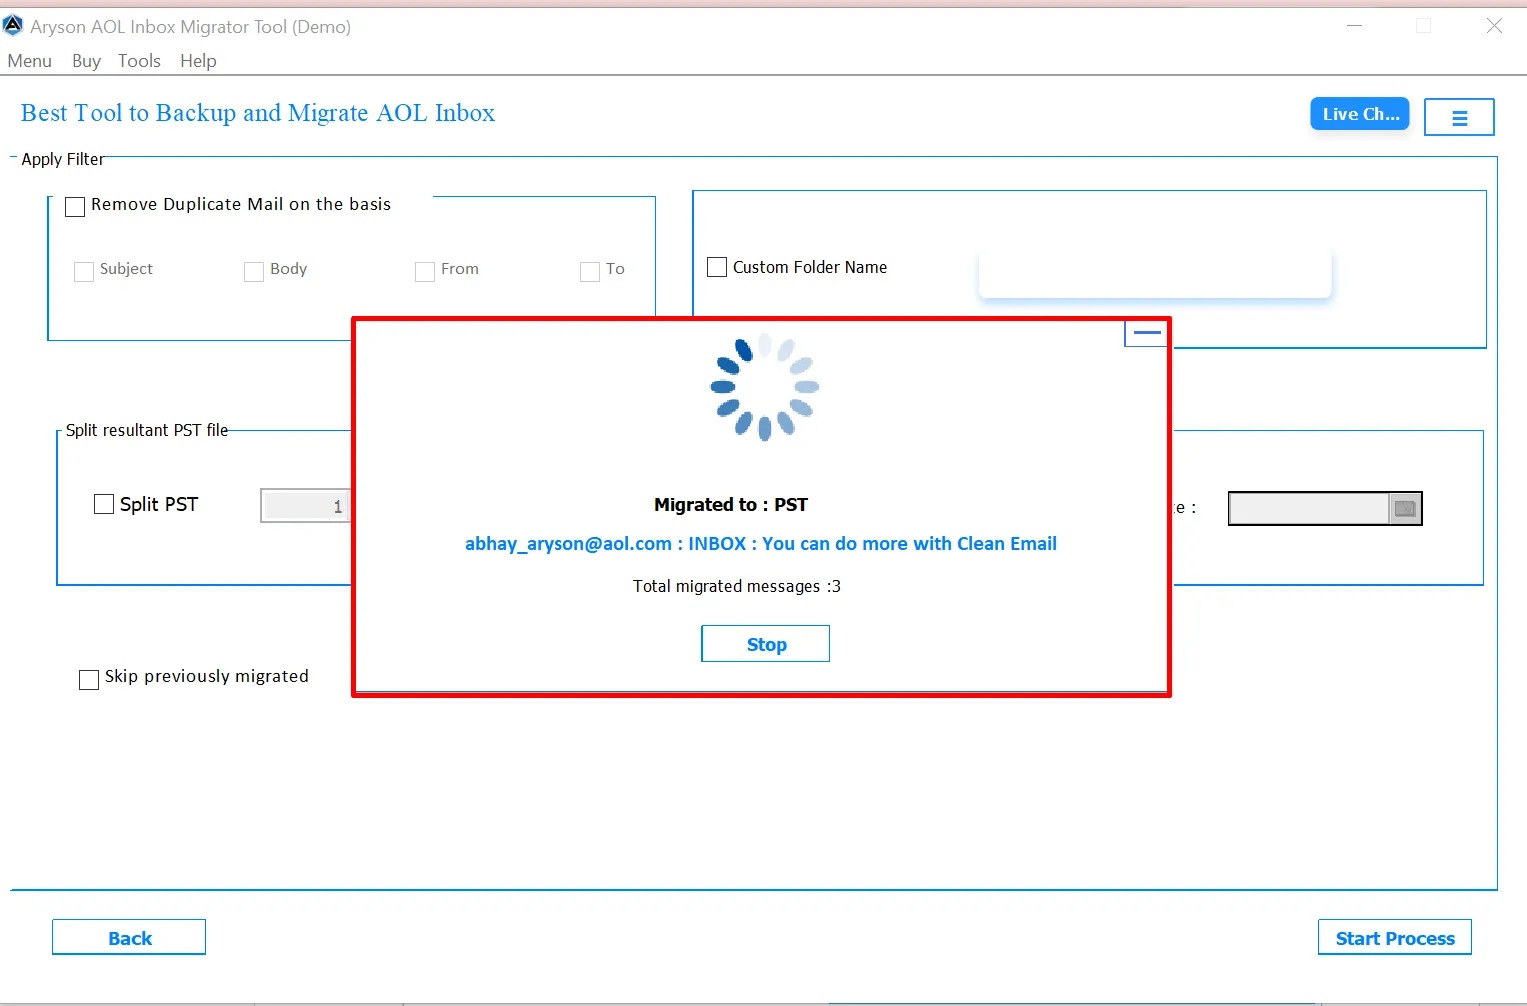
Step 15: The marked panel displays the processing status of the migration. It shows that the AOL Mail data is being migrated to PST format, along with a loading indicator.
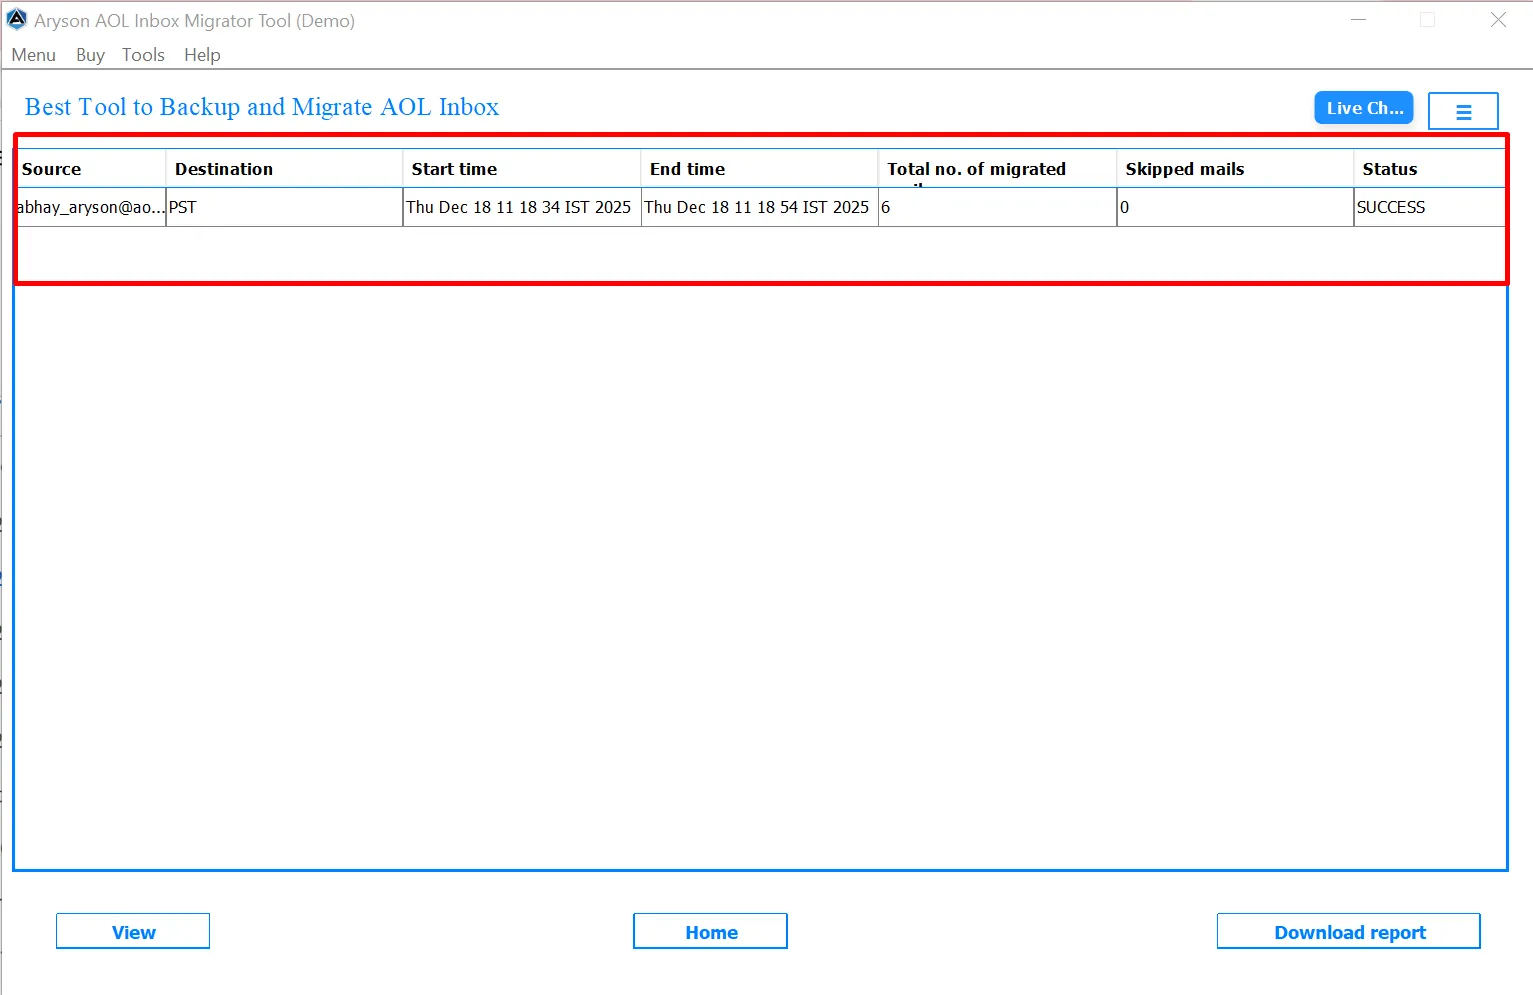
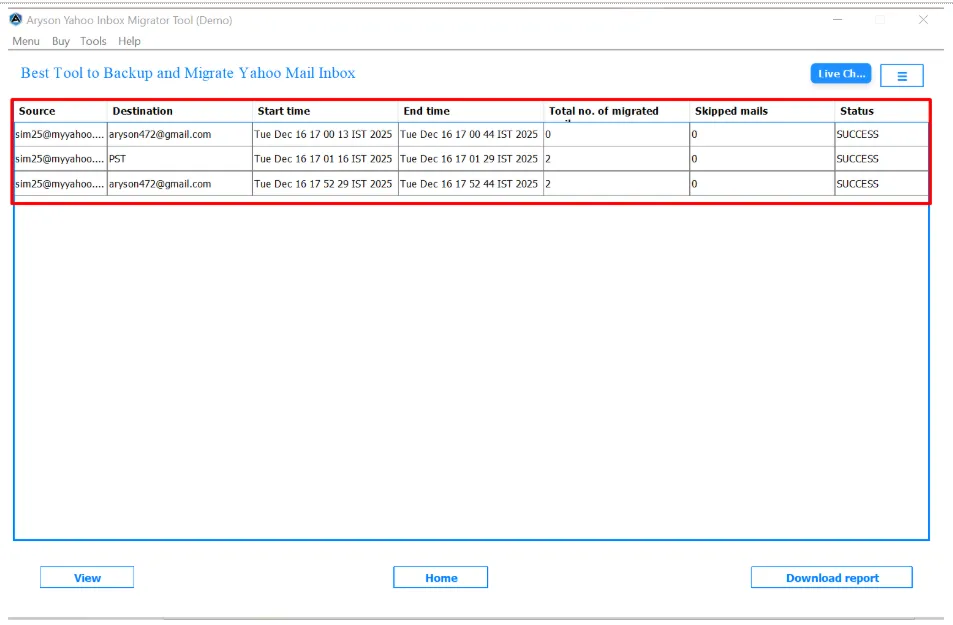
Step 16: Now, it displays a detailed migration summary report, including the source account, destination, start time, end time, total number of migrated emails, skipped emails, and the overall status of the migration.
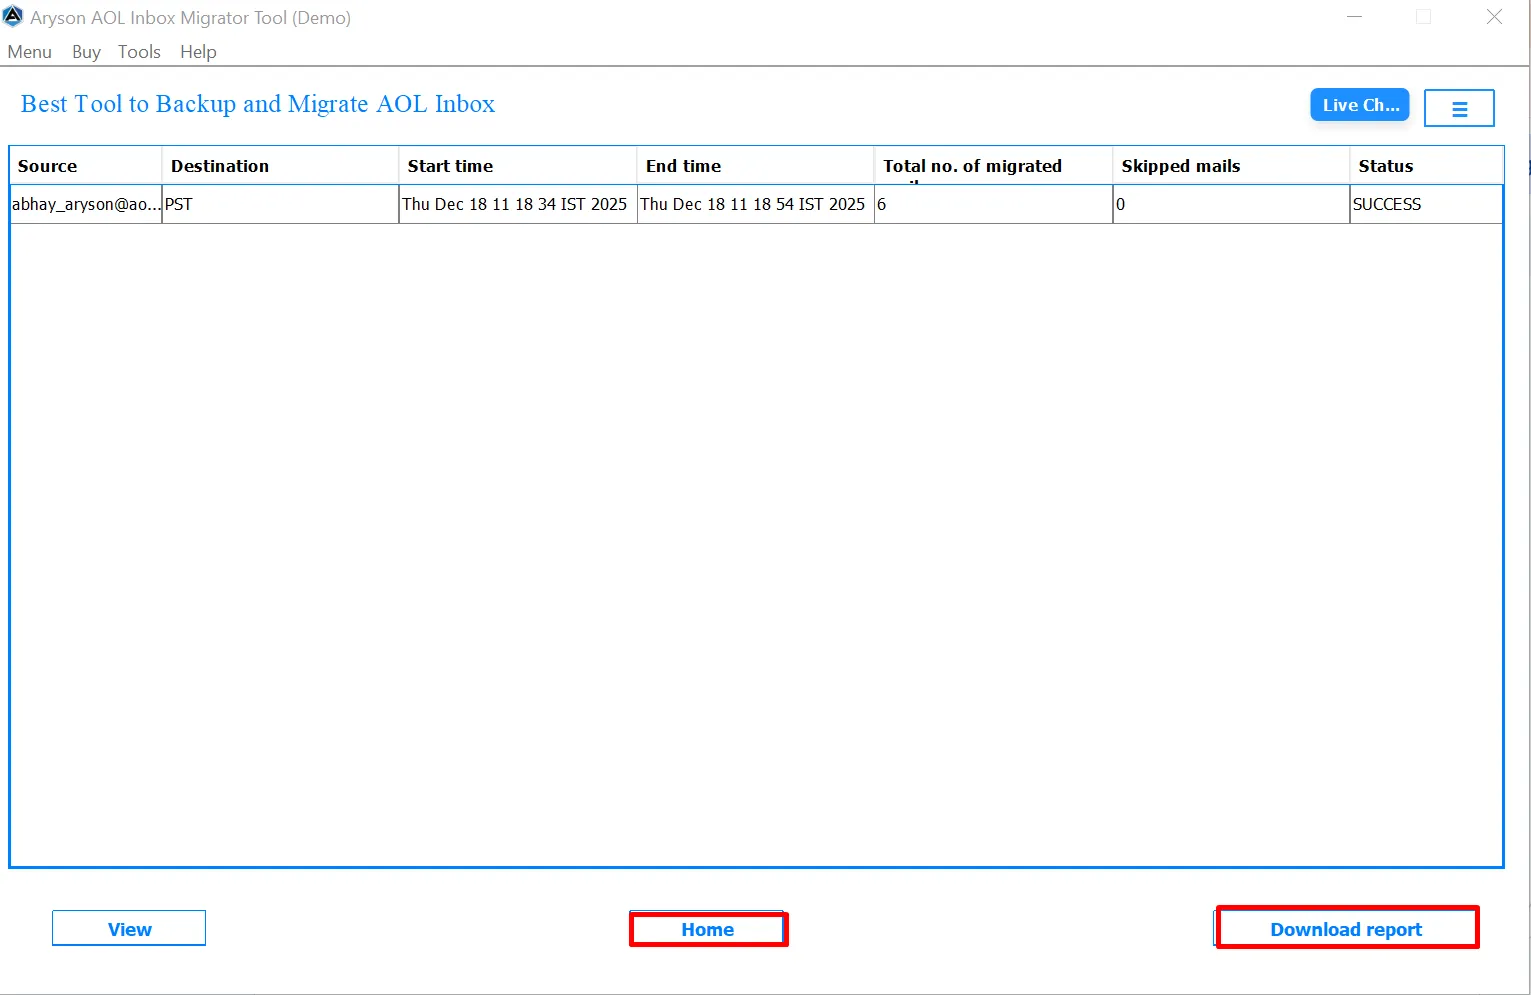
Step 17: After the migration completes, you can use the marked options to manage your next action:
- Home Button: Click this button if you want to start a new migration immediately. It takes you back to the main screen without closing the tool.
- Download Report: Use this option to save a detailed migration report
Step 1: Download the Aryson AOL Mail Migrator, run the setup, complete the installation, and launch the tool.
Step 2: After reading Prerequisite, click on the Continue button to proceed further.

Step 3: Enter your AOL email address and app password, then click Login.

Step 4: If you face login issues or use two-step verification, click the “ How to create app password for AOL account ” link
Step 5: Once you have completed the login process, the tool begins processing your AOL mailbox.

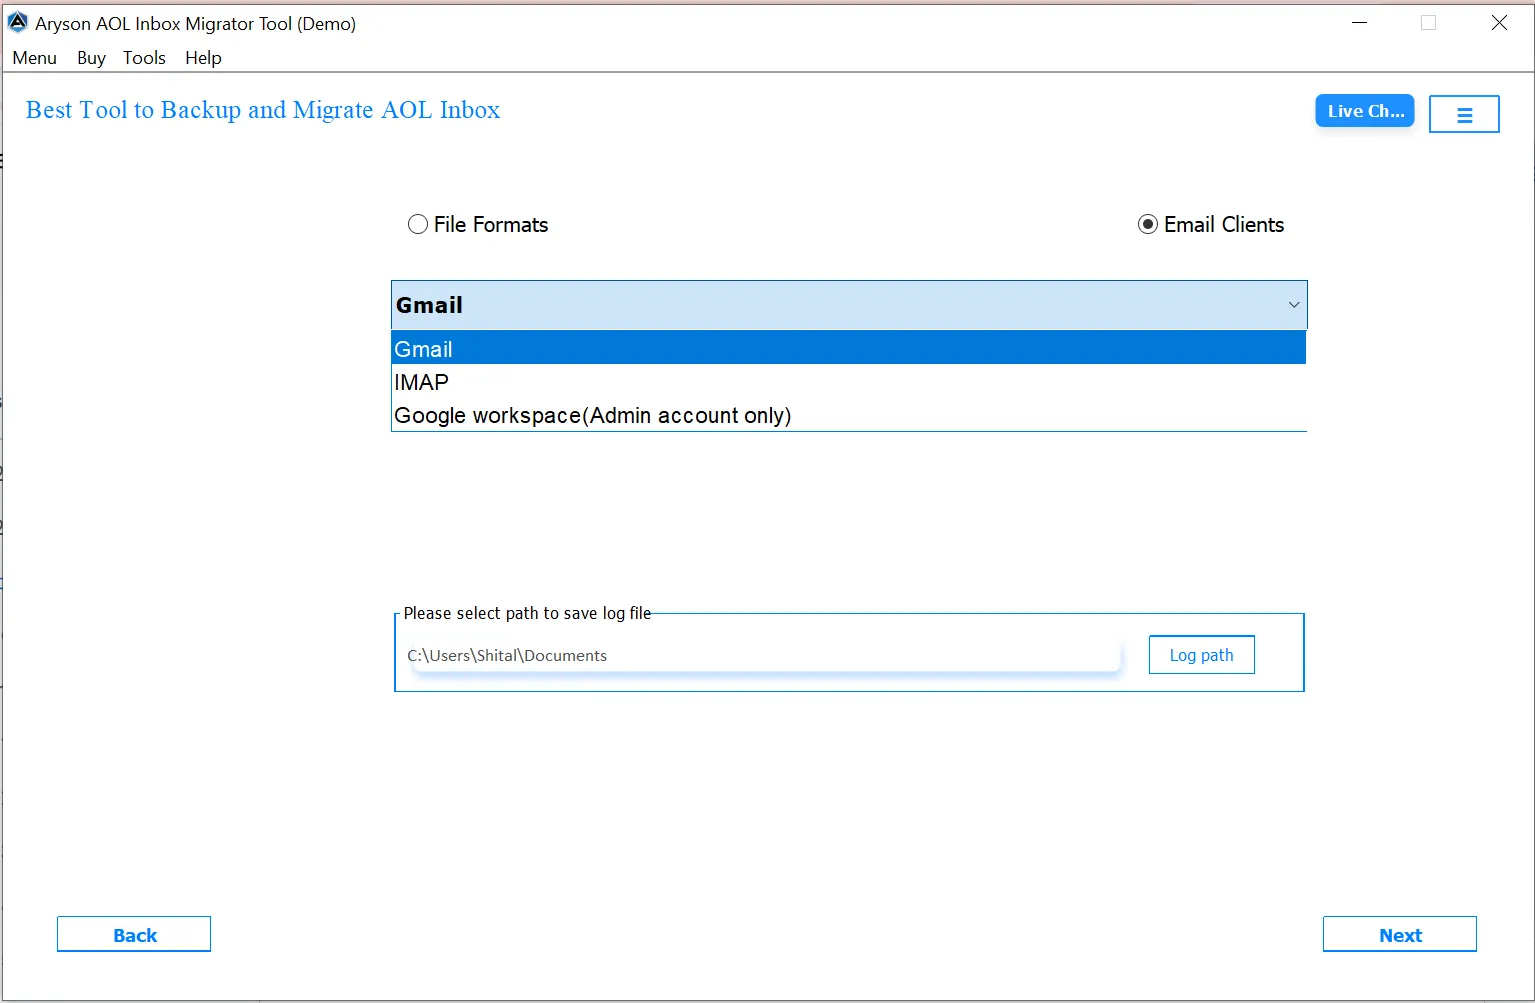
Step 6: Choose the desired destination Email Clients as Gmail for migrating your AOL Inbox data.
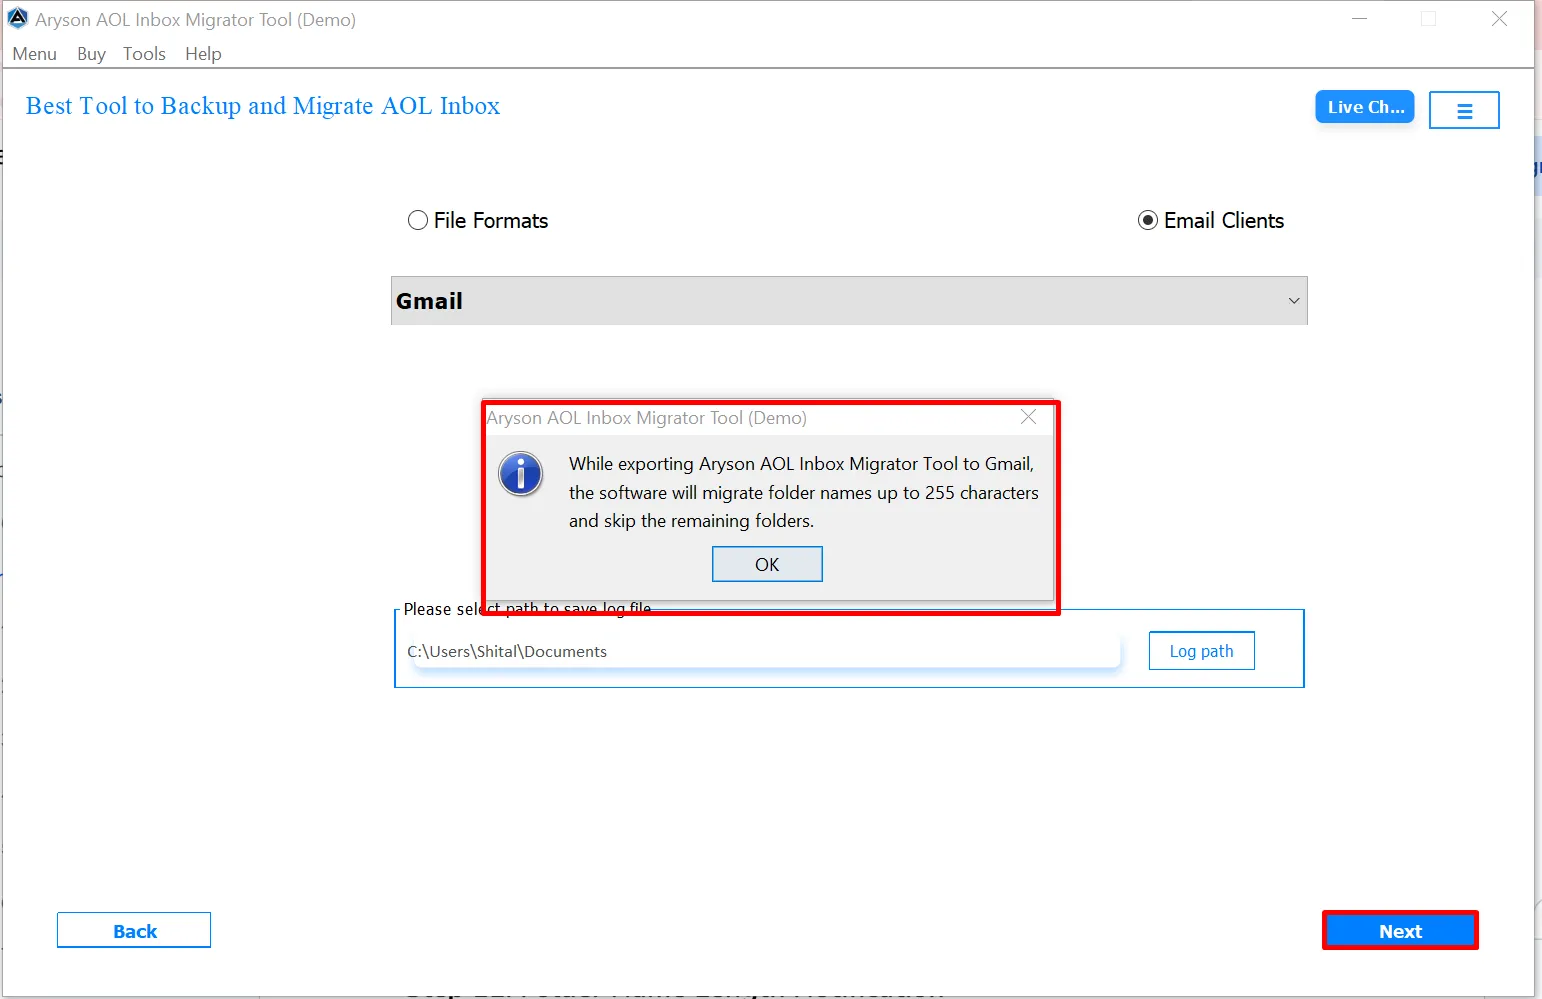
Step 7: The tool shows a notification stating that folder names up to 255 characters will be migrated, while longer folders will be skipped. Click OK to continue.
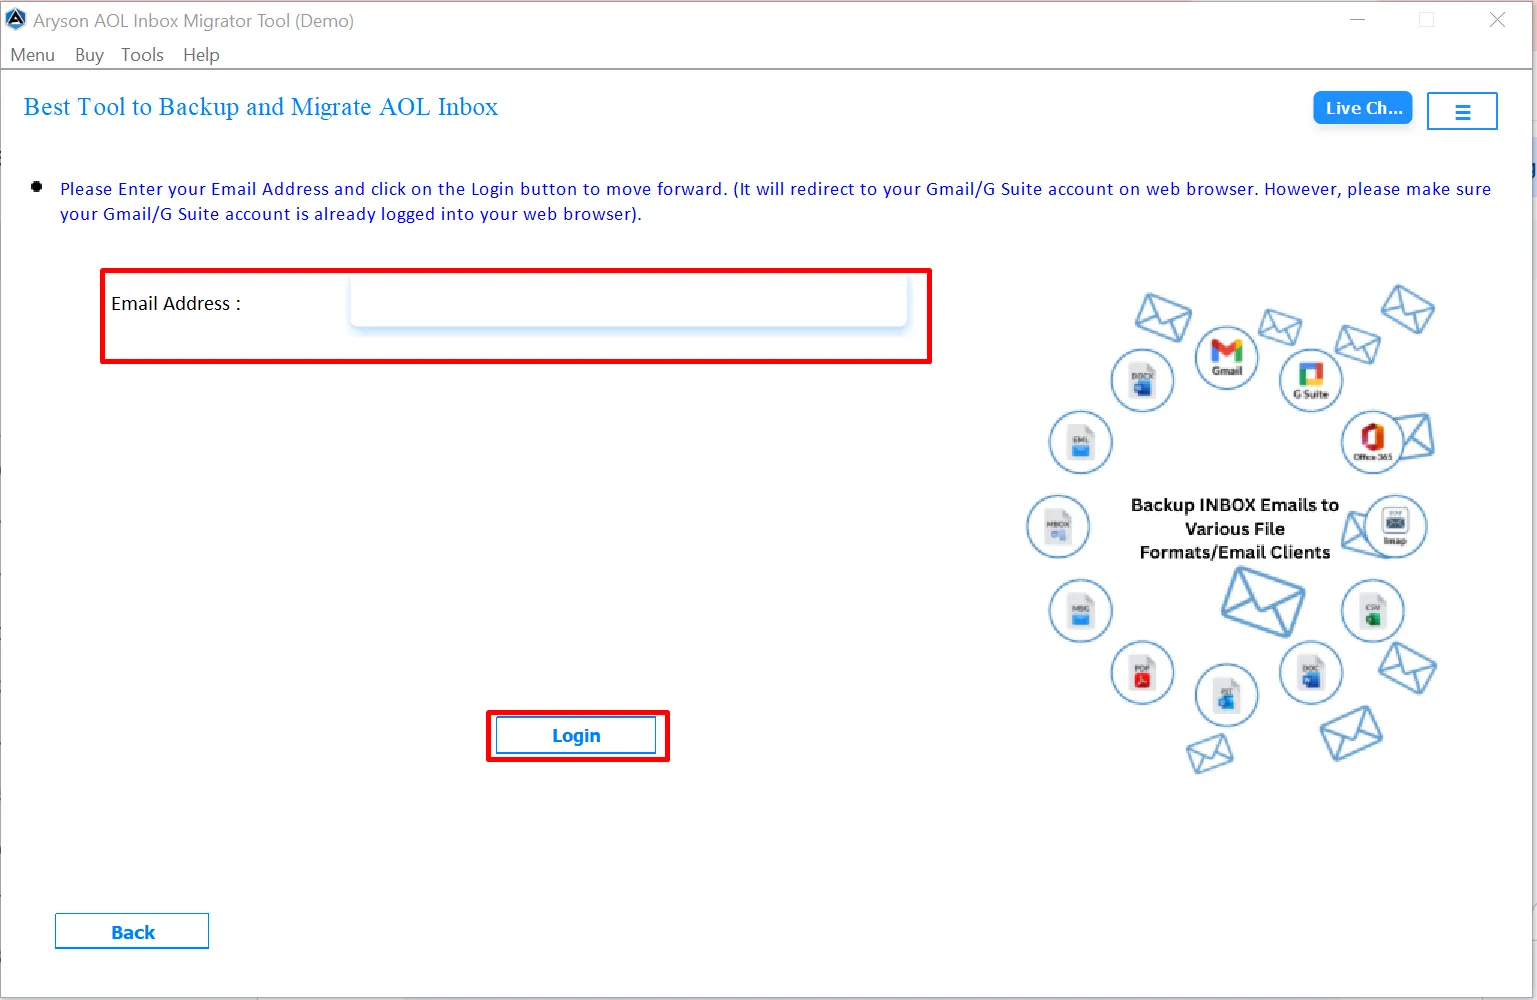
Step 8: Enter your email address in the highlighted field. After entering the email address, click on the Login button to proceed.
Step 9: Now, “Choose an account” and procced further. Once the verification code is received and confirmed, a message will appear stating “ Received verification code. You may now close this window. ”

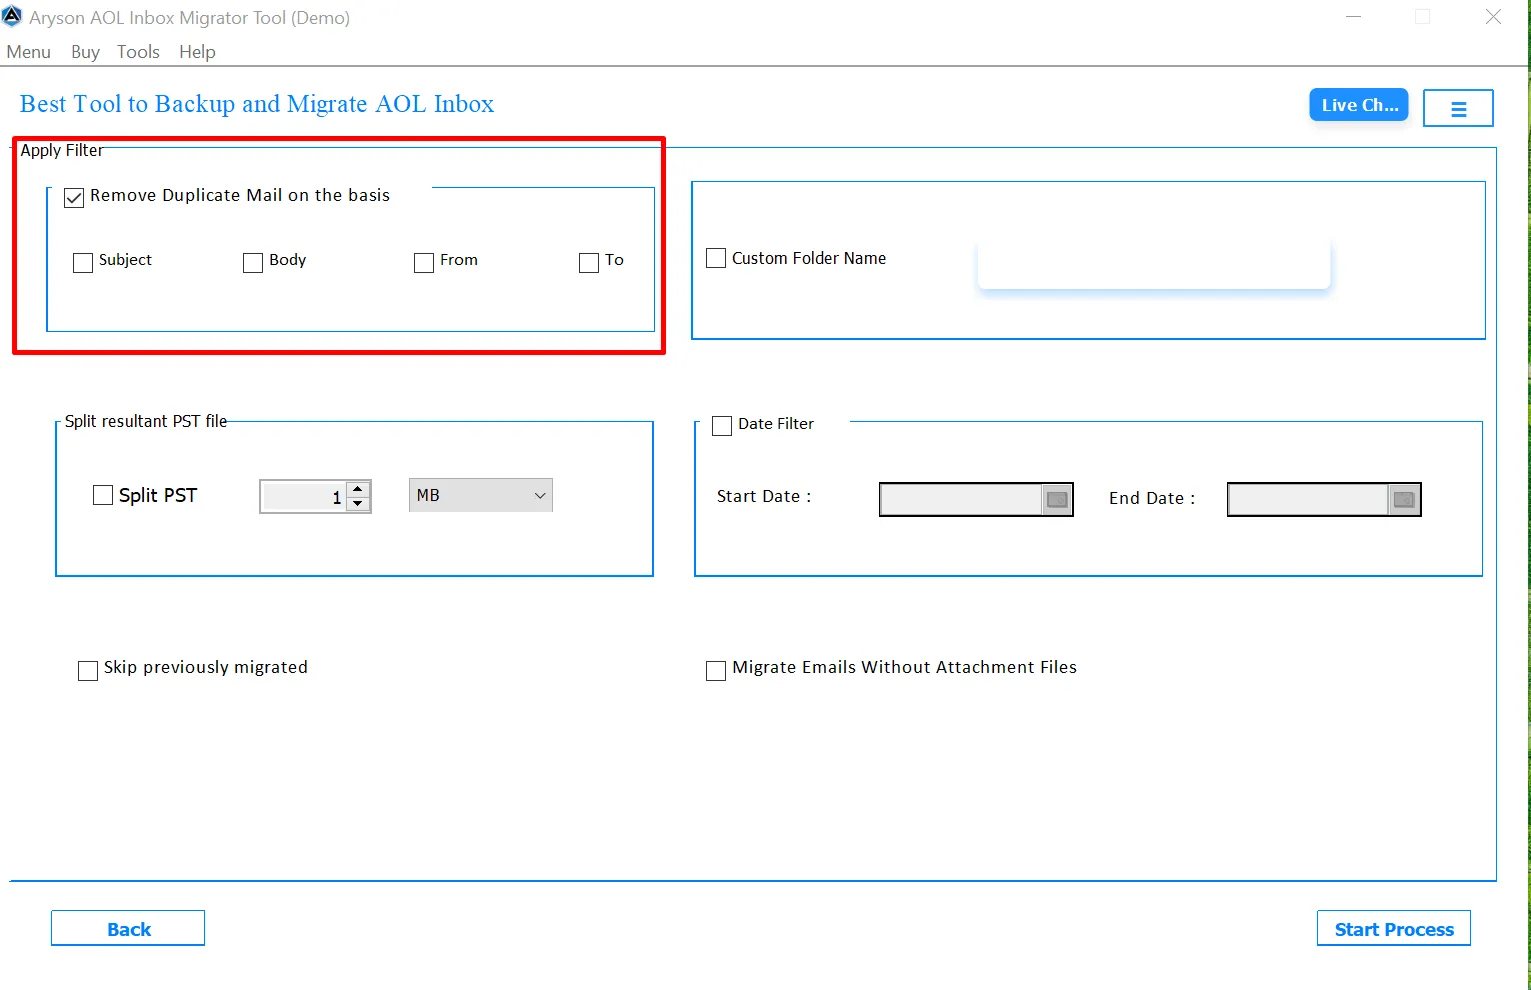
Step 10: Use the Apply Filter on the basis option to avoid migrating or backing up duplicate emails.
- Enable the Remove Duplicate Mail on the basis checkbox.
- Choose one or more conditions to identify duplicates:
- Subject
- Body
- From
- To
Step 11: The Custom Folder Name feature allows users to define a personalized folder name for storing migrated emails.
Step 12: The Date Filter option allows users to migrate emails within a specific time frame.
- Start Date Selection: Emails received or sent on or after the selected start date will be processed.
- End Date Selection: Users can define the ending date of the migration period. Emails beyond the selected date are excluded.

Step 13: When the user enables this feature, this feature prevents the re-migration of emails that were already transferred in earlier sessions.

Step 14: This option allows users to migrate only email messages while excluding attachments. It is ideal when attachments are large or unnecessary.
Step 15: After completing all required selections and settings, click the Start Process button to start the process.

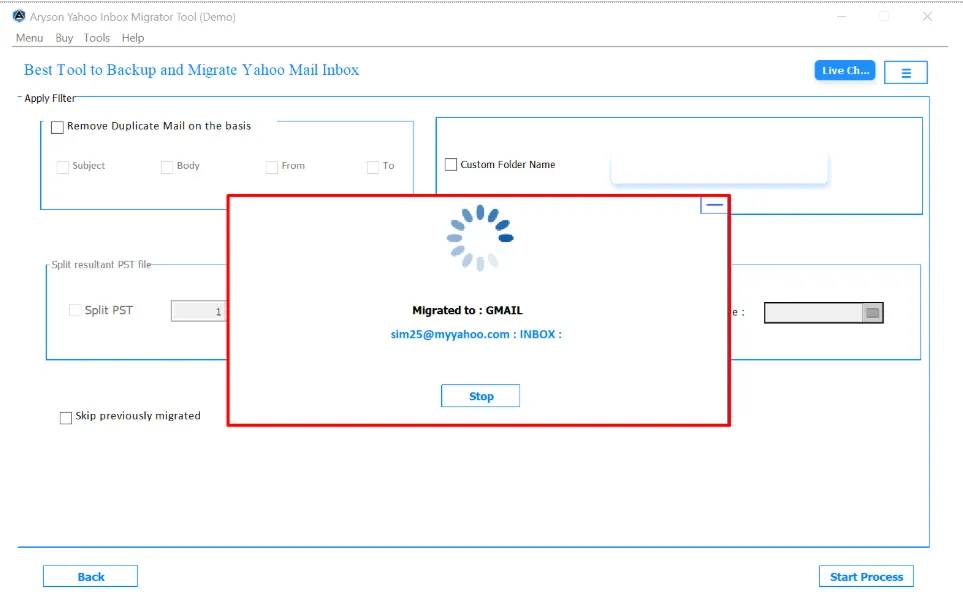
Step 16: Here is the processing status of the migration. It shows that the AOL Mail data is being migrated to your Gmail Account, along with a loading indicator.
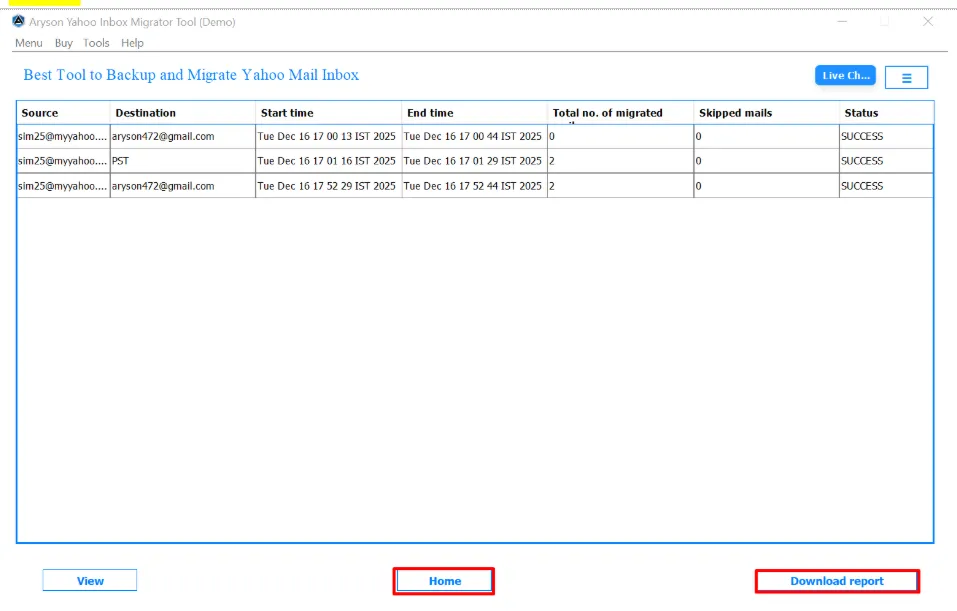
Step 17: Now, it displays a detailed migration summary report, including the source account, destination, start time, end time, total number of migrated emails, skipped emails, and the overall status of the migration.
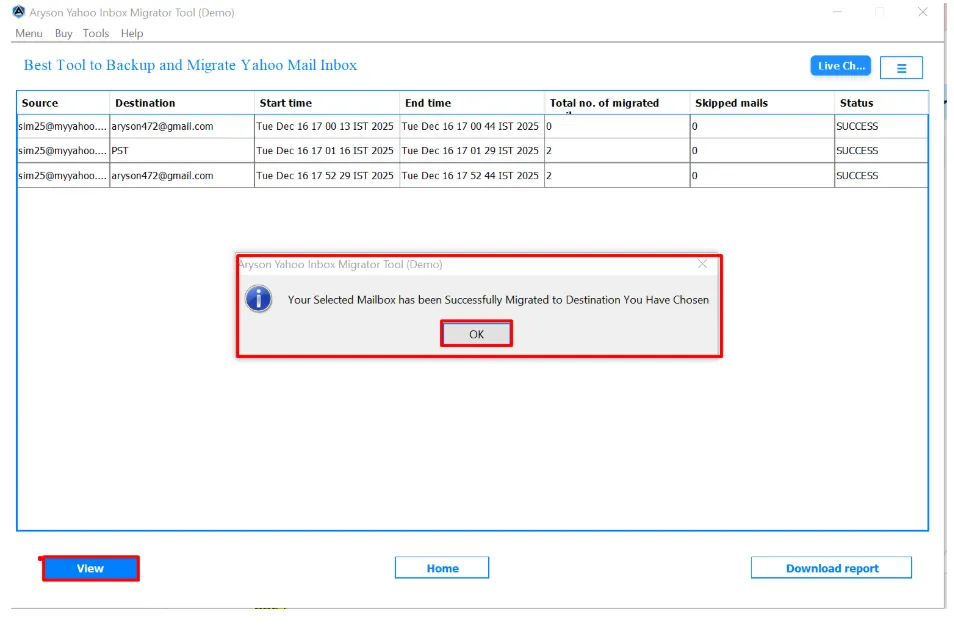
Step 18: When you tap on the View button, a confirmation prompt appears. This prompt informs you that the selected mailbox has been successfully migrated to the chosen destination. Click on the OK button to confirm the message and close the prompt.
Step 19: After the migration completes, you can use the marked options to manage your next action:
- Home Button: Click this button if you want to start a new migration immediately. It takes you back to the main screen without closing the tool.
- Download Report: Use this option to save a detailed migration report. This report is quite helpful for records or documentation.
Activation Guide
Activate the Software
Installation & Uninstallation
Installation & Uninstallation of Software
User Interface
User Interface
After downloading the Aryson OST to PST Converter Tool, you will find the welcome screen as played below.