Complete Step-by-Step Guide for Aryson Microsoft 365 Migration Tool
Easily migrate Mailbox, SharePoint, and OneDrive data from Microsoft 365 with an advanced tool built for secure and precise transfers. It includes powerful deduplication for Emails, SharePoint, and OneDrive, scanning data to detect and remove duplicates before migration, reducing unnecessary transfer and improving storage efficiency.
- Table of Content
- Software Working Process
- Deduplication
- Activation Guide
- Installation & Uninstallation
- User Interface
Software Working Process
Software Working Process
Step 1: Download and install the Aryson Microsoft 365 Migration Tool.

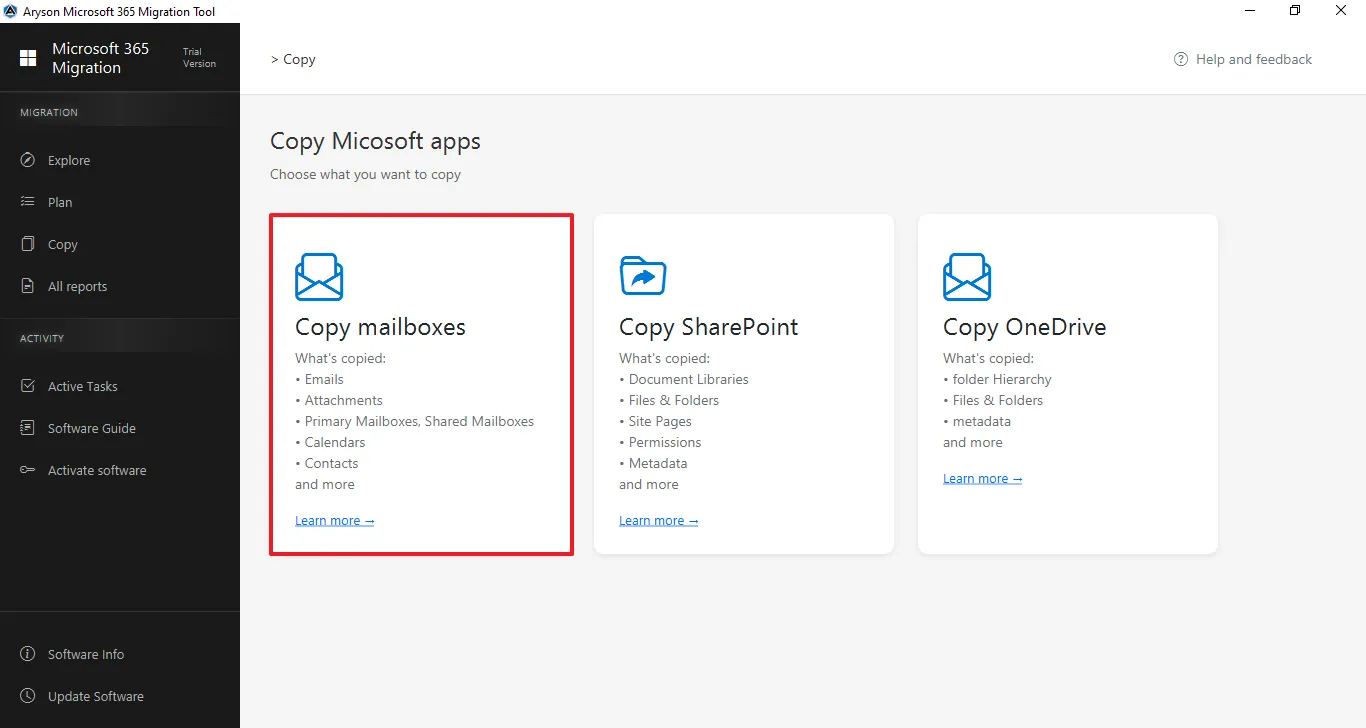
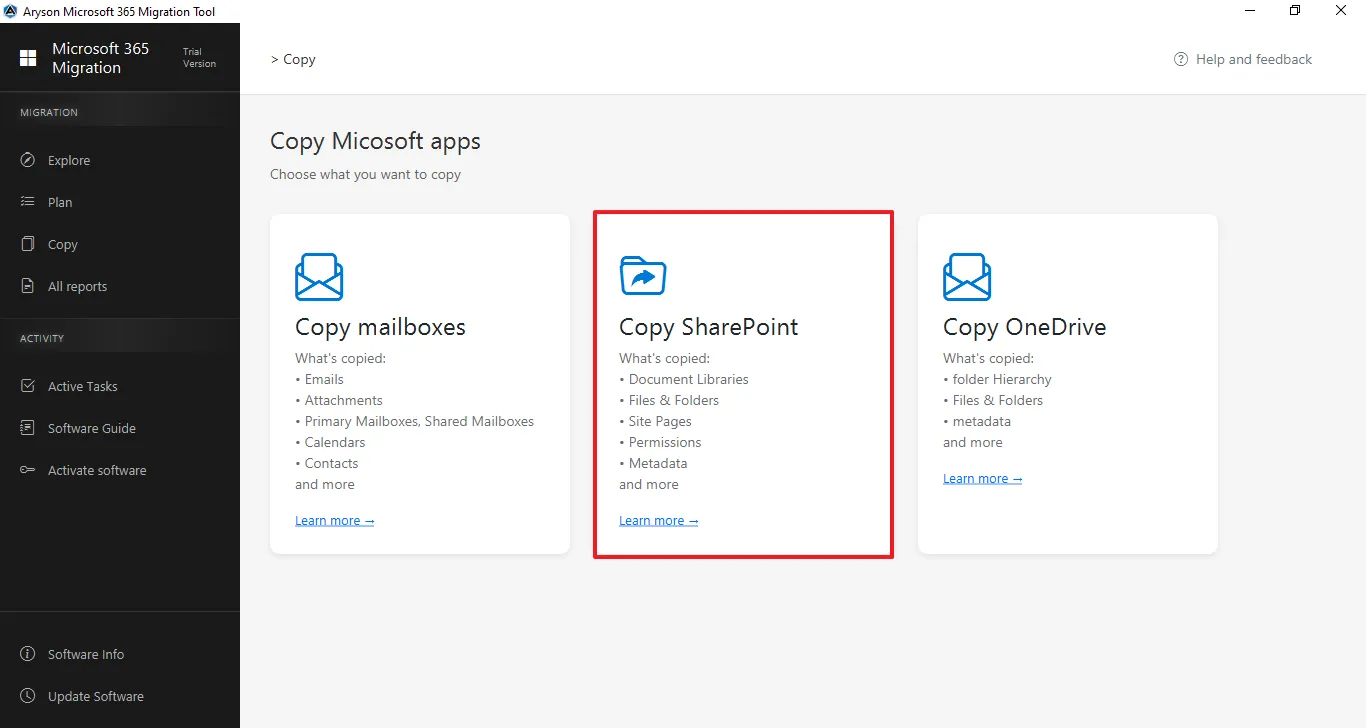
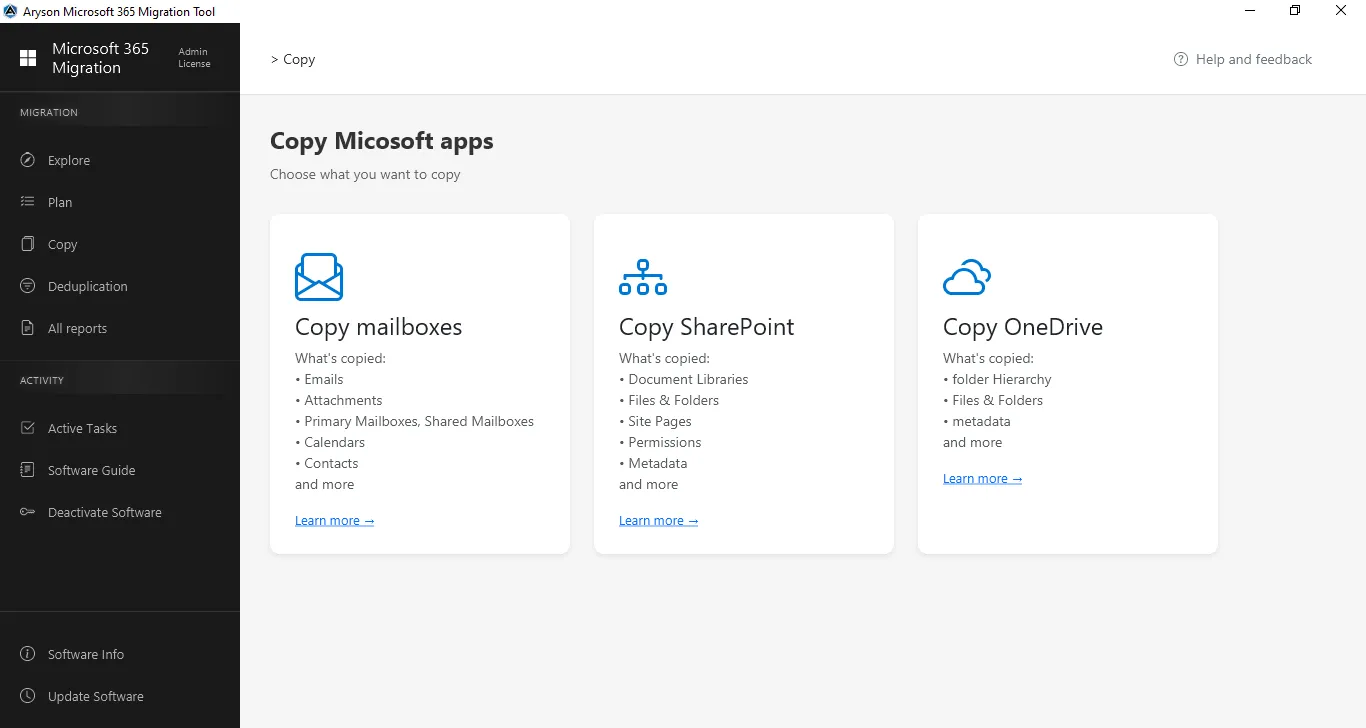
Step 2: Select Copy Mailboxes from the centre panel.

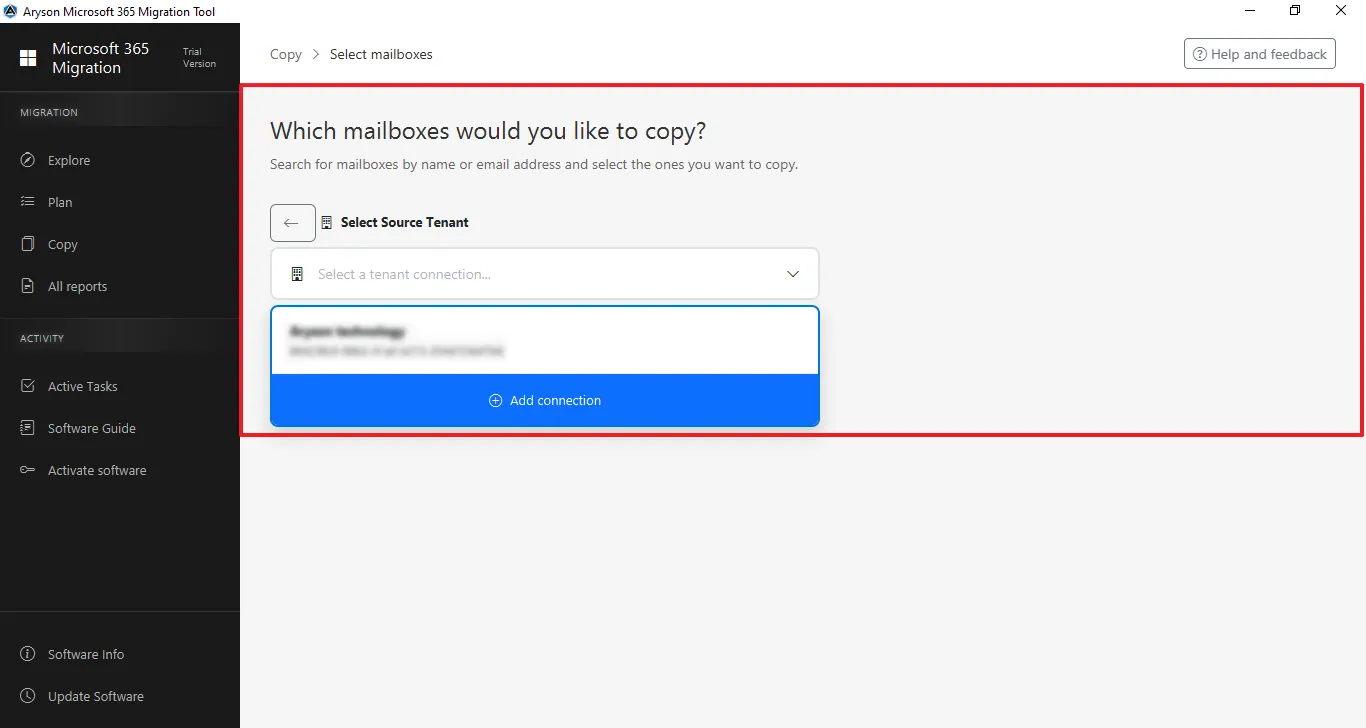
Step 3: Connect to the Source Tenant
- Click on Add Connection to connect with the source tenant.
- Select the previously added tenant from the dropdown list.

Step 4: Sign in: Enter the Admin email ID to log in.

Step 5: Enter the Microsoft Office 365 associated Password for the authentication.

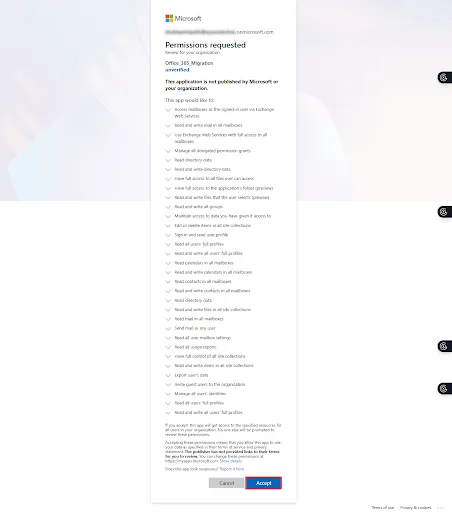
Step 6: This screen shows the Microsoft permissions consent page for the Microsoft 365 Migration Tool, listing the required organisation-wide access permissions for mailbox and data migration—click Accept to grant access and continue or Cancel to stop the process.

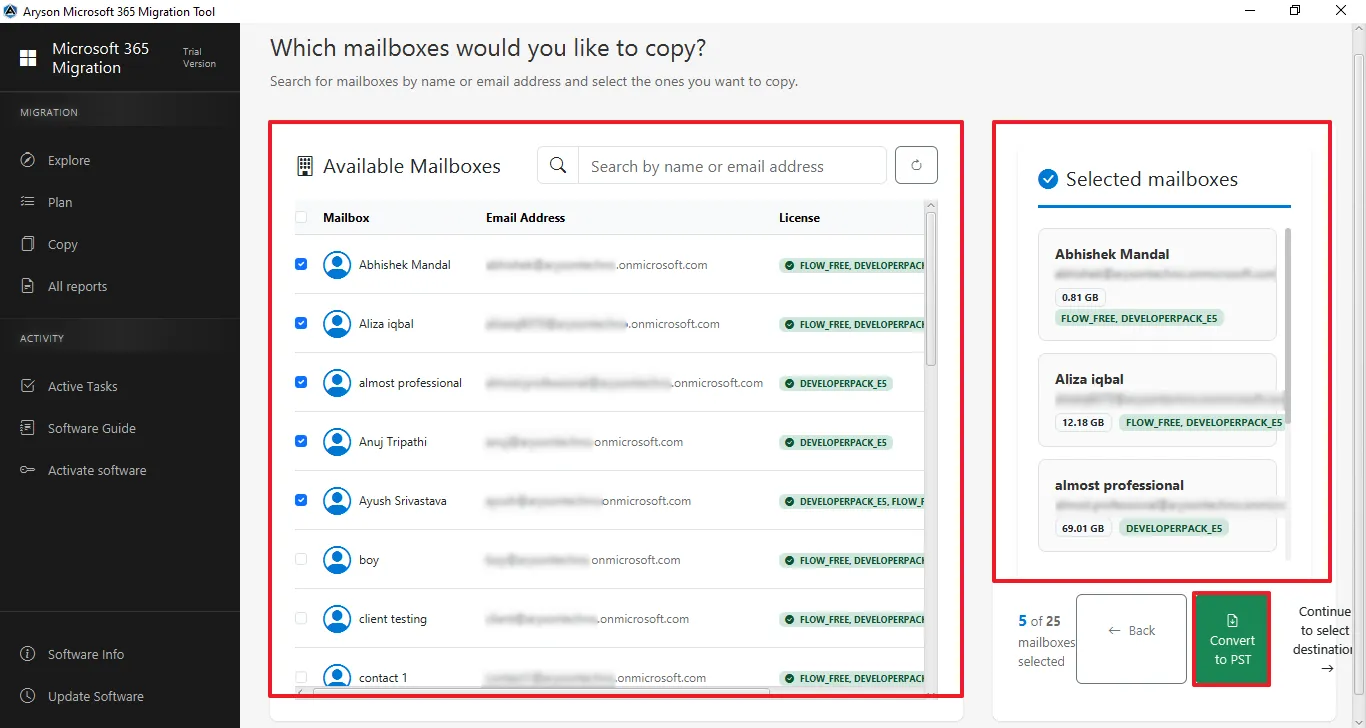
Step 7: Select Available Mailboxes to Migrate
- View and search available Mailboxes by name or email address.
- Select the required mailbox and confirm it in the Selected Mailboxes panel.
- Click Convert to PST to proceed.
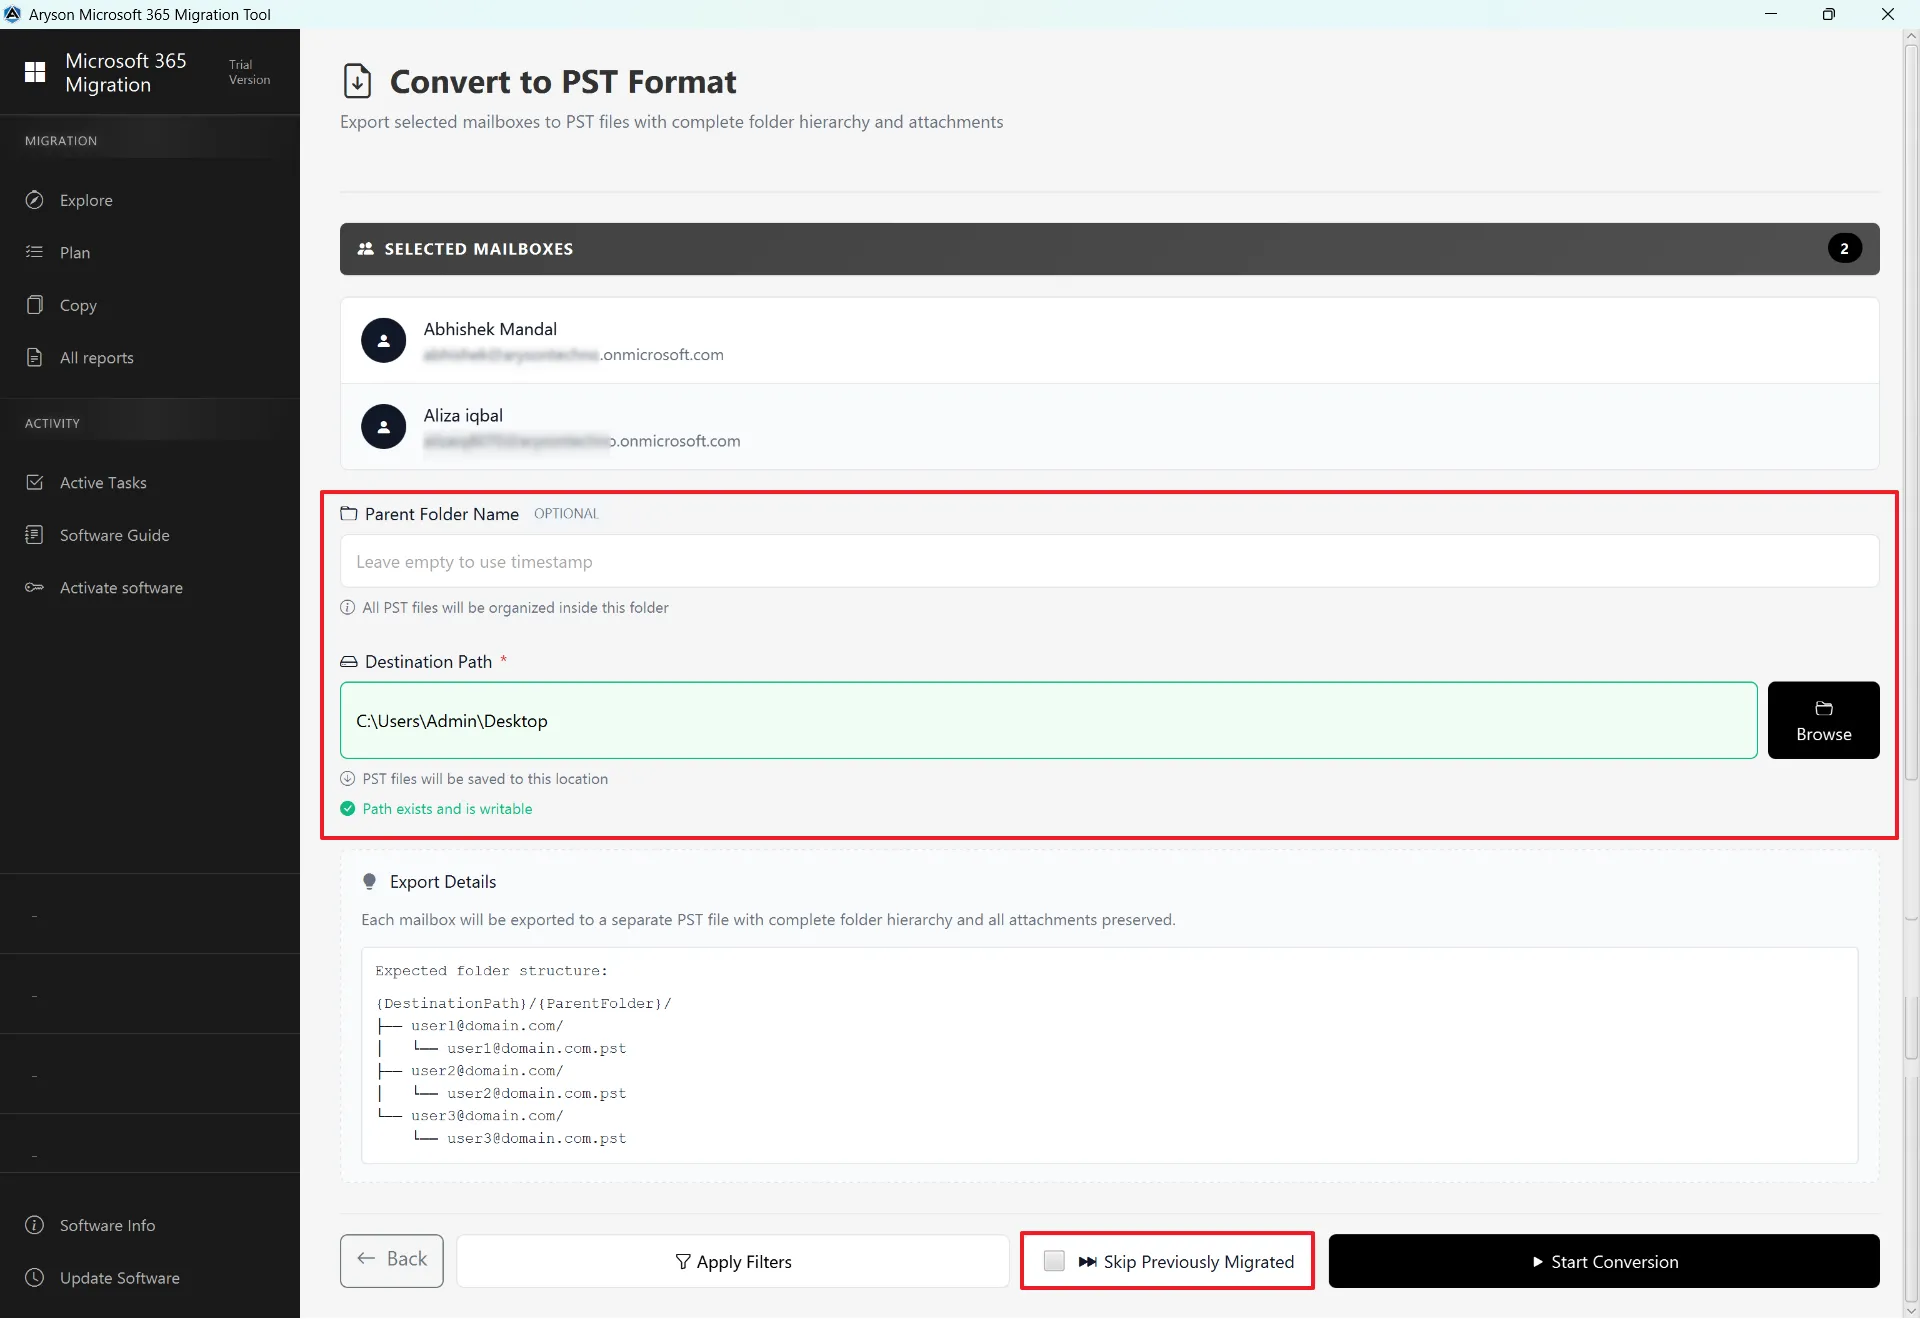
Step 8: Convert to PST Format
- This page lets you convert selected Microsoft 365 mailboxes to PST files.
- You can choose the destination location and set a parent folder name.
- It shows export details and allows you to skip previously migrated data.
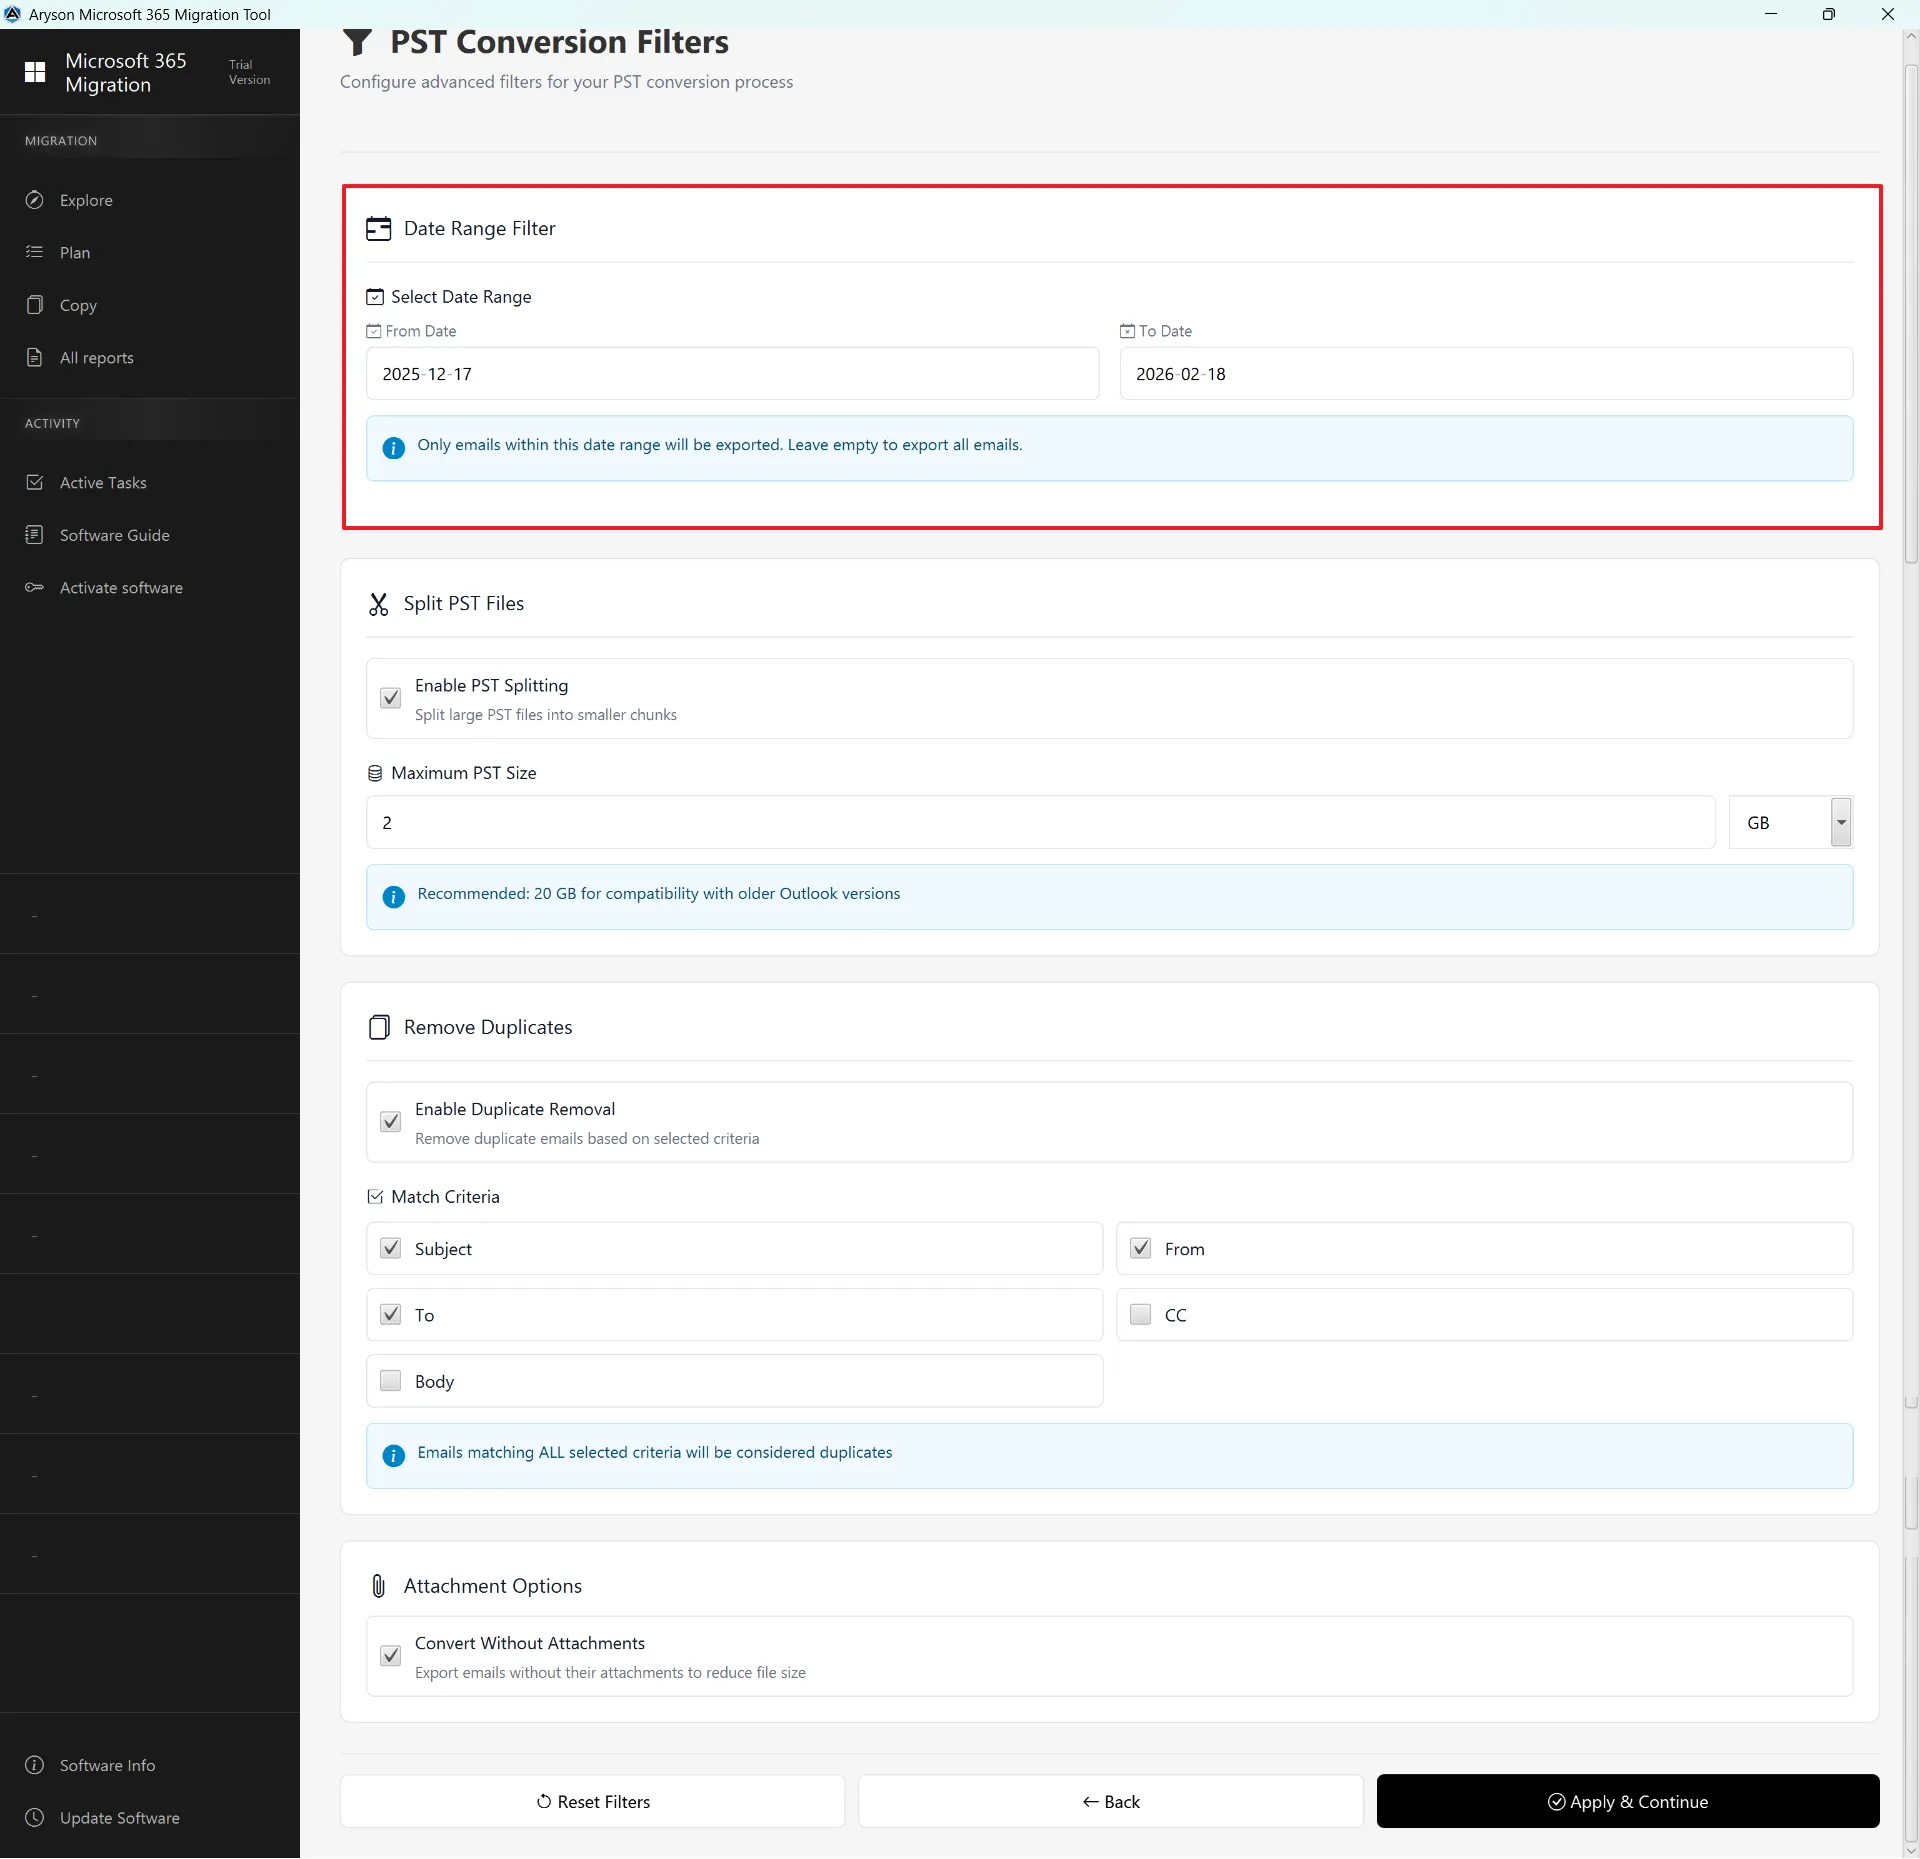
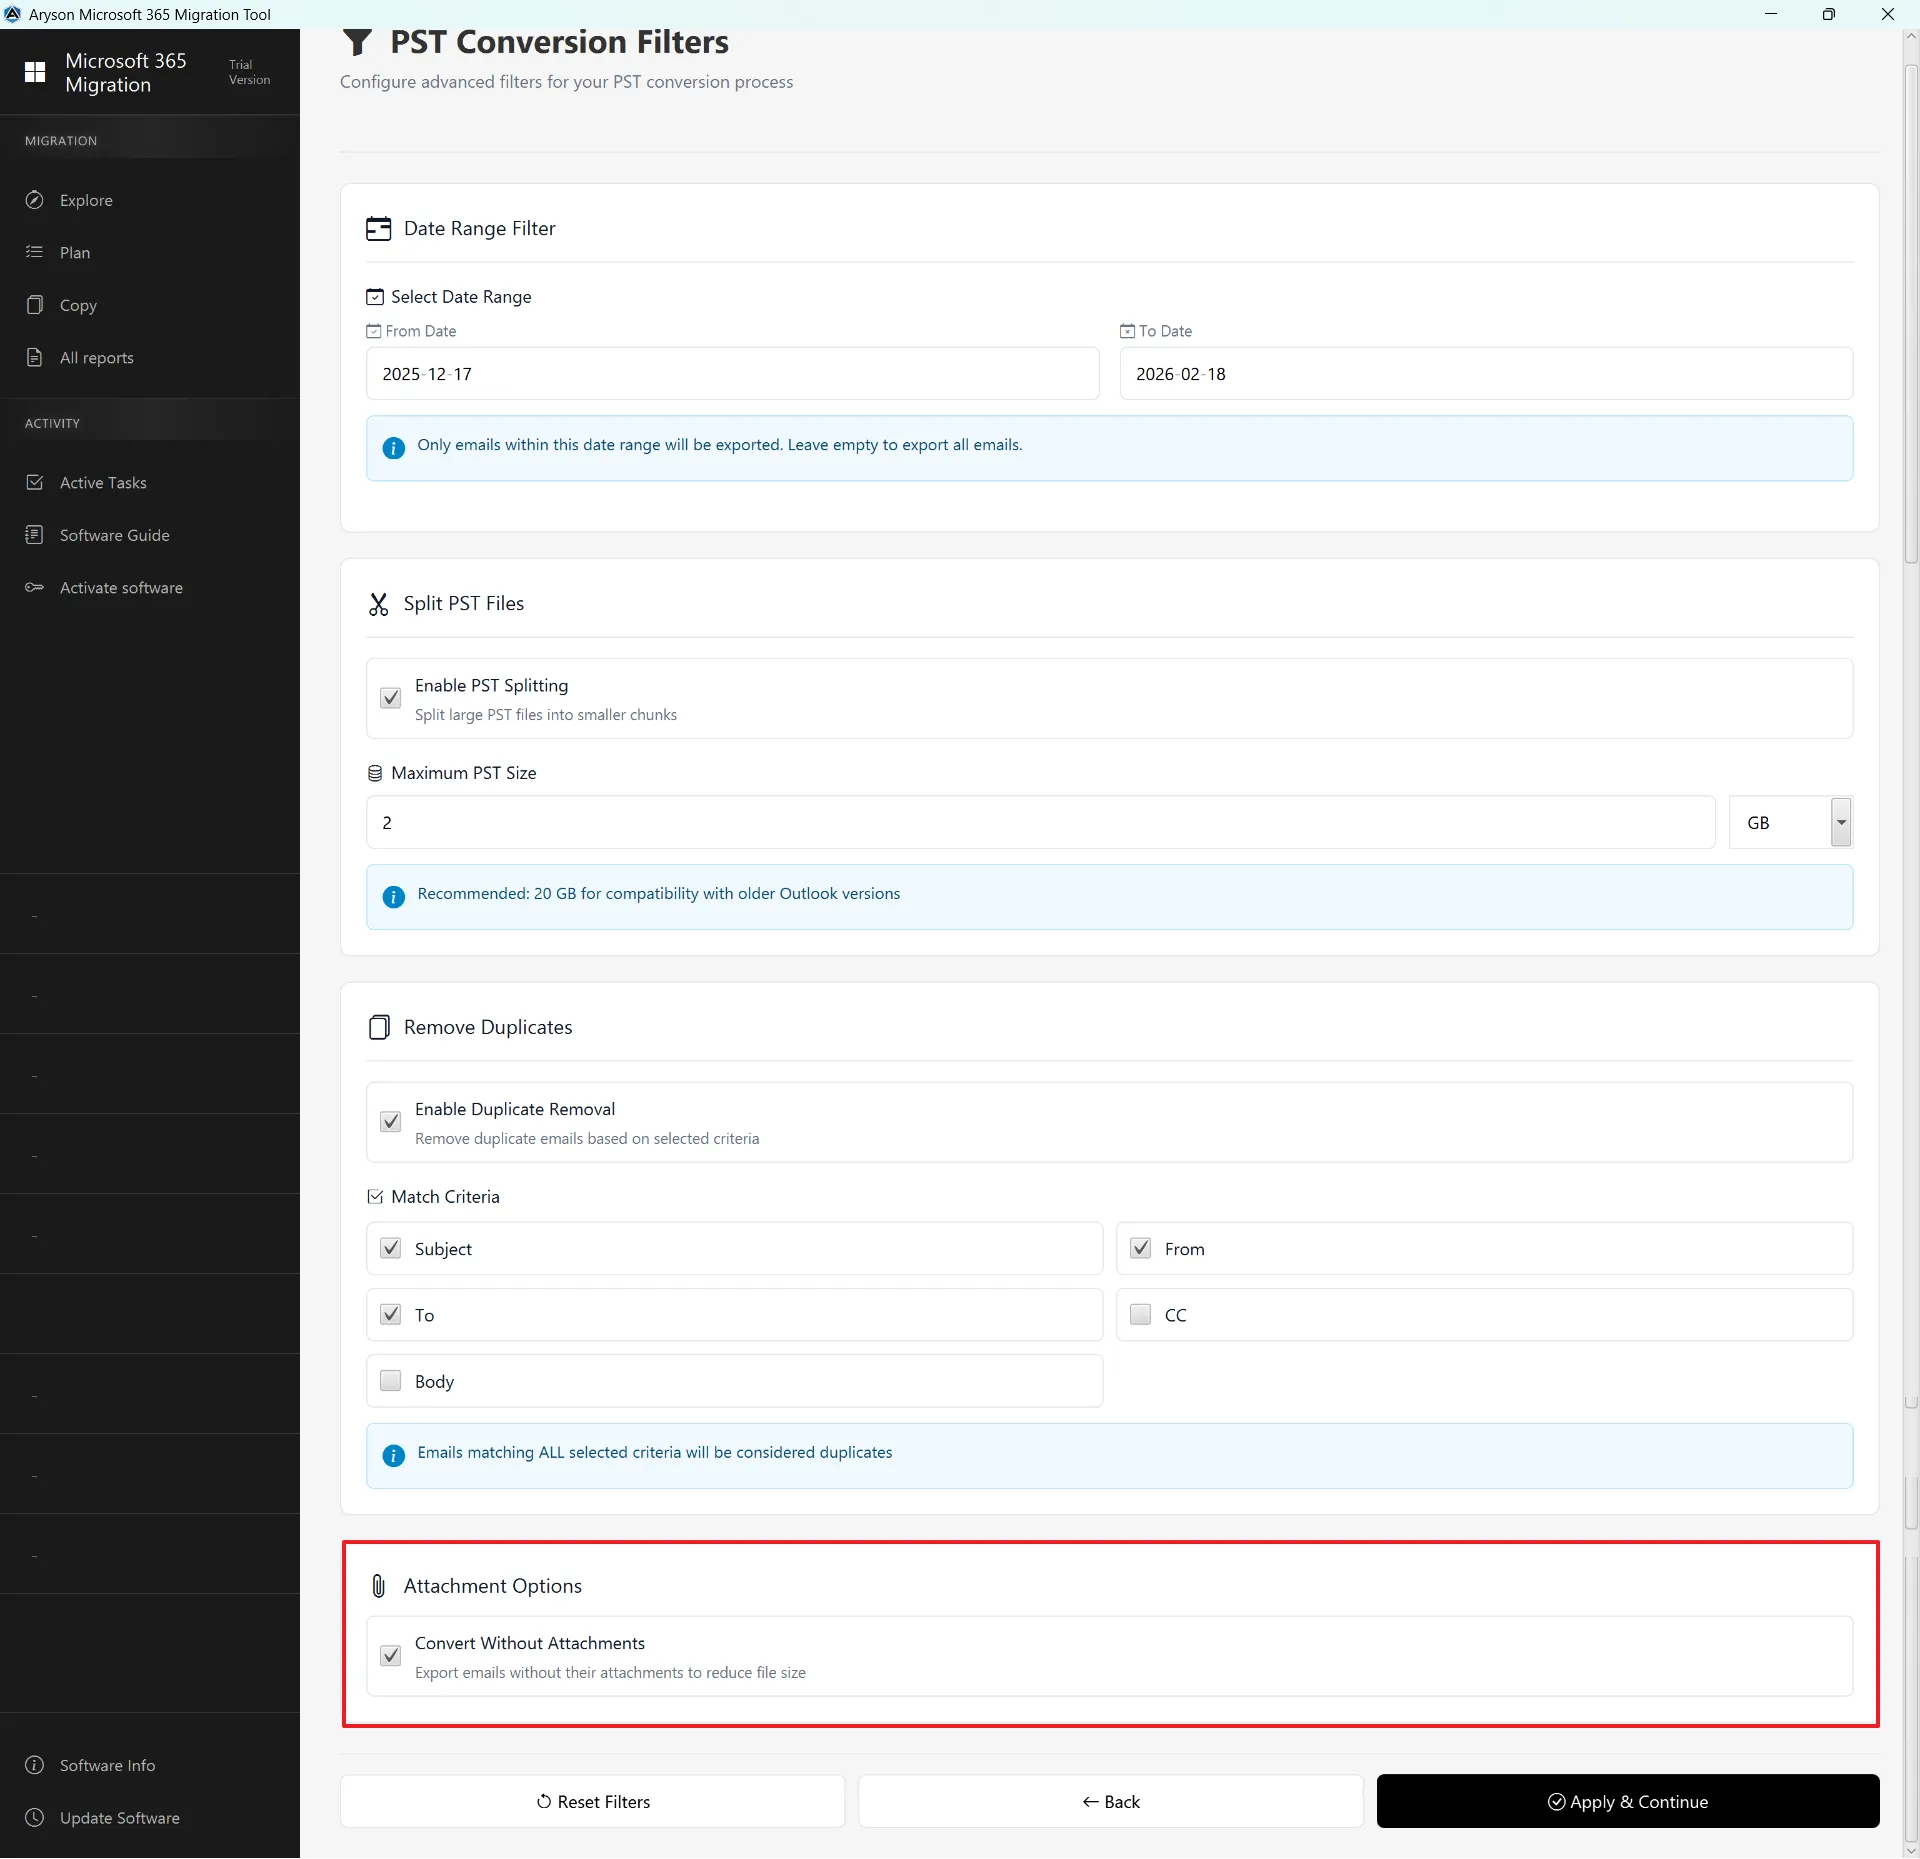
Step 9: Date Range Filter – This feature allows you to export emails from a specific time period instead of the entire mailbox.
- Select Date Range: Enable this option to activate the filter.
- From Date / To Date: Choose the start and end dates.
- Only emails within the selected dates will be converted to PST.
- If left empty, all emails will be exported.
Step 10: Split PST Files - This option helps manage large PST files by breaking them into smaller parts.
- Enable PST Splitting: Activates the split feature.
- Maximum PST Size: Set the size limit (e.g., 2 GB, 10 GB, 20 GB).
- When the file reaches the defined size, this tool automatically creates a new PST file.
- Recommended for better compatibility with older Outlook versions and to prevent corruption.

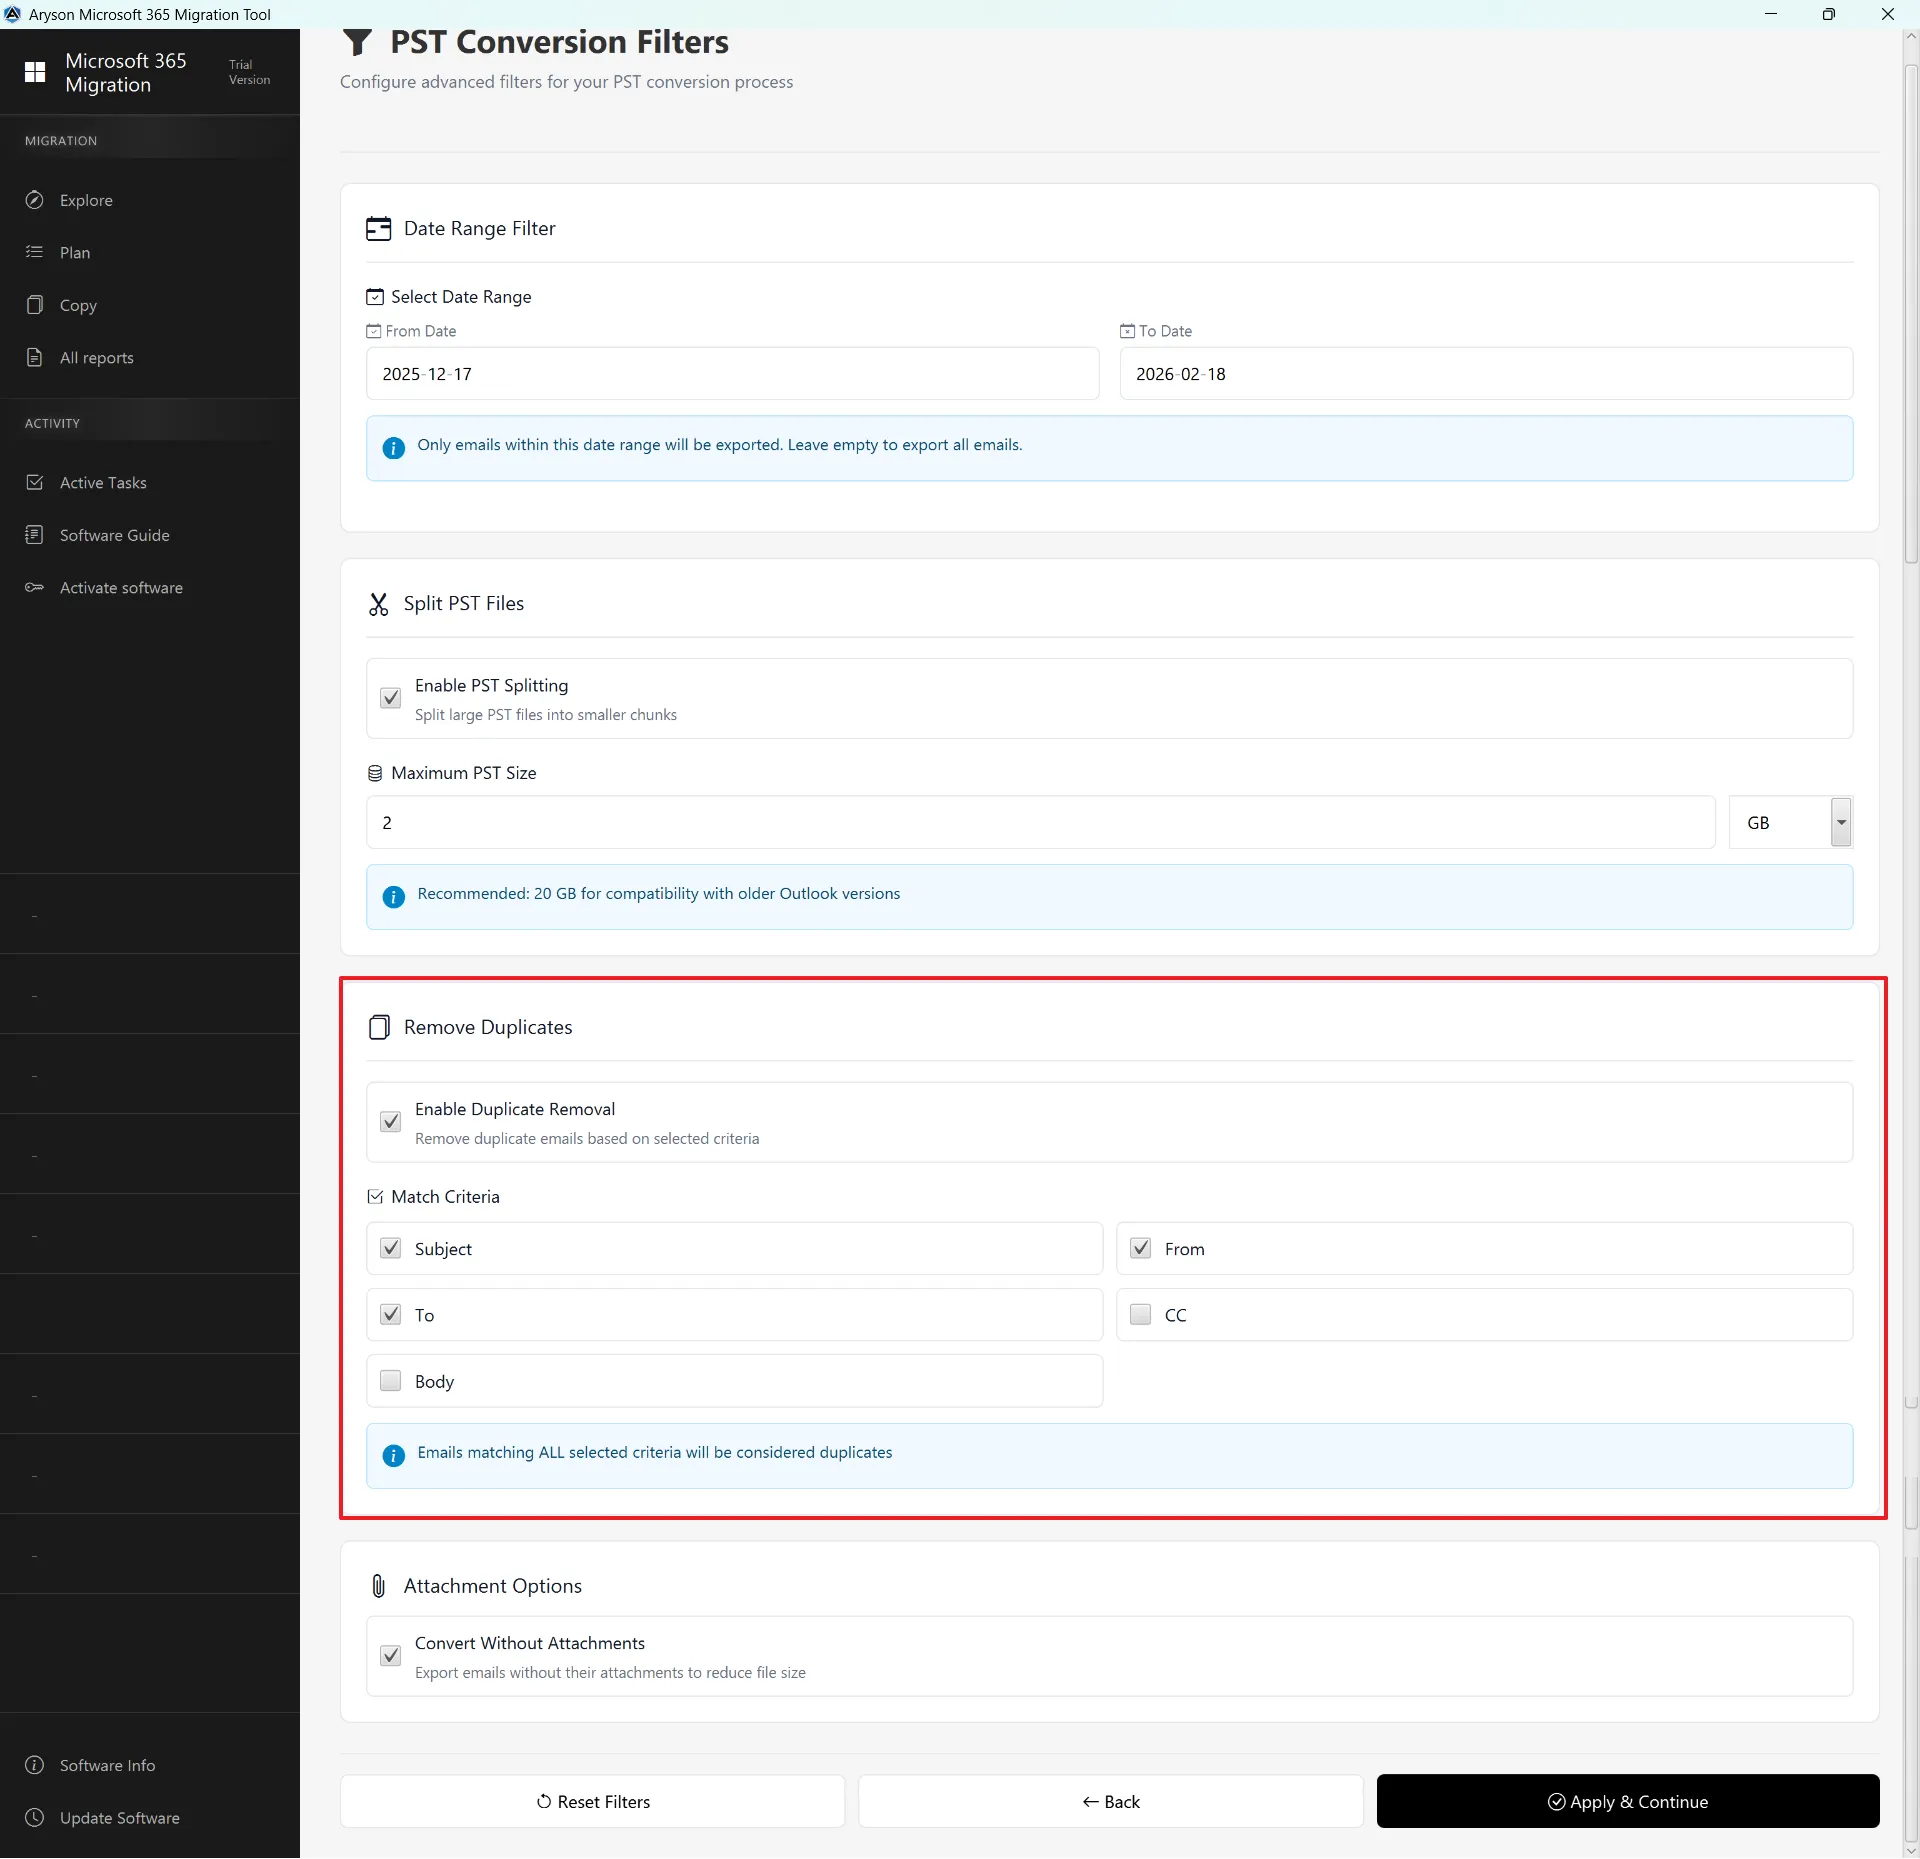
Step 11: Remove Duplicates – This feature removes duplicate emails during conversion to avoid redundancy.
- Enable Duplicate Removal: Activates duplicate filtering.
- Match Criteria Options: Subject, From, To, CC & Body.
- Emails matching all selected criteria will be considered duplicates and excluded from export.
Step 12: Attachment Options – This option allows you to manage email attachments during conversion.
- Convert Without Attachments: Exports emails without attachments.
- Helps reduce PST file size.
- Useful when attachments are not required in the backup.
Apply & Continue – Applies the selected filter settings and proceeds to the next step of the PST conversion process.
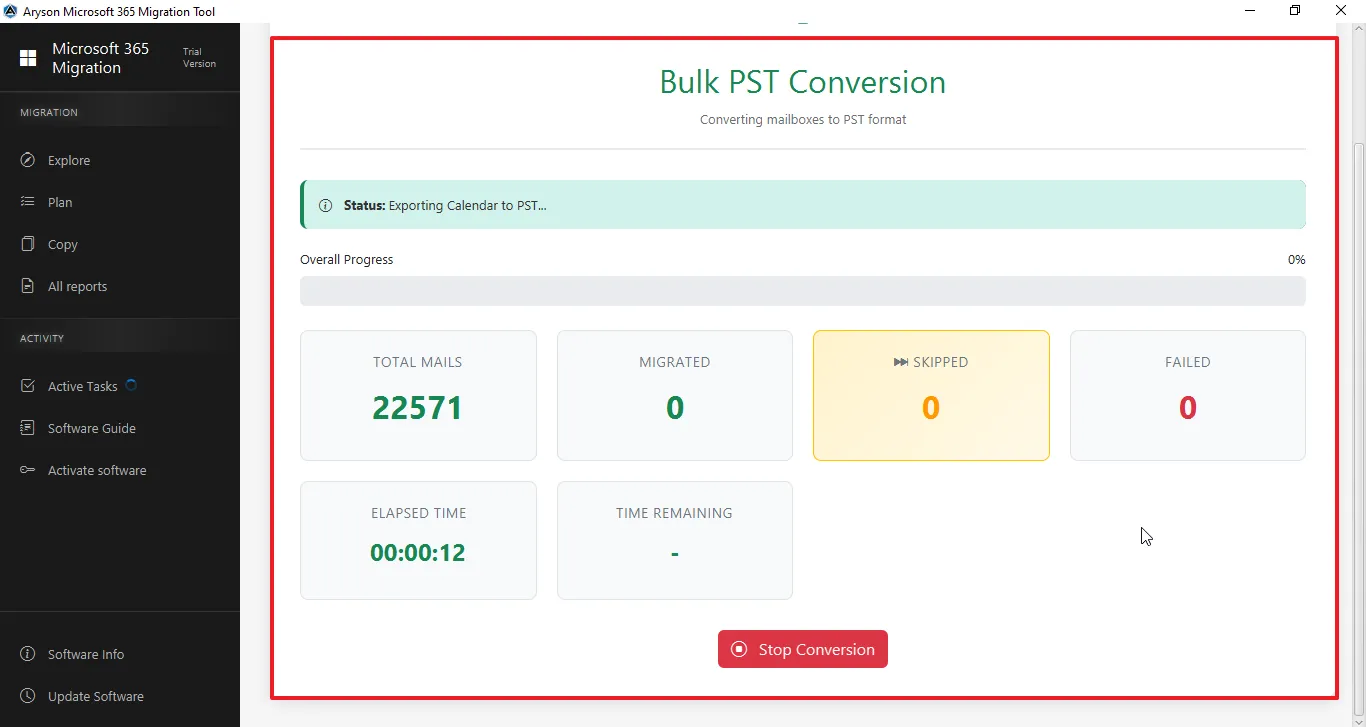
Step 13: After Clicking Apply and Continue
- This page displays the real-time progress of the Bulk PST Conversion process.
- It shows total mails, migrated, skipped, and failed items, and elapsed time.
- You can stop the conversion anytime using the Stop Conversion button.
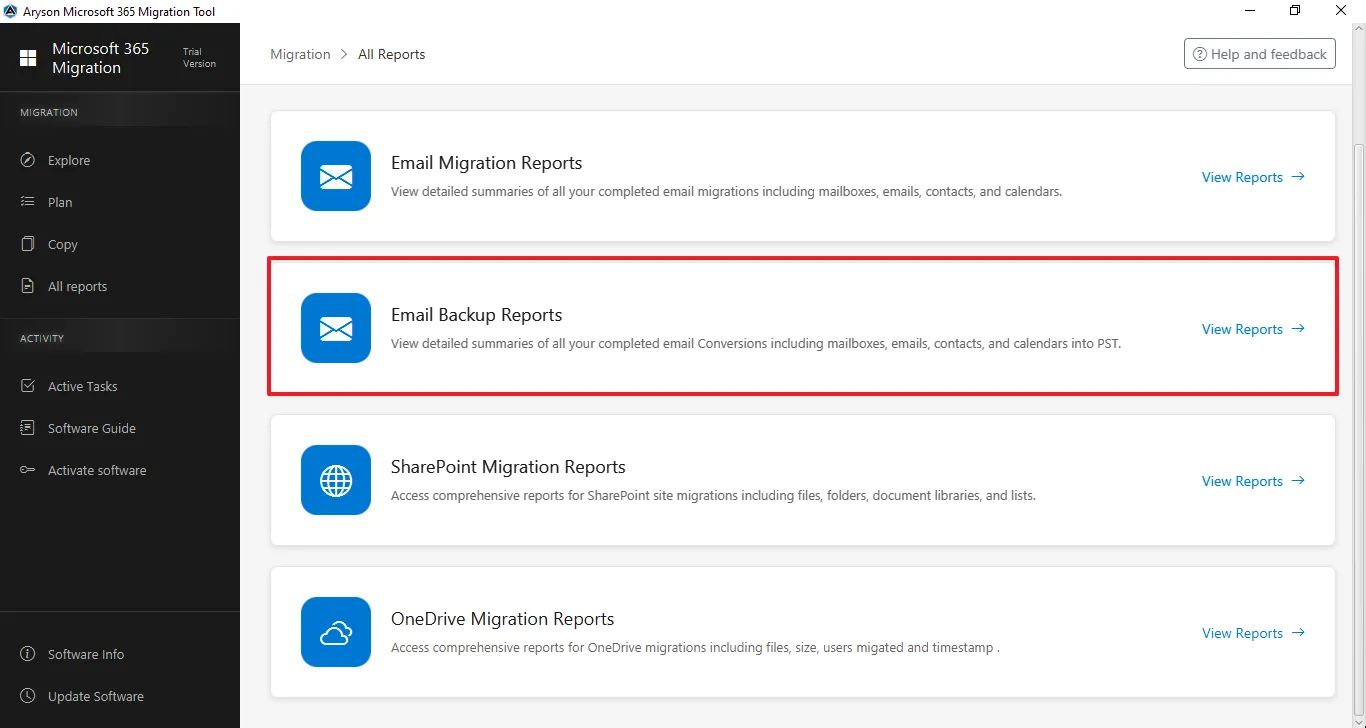
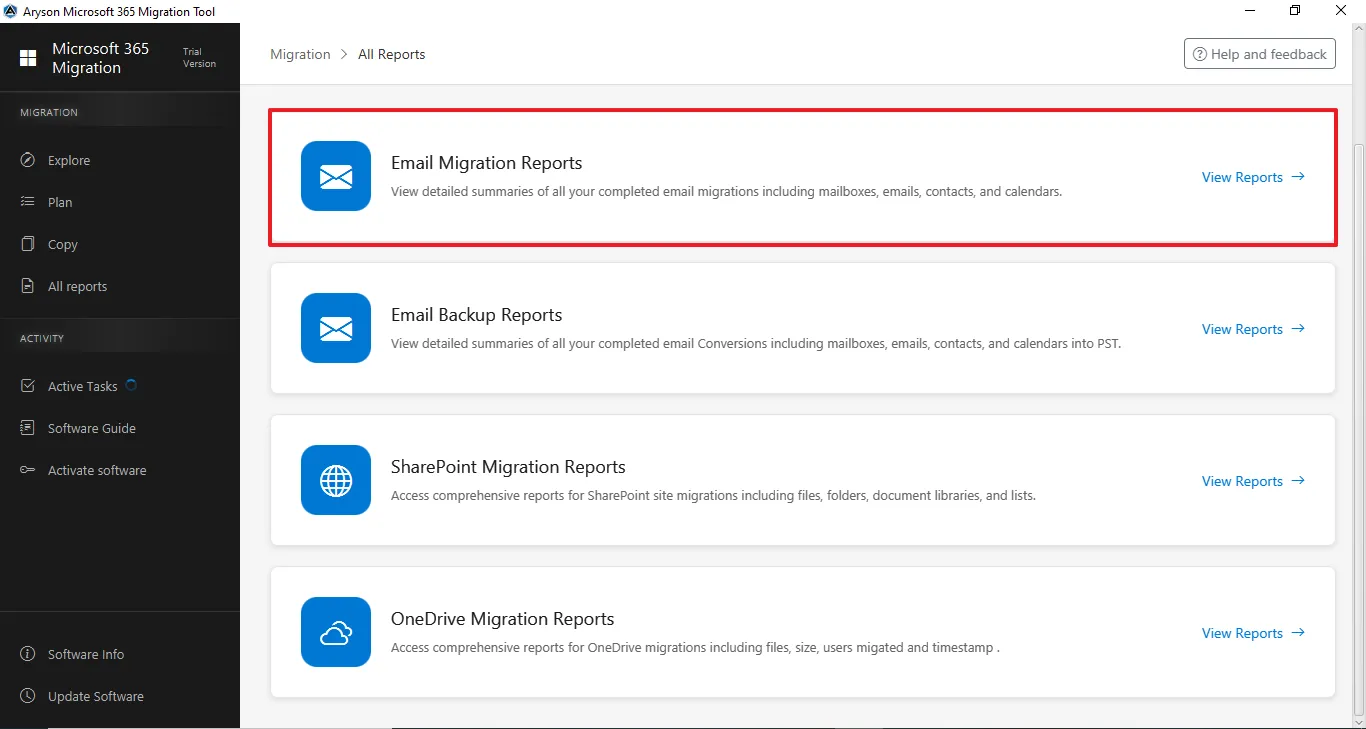
Step 14: The All Reports section gives a complete overview of all migration and backup activities. It lets users track status, view summaries, and review logs for Email, SharePoint, and OneDrive in one place.
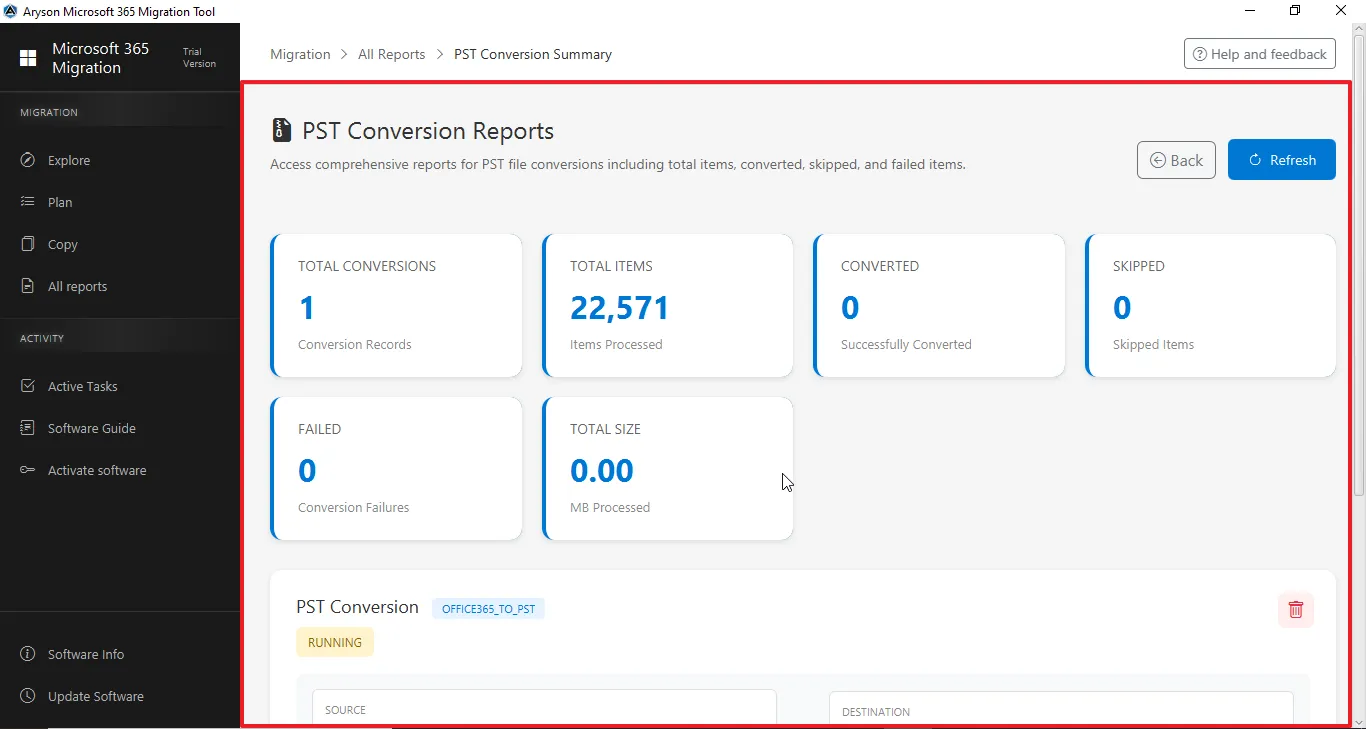
Step 15: This page shows the PST Conversion Reports with a complete summary of total conversions, items processed, converted, skipped, and failed. It also displays the total size processed and the detailed status of each PST conversion task.
Step 1: Download and install the Aryson Microsoft 365 Migration Tool.
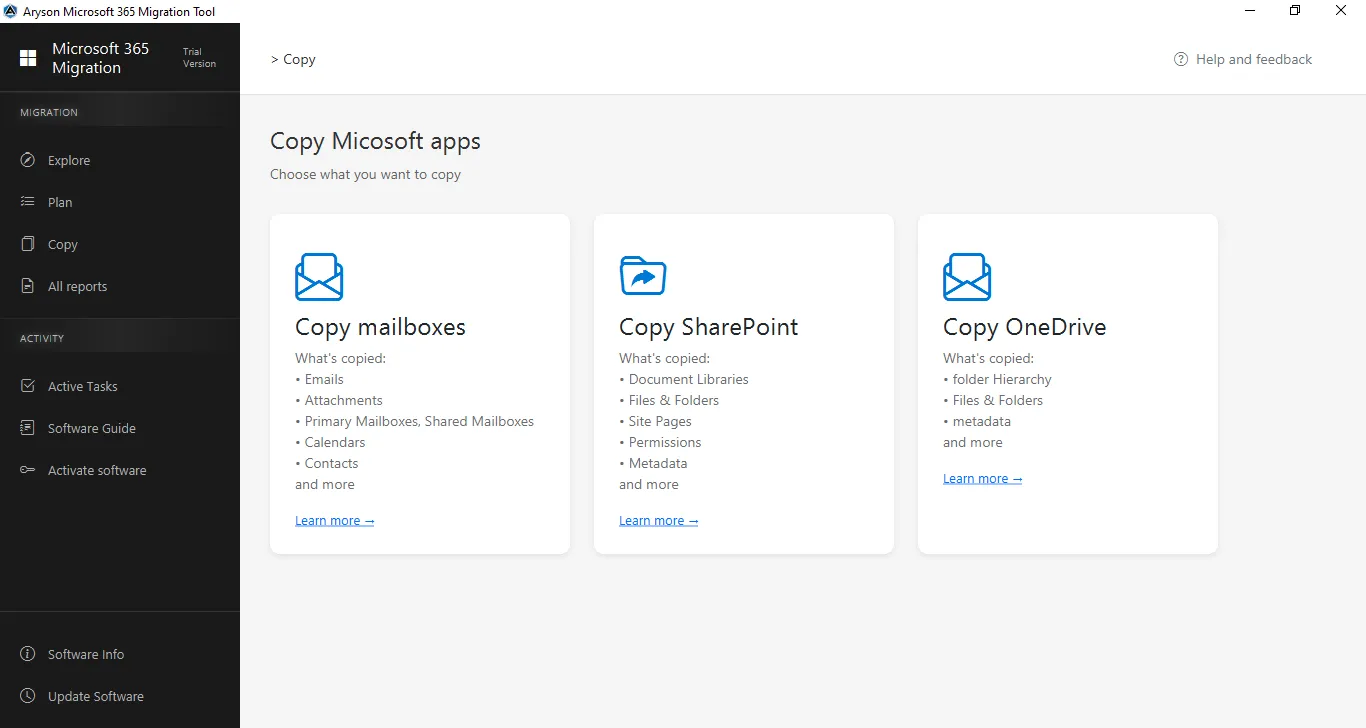
Step 2: Select Copy Mailboxes from the centre panel.
Step 3: Connect to the Source Tenant
- Click on Add Connection to connect with the source tenant.
- Select the previously added tenant from the dropdown list.
Step 4: Sign in: Enter the Admin email ID to log in.

Step 5: Enter the Microsoft Office 365 associated Password for the authentication.

Step 6: This screen shows the Microsoft permissions consent page for the Microsoft 365 Migration Tool, listing the required organisation-wide access permissions for mailbox and data migration—click Accept to grant access and continue or Cancel to stop the process.
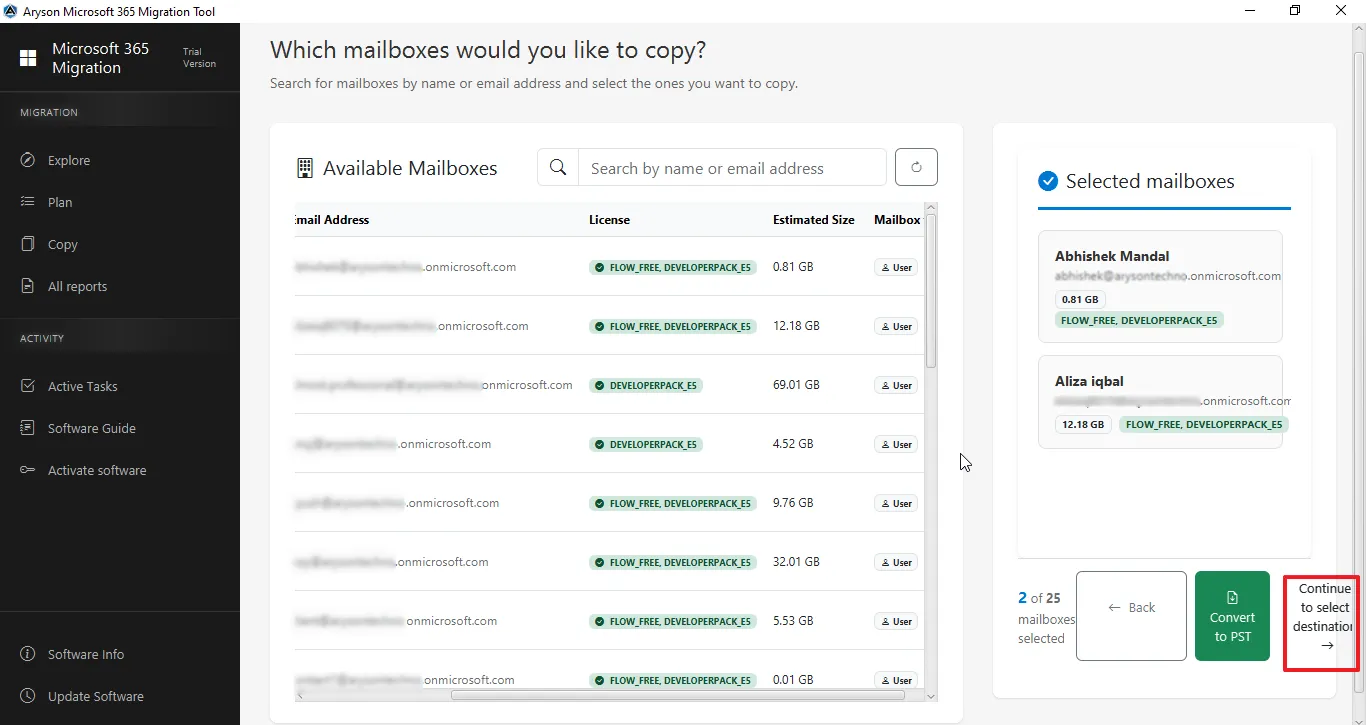
Step 7: Select Available Mailboxes to Migrate
- View and search available Mailboxes by name or email address.
- Select the required mailbox and confirm it in the Selected Mailboxes panel.
- Click Continue to select destination to proceed.
Step 8: Connect to the Destination Tenant
- Click on Add Connection to connect with the destination tenant.
- Select the previously added tenant from the dropdown list.

Step 9: Sign in: Enter the Admin email ID to log in.
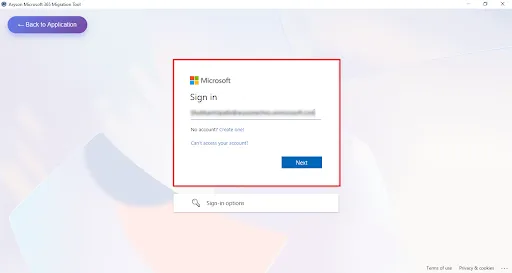
Step 10: Enter the Microsoft Office 365 associated Password for the authentication.

Step 11: This screen shows the Microsoft permissions consent page for the Microsoft 365 Migration Tool, listing the required organisation-wide access permissions for mailbox and data migration—click Accept to grant access and continue or Cancel to stop the process.

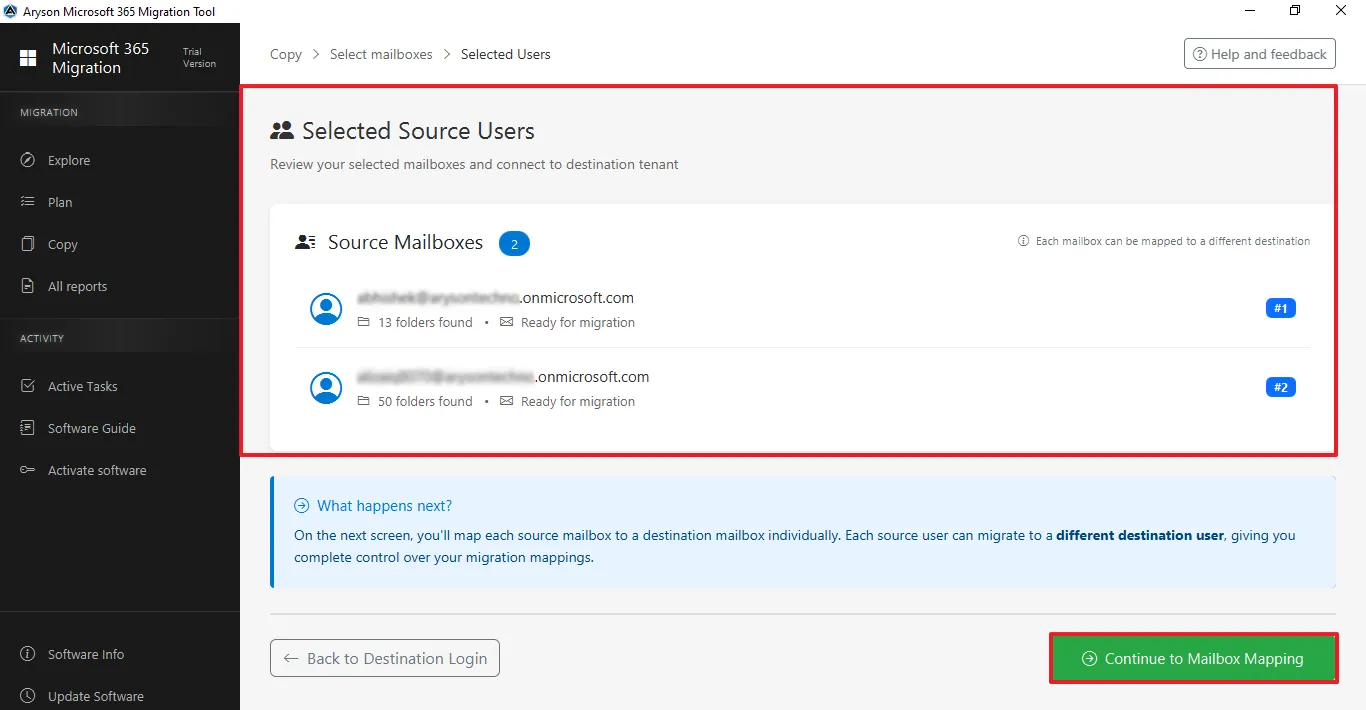
Step 12: Selected Source Users
- This page shows the selected source mailboxes along with their folder count and migration status.
- You can review the users and continue to map them to destination mailboxes.
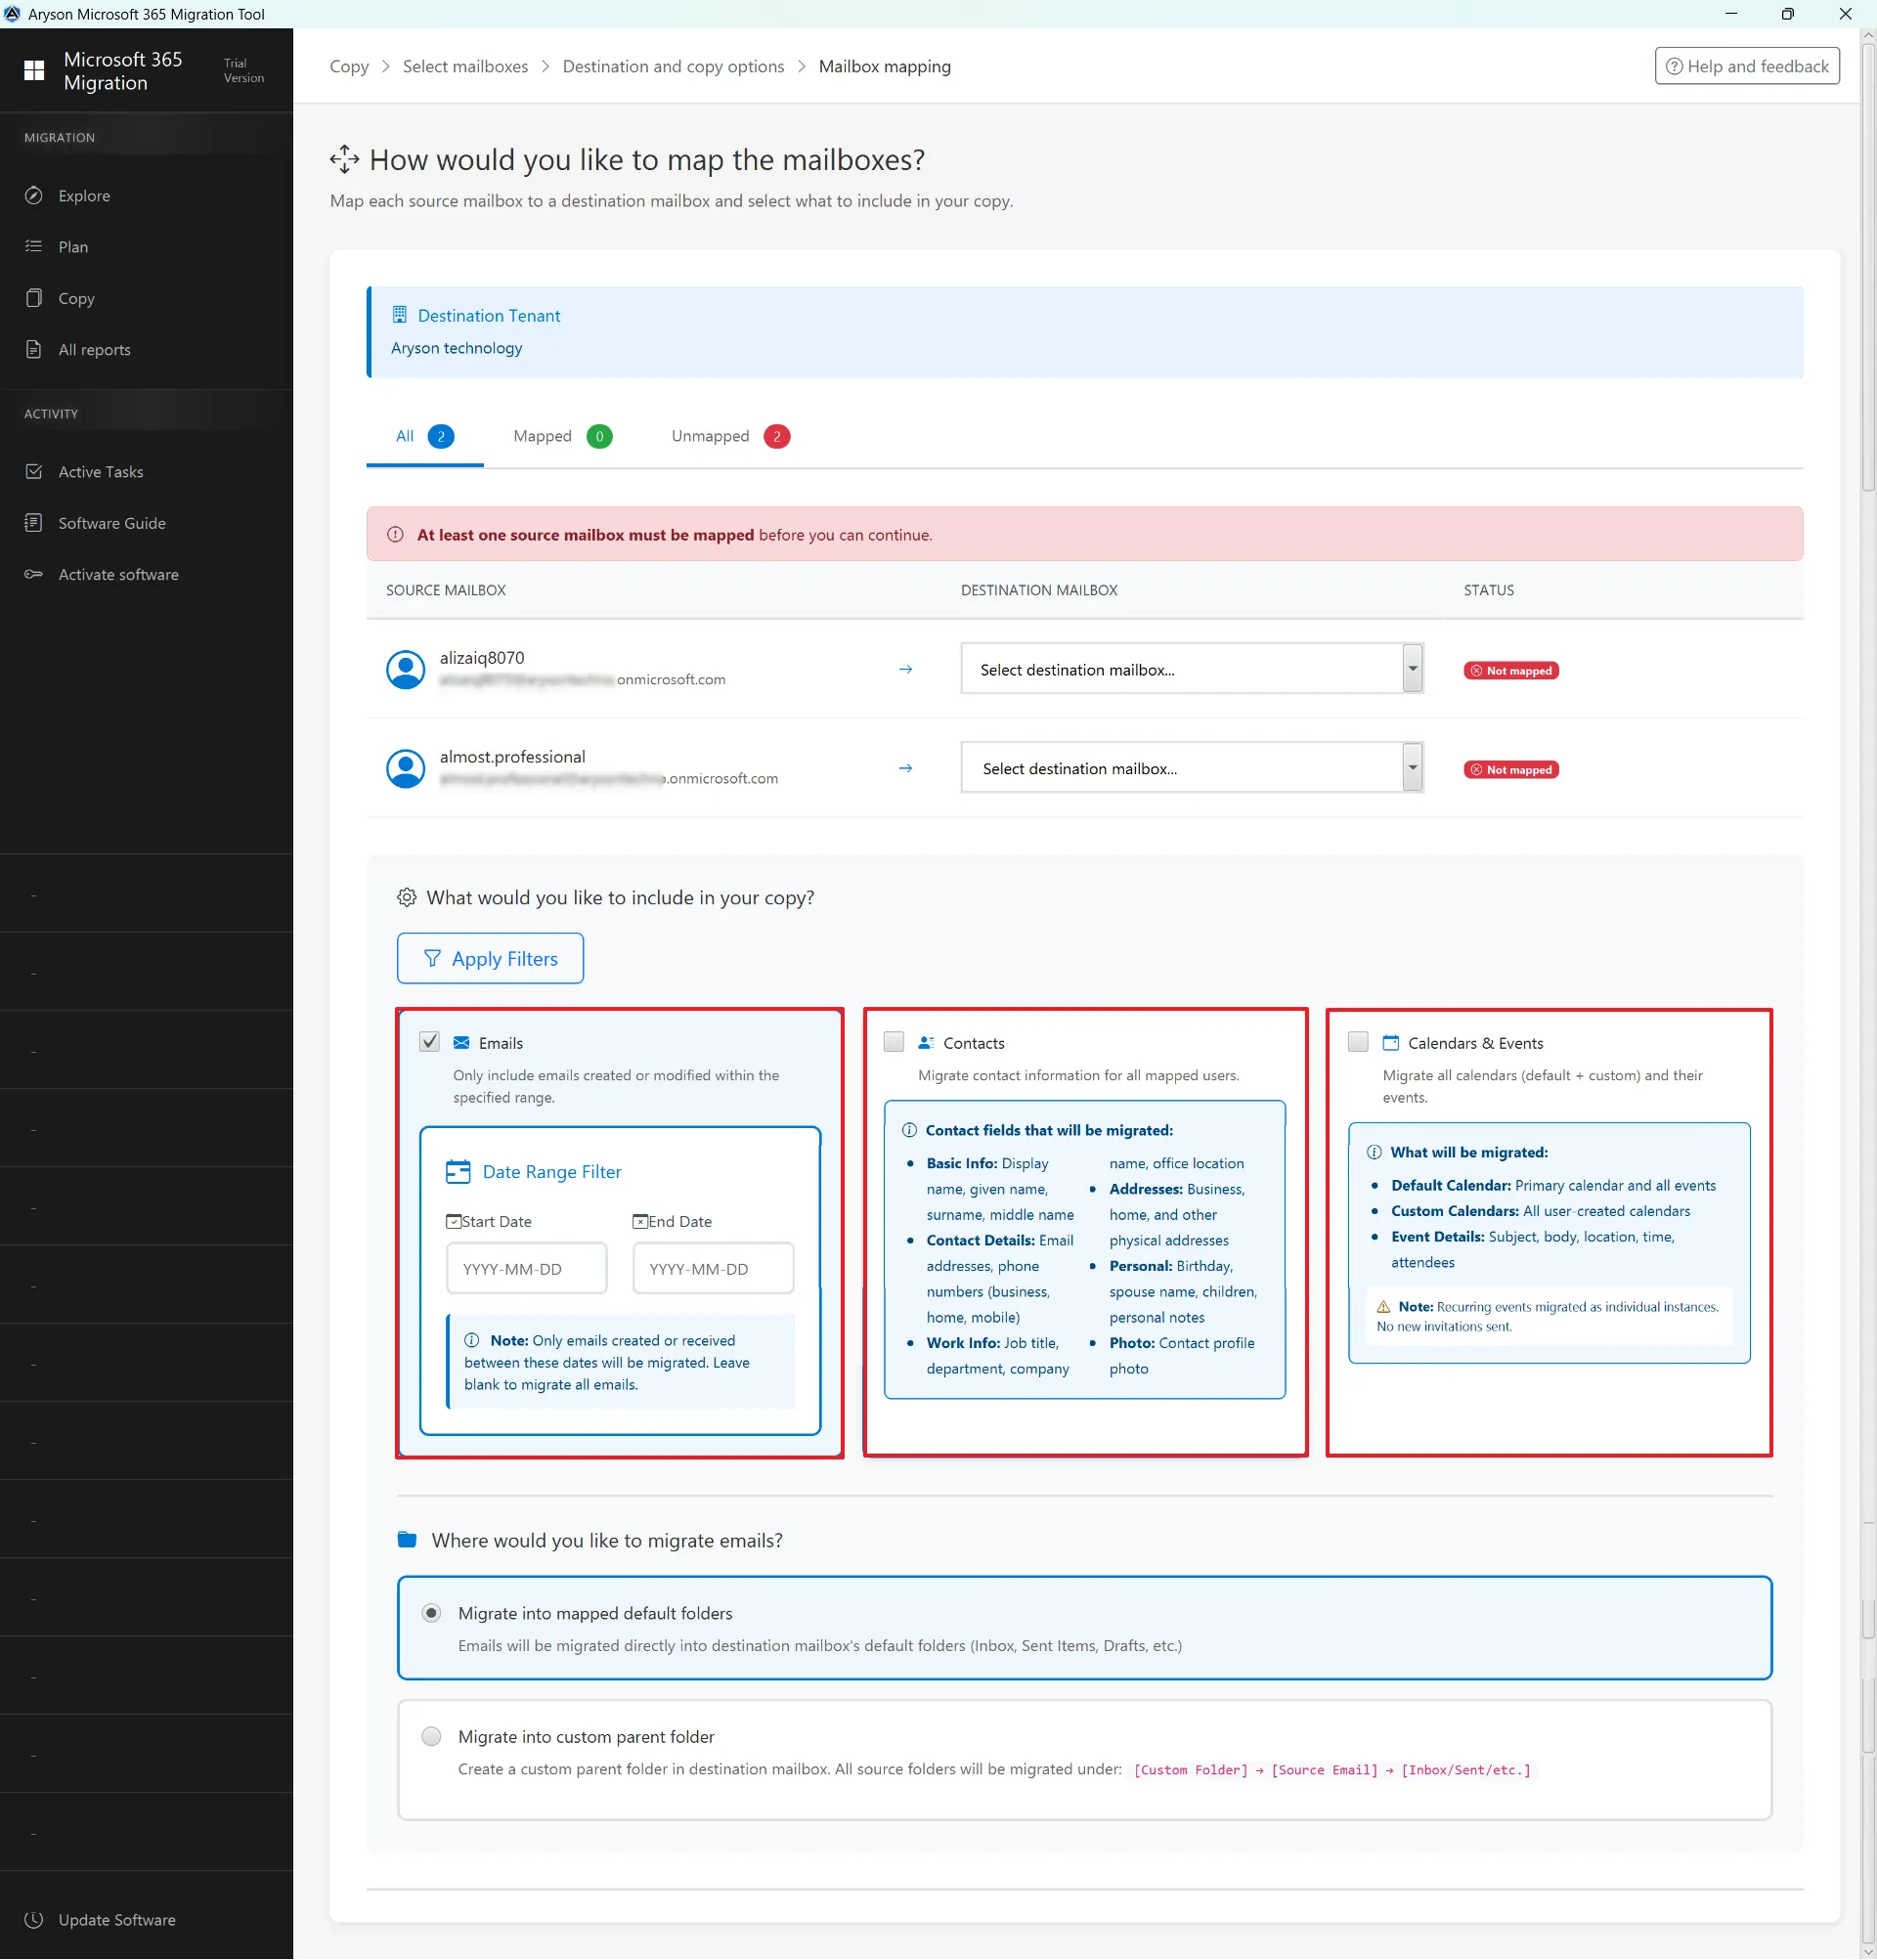
Step 13: This screen shows the mailbox mapping step, where source mailboxes must be mapped to destination mailboxes before continuing. Currently, the listed mailboxes are not mapped, and you need to select the corresponding destination mailbox for each user.
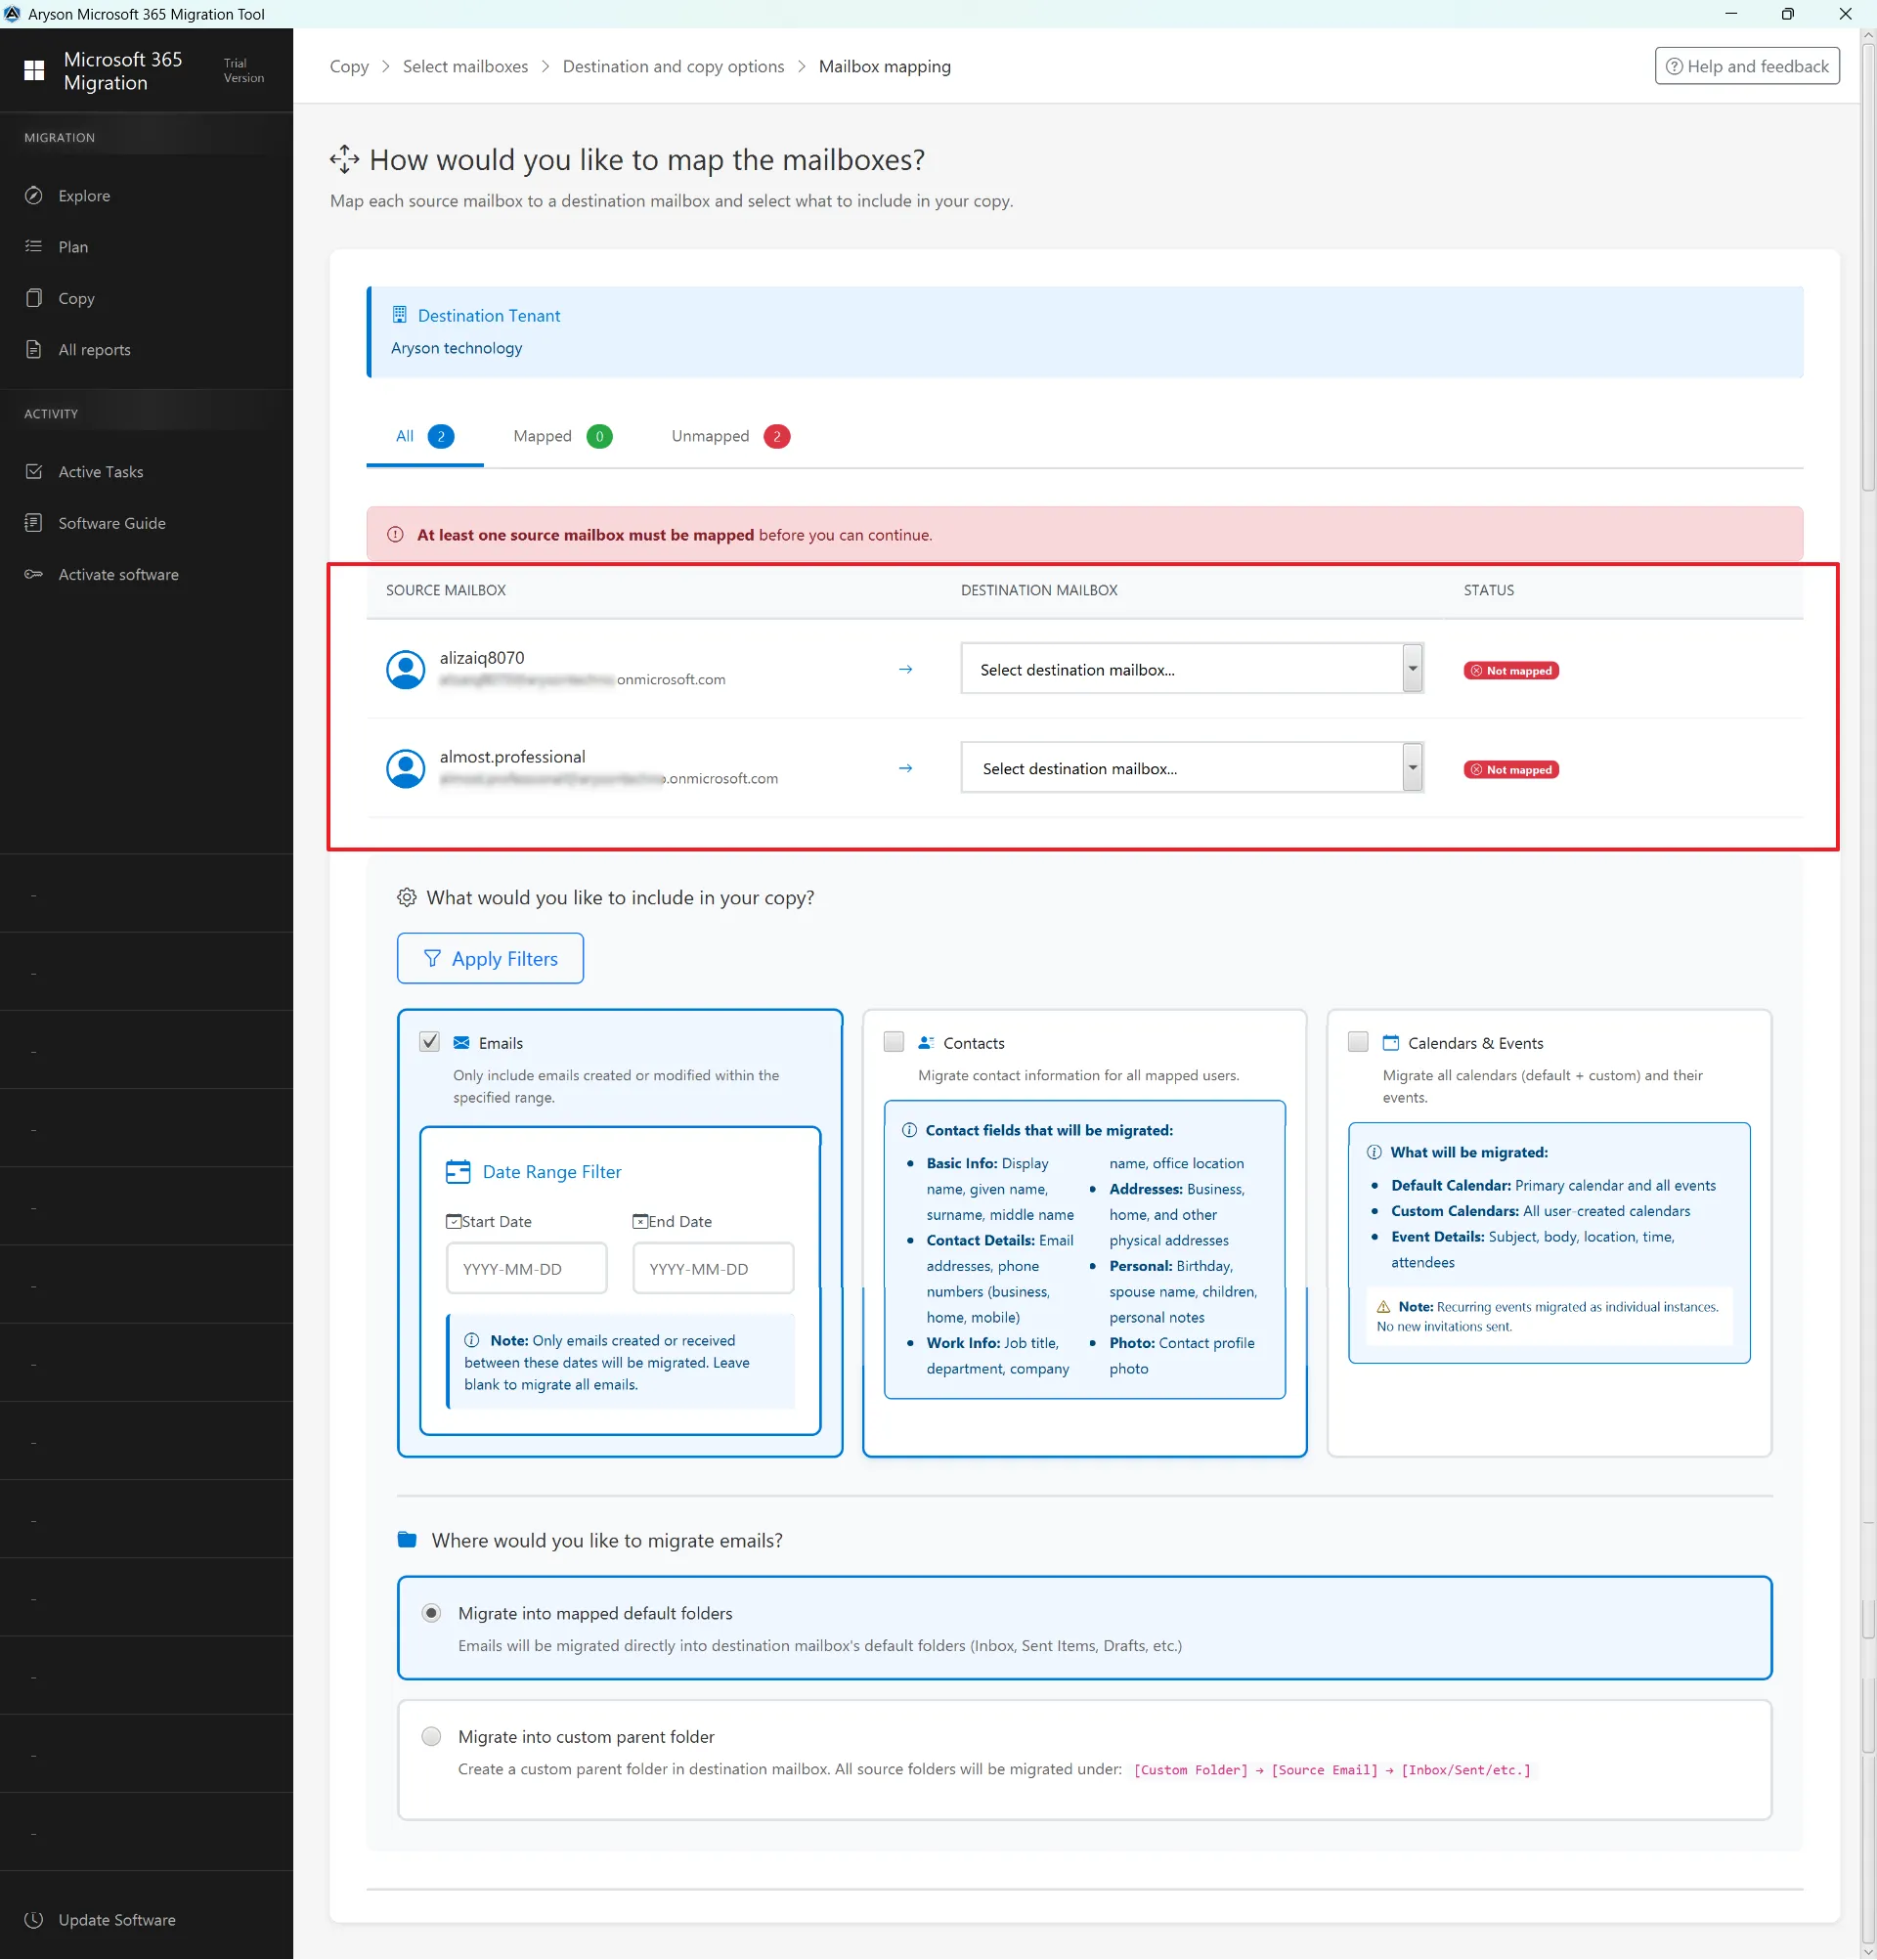
Step 14: Apply Filters – Apply filters to refine and control which data (emails, contacts, and events) is included in the migration process.
Emails
- Option to migrate emails.
- The date range filter lets you migrate emails between specific start and end dates.
- If left blank, all emails will be migrated.
Contacts
- Basic info (name, display name).
- Contact details (email addresses, phone numbers).
- Work info (job title, department).
- Personal info and contact photos.
Calendars & Events
- Default and custom calendars.
- Event details (subject, body, time, attendees).
- Recurring events are migrated as individual instances.
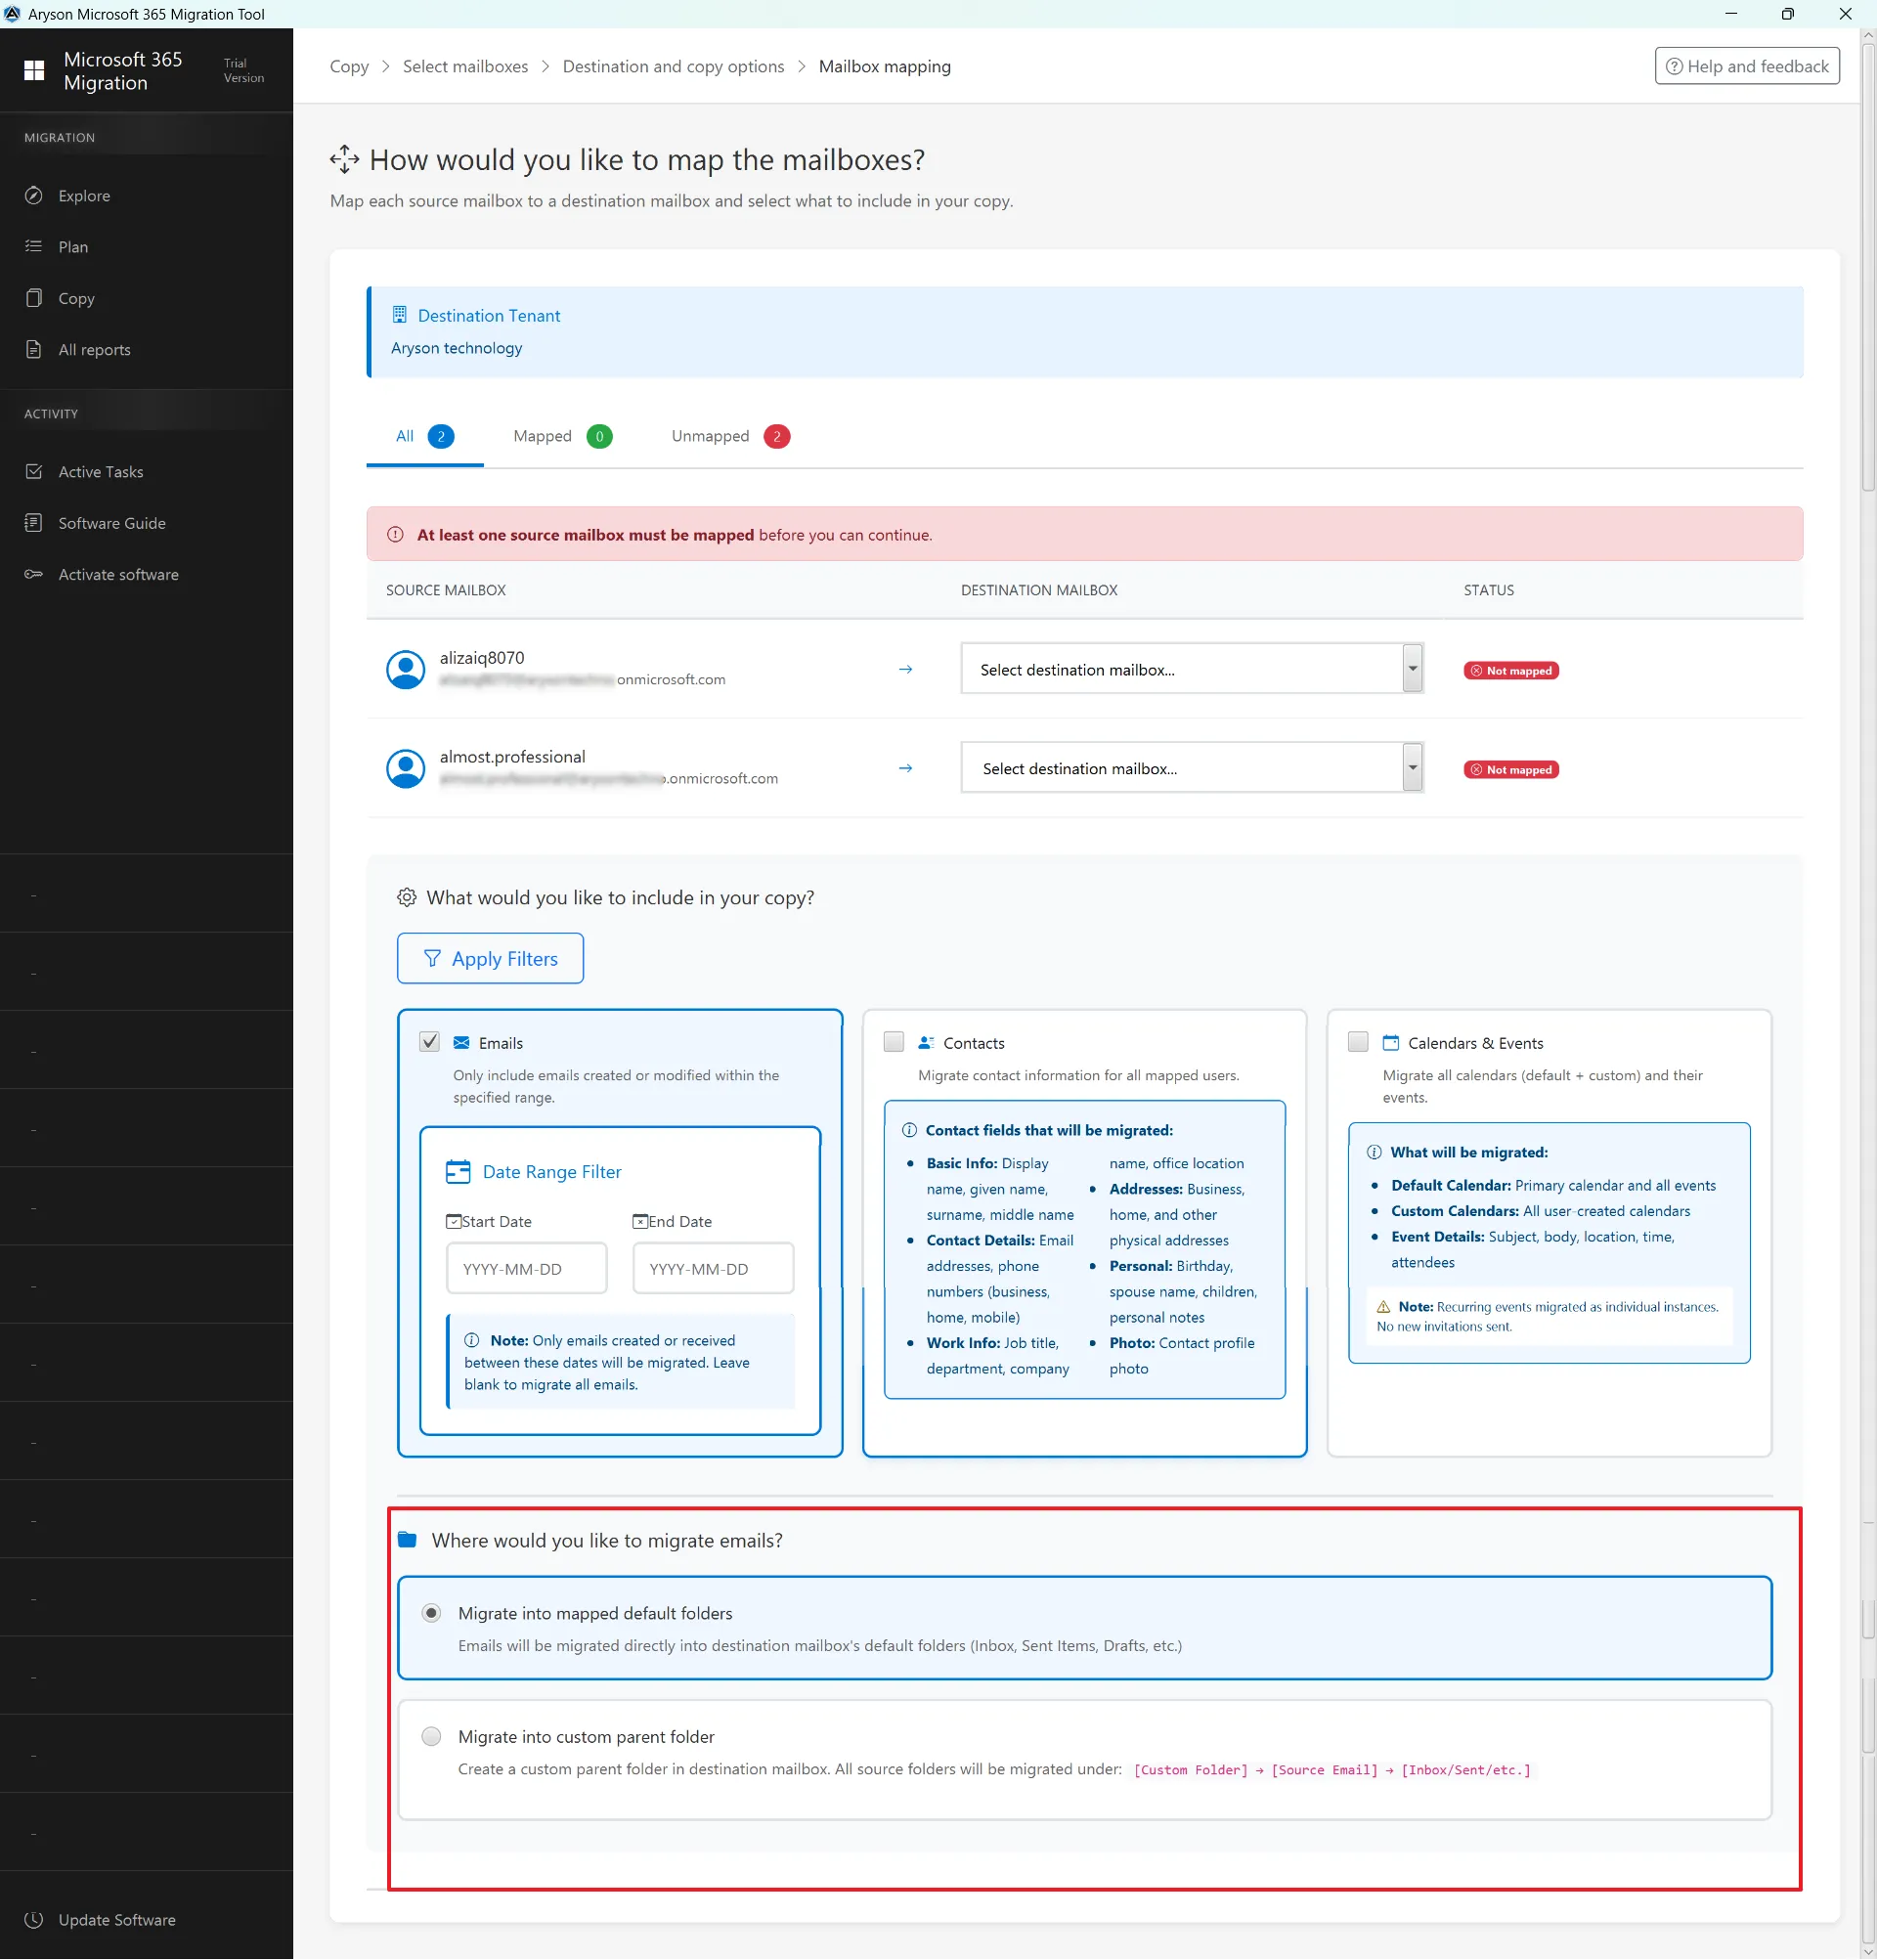
Step 15: Two Migration options are available:
- Migrate into mapped default folders – Emails will go directly into standard folders like Inbox, Sent Items, and Drafts.
- Migrate into the custom parent folder – Creates a new custom folder in the destination mailbox and migrates all source data under that folder structure.
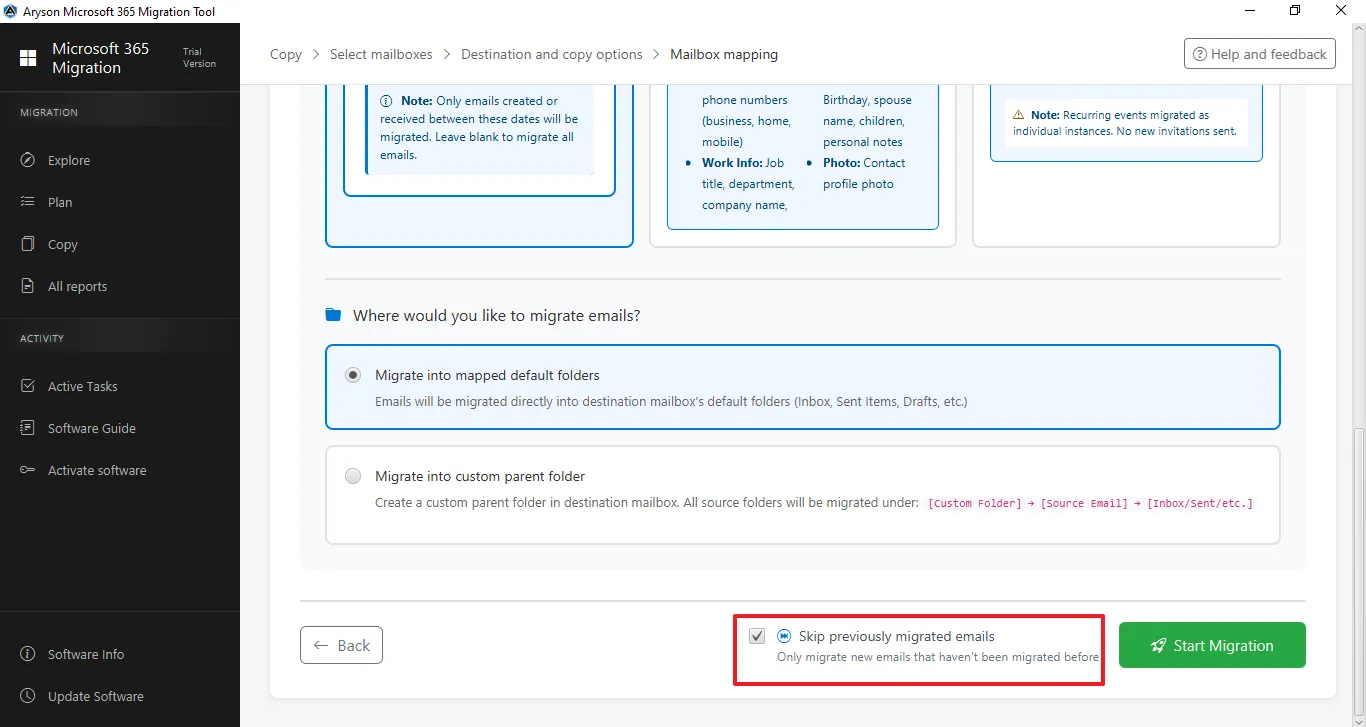
Step 16: Skip Previously Migrated - This option allows the software to ignore emails that have already been migrated in earlier sessions. It ensures that only new or unprocessed emails are transferred, preventing duplication and saving migration time and bandwidth.
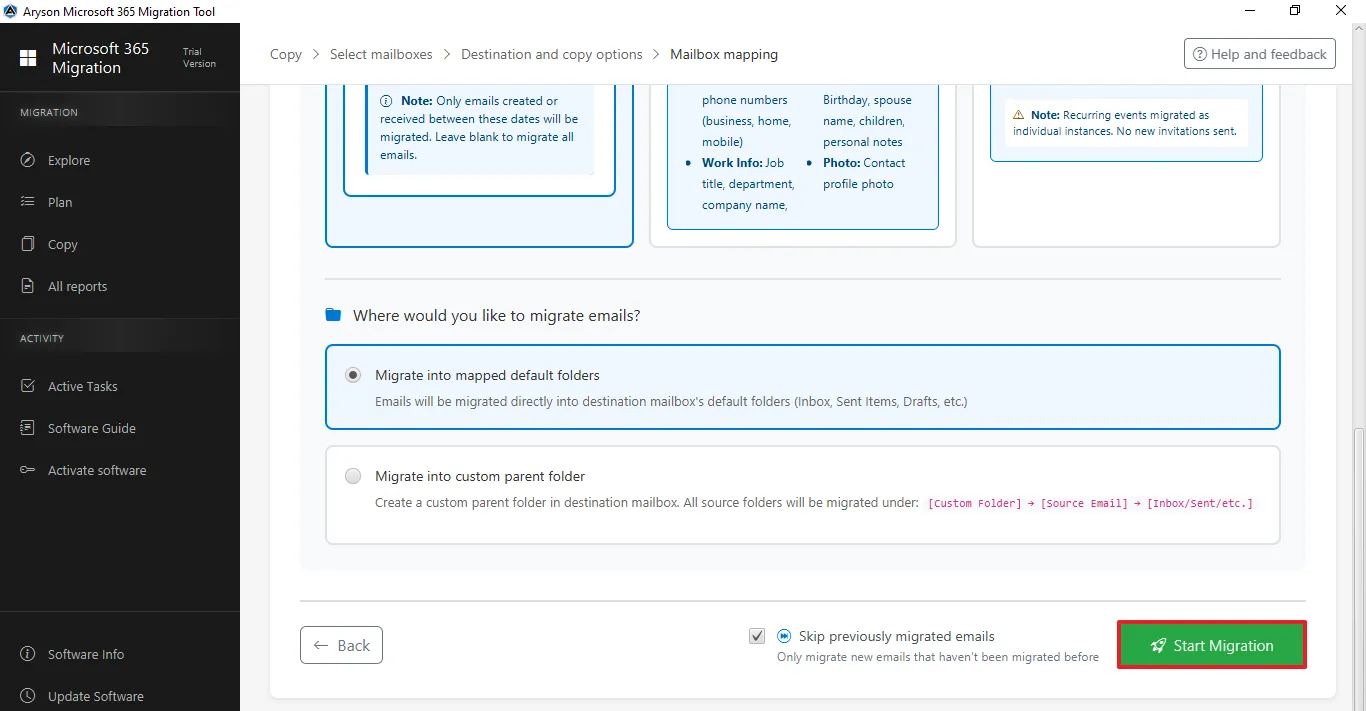
Step 17: The Start Migration button initiates the migration process based on the selected mailbox mapping and copy settings. Once clicked, the tool begins transferring the selected data to the destination tenant.
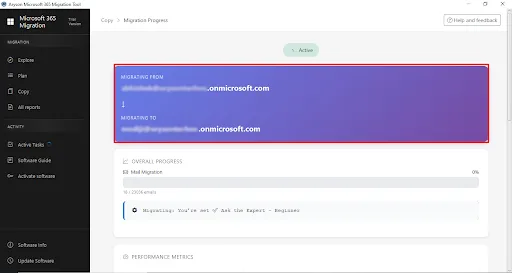
Step 18: Migration in process – This shows the migration status along with detailed statistics.
Step 19: The All Reports section gives a complete overview of all migration and backup activities. It lets users track status, view summaries, and review logs for Email, SharePoint, and OneDrive in one place.
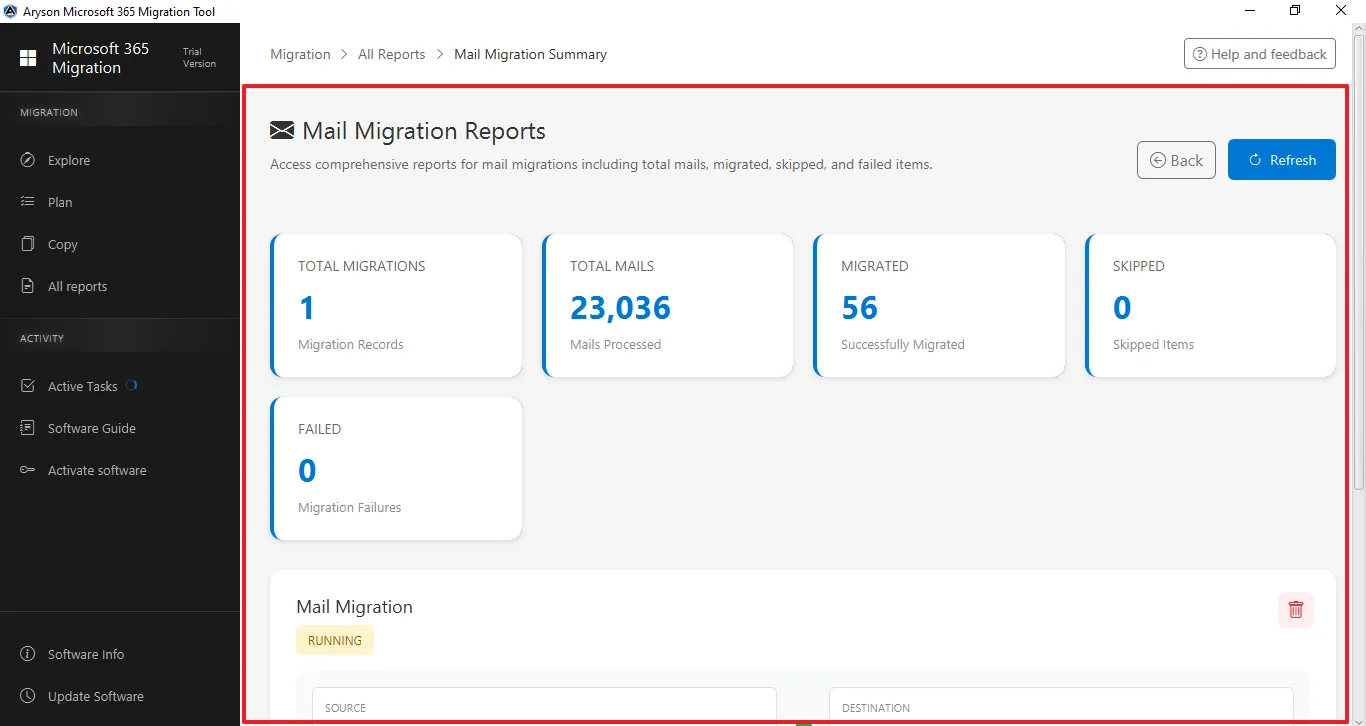
Step 20: This screen shows the Mail Migration Reports dashboard, which provides a summary of the migration process. The status section below indicates that the mail migration is currently Running, allowing users to monitor progress in real time. The Refresh button updates the report, and the Back button returns to the previous screen.
Step 1: Download and install the Aryson Microsoft 365 Migration Tool.

Step 2: Select Copy SharePoint from the centre panel.
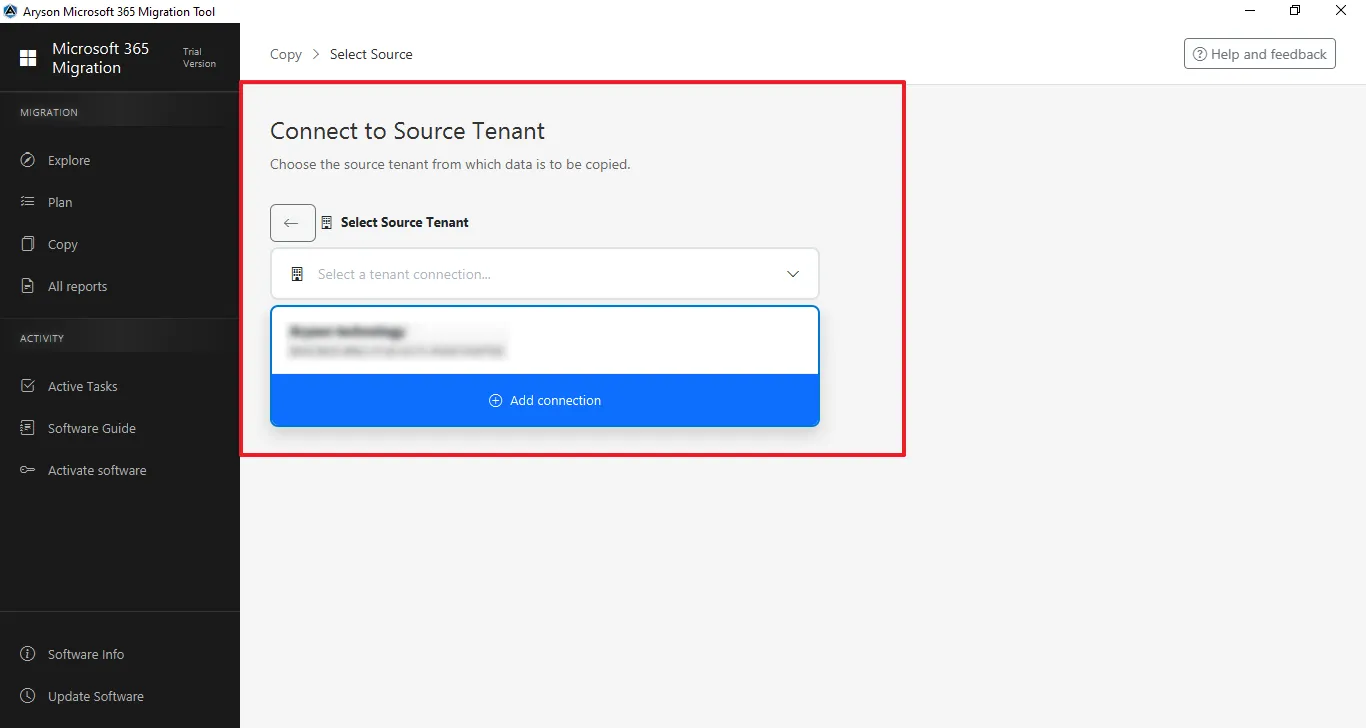
Step 3: Connect to the Source Tenant
- Click on Add Connection to connect with the source tenant.
- Select the previously added tenant from the dropdown list.
Step 4: Sign in: Enter the Admin email ID to log in.

Step 5: Enter the Microsoft Office 365 associated Password for the authentication.

Step 6: This screen shows the Microsoft permissions consent page for the Microsoft 365 Migration Tool, listing the required organisation-wide access permissions for mailbox and data migration—click Accept to grant access and continue or Cancel to stop the process.

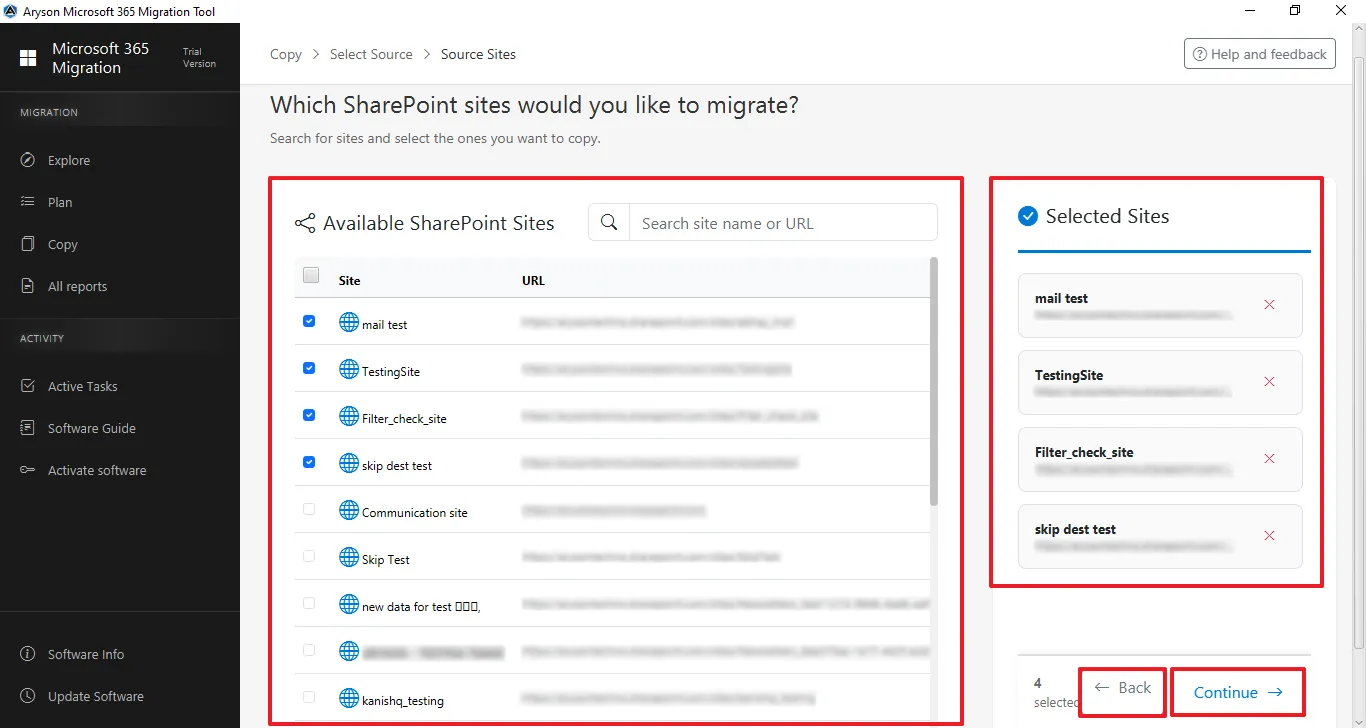
Step 7: Select Source SharePoint Sites to Migrate
- View and search available SharePoint sites by name or URL.
- Select the required sites and confirm them in the Selected Sites panel.
- Click Continue to proceed.
Step 8: Connect to the Destination Tenant
- Click on Add Connection to connect with the destination tenant.
- Select the previously added tenant from the dropdown list.

Step 9: Sign in: Enter the Admin email ID to log in.

Step 10: Enter the Microsoft Office 365 associated Password for the authentication.

Step 11: This screen shows the Microsoft permissions consent page for the Microsoft 365 Migration Tool, listing the required organisation-wide access permissions for mailbox and data migration—click Accept to grant access and continue or Cancel to stop the process.

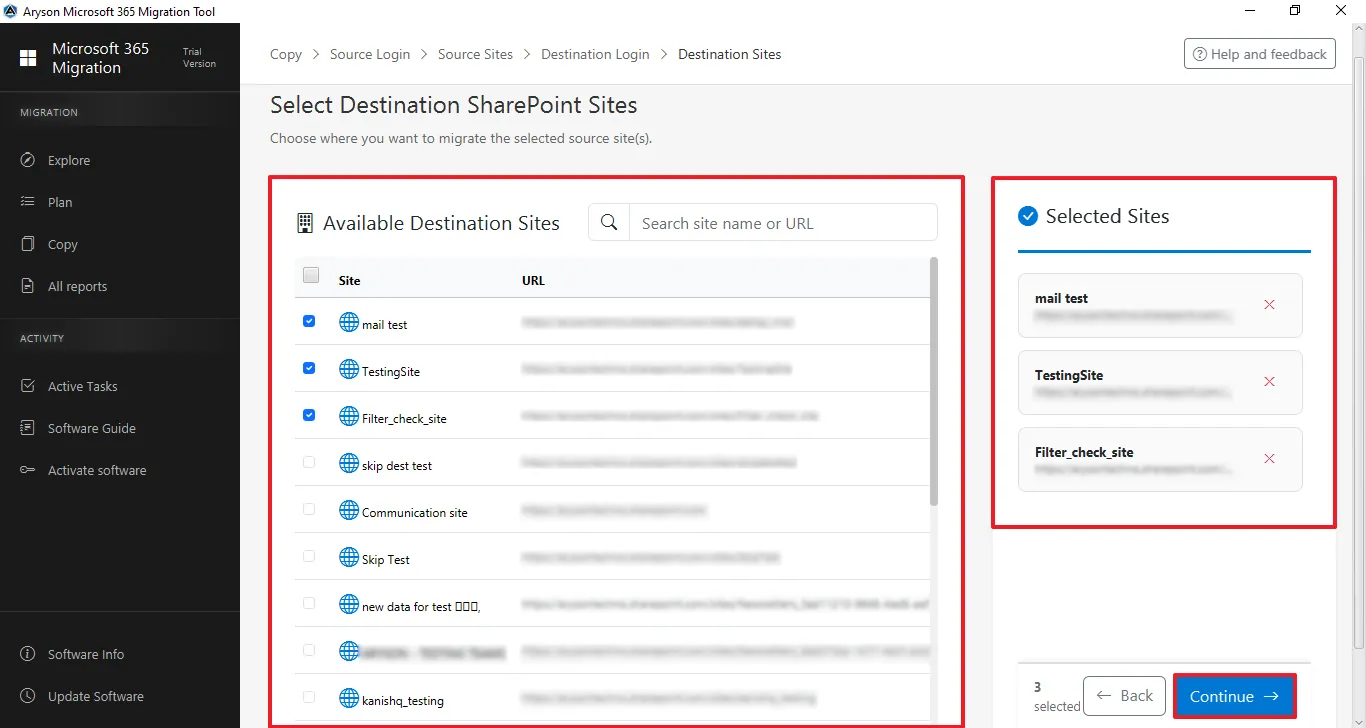
Step 12: Select Destination SharePoint Sites to Migrate
- View and search available SharePoint sites by name or URL.
- Select the required sites and confirm them in the Selected Sites panel.
- Click Continue to proceed.
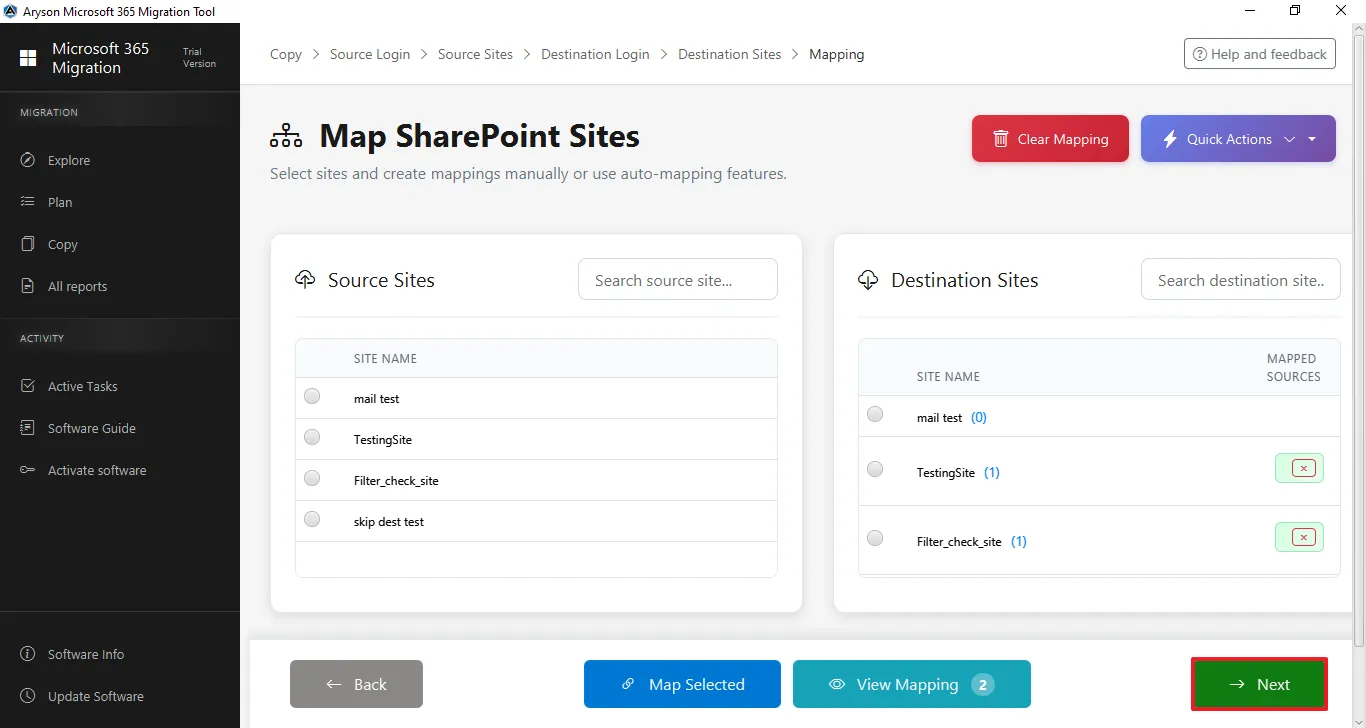
Step 13: Map SharePoint Sites
- Selected source and destination sites are fetched from their respective tenants.
- Choose a user from Source Users and the corresponding user from Destination Users.
- Click Map Selected to link accounts, and view the message "Mapping Created Successfully".
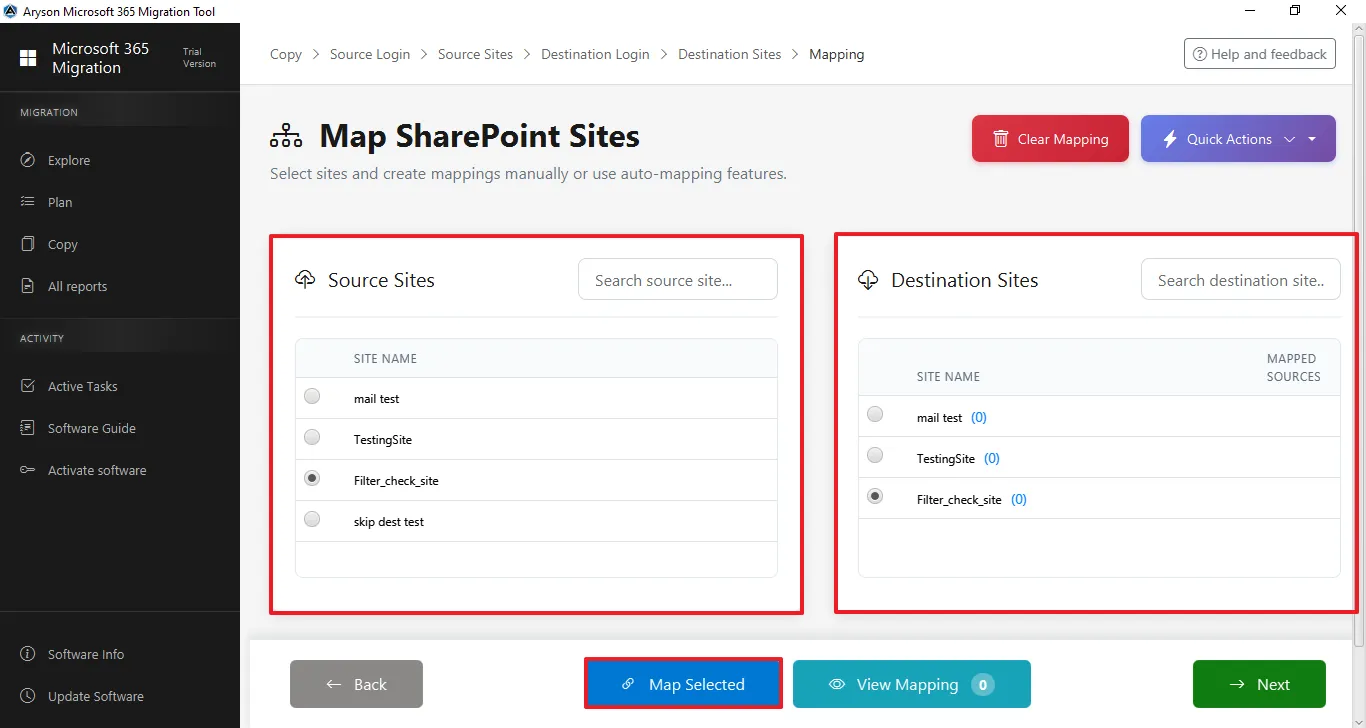
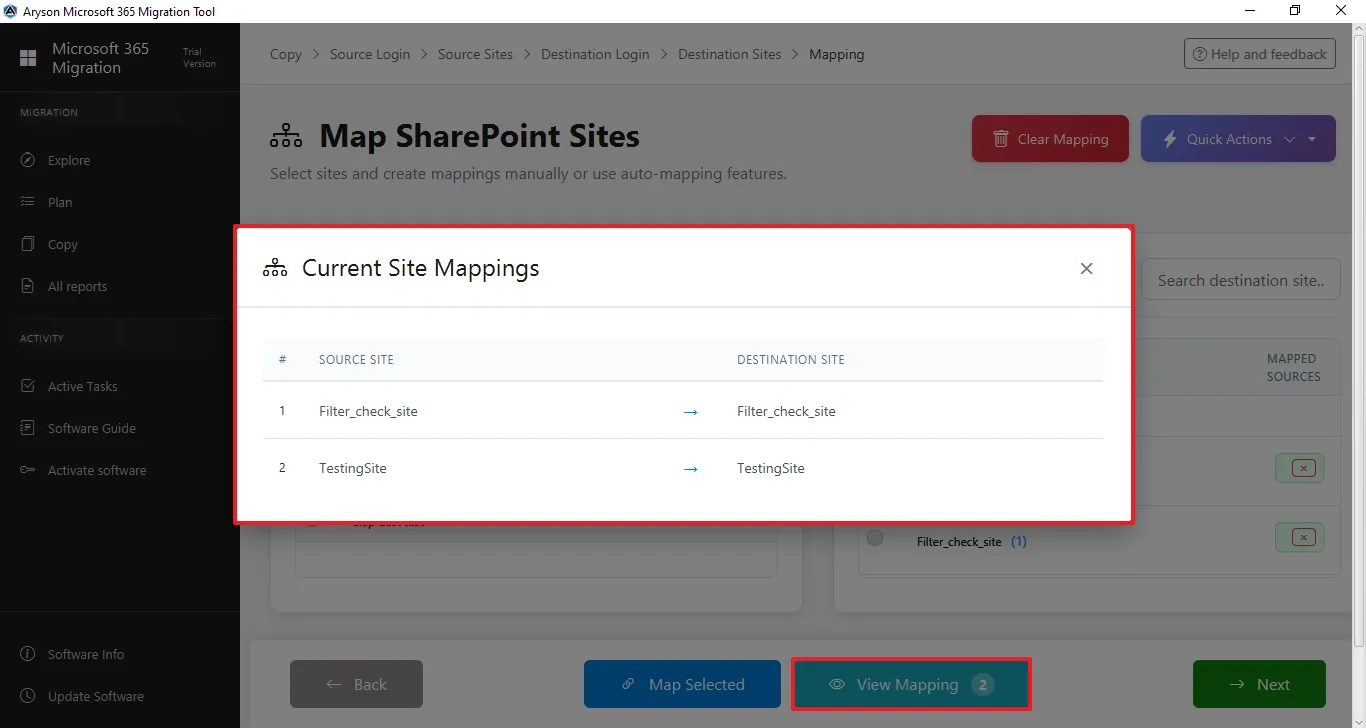
Step 14: Click View Mapping to verify that the source user is linked to destination users in the Current User Mappings window.
Step 15: Click on Next to proceed further.
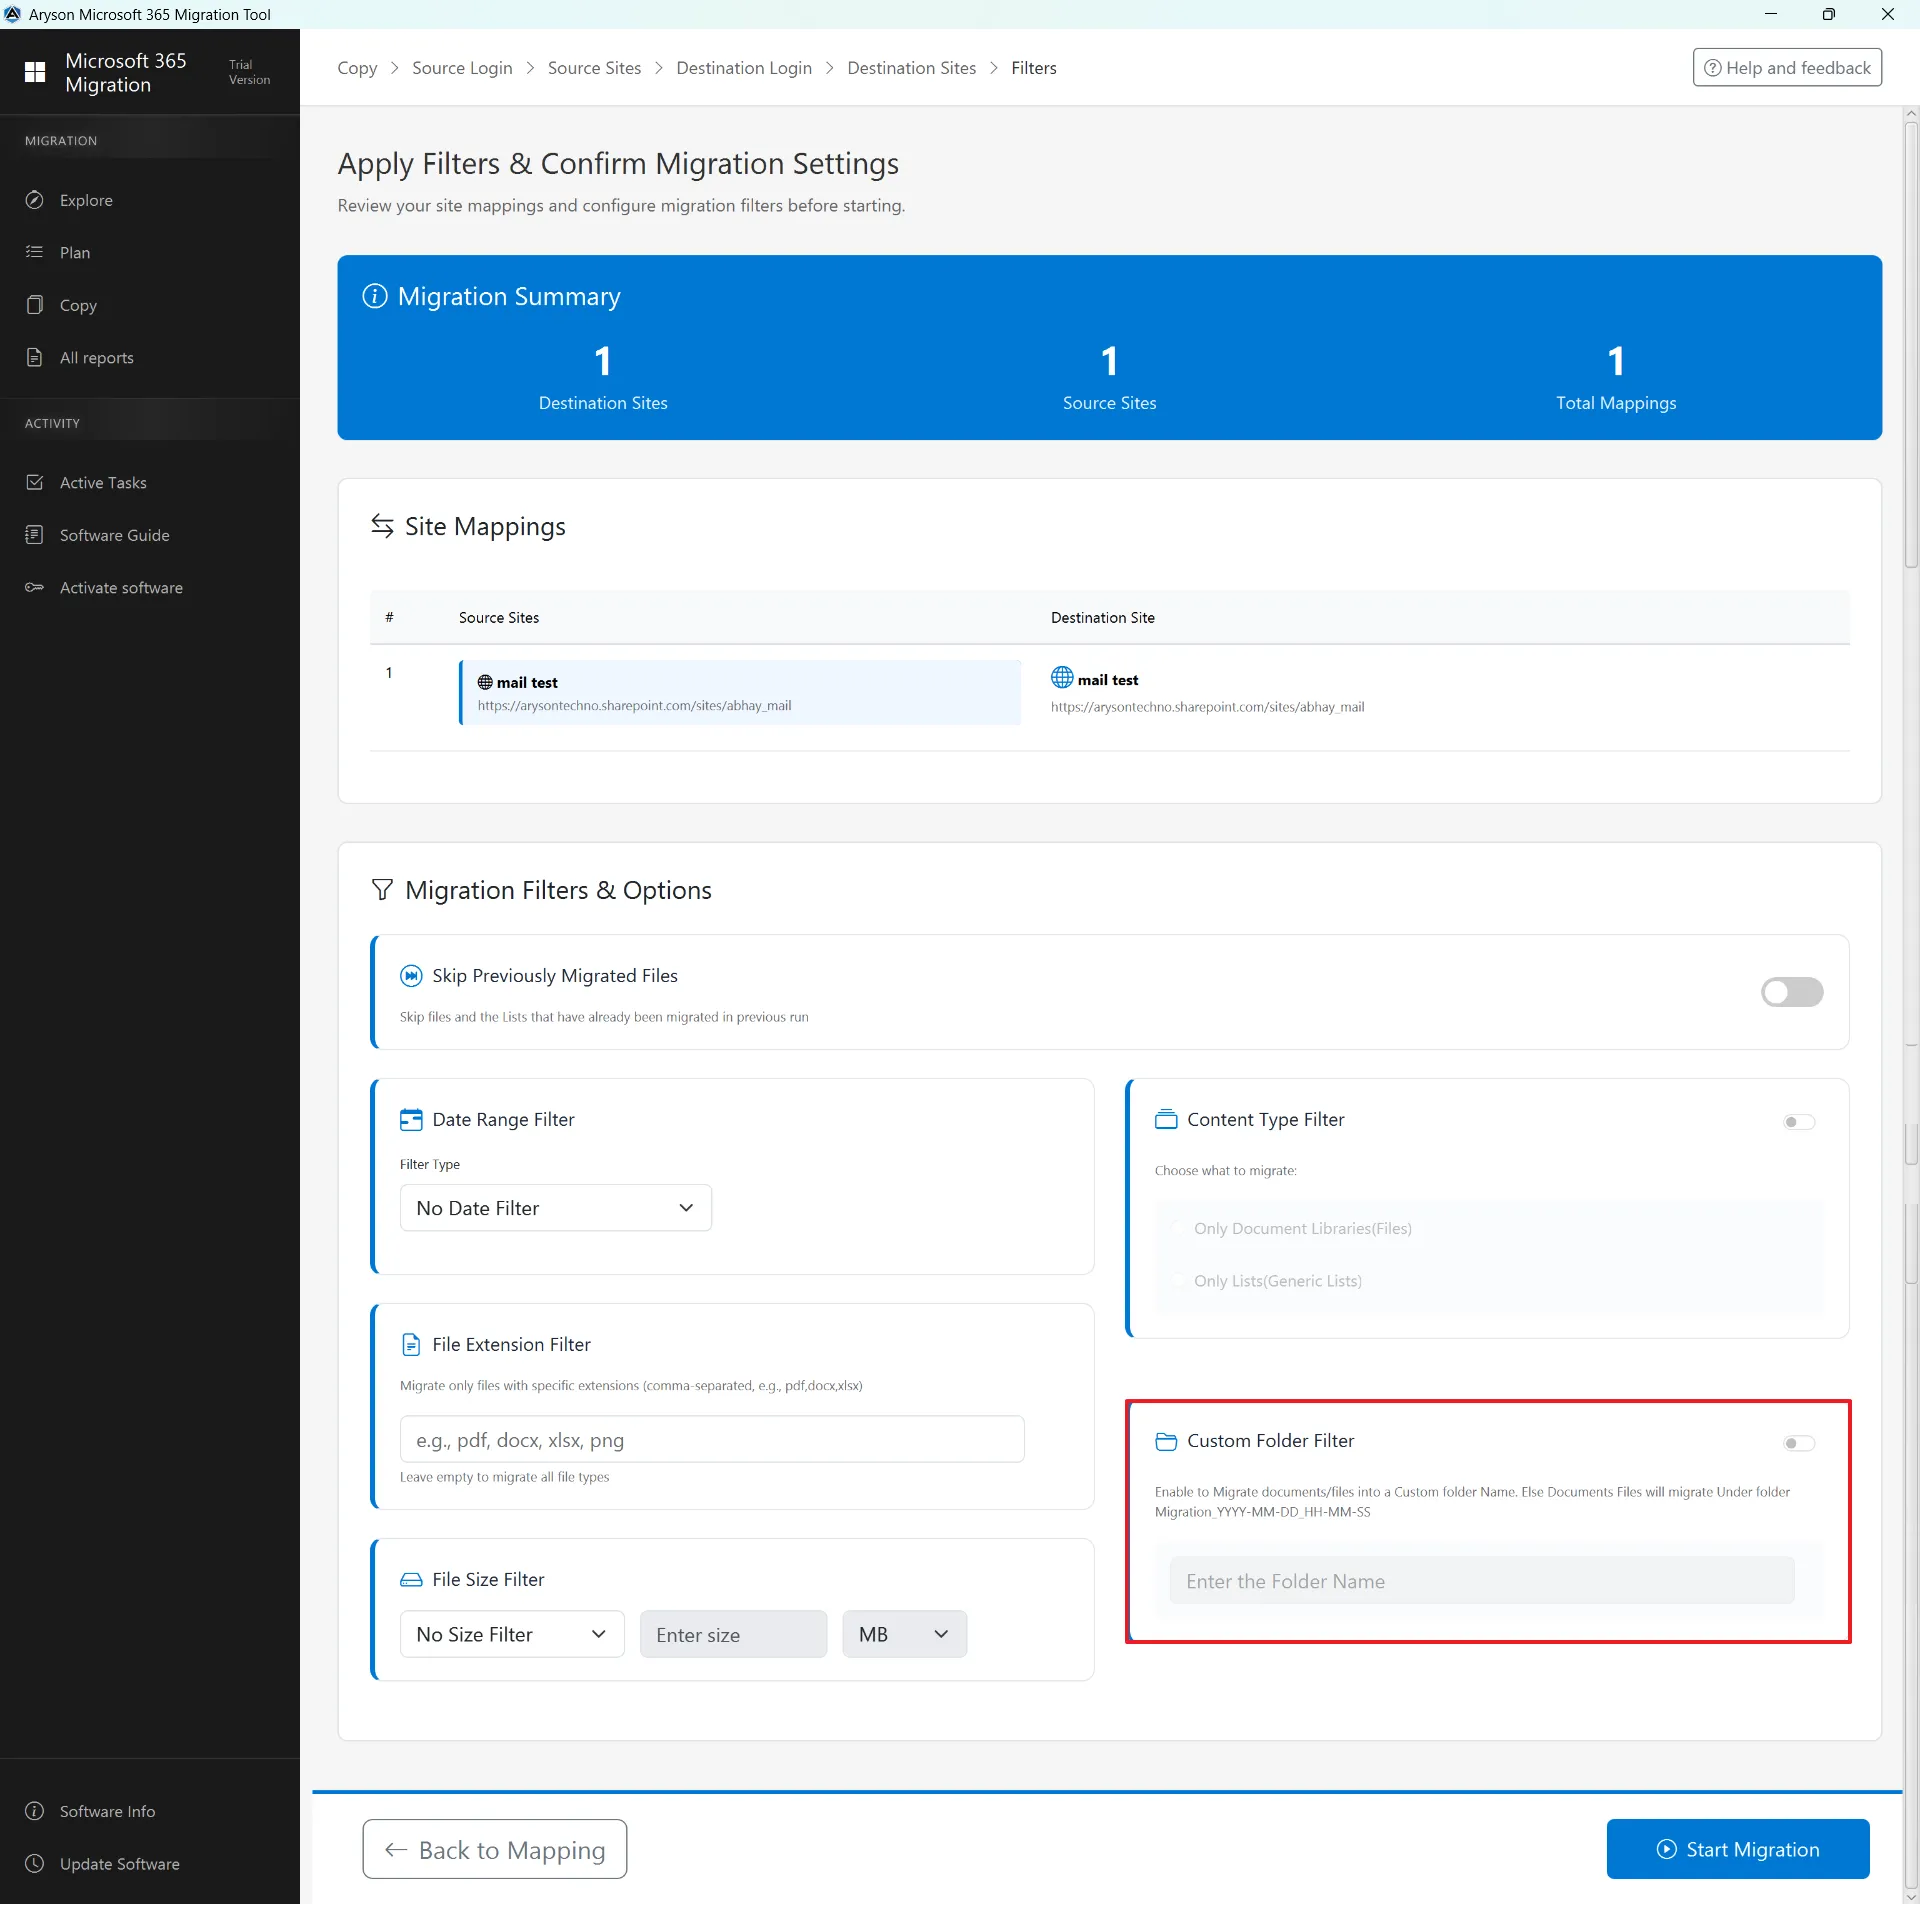
Step 16: Apply Filter & Confirm Migration Setting
This screen shows the Apply Filters & Confirm Migration Settings page, where users review site mappings and configure migration filters before starting. It displays migration summary details along with options like date, file size, file type, and custom folder filters before clicking Start Migration.

Step 17: Skip Previously Migrated Data
- It ignores files and lists already migrated, transferring only new or updated data to prevent duplicates.
- It saves time, reduces system load and internet usage, and is useful when resuming migration after interruption.
- If disabled, all selected data will be migrated again, including previously transferred items.

Step 18: Date Range Filter
- The Date Range Filter allows you to migrate data based on Created or Modified dates, or migrate all data without any date restriction.
- It helps transfer only required or recent content, reducing migration time and avoiding unnecessary data.
- This option ensures a more organised and selective migration process.
Important Note: SharePoint may show the same Created and Modified dates for new files, but Microsoft Graph API treats them separately; therefore, our tool applies date filters to both fields to ensure no data is missed during migration.

Step 19: File Extension Filter
- The File Extension Filter lets you migrate only selected file types by entering extensions (e.g., pdf, docx, xlsx) separated by commas.
- Only matching files are migrated, helping exclude unwanted file types and keep data organised.
- If left empty, all file types will be migrated without restriction.

Step 20: File Size Filter
- The File Size Filter lets you migrate files based on size using options like No Size Filter, Greater Than, or Less Than (in MB).
- It helps skip very large files or migrate only small files as needed.
- This option makes migration faster and more organised.

Step 21: Content Type Filter
- The Content Type Filter lets you migrate only specific SharePoint content, like Document Libraries (files) or Lists.
- It helps you avoid migrating unnecessary data and focus on the required content only.
- This option ensures a clean and organised migration process.

Step 22: Custom Folder Name
- Custom Folder Filter lets you choose a specific folder where all migrated files will be stored.
- It keeps migrated data organised and easy to identify, instead of mixing with existing files.
- If not enabled, this tool creates a default auto-named folder for storing migrated content.
Step 23: Start Migration
- Click Start Migration after setting all filters and configurations to begin the process.
- Make sure the source, destination, and filters are correct before starting.
- Once started, the migration runs automatically, and progress can be tracked in Active Tasks or Reports.

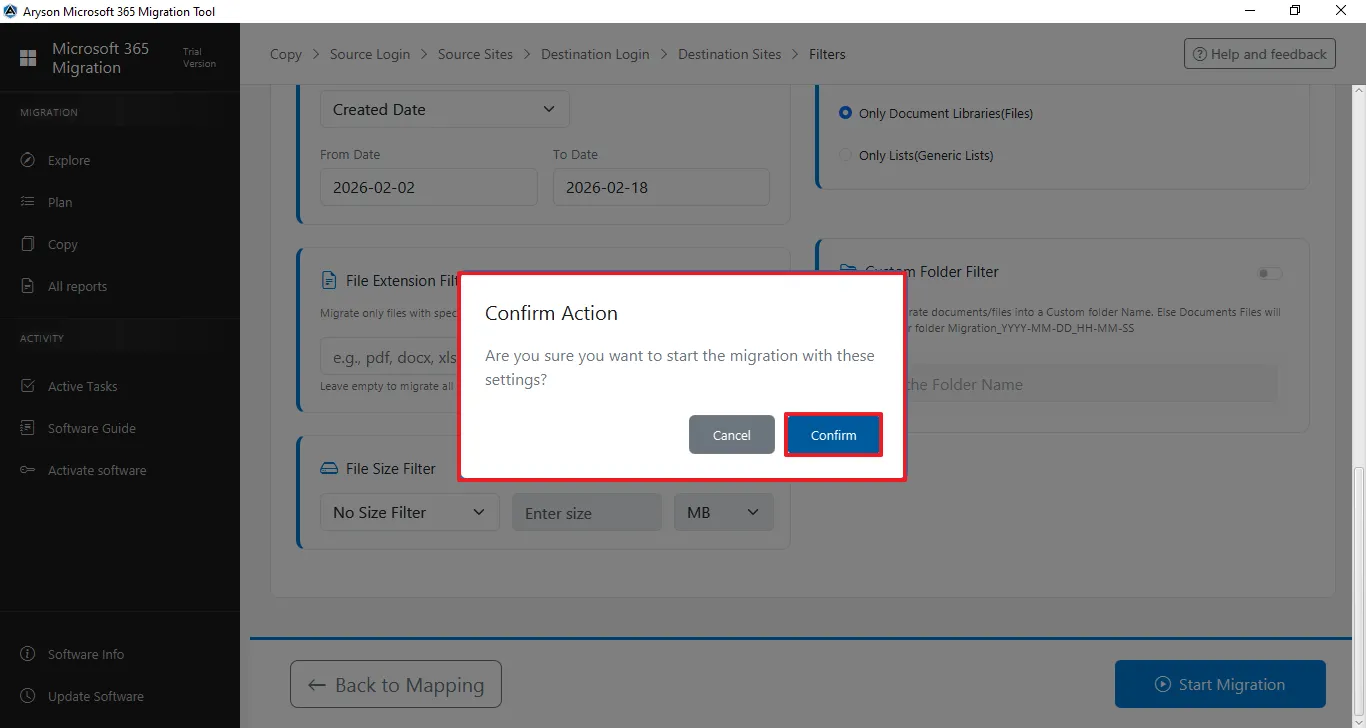
Step 24: Confirmation Action
- A confirmation pop-up appears after clicking Start Migration, asking you to review your selected settings and filters.
- Click Confirm to begin the migration or Cancel to go back and make changes.
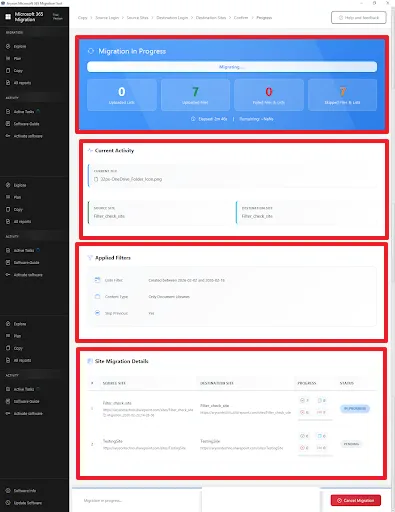
Step 25:Migration in Process
- Shows live migration status with progress, counts, and time details.
- Displays current file activity and highlights failed or skipped items.
Cancel Migration: The process can be stopped at any time using the Cancel Migration option if needed.
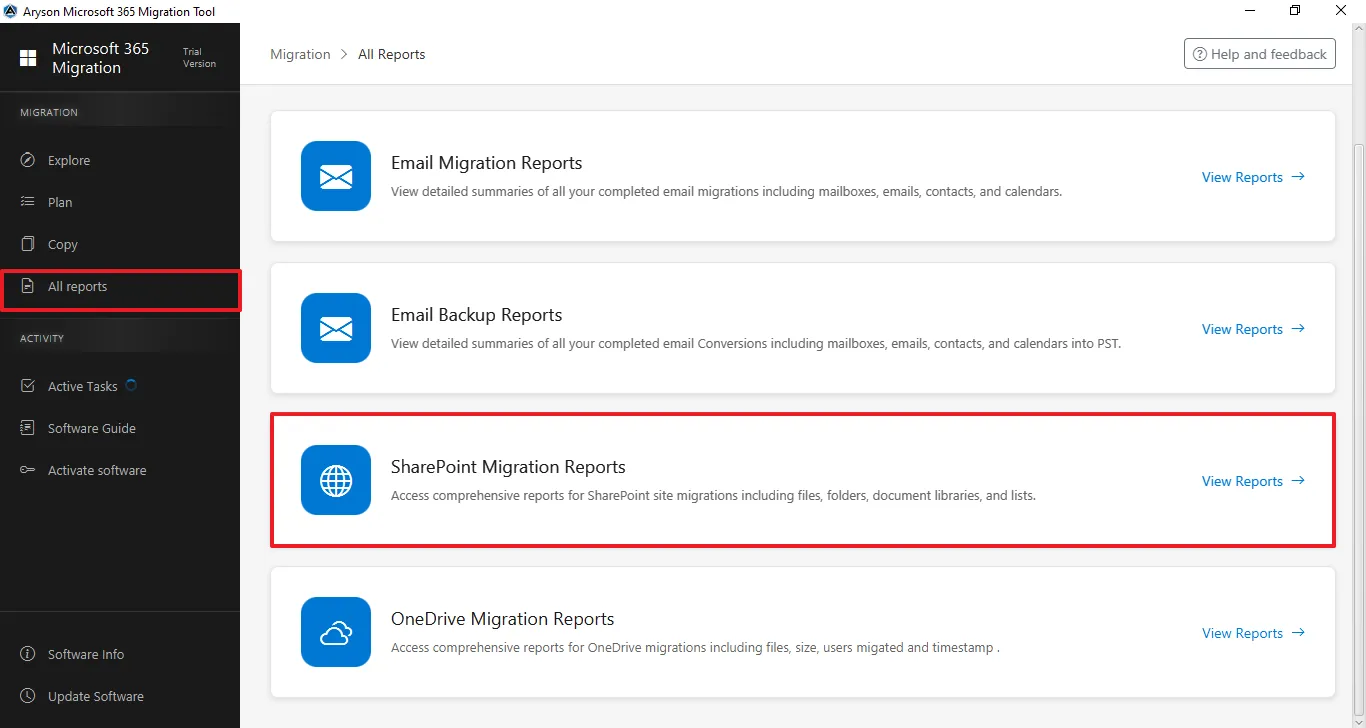
Step 26:The All Reports section gives a complete overview of all migration and backup activities. It lets users track status, view summaries, and review logs for Email, SharePoint, and OneDrive in one place.
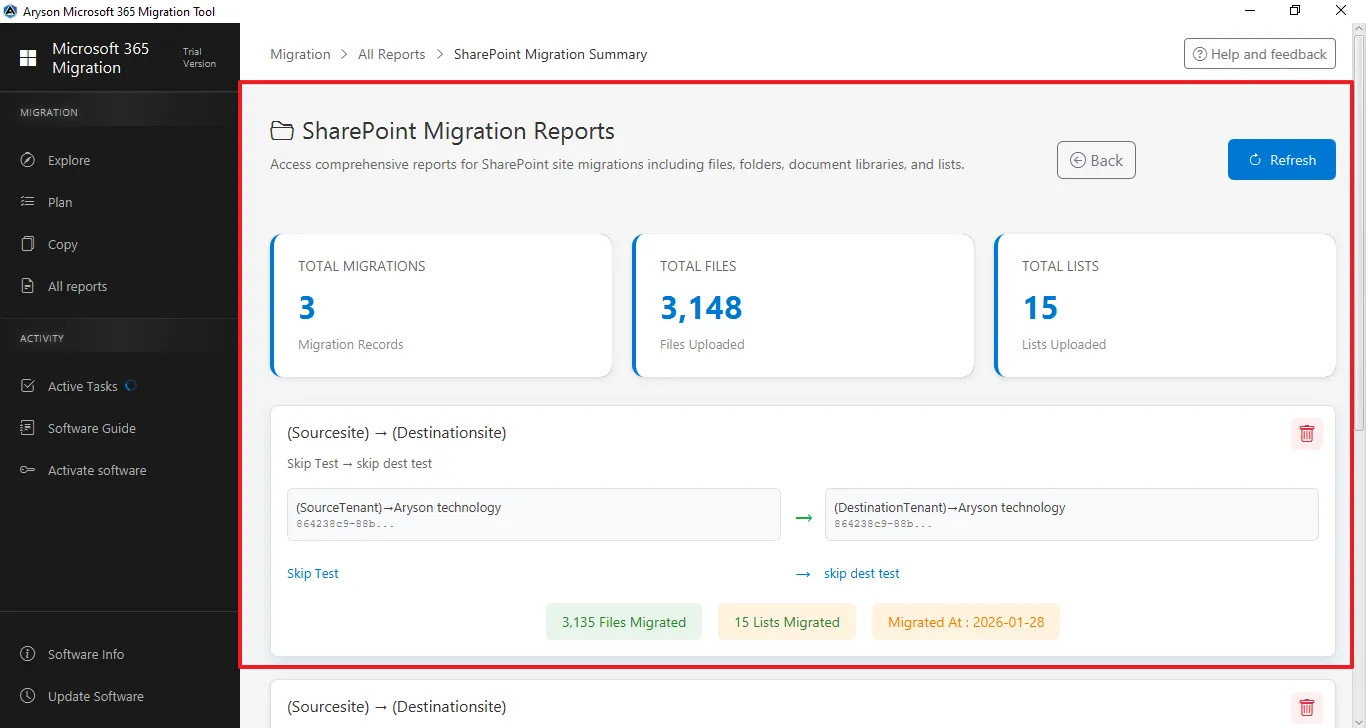
Step 27:The SharePoint Migration Reports section shows a complete summary of all SharePoint migrations. It helps administrators track progress, verify transferred data, and review key statistics after migration.
Step 1: Download and install the Aryson Microsoft 365 Migration Tool.

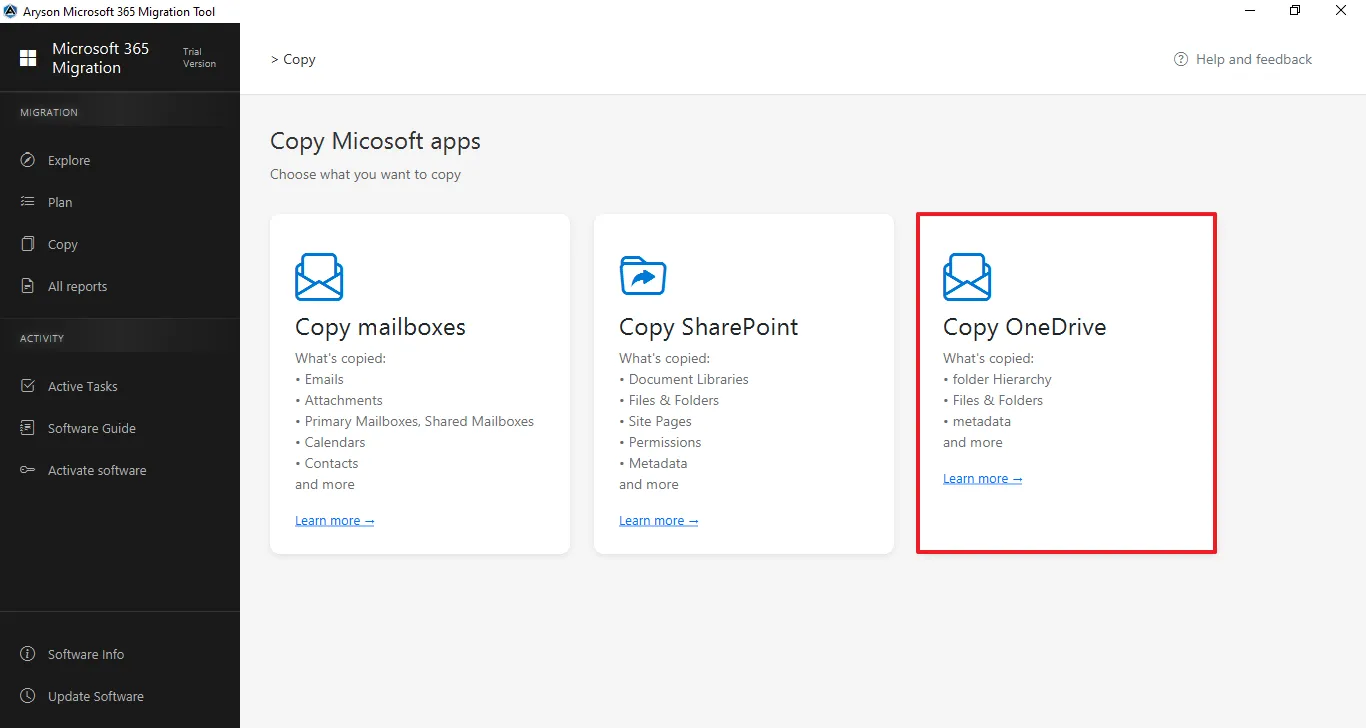
Step 2: Select Copy OneDrive from the centre panel.
Step 3: Select Modern Authentication and Admin Impersonation or select the previously added tenant.
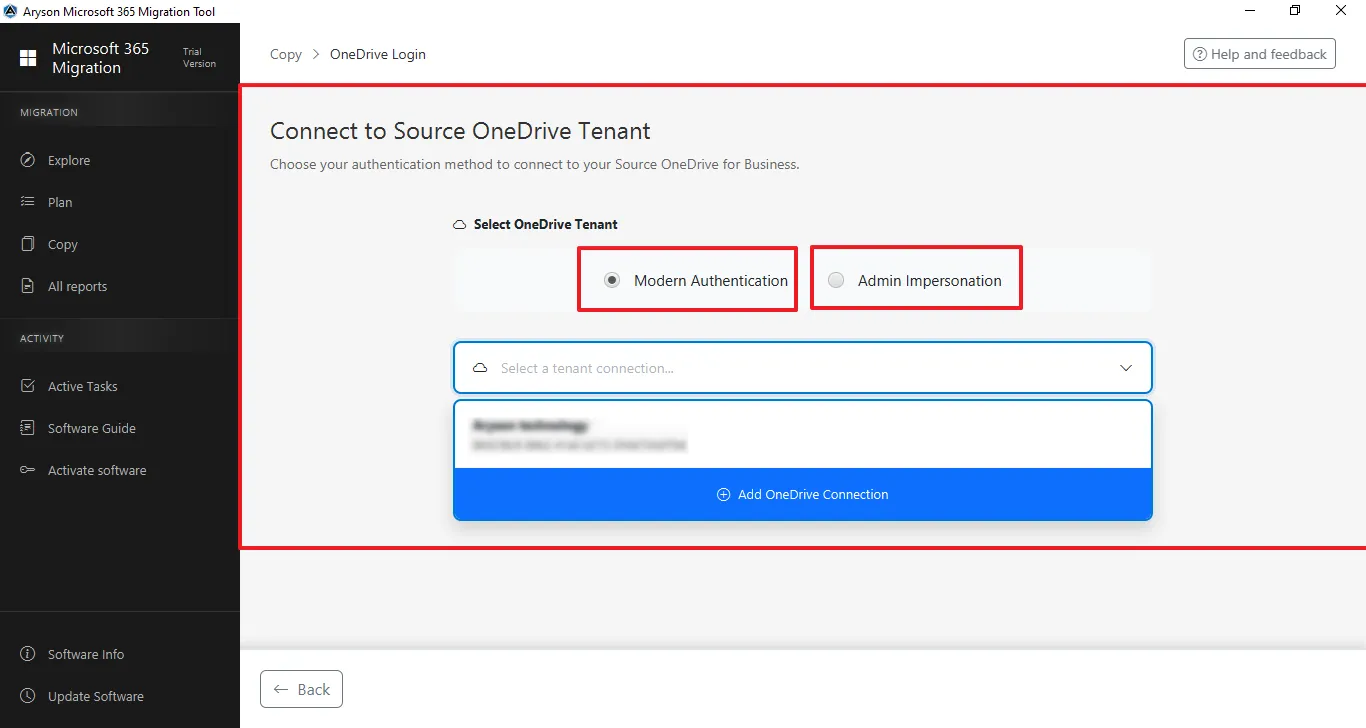
Step 4: Sign in: Enter the Admin email ID to log in.

Step 5: Enter the Microsoft Office 365 associated Password for the authentication.

Step 6: This screen shows the Microsoft permissions consent page for the Microsoft 365 Migration Tool, listing the required organisation-wide access permissions for mailbox and data migration—click Accept to grant access and continue or Cancel to stop the process.

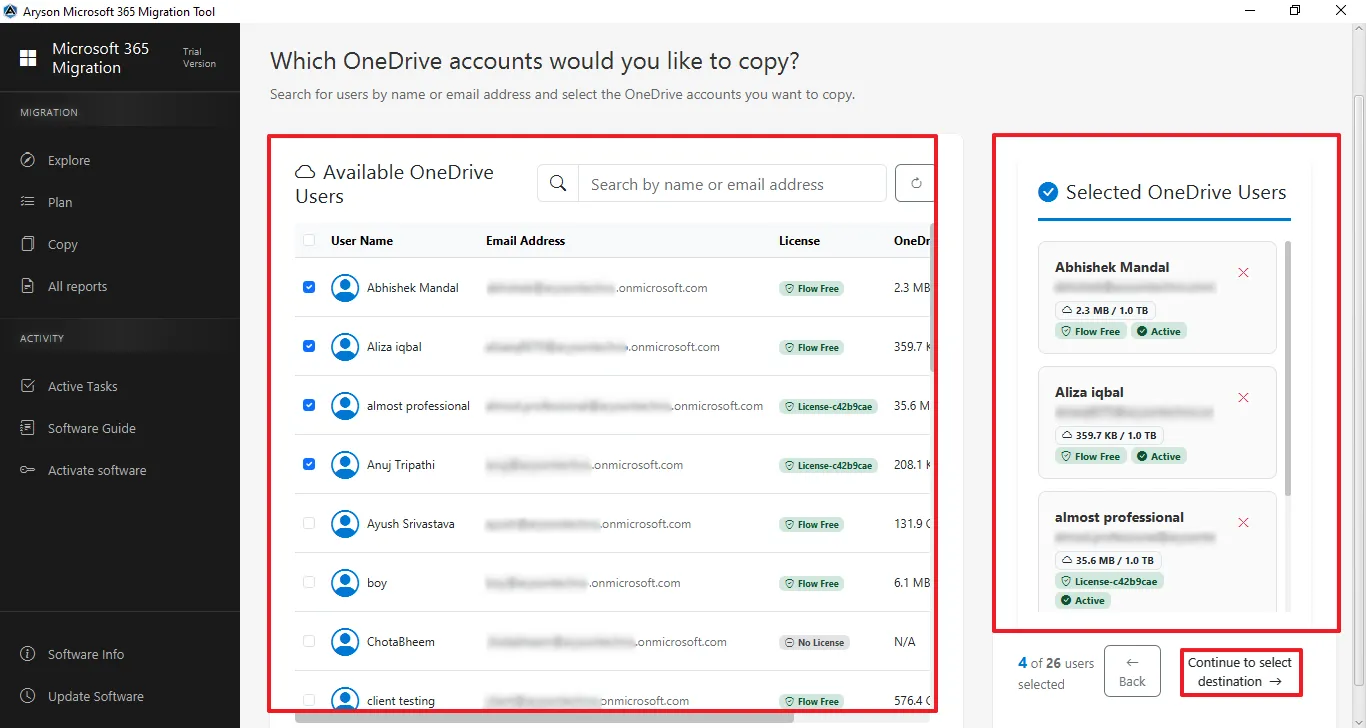
Step 7: Select Available Mailboxes to Migrate
- View and search available OneDrive users by name or ID.
- Select the required users and confirm them in the Selected Users panel.
- Click Continue to select a destination to proceed.
Step 8: Select Modern Authentication and Admin Impersonation or select the previously added tenant..
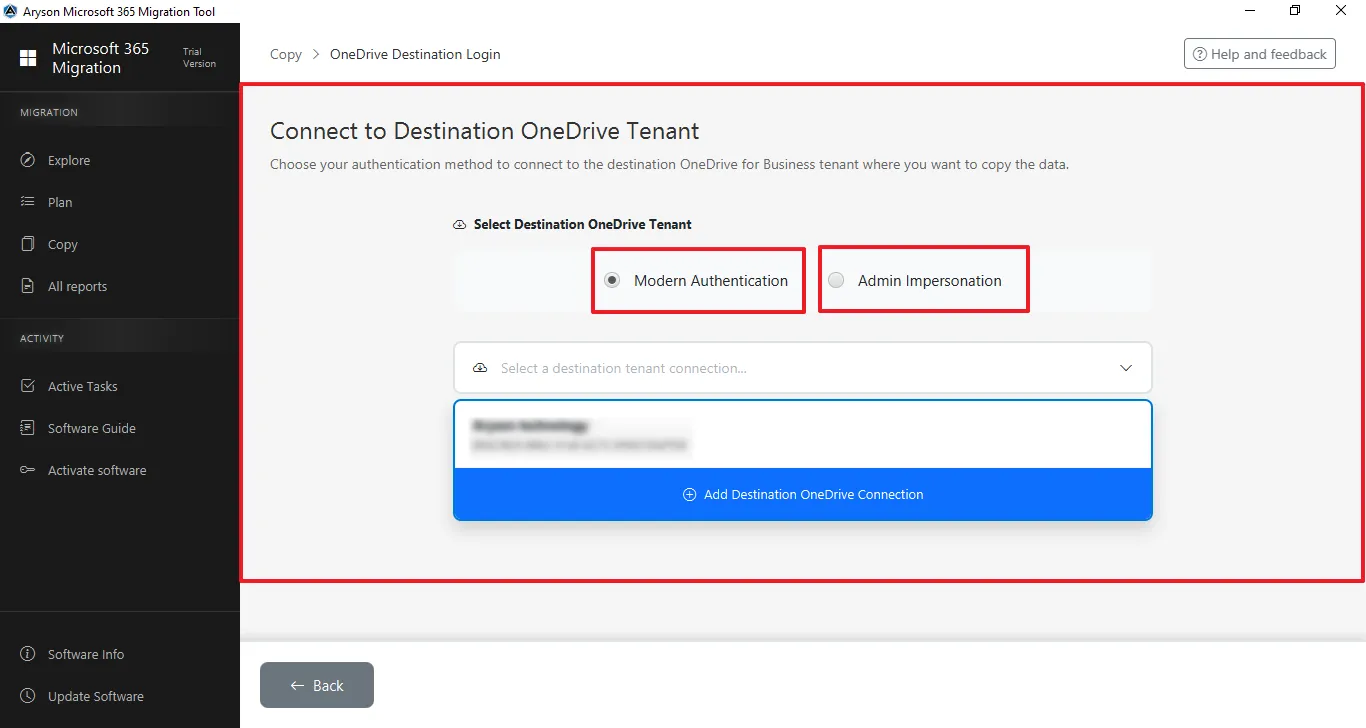
Step 9: Sign in: Enter the Admin email ID to log in.

Step 10: Enter the Microsoft Office 365 associated Password for the authentication.

Step 11: This screen shows the Microsoft permissions consent page for the Microsoft 365 Migration Tool, listing the required organisation-wide access permissions for mailbox and data migration—click Accept to grant access and continue or Cancel to stop the process.

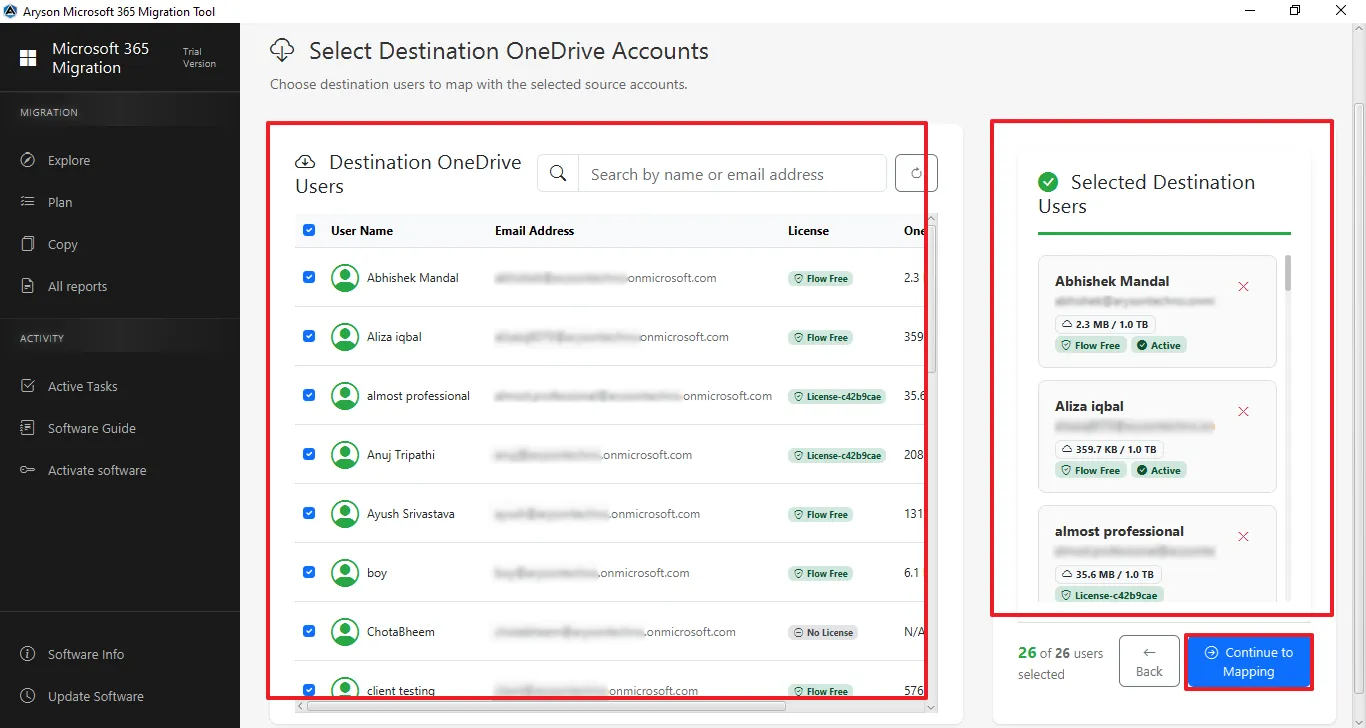
Step 12: Select Destination OneDrive Account to Migrate
- View and search available OneDrive sites by name or ID.
- Select the required users and confirm them in the Selected Users panel.
- Click Continue to proceed.
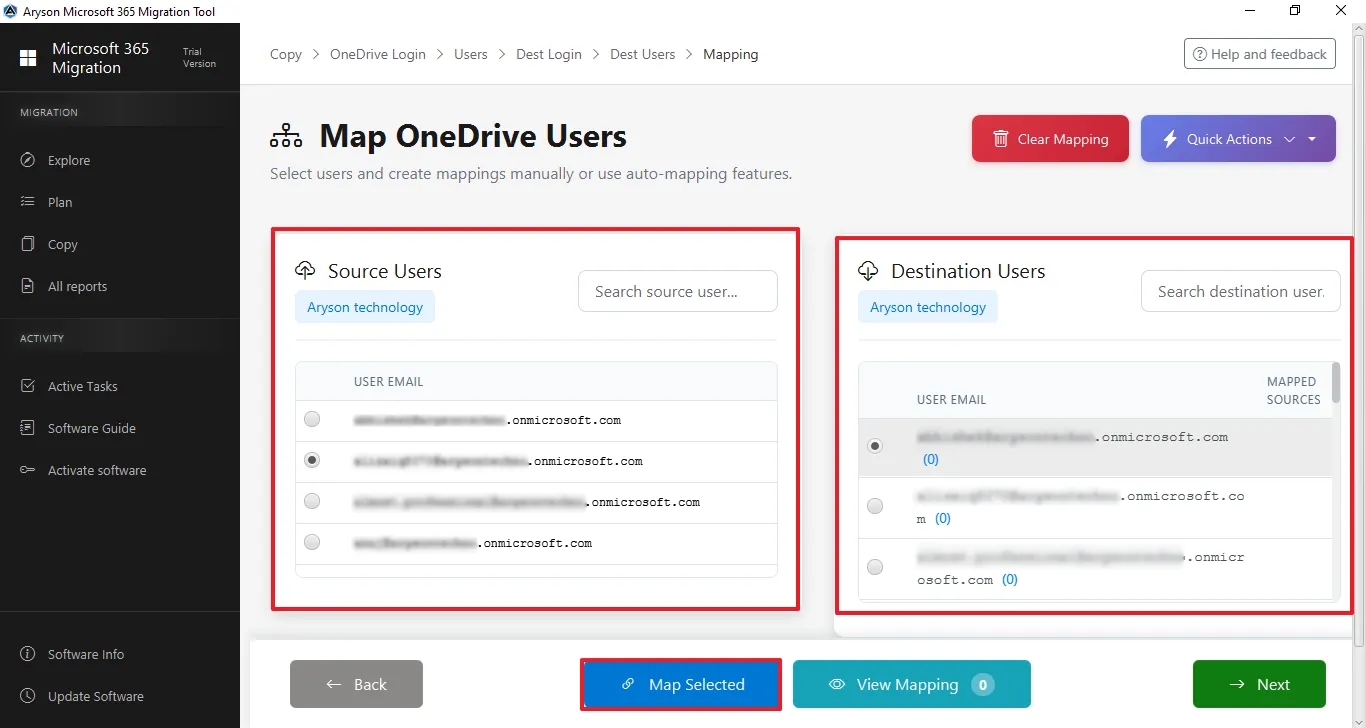
Step 13: Map OneDrive Users
- Selected source and destination users are fetched from their respective tenants.
- Choose a user from Source Users and the corresponding user from Destination Users.
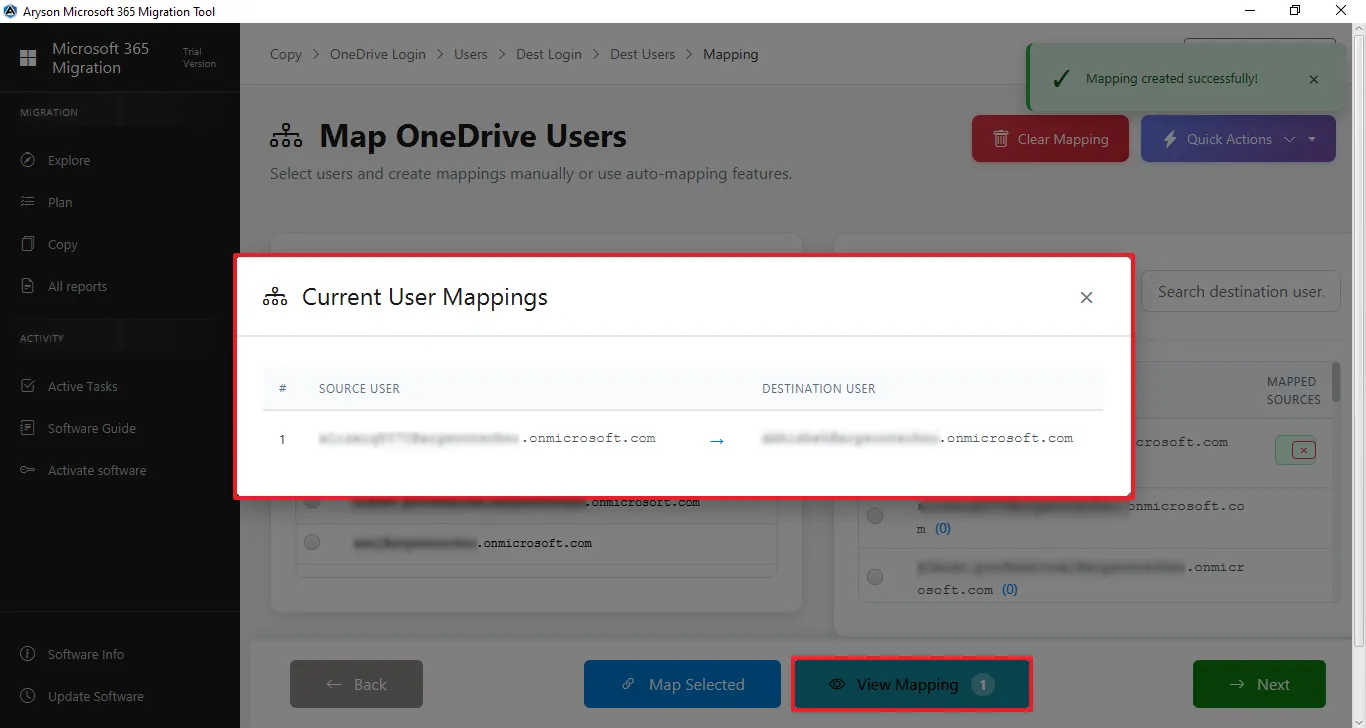
- Click Map Selected to link accounts, and view the message "Mapping Created Successfully".
Step 14: Click View Mapping to verify that the source user is linked to destination users in the Current User Mappings window.
Step 15: Click on Next to proceed further.

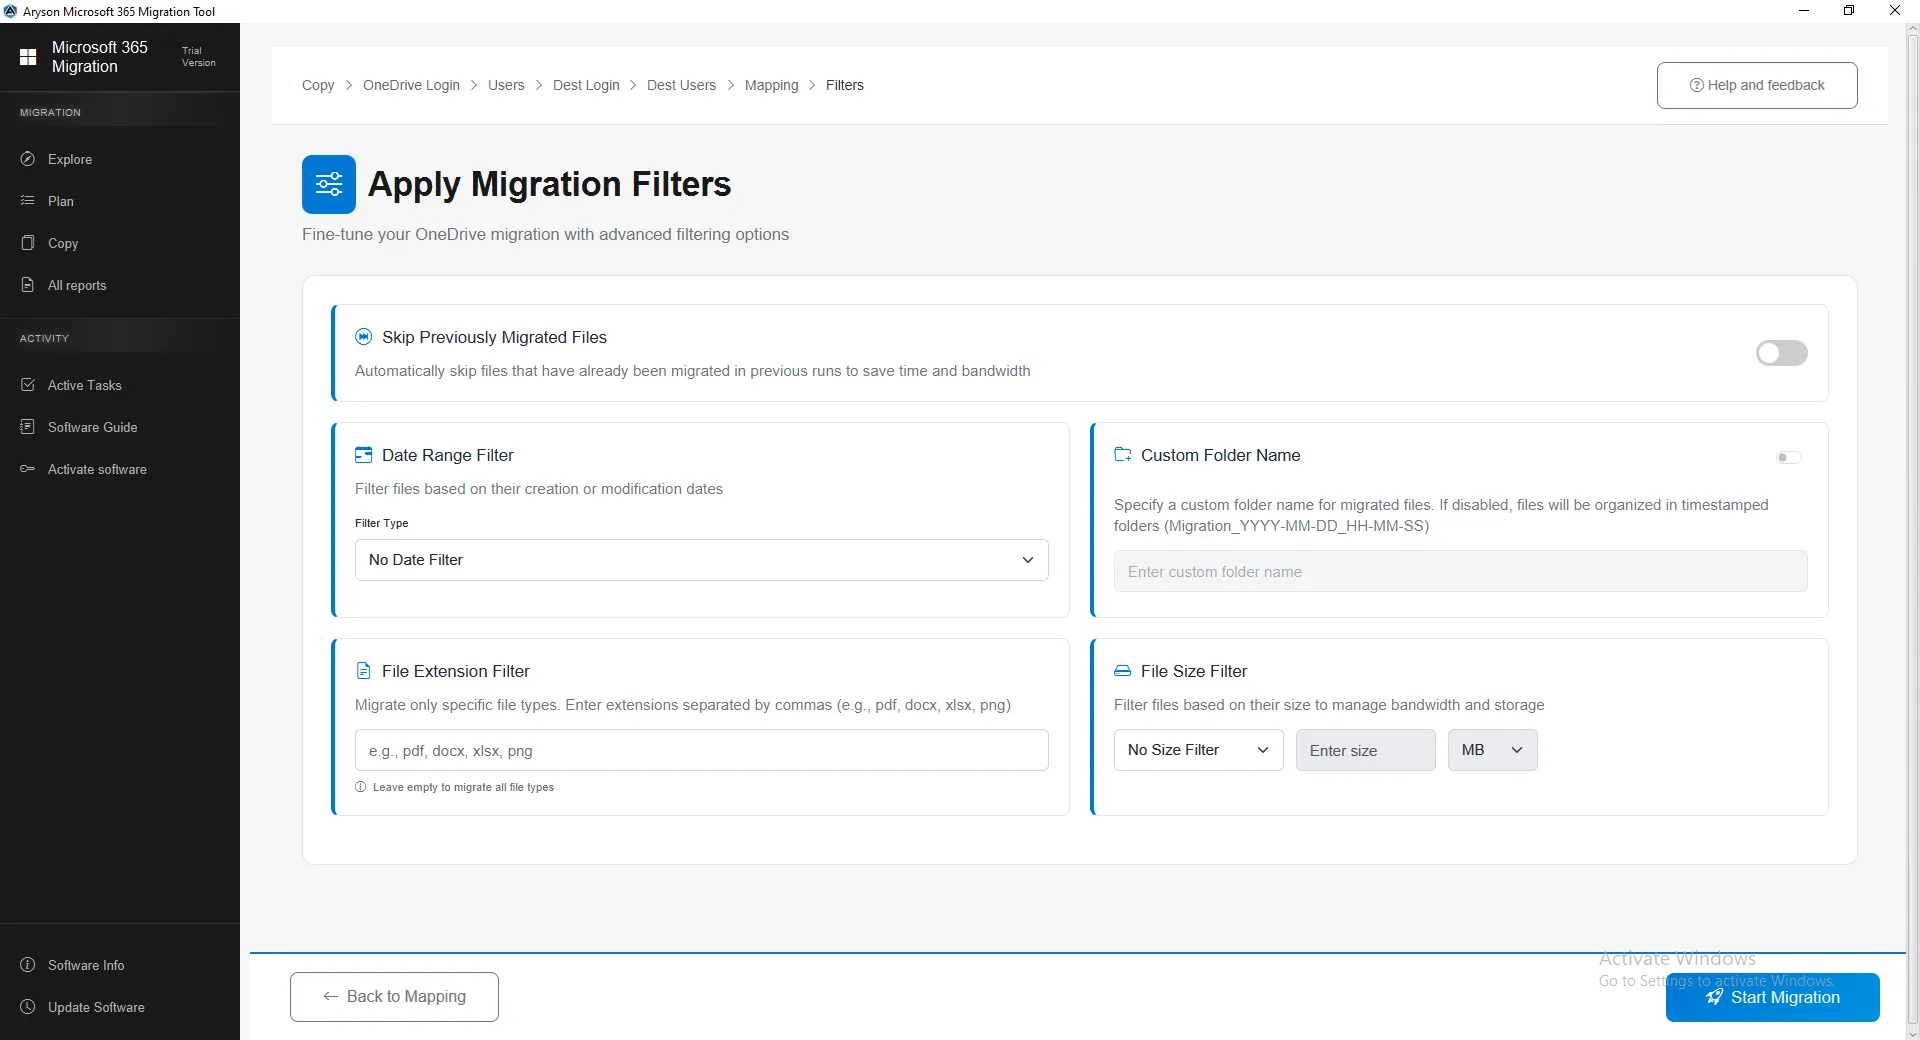
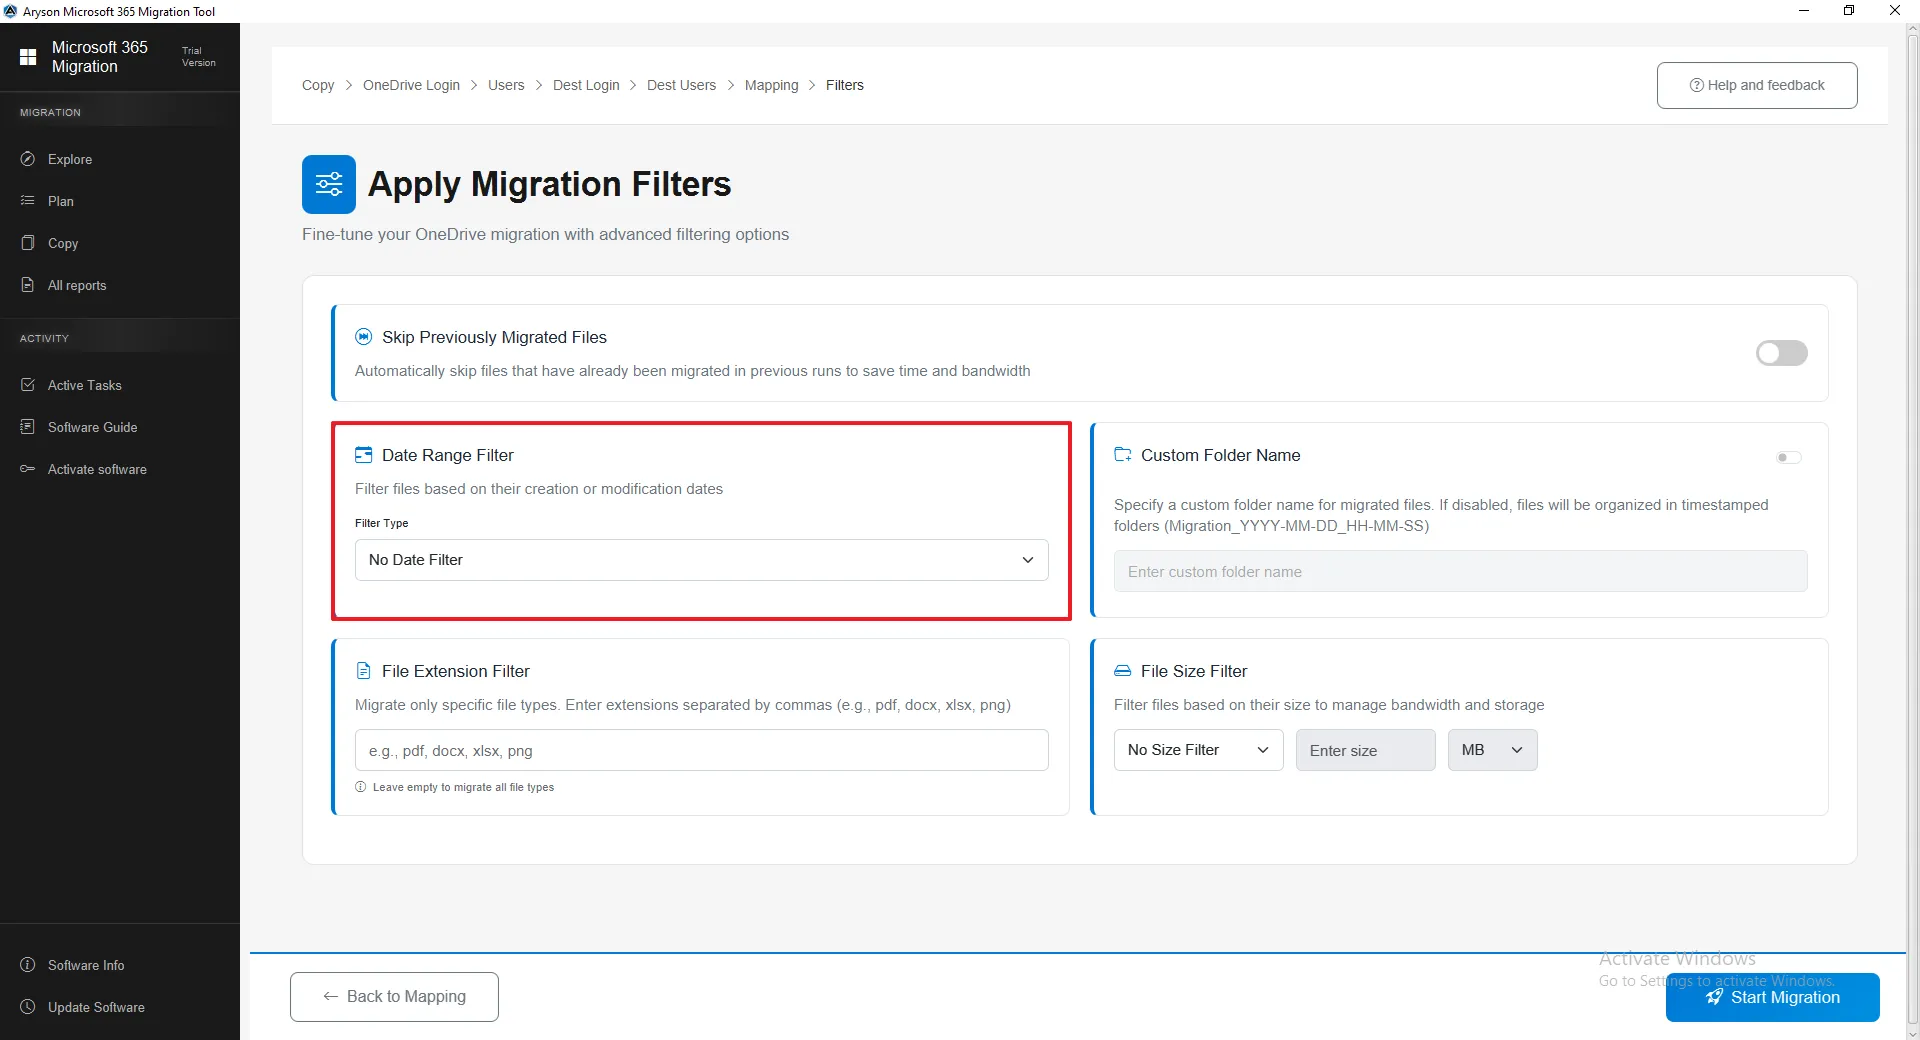
Step 16: Apply Filter & Confirm Migration Setting
This screen shows the Apply Filters & Confirm Migration Settings page, where users review site mappings and configure migration filters before starting. It displays migration summary details along with options like date, file size, file type, and custom folder filters before clicking Start Migration.
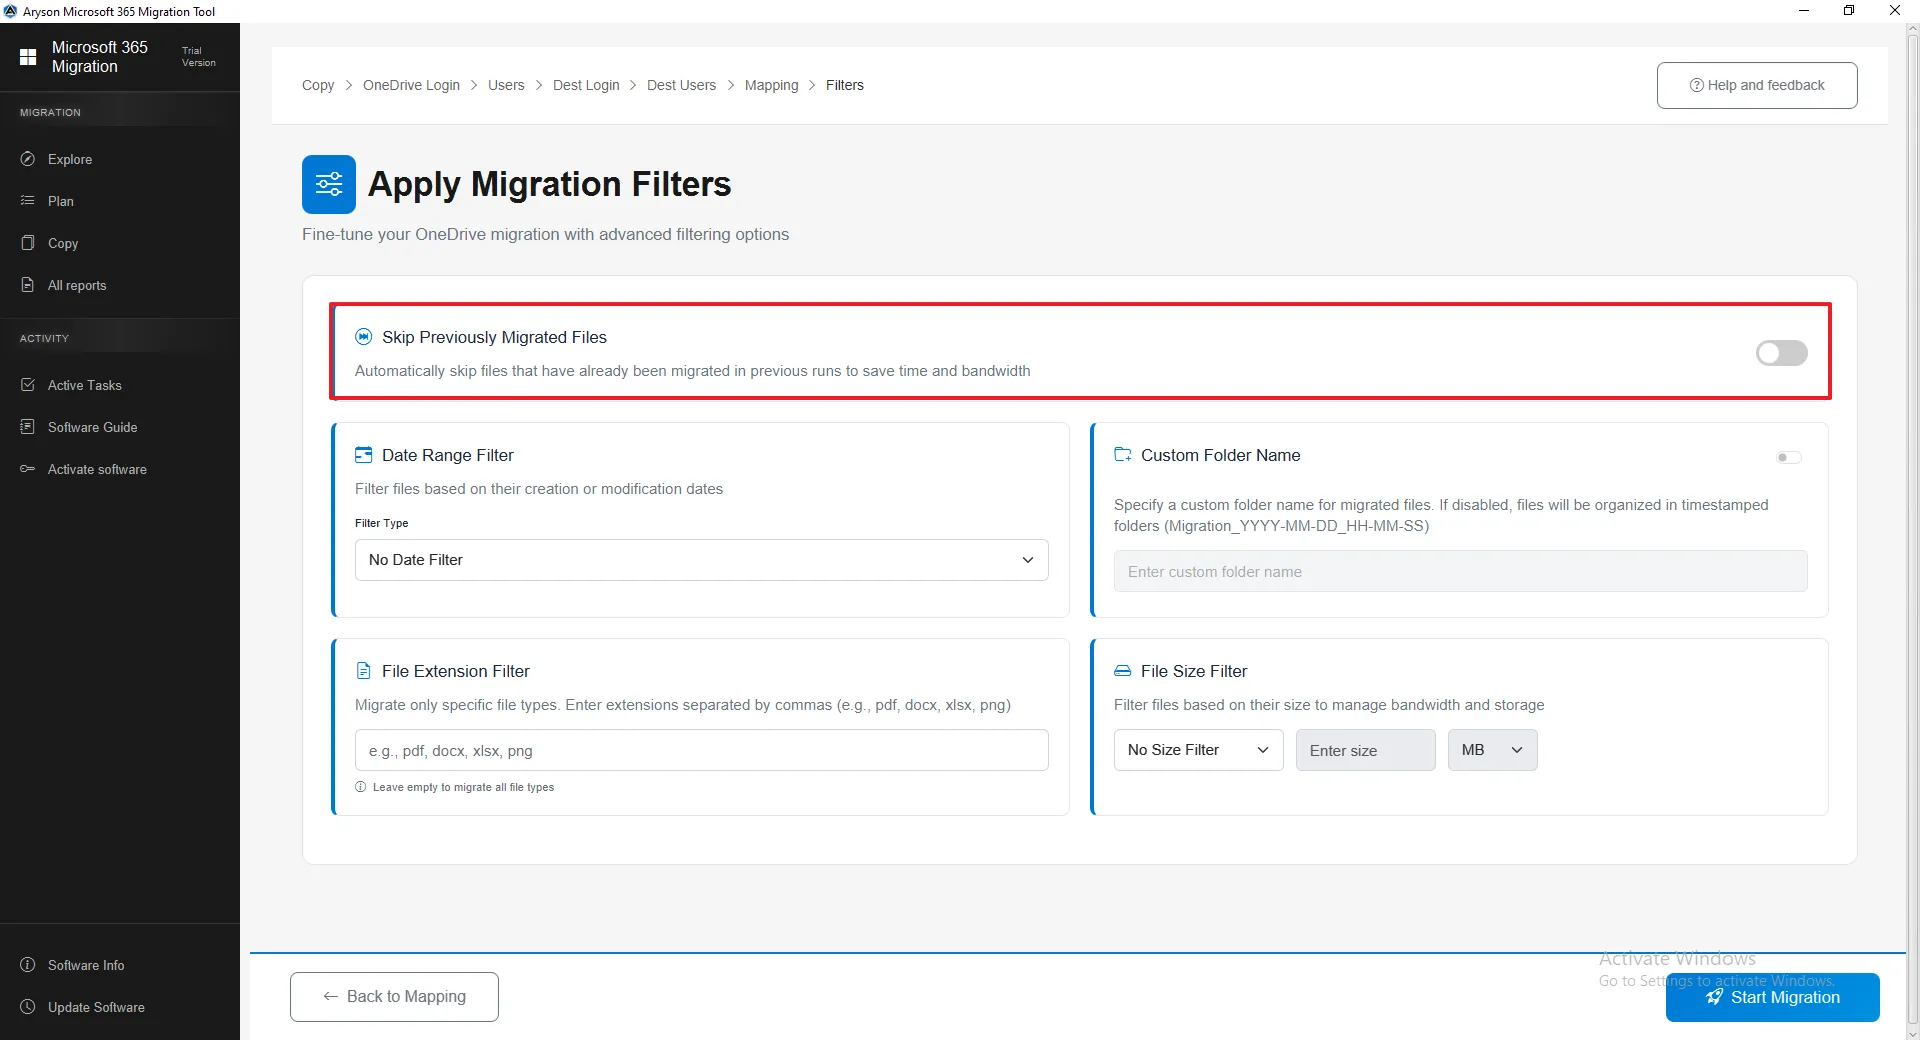
Step 17: Skip Previously Migrated Data
- It ignores files and lists already migrated, transferring only new or updated data to prevent duplicates.
- It saves time, reduces system load and internet usage, and is useful when resuming migration after interruption.
- If disabled, all selected data will be migrated again, including previously transferred items.
Step 18: Date Range Filter
- The Date Range Filter allows you to migrate data based on Created or Modified dates, or migrate all data without any date restriction.
- It helps transfer only required or recent content, reducing migration time and avoiding unnecessary data.
- This option ensures a more organised and selective migration process.
Important Note: OneDrive may show the same Created and Modified dates for new files, but Microsoft Graph API treats them separately; therefore, our tool applies date filters to both fields to ensure no data is missed during migration.
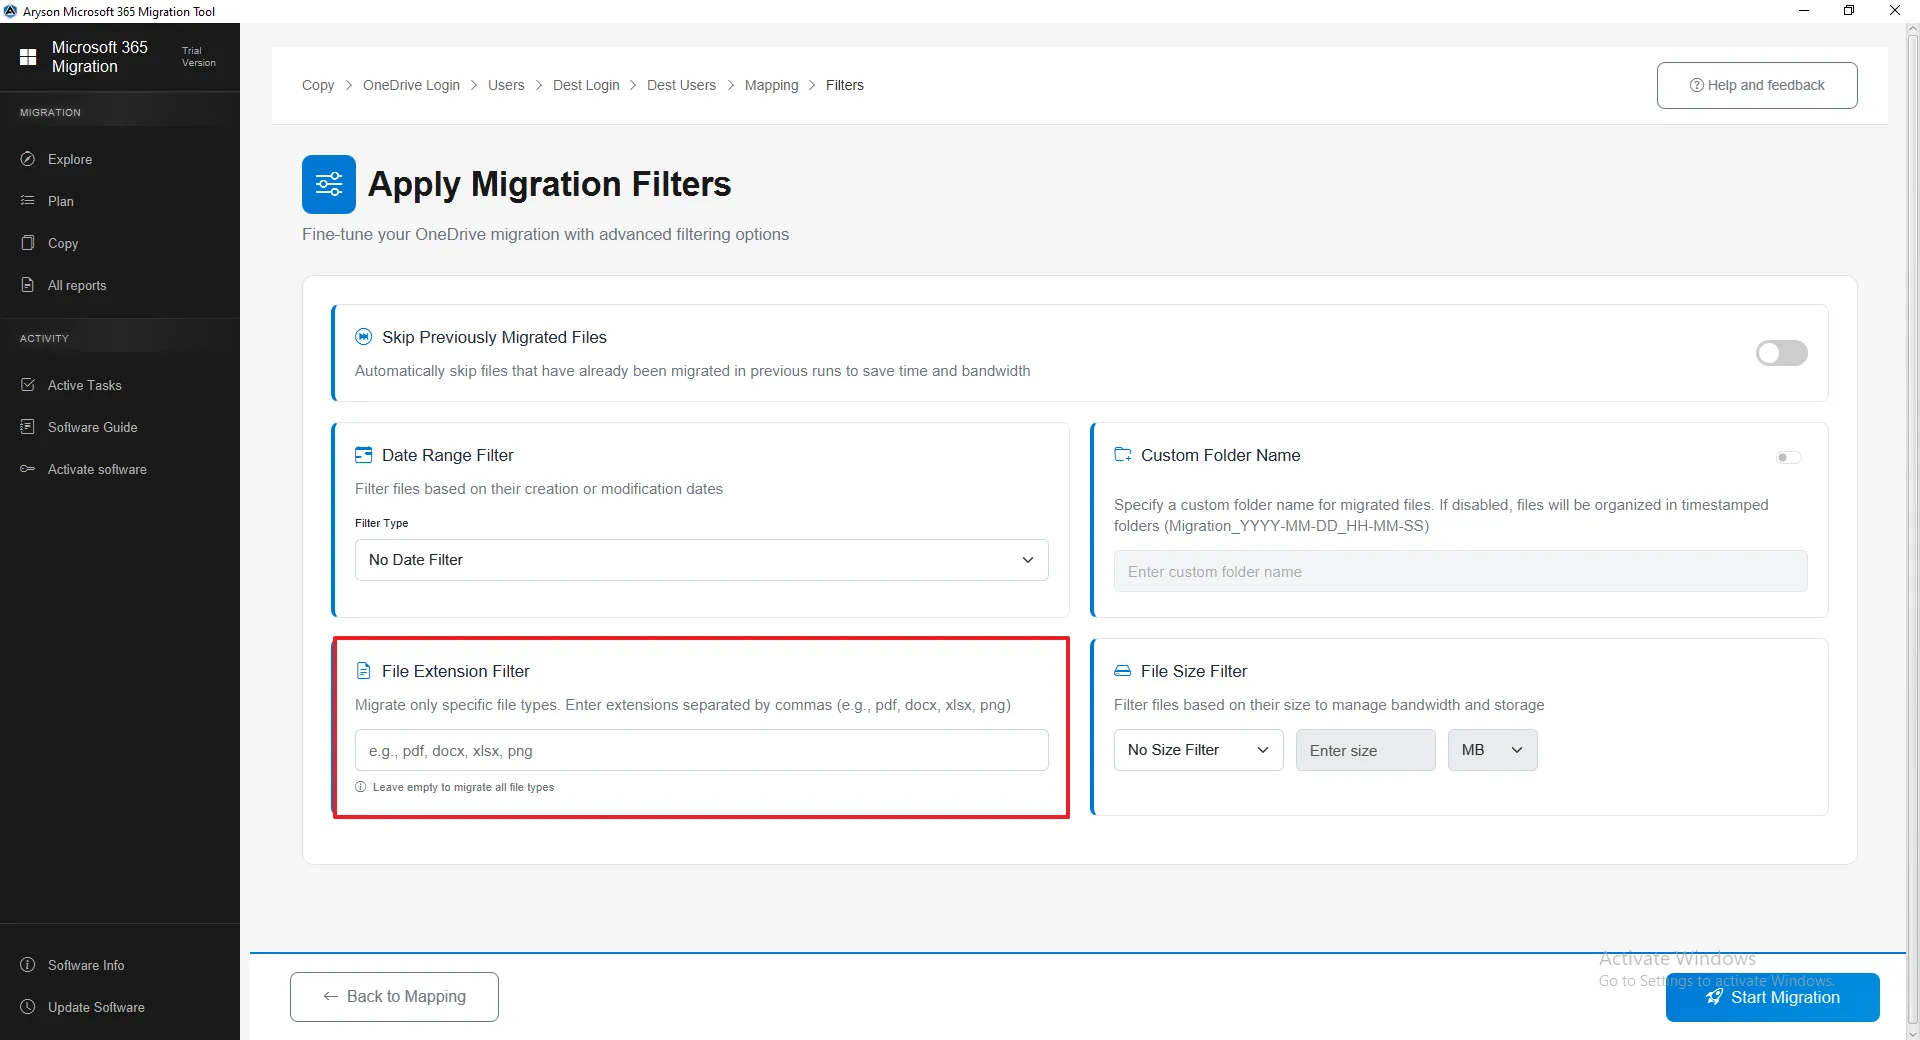
Step 19: File Extension Filter
- The File Extension Filter lets you migrate only selected file types by entering extensions (e.g., pdf, docx, xlsx) separated by commas.
- Only matching files are migrated, helping exclude unwanted file types and keep data organised.
- If left empty, all file types will be migrated without restriction.
Step 20: Custom Folder Name
- Custom Folder Filter lets you choose a specific folder where all migrated files will be stored.
- It keeps migrated data organised and easy to identify, instead of mixing with existing files.
- If not enabled, this tool creates a default auto-named folder for storing migrated content.

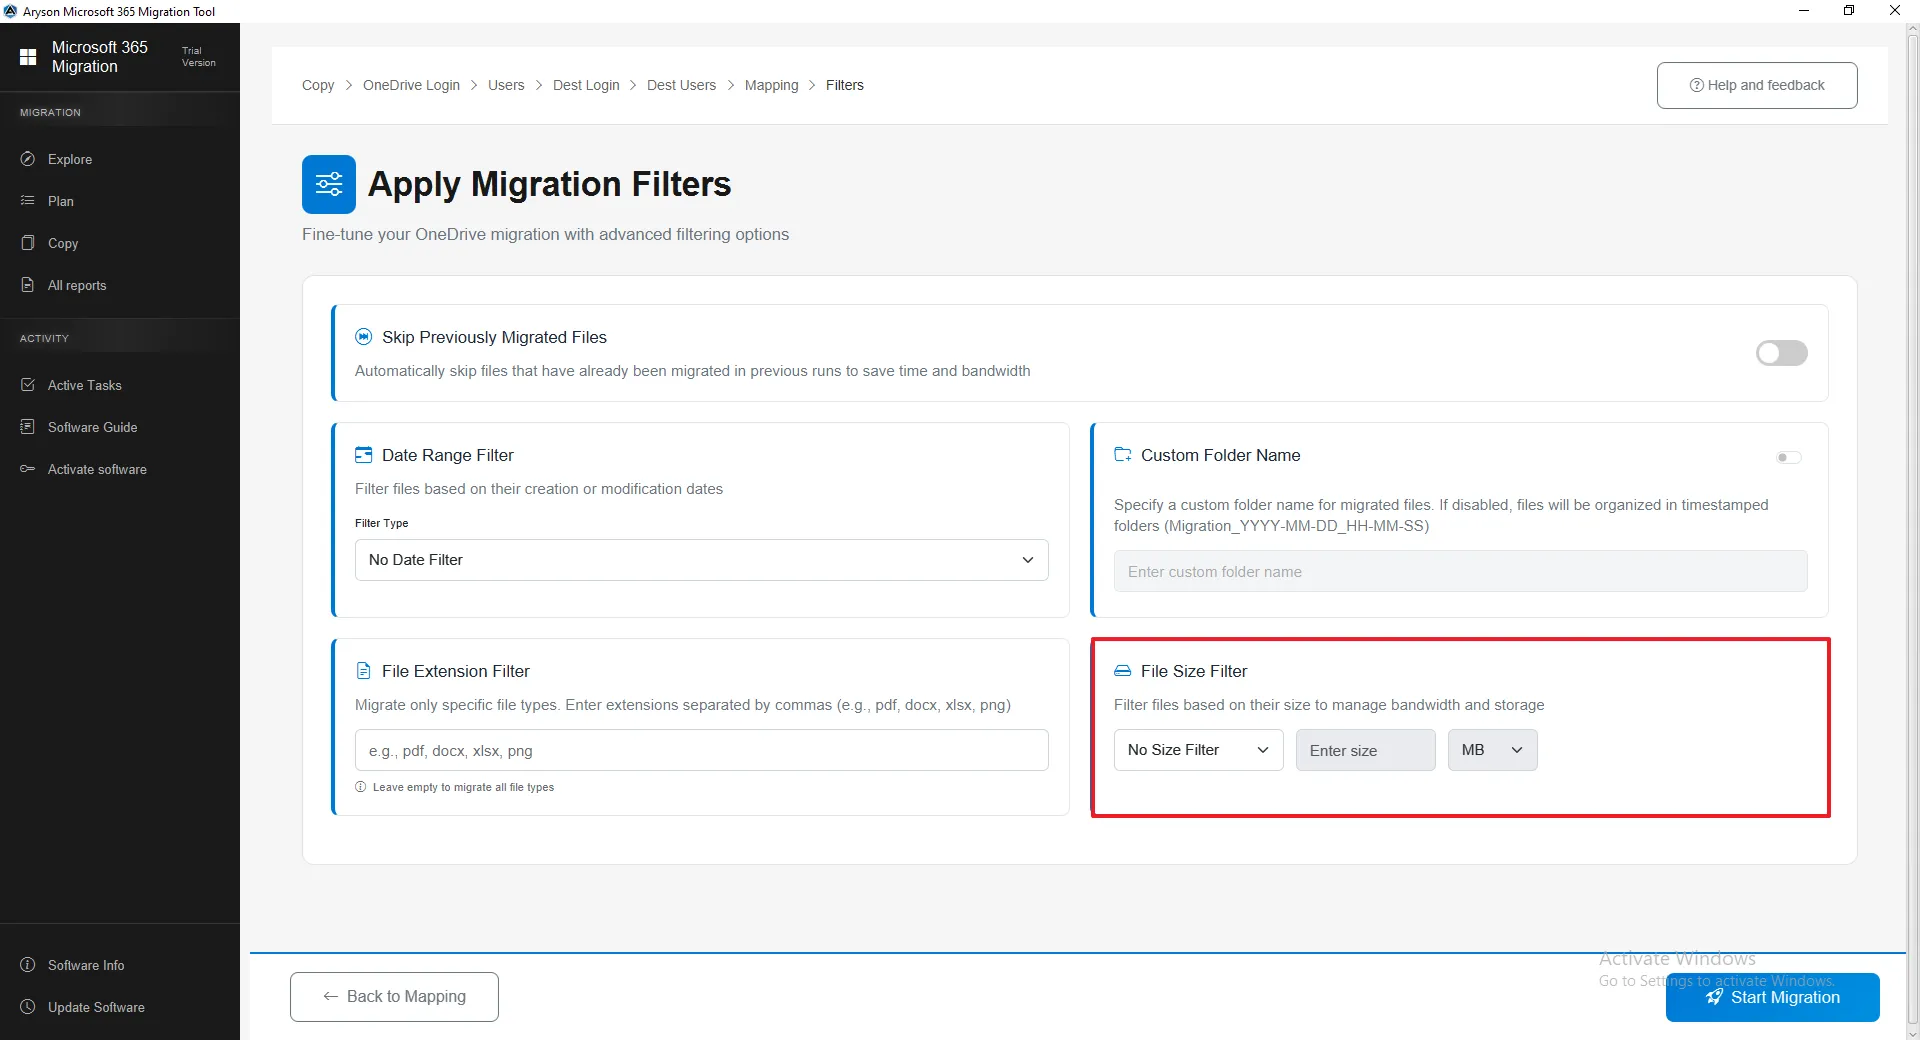
Step 21: File Size Filter
- The File Size Filter lets you migrate files based on size using options like No Size Filter, Greater Than, or Less Than (in MB).
- It helps skip very large files or migrate only small files as needed.
- This option makes migration faster and more organised.
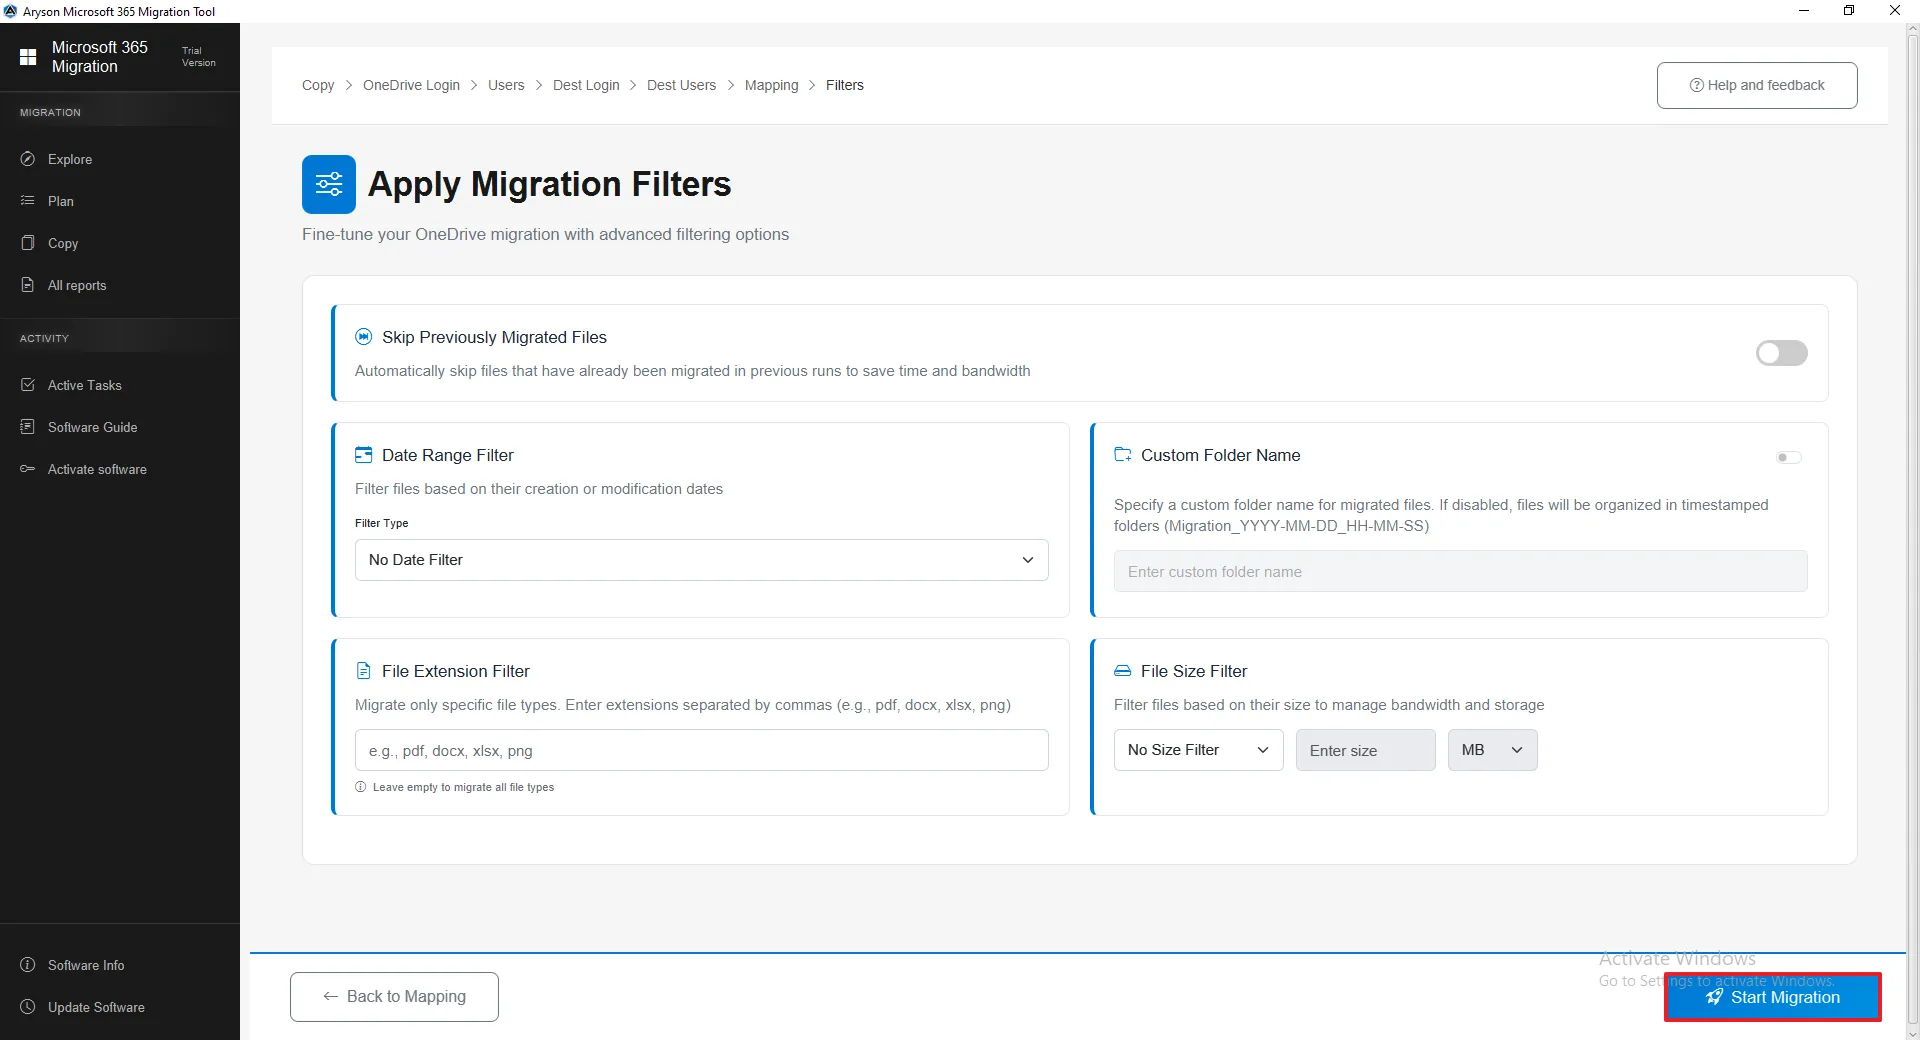
Step 22: Start Migration
- Click Start Migration after setting all filters and configurations to begin the process.
- Make sure the source, destination, and filters are correct before starting.
- Once started, the migration runs automatically, and progress can be tracked in Active Tasks or Reports.
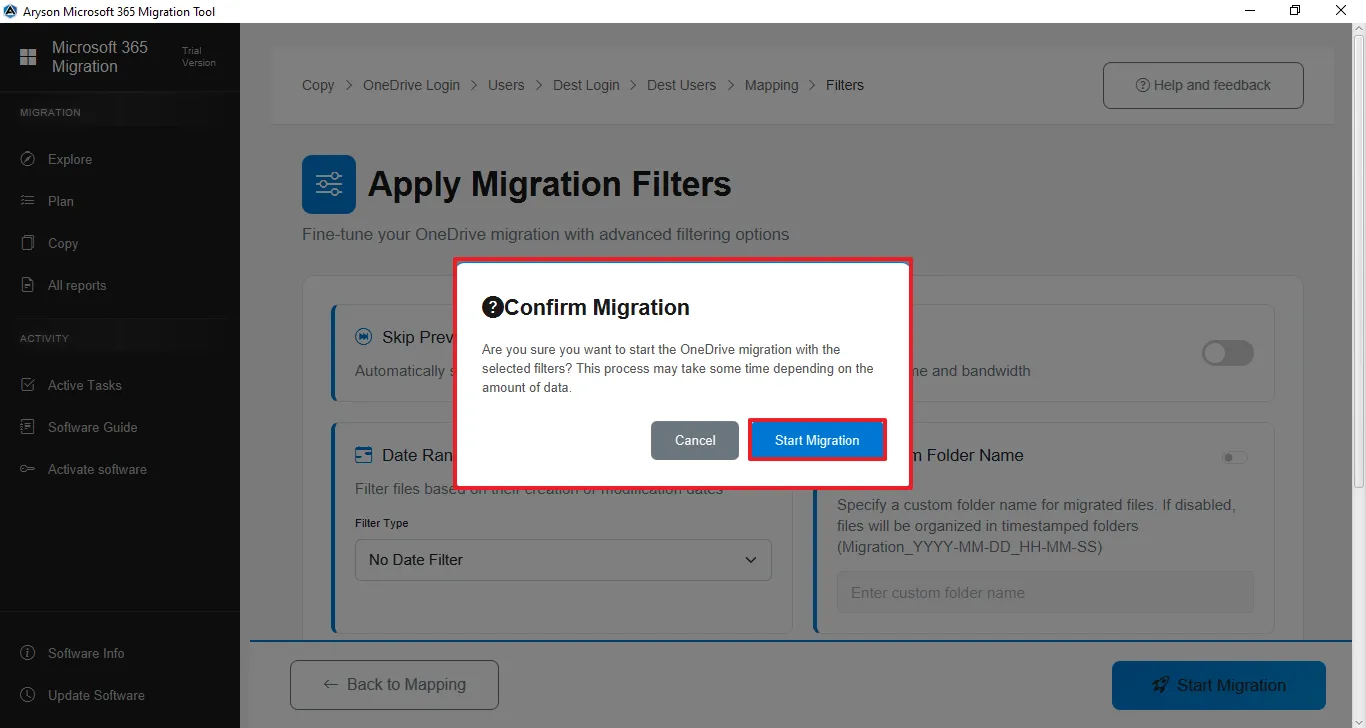
Step 23: Confirmation Action
- A confirmation pop-up appears after clicking Start Migration, asking you to review your selected settings and filters.
- Click Confirm to begin the migration or Cancel to go back and make changes.
Step 24: Migration in Process
- Shows the live migration status, including progress, counts, and time details.
- Displays current file activity and highlights failed or skipped items.
Cancel Migration: The process can be stopped at any time using the Cancel Migration option.

Step 25:The All Reports section gives a complete overview of all migration and backup activities. It lets users track status, view summaries, and review logs for Email, SharePoint, and OneDrive in one place.
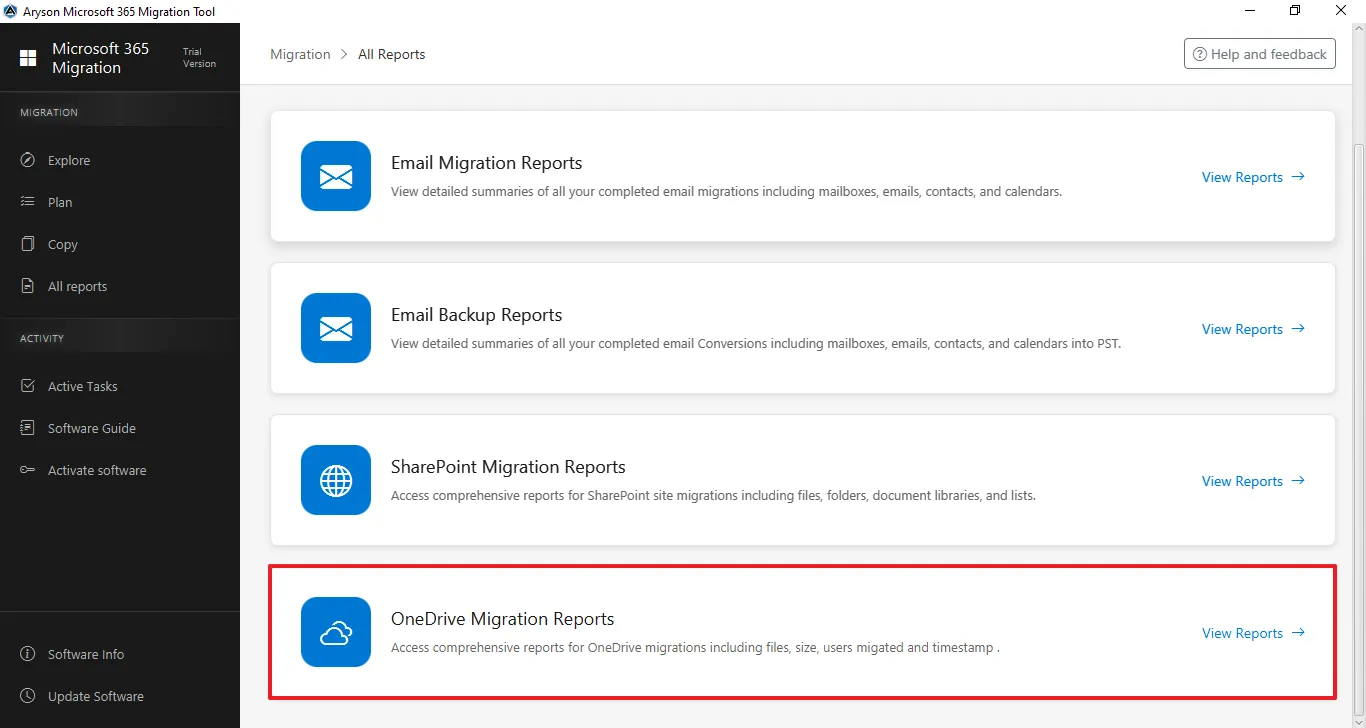
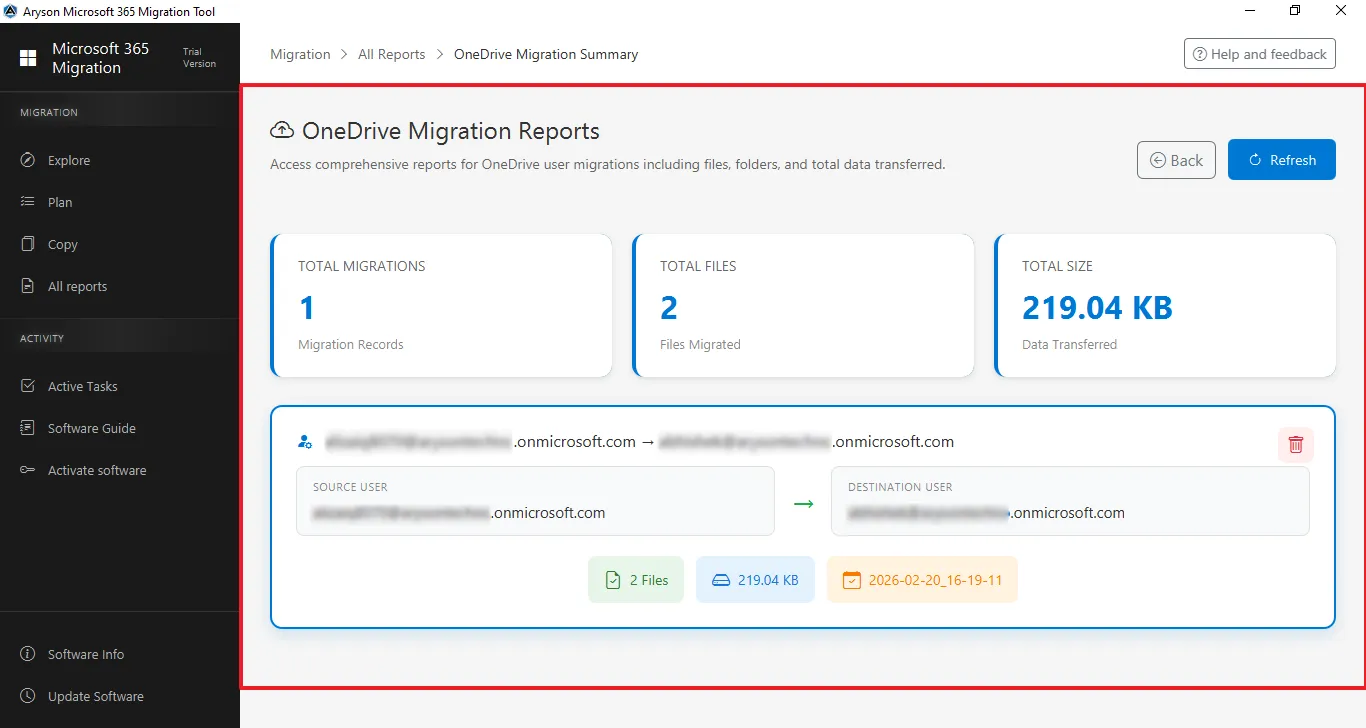
Step 26:The OneDrive Migration Reports section shows a complete summary of all OneDrive migrations. It helps administrators track progress, verify transferred data, and review key statistics after migration.
Steps for SharePoint Deduplication
Software Working Process
Step 1: Download and install the Aryson Microsoft 365 Migration Tool.

Step 2: From the left panel, click on Deduplicate and click on Email Deduplication from the center panel.

Step 3: Select mailboxes to remove the tenant:
- Select Modern Authentication (recommended), then click Add connection or select the previously added tenant.
- Select Admin Impersonation (Bulk/Advanced) and enter the Application client ID or select a previously added client ID through the Use Saved Admin Connection.
Step 4: Login process for Modern Authentication
- Enter the Admin email ID for secure sign-in.
- Enter the Microsoft Office 365 associated Password for the authentication.

- This screen shows the Microsoft permissions consent page for the Microsoft 365 Migration Tool, listing the required organisation-wide access permissions for mailbox and data migration—click Accept to grant access and continue or Cancel to stop the process.
Step 5: Login process for Admin Impersonation - Enter the Application (Client) ID, Client Secret ID, and Directory (Tenant) ID, and click on Connect & Verify.
Step 6: Select Available Mailboxes to identify duplicates:
- View and search available Mailboxes by Name or Email address.
- Select the required users and confirm them in the Selected Sites panel.
- Click Continue to select a destination to proceed.
Step 7:Configure Duplicate Detection
- Mail - Enable to remove emails based on Subject, From, To, CC, or Body. Further, you can select specific time-period data to detect duplicates using the Date Range Filter option.
- Contact - Enable Name, Email, Phone to remove duplicate contacts, and click on Start Scanning.
- Calendar - Enable Subject, Start Date, End Date, or organizer to remove calendar duplicates based on these criteria, and click on Start Scanning.
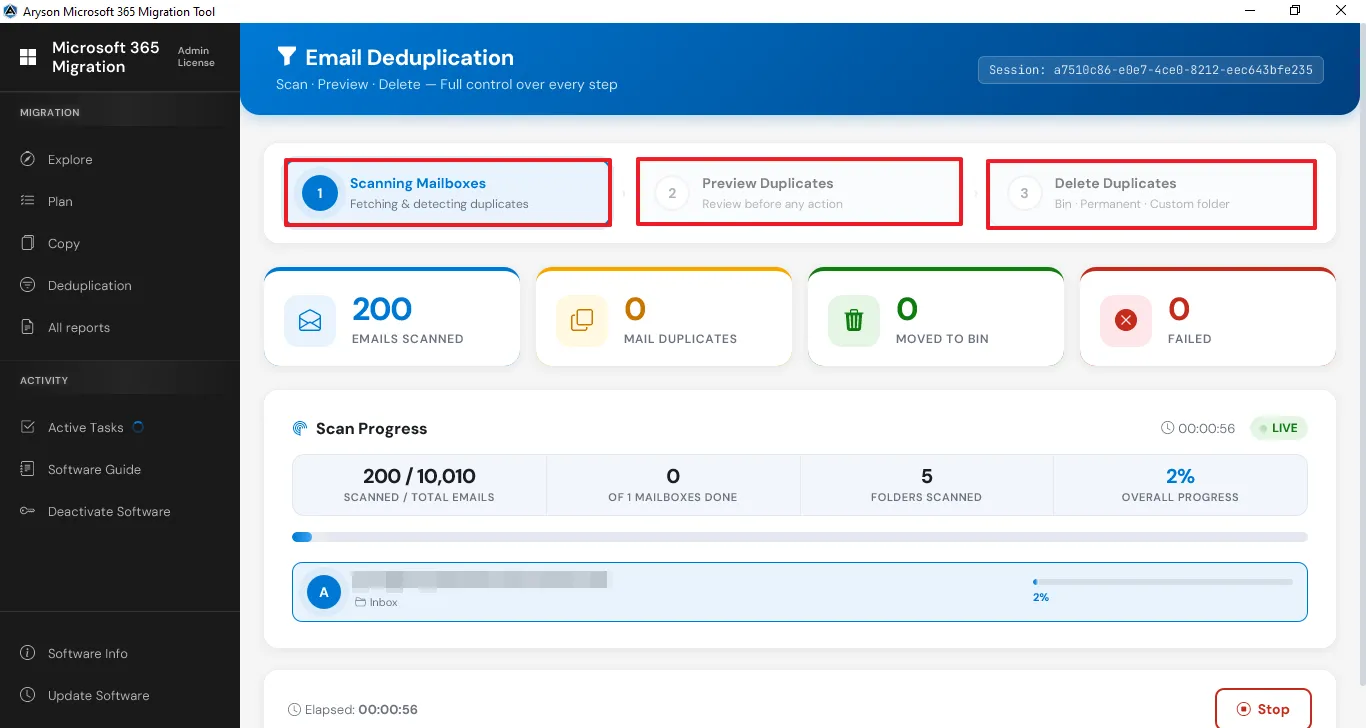
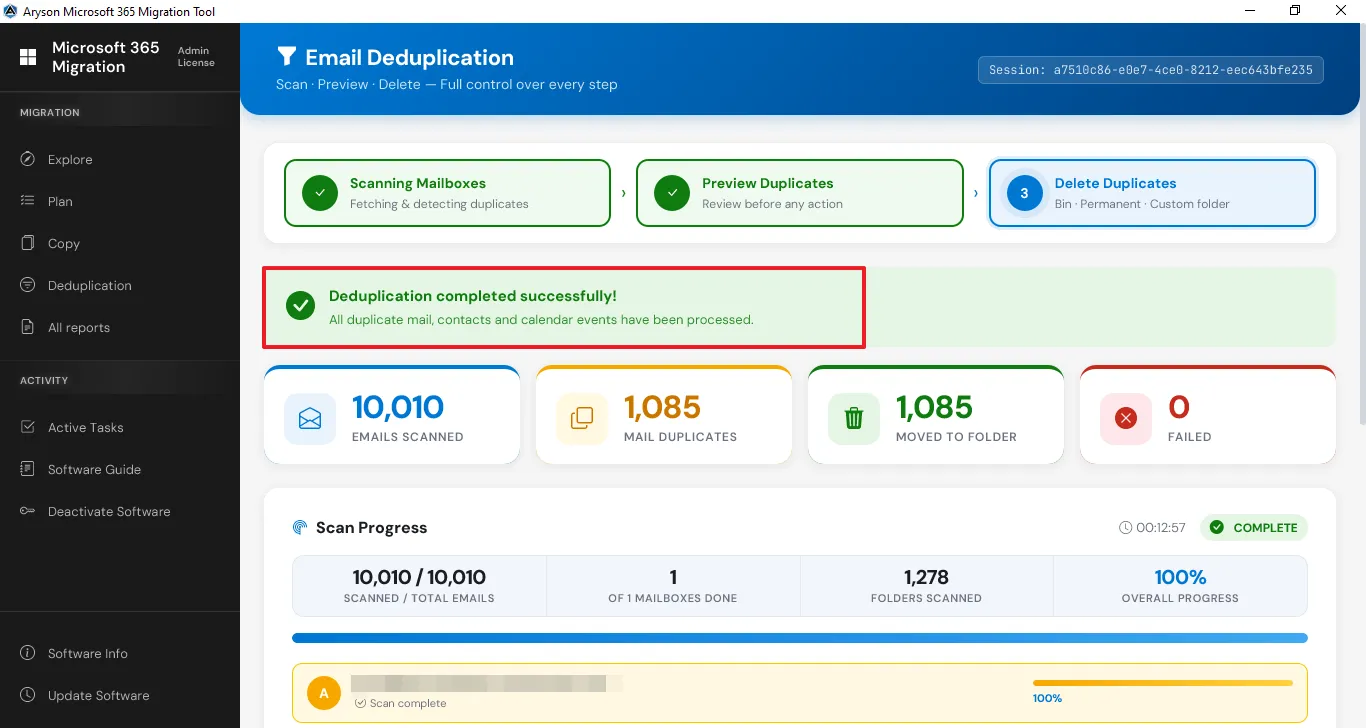
Step 8: Email Deduplication scanning process begins - in the pop-up windows, you’ll see the analysis of duplicate detection.
Step 9: From scanning to deletion, there are the steps to analyze and complete the duplication process.
Scanning: The system scans all selected data (emails, contacts, calendar items) to identify duplicates based on defined criteria.
Preview: It displays the detected duplicate items, allowing you to review and confirm what should be removed.
Deletion: The selected duplicate items are permanently removed, keeping only the required and unique data.
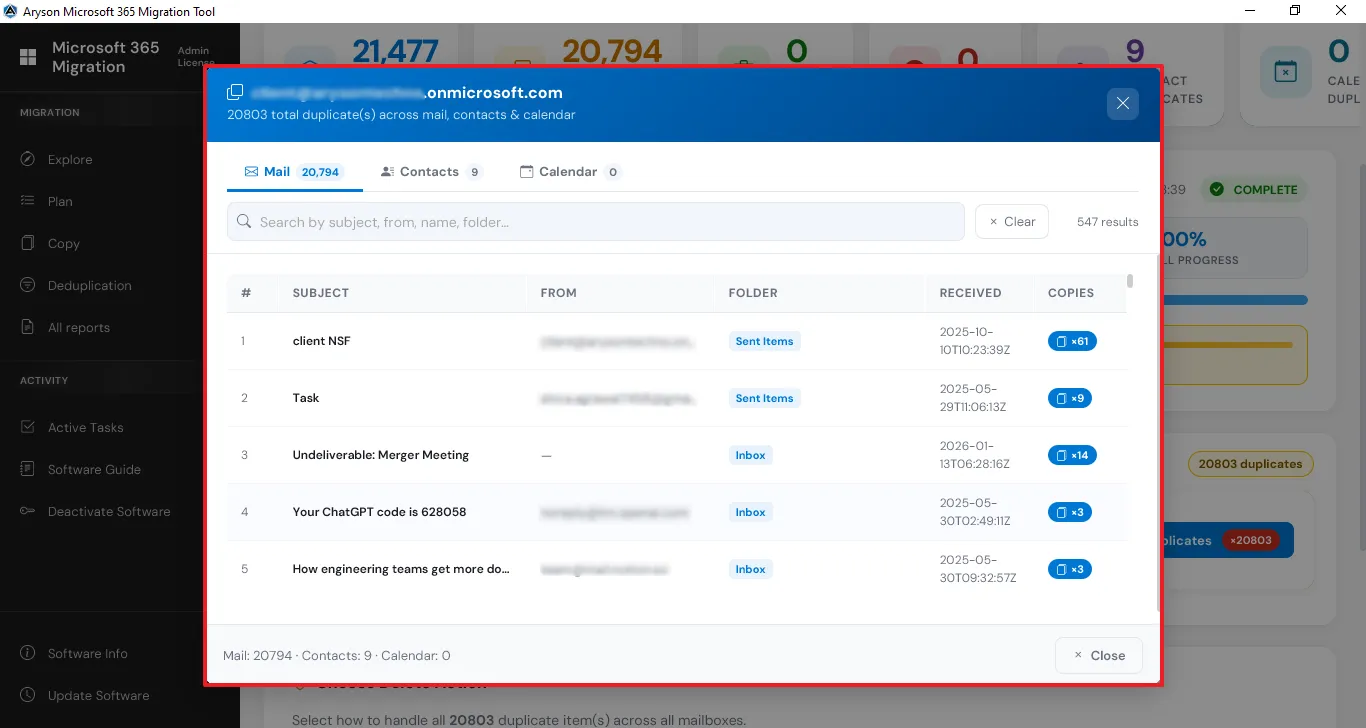
Step 10: In the Per-Mailbox Results, click on the View Duplicates and preview all duplicate emails, contacts, and calendars in one place.
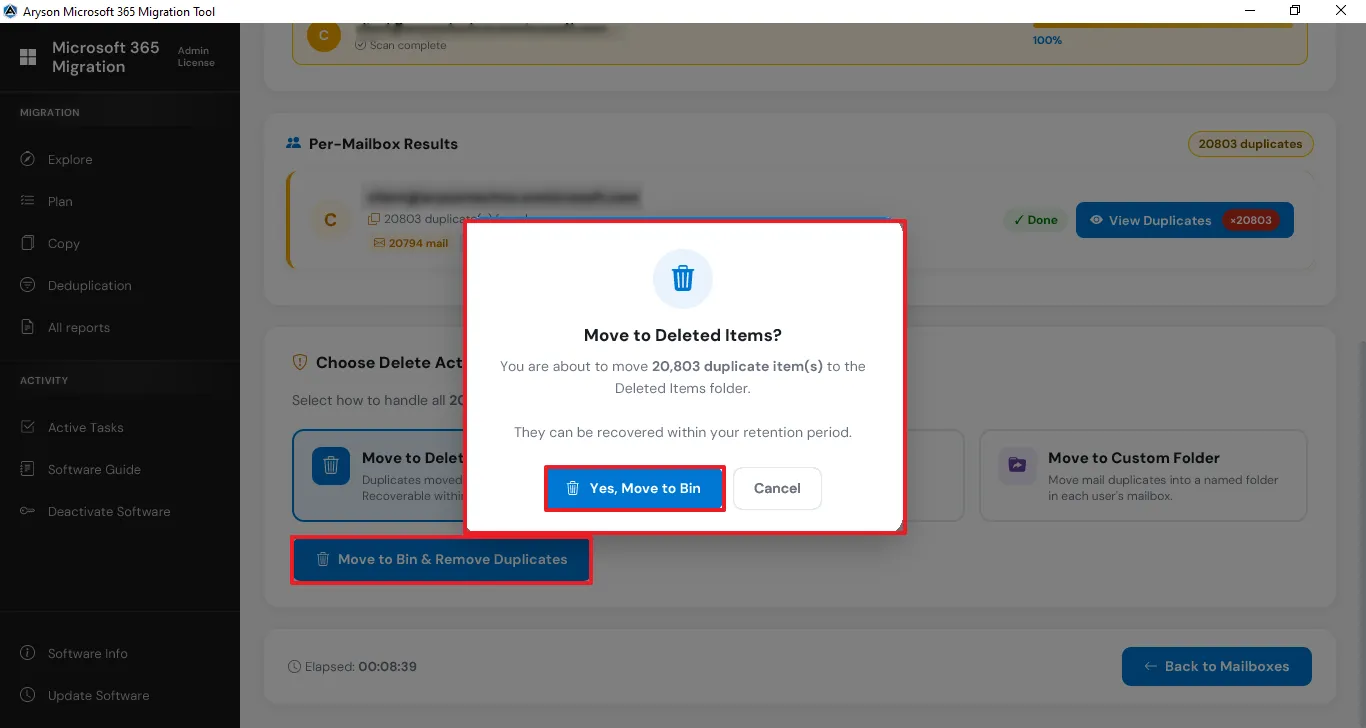
Step 11: Click on Move to bin & remove duplicates, and then click on Yes, Move to Bin to confirm the deletion.
Step 12: Deduplication completed successfully
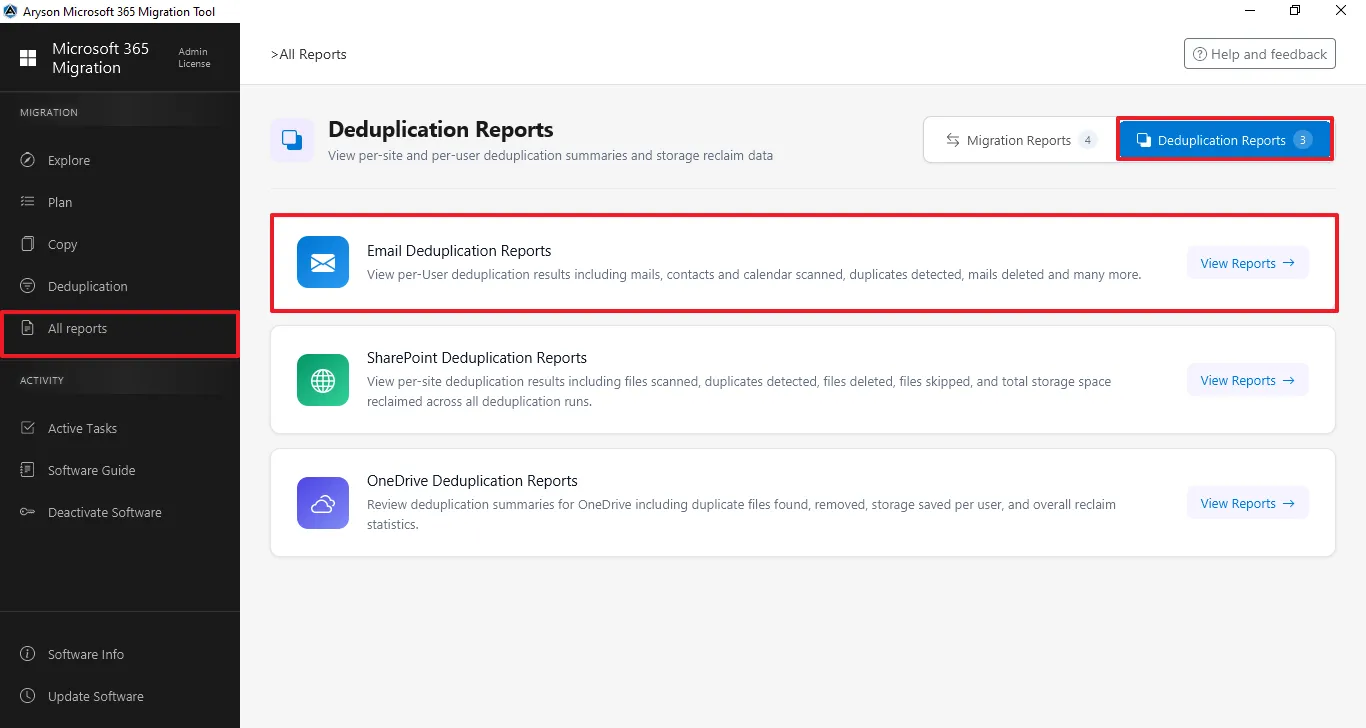
Step 13: The All Reports section gives a complete overview of all migration and backup activities. It lets users track status, view summaries, and review logs. Click on Deduplicate Reports and then click on the Email Deduplication Reports.
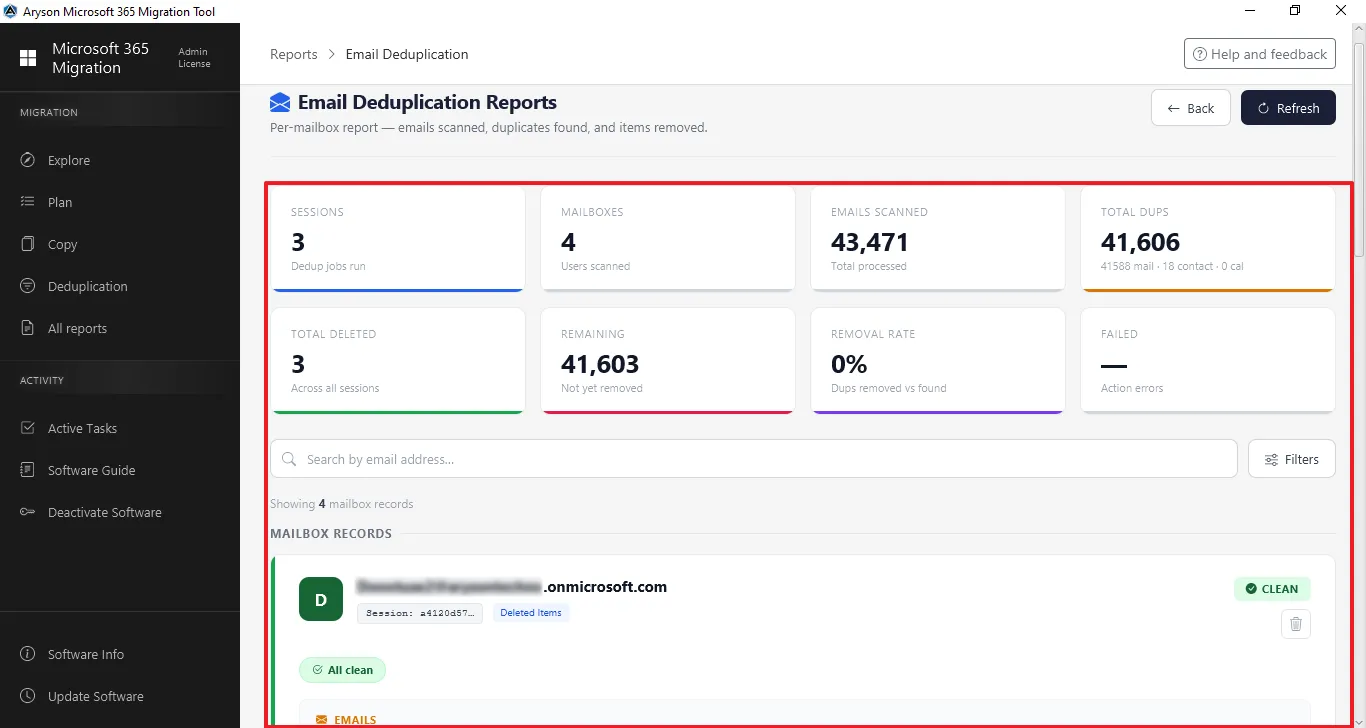
Step 14: View the email deduplication reports, which show emails scanned, total duplicates, etc.
Step 1: Download and install the Aryson Microsoft 365 Migration Tool.

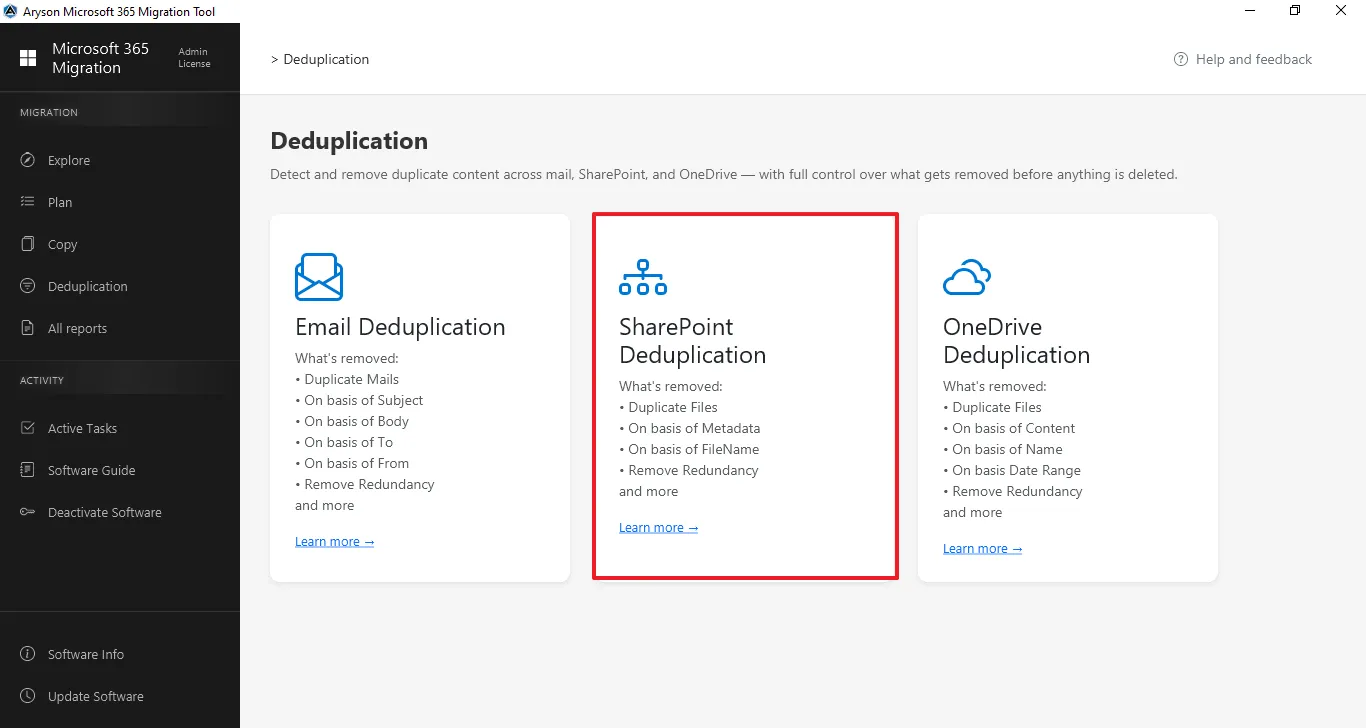
Step 2: From the left panel, click on Deduplicate and click on SharePoint Deduplication from the center panel.
Step 3: Connect to the SharePoint Tenant:
- Select Modern Authentication (recommended), then click Add connection or select the previously added tenant.
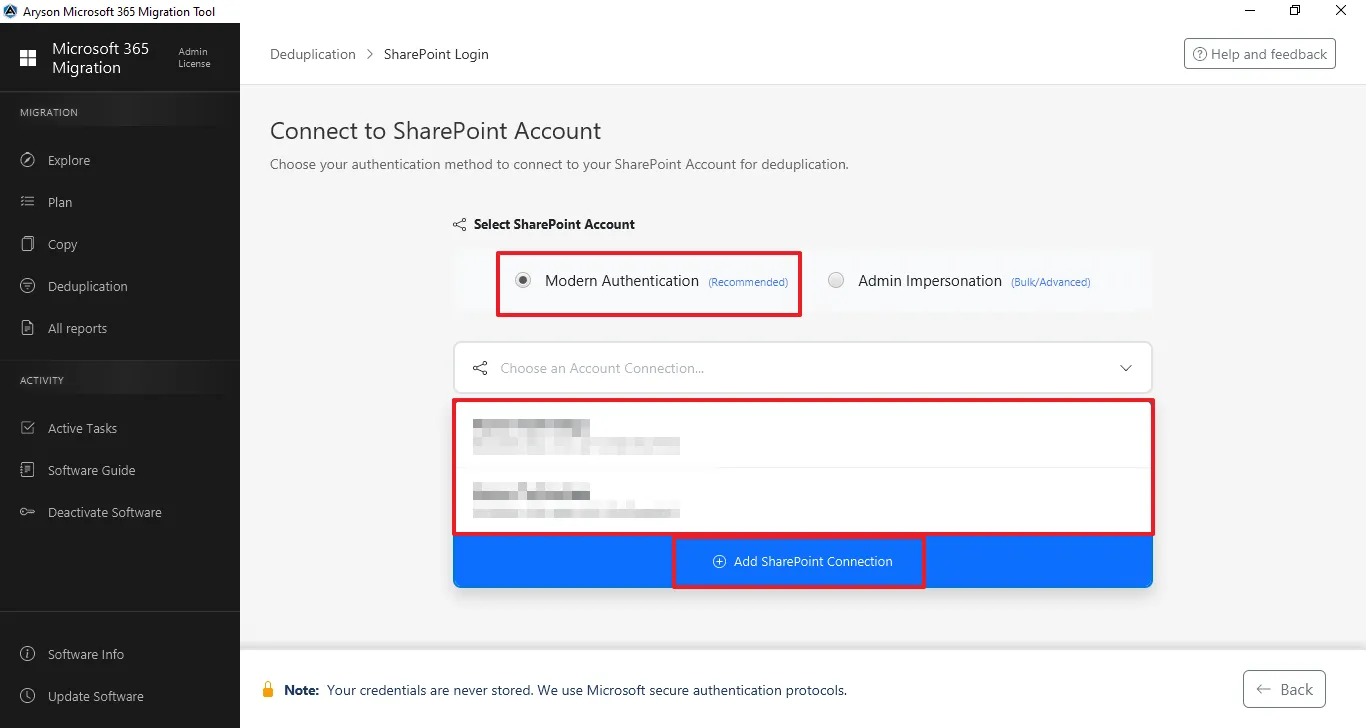
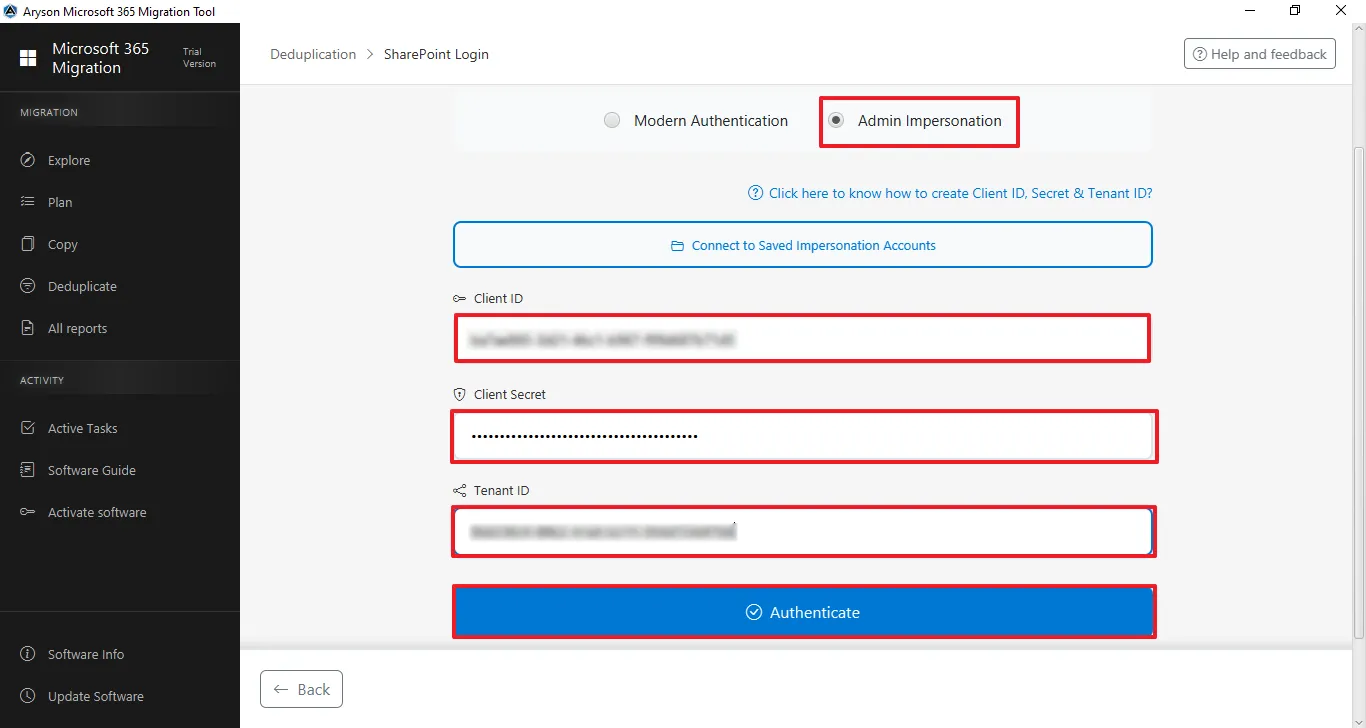
- Select Admin Impersonation (Bulk/Advanced) and enter the Application client ID or select a previously added client ID through the Use Saved Admin Connection.

Step 4: Login process for Modern Authentication
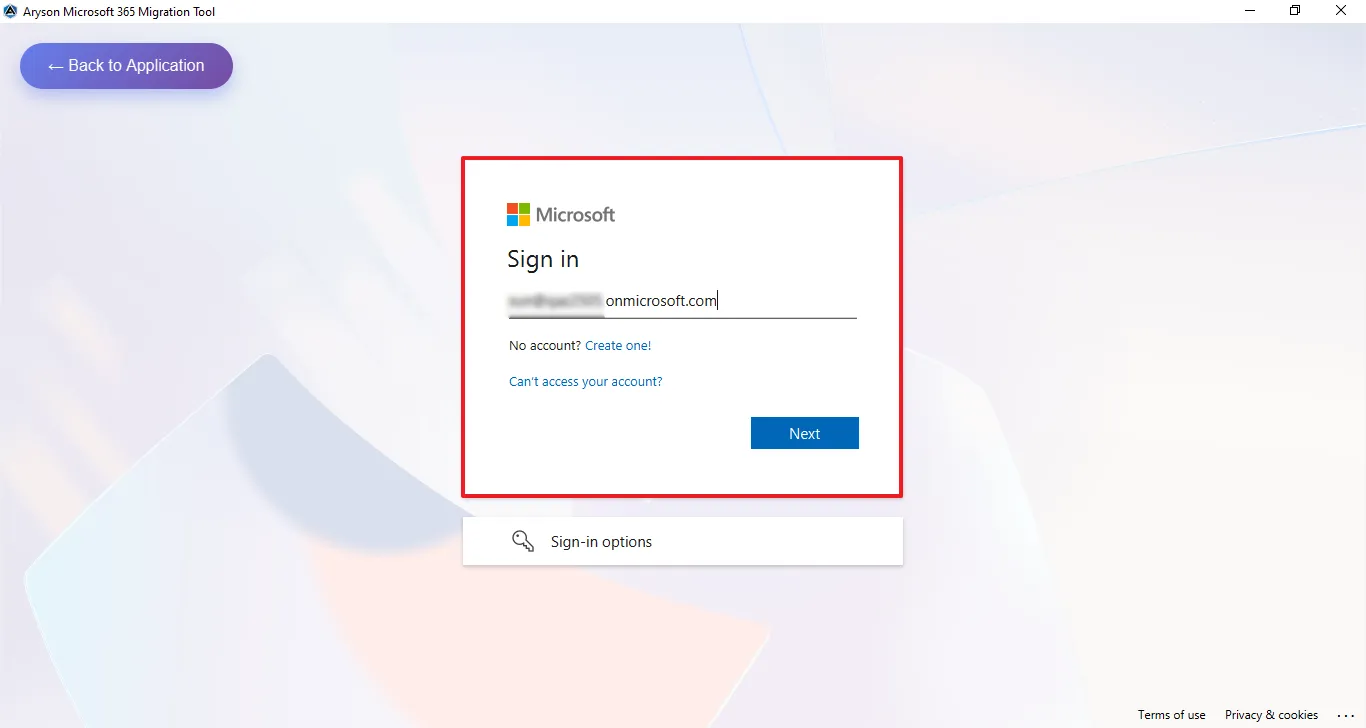
- Enter the Admin email ID for secure sign-in.

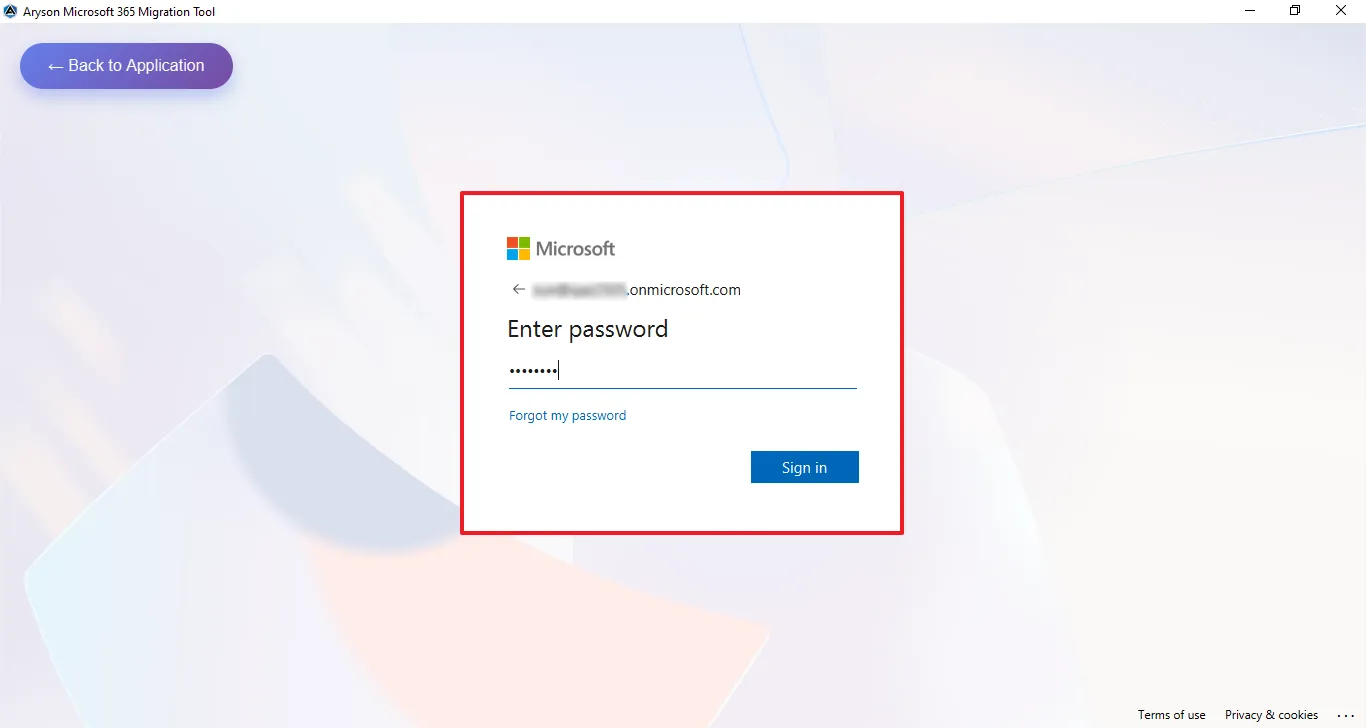
- Enter the Microsoft Office 365 associated Password for the authentication.

- This screen shows the Microsoft permissions consent page for the Microsoft 365 Migration Tool, listing the required organisation-wide access permissions for mailbox and data migration—click Accept to grant access and continue or Cancel to stop the process.

Step 5: Login process for Admin Impersonation - Enter the Application (Client) ID, Client Secret ID, and Directory (Tenant) ID, and click on Connect & Verify.

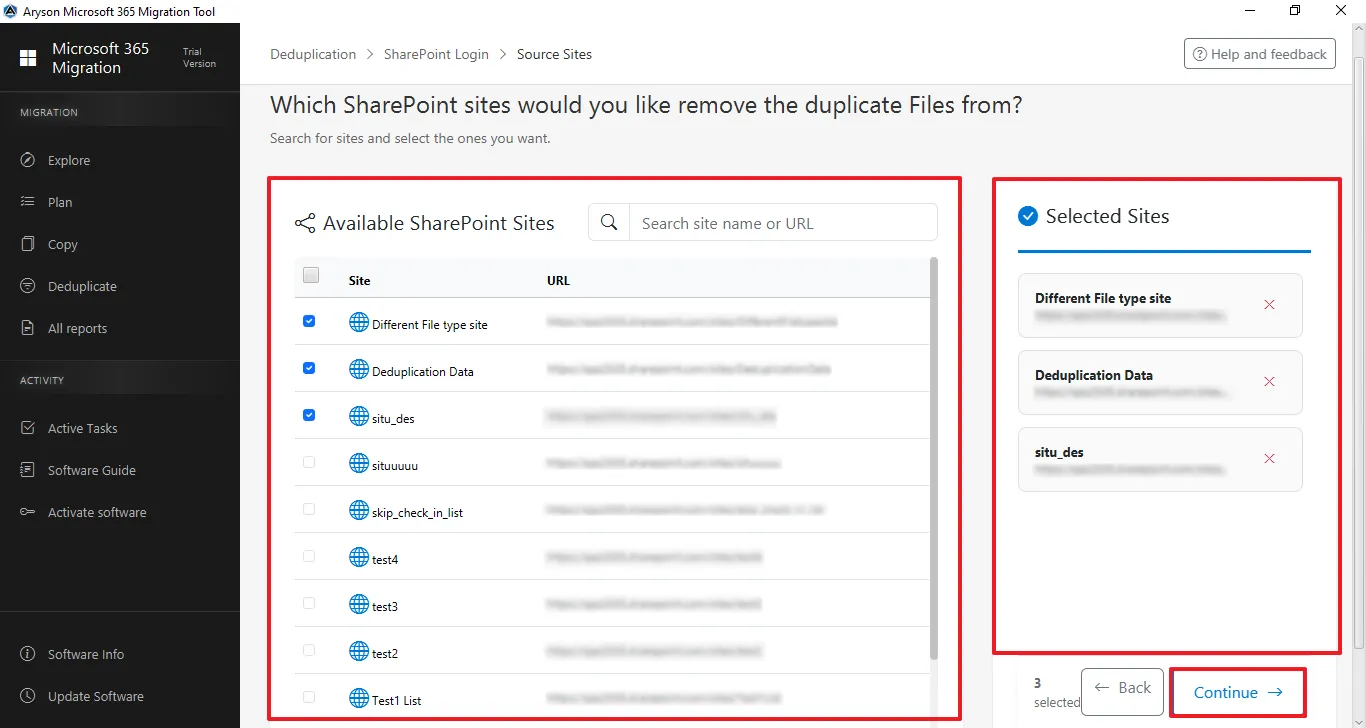
Step 6: Select Available Users to Identify Duplicates
- View and search available SharePoint Sites by URL.
- Select the required users and confirm them in the Selected Sites panel.
- Click Continue to apply the filters to scan the duplicate files.

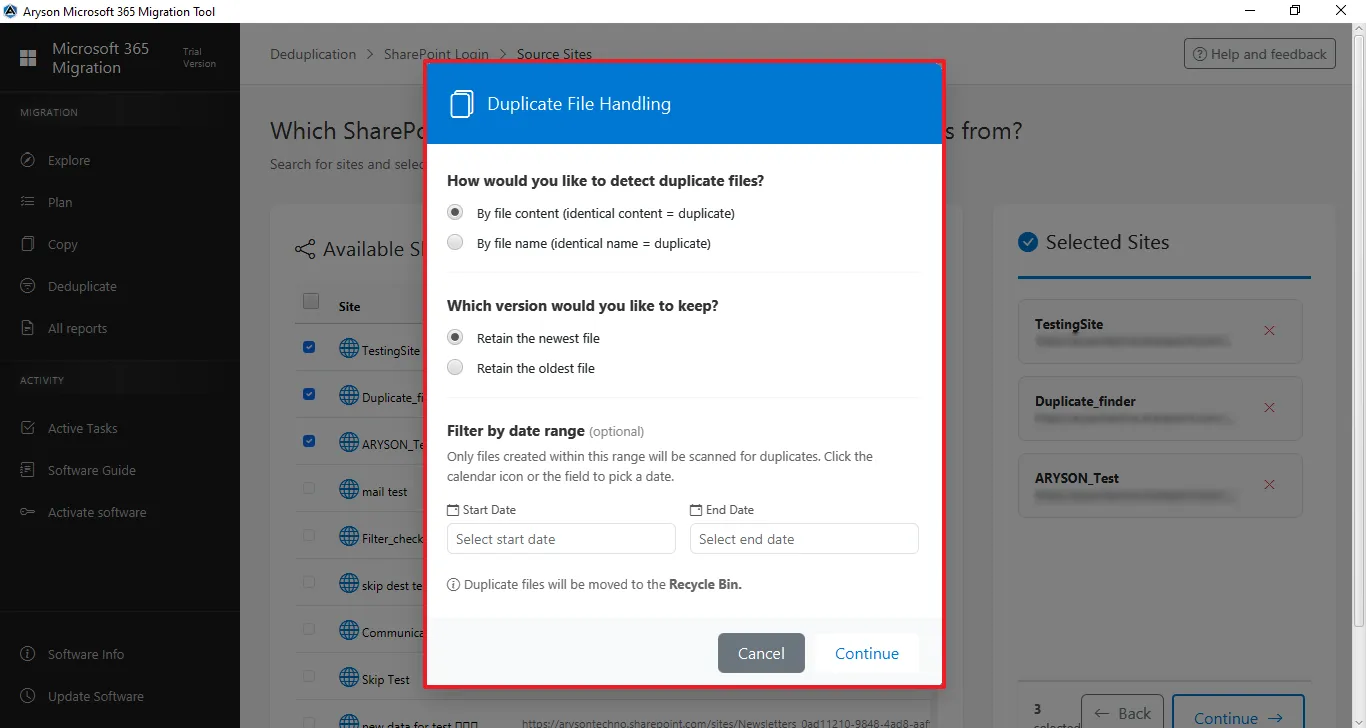
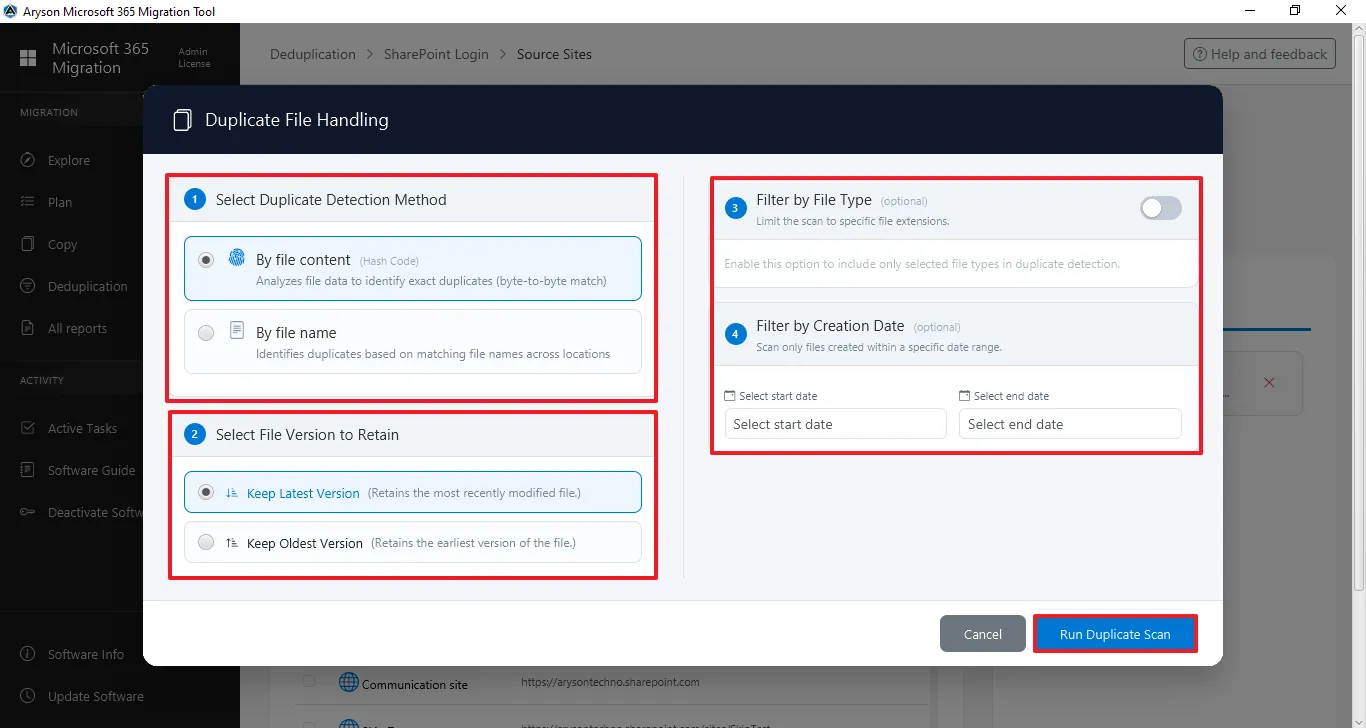
Step 7: Select the option based on which you want to identify duplicates.
- Duplicate Detection Method: Choose to find duplicate files by file content or file name.
- Selective File Version: Option to keep the newest or oldest file among duplicates.
- Date Filter: Set a start and end date to scan files within a specific time range.
- Run Duplicate Scan: Click on that to begin the scanning process.
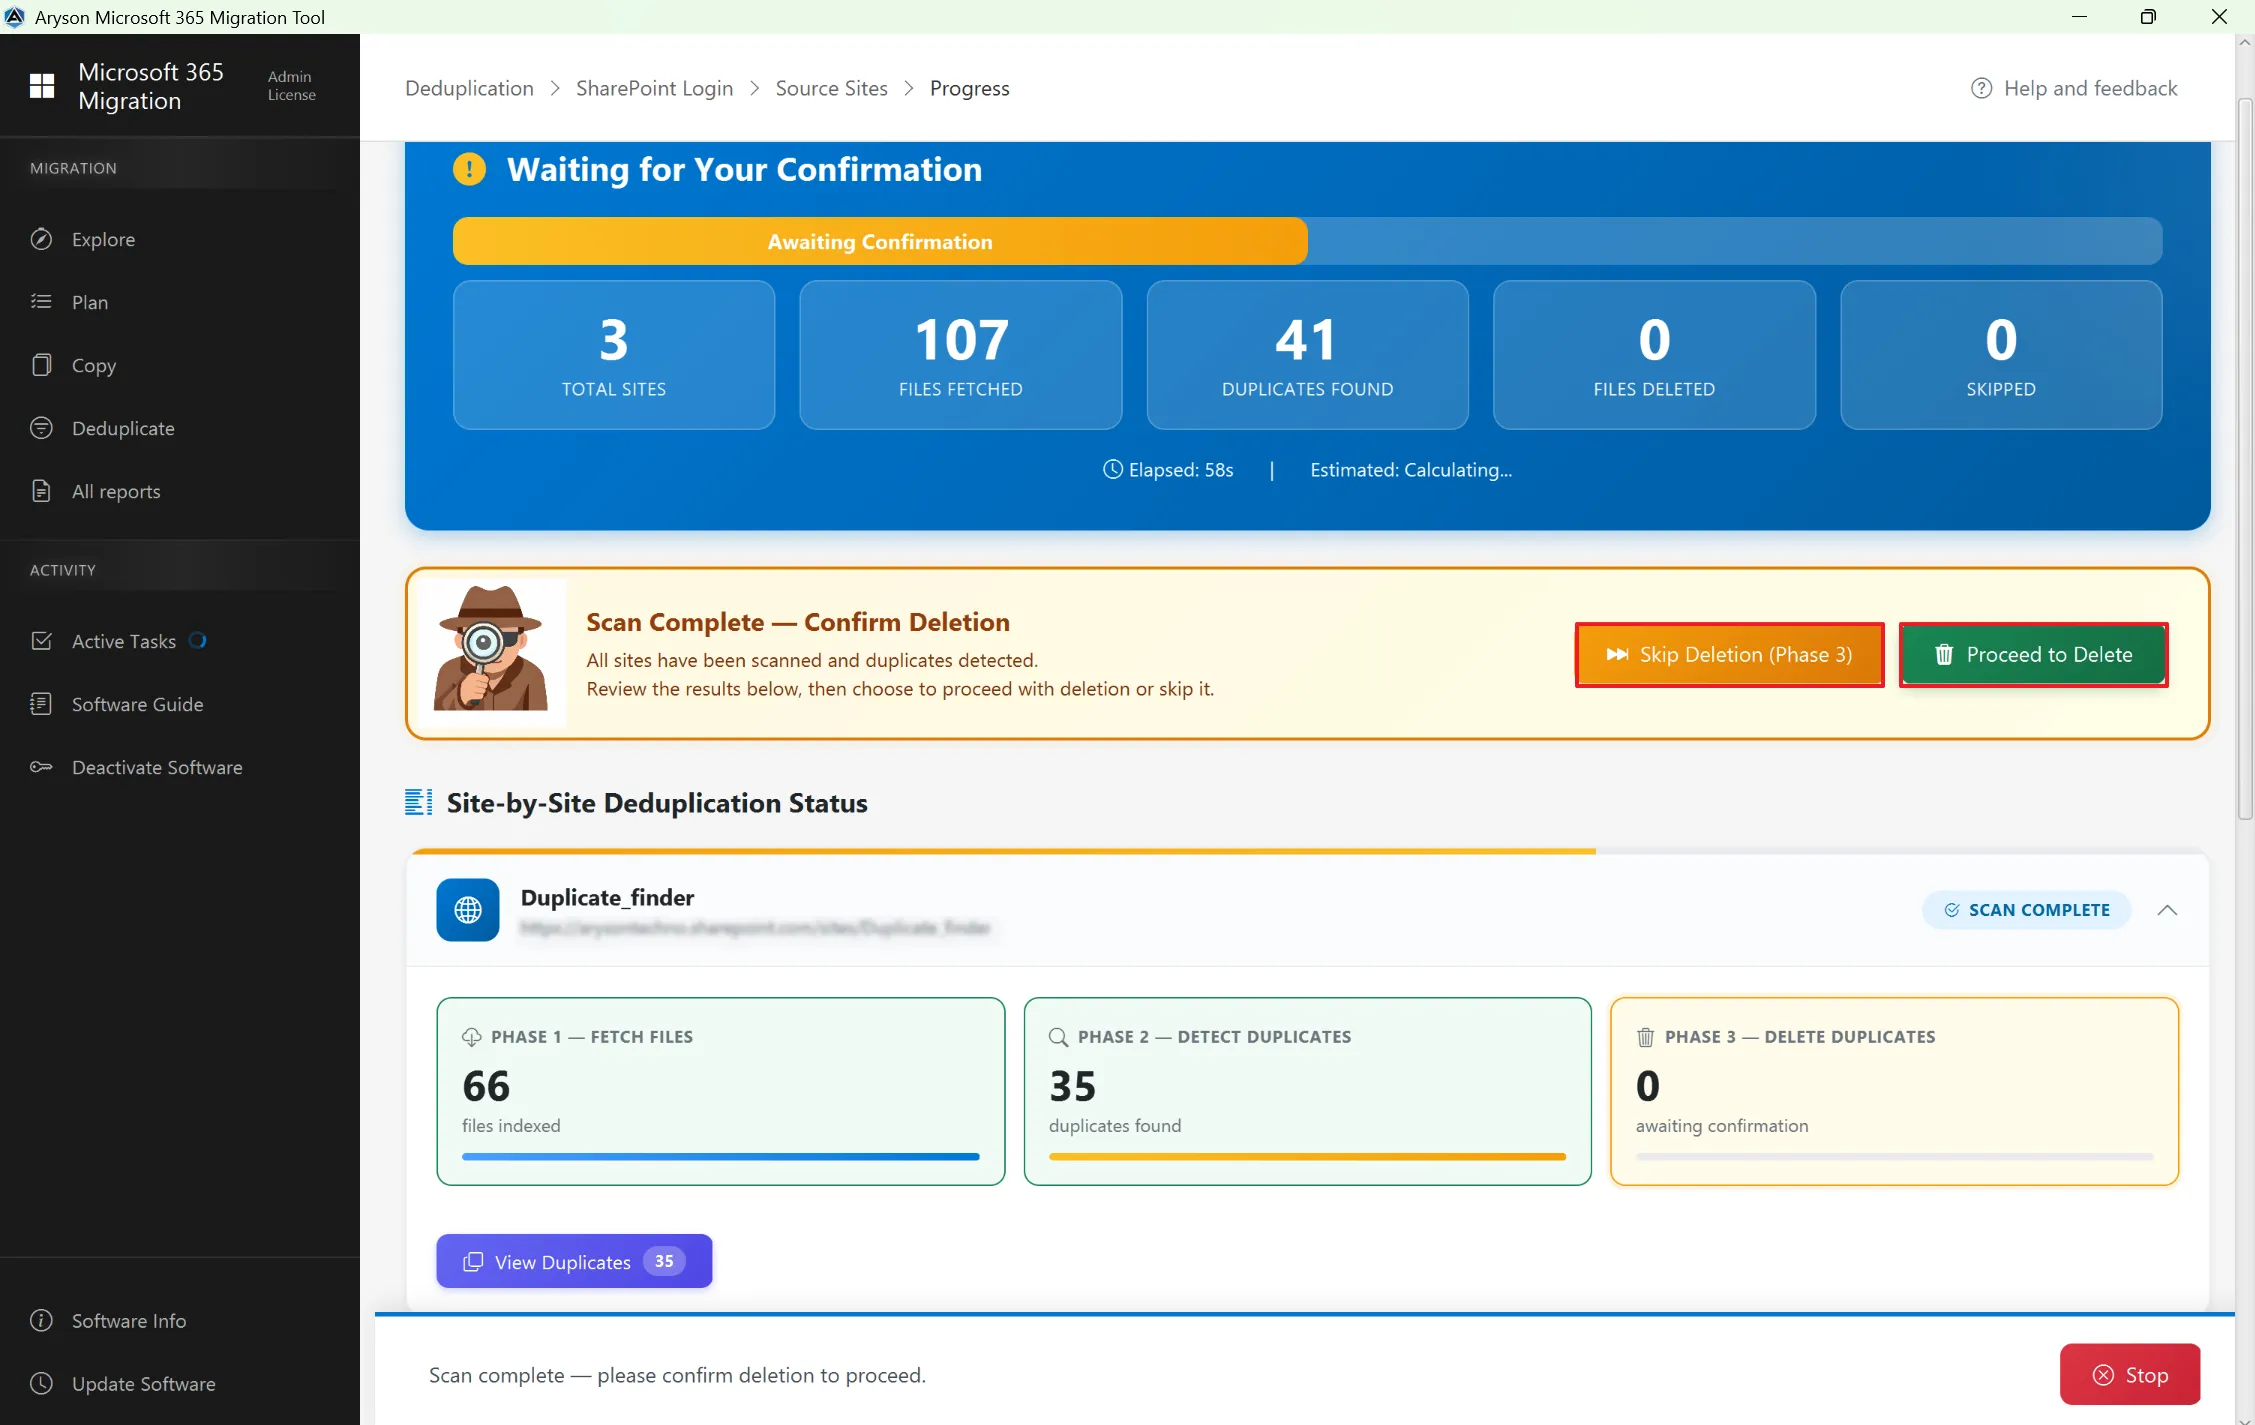
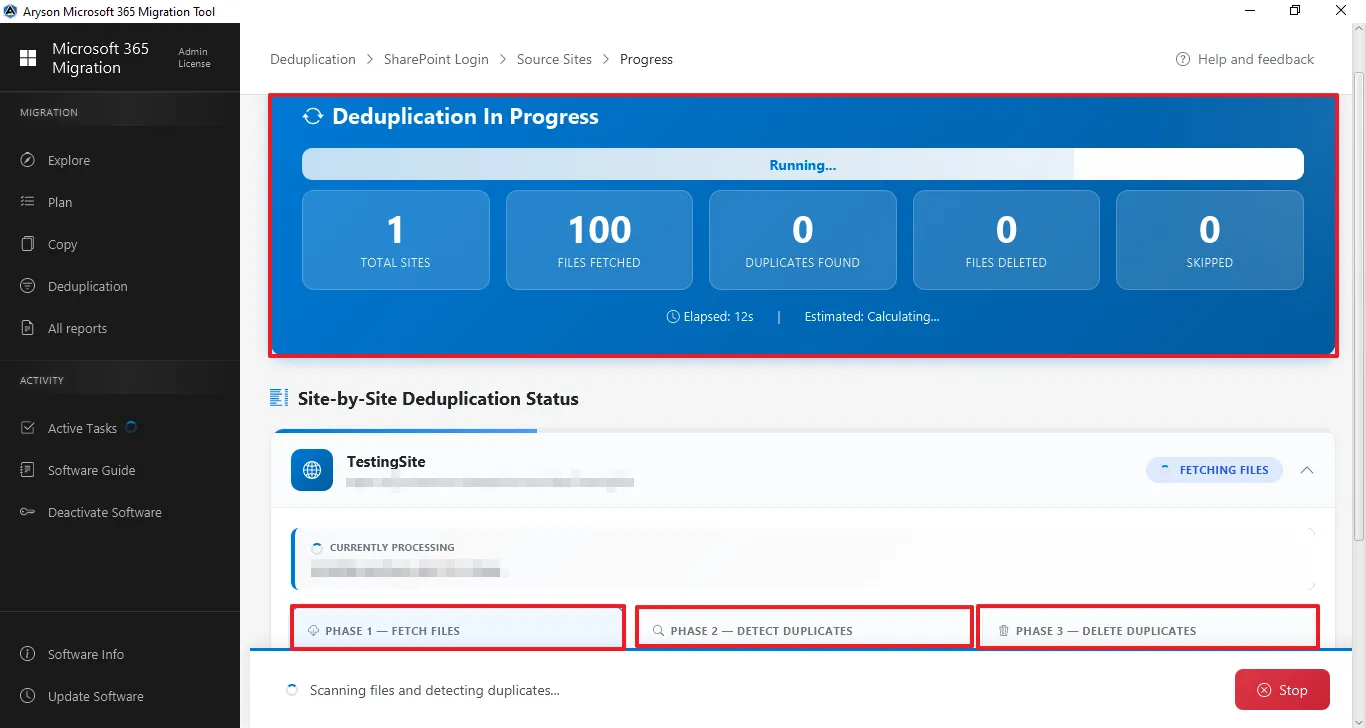
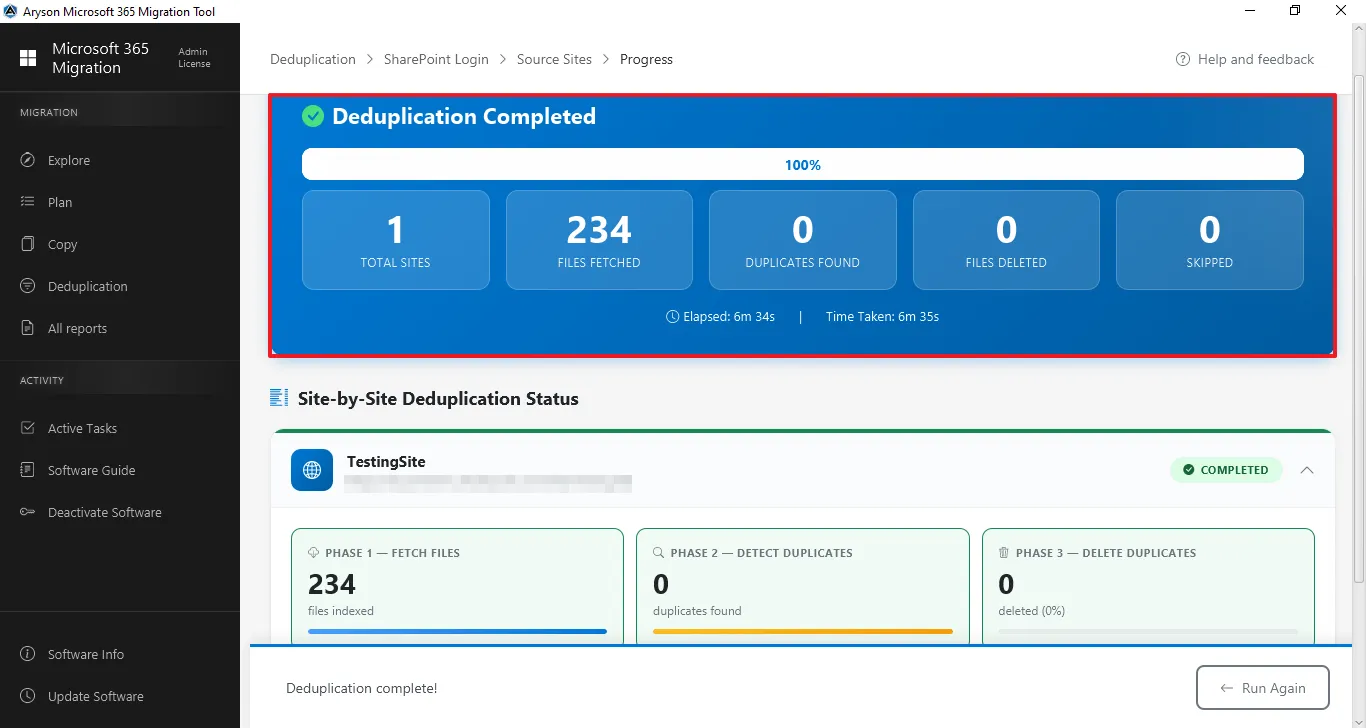
Step 8: The Deduplication In Progress page displays the real-time status of the SharePoint deduplication process. It provides a clear overview of how many sites and files are being processed and shows the progress of duplicate detection and removal.
Deduplication Phases
The process is divided into three phases for better transparency:
- Phase 1 – Fetch Files: It scans the selected SharePoint site and indexes all files available in the libraries.
- Phase 2 – Detect Duplicates: After fetching files, the system analyzes them to identify duplicate items based on the selected criteria.
- Phase 3 – Delete Duplicates: Once duplicates are detected, the tool removes them according to the configured rules, ensuring only the required version remains.
Additional Controls
- Displays real-time updates while scanning and detecting duplicates.
- Provides a Stop option to cancel the process if needed.
Step 9: After Scanning Completion - It provides two options after the duplicate scan is complete: Skip Deletion (Phase 3) to ignore the removal of duplicate files, or Proceed to Delete to confirm and delete the detected duplicate files from the selected SharePoint sites.
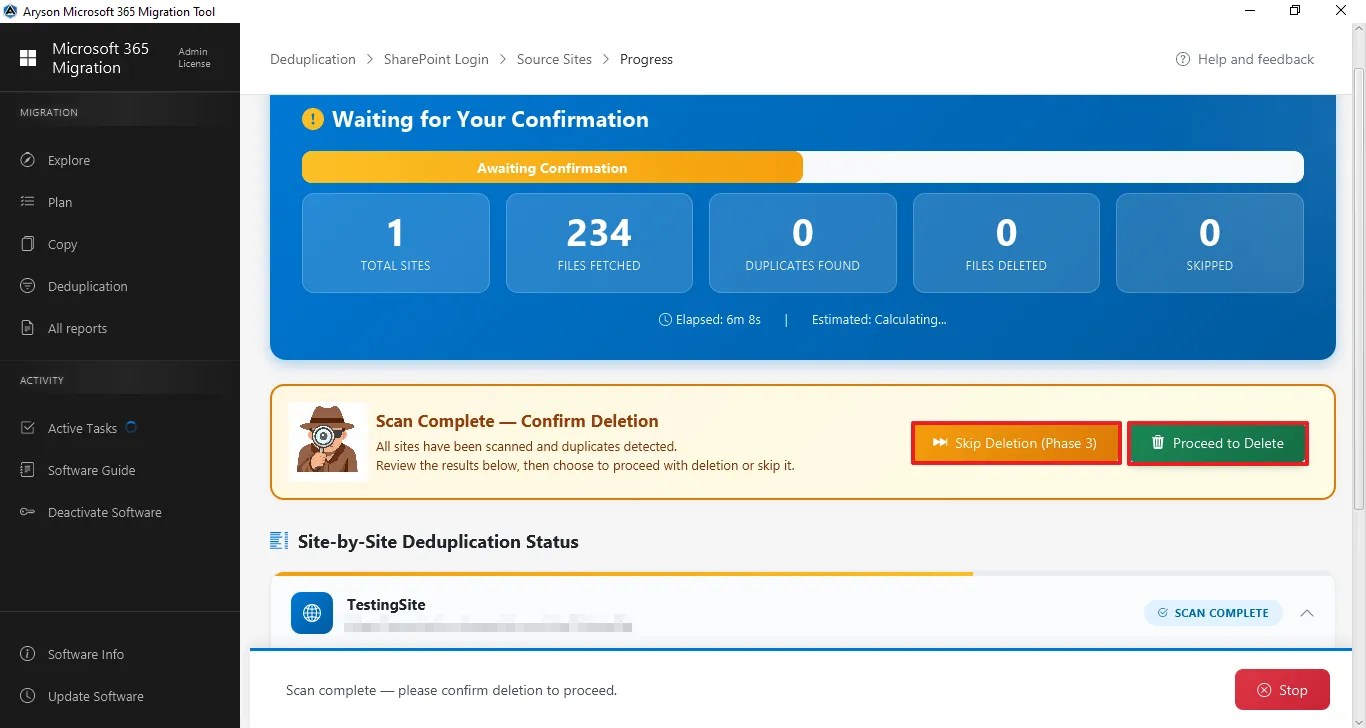
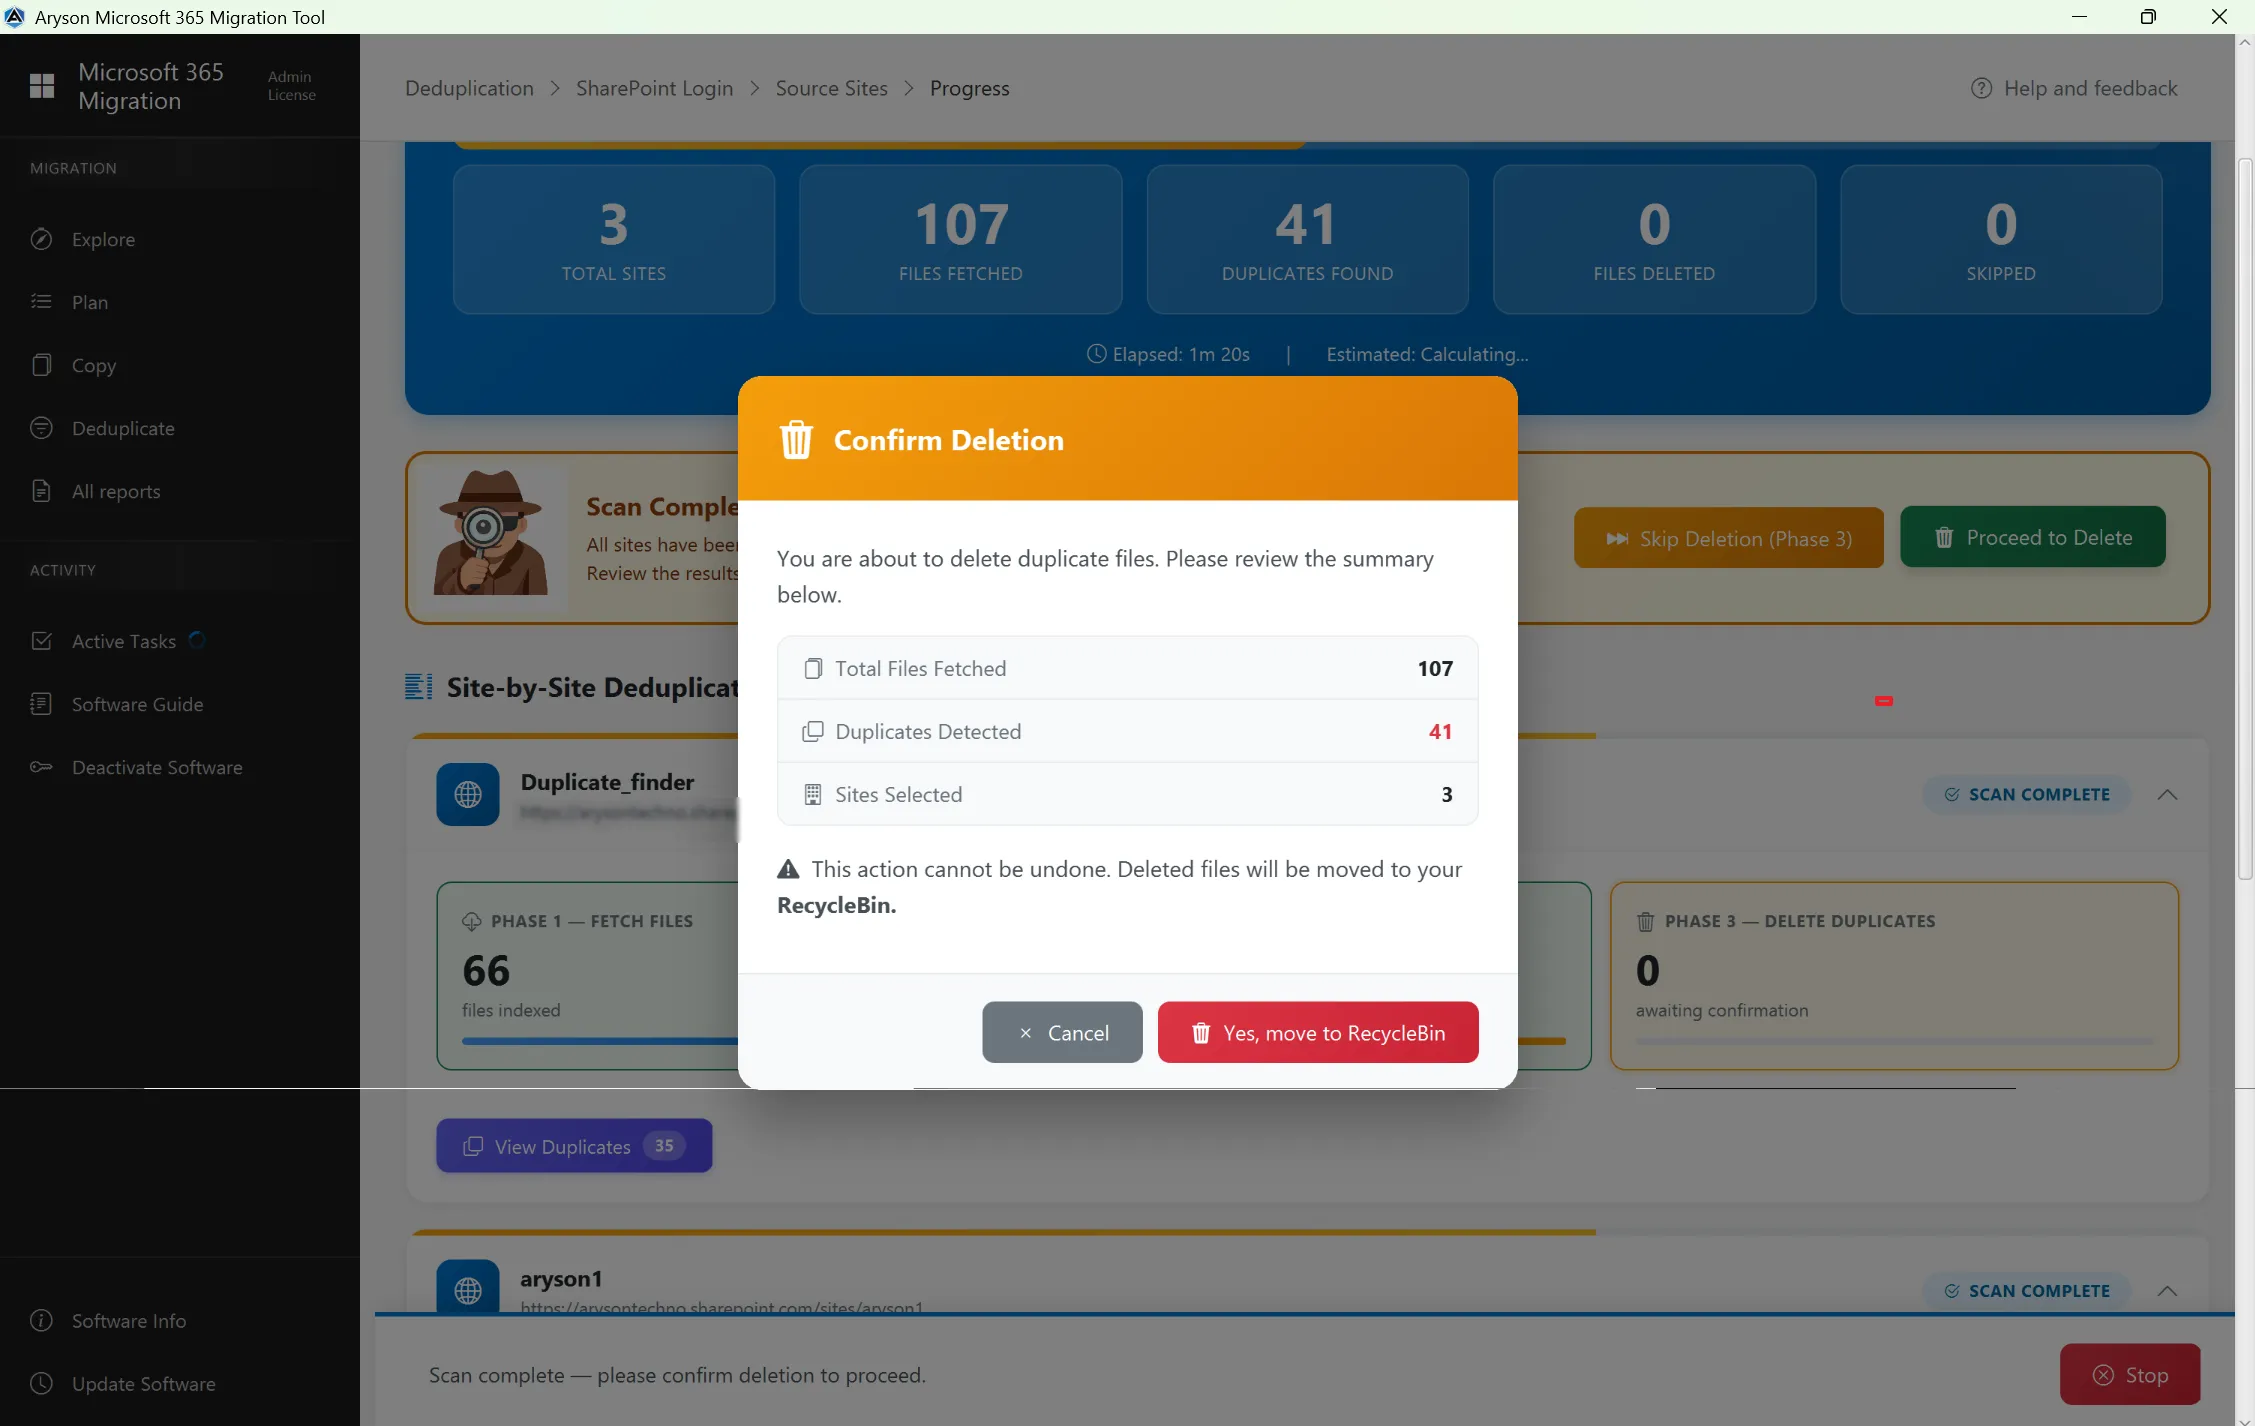
Step 10: It displays a “Confirm Deletion” dialog that appears after the scan for duplicate files has completed.

Step 11: Deduplication Completed - It displays that the process of duplicate removal has been completed.
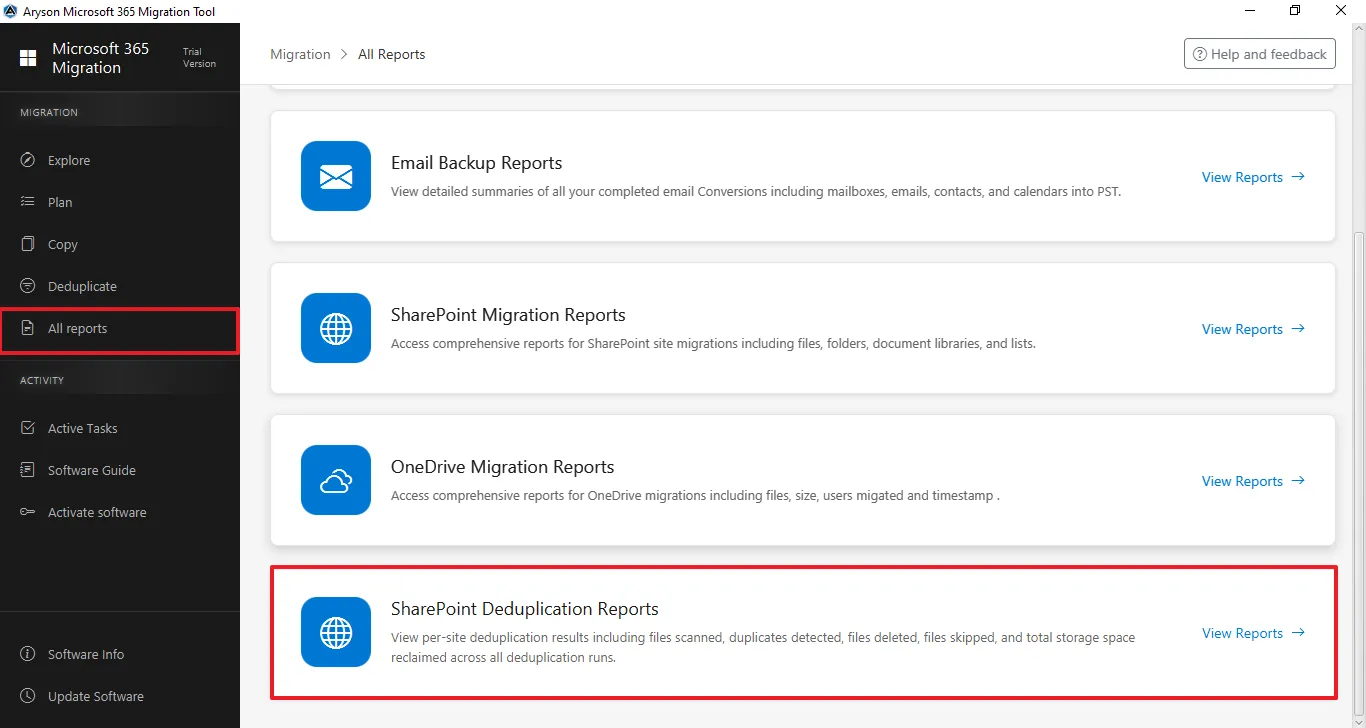
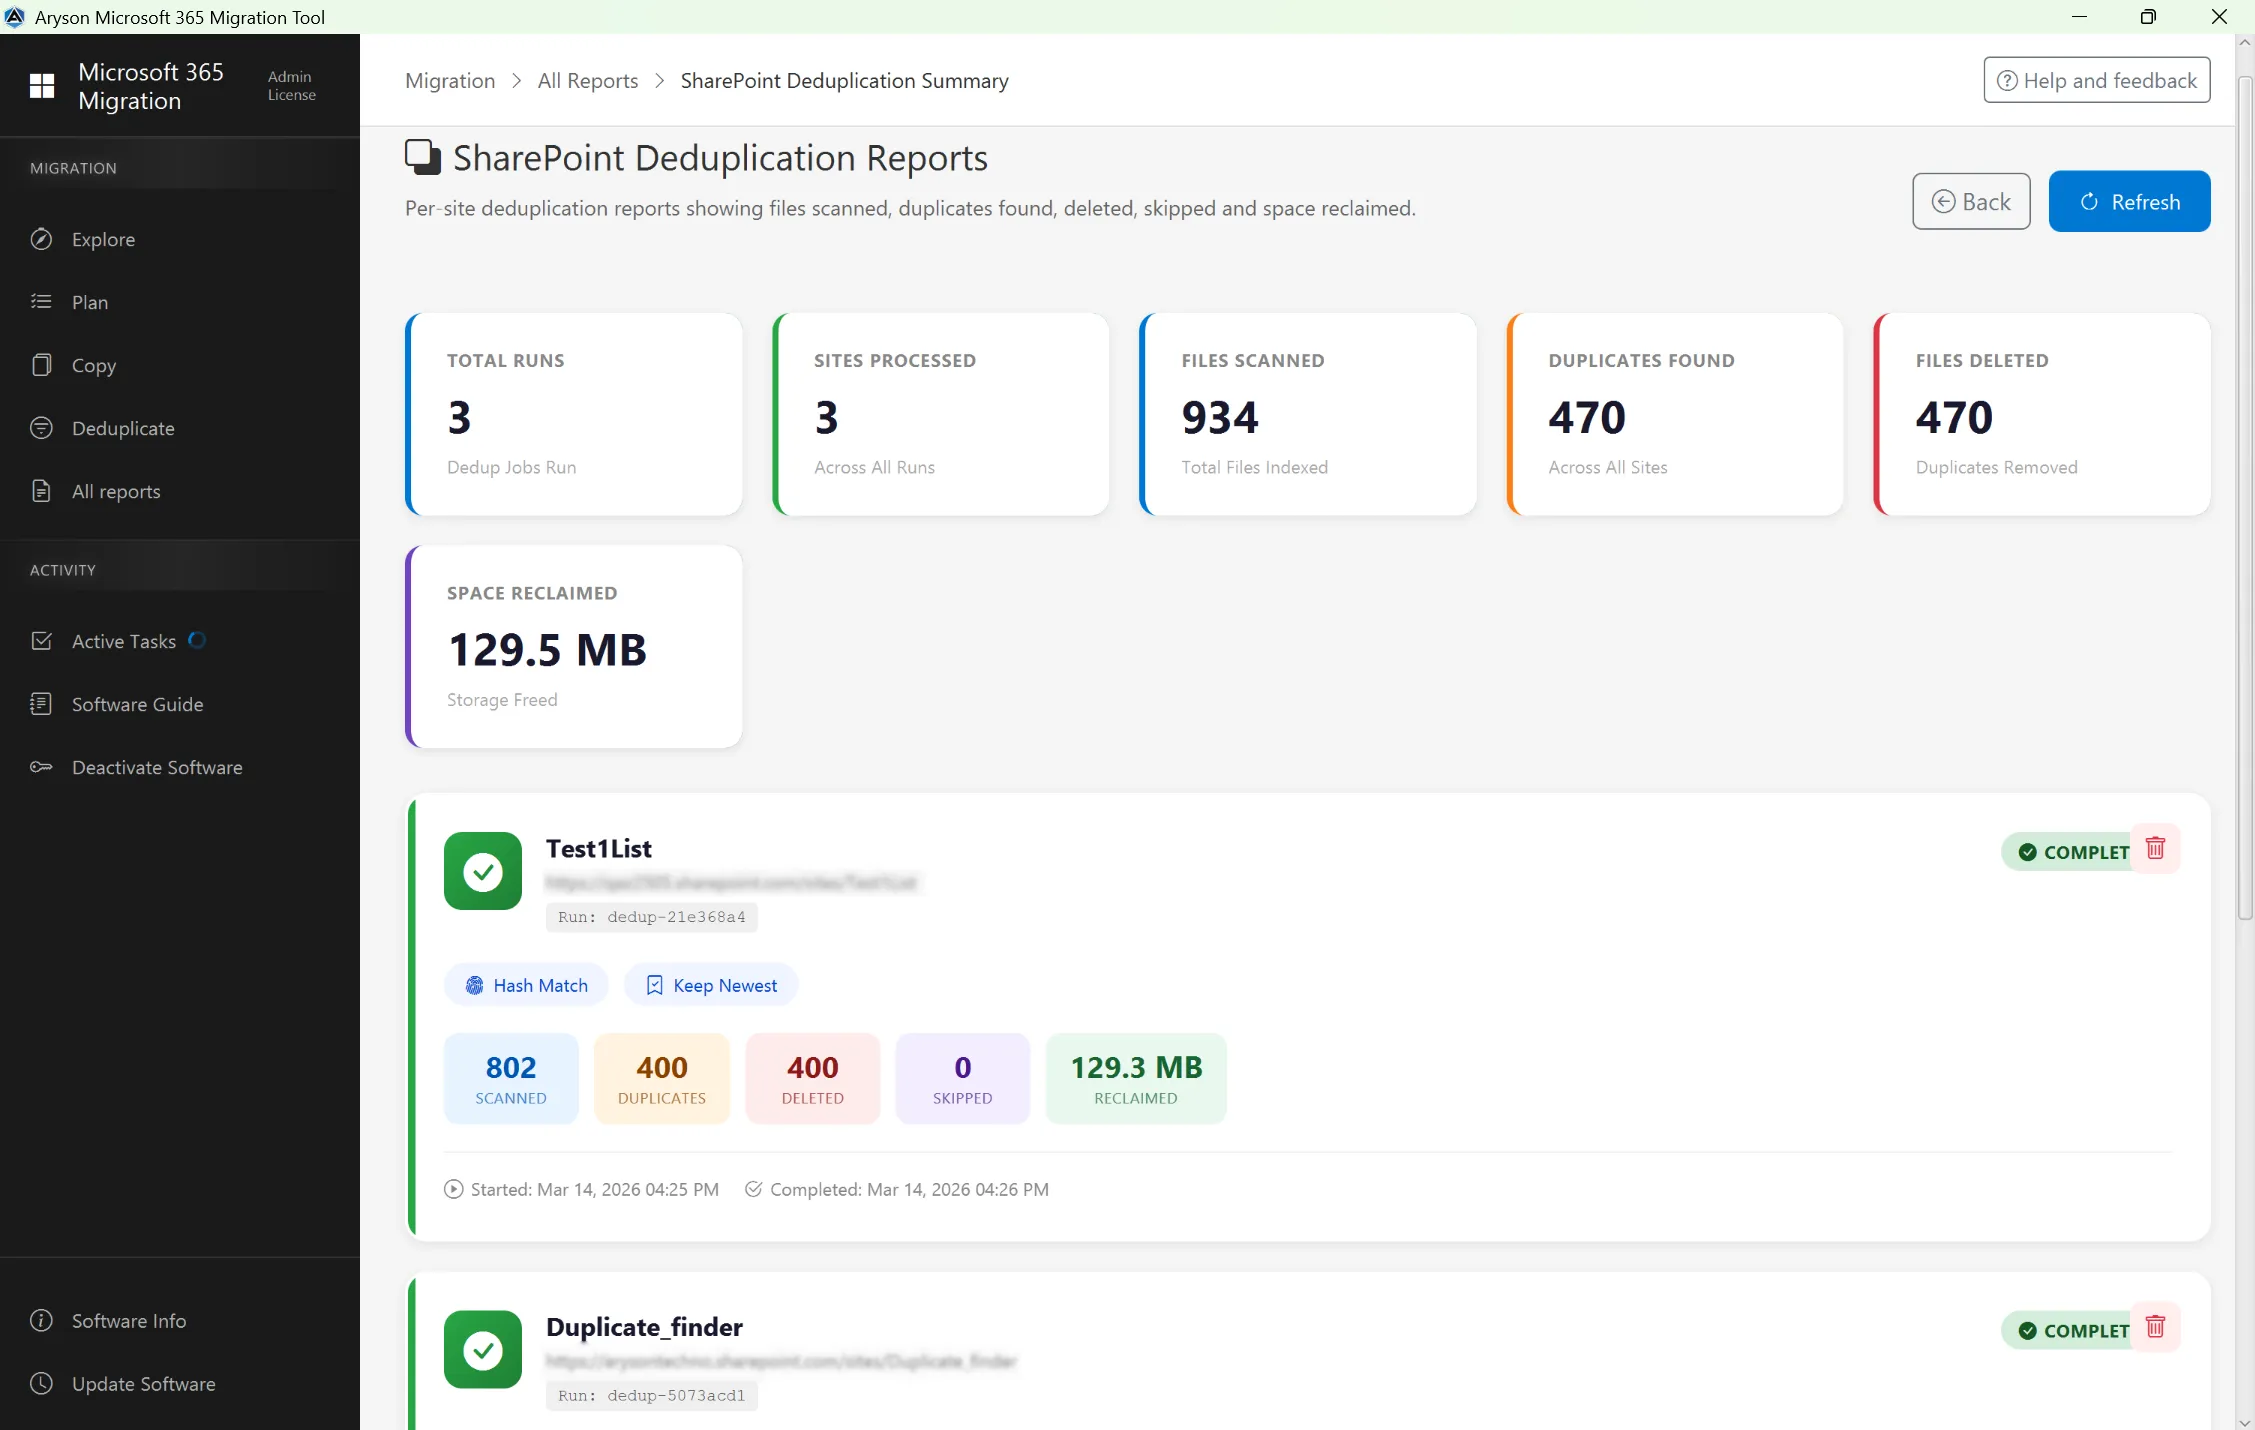
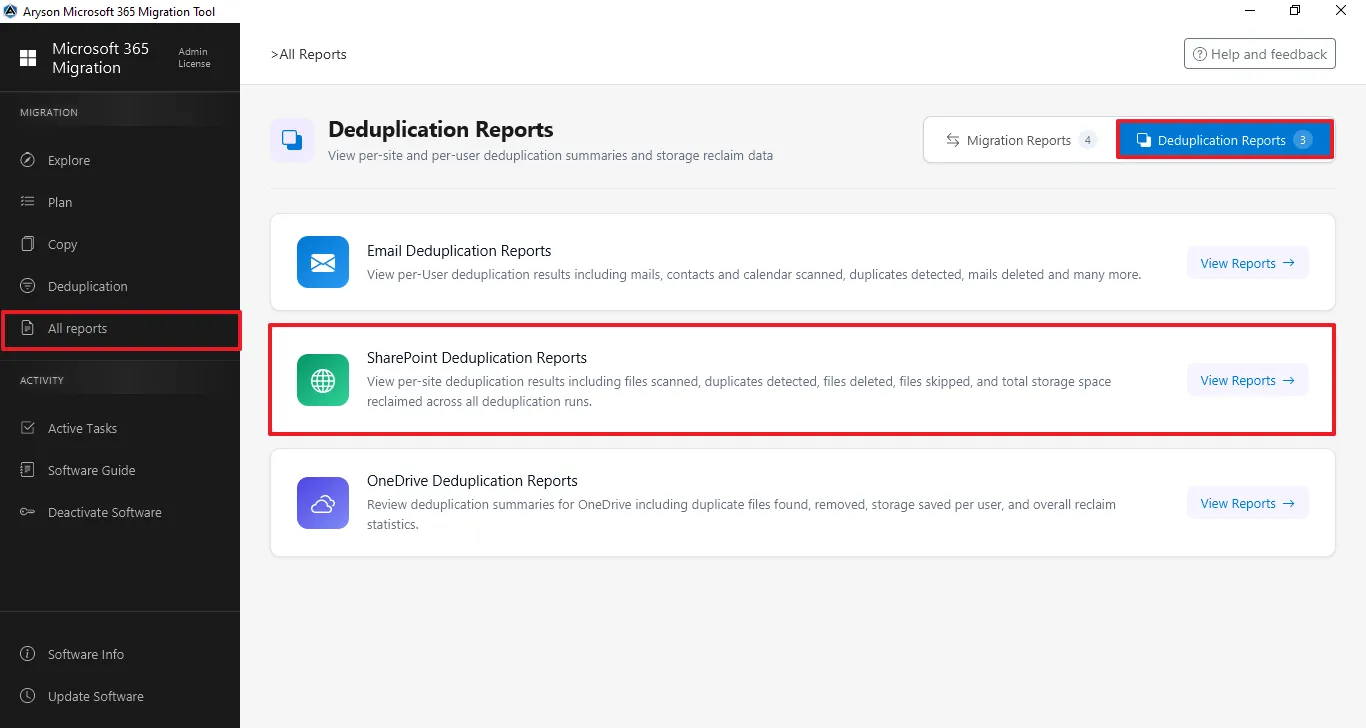
Step 12: The All Reports section gives a complete overview of all migration and backup activities. It lets users track status, view summaries, and review logs. Click on Deduplicate Reports and then click on the SharePoint Deduplication Reports.
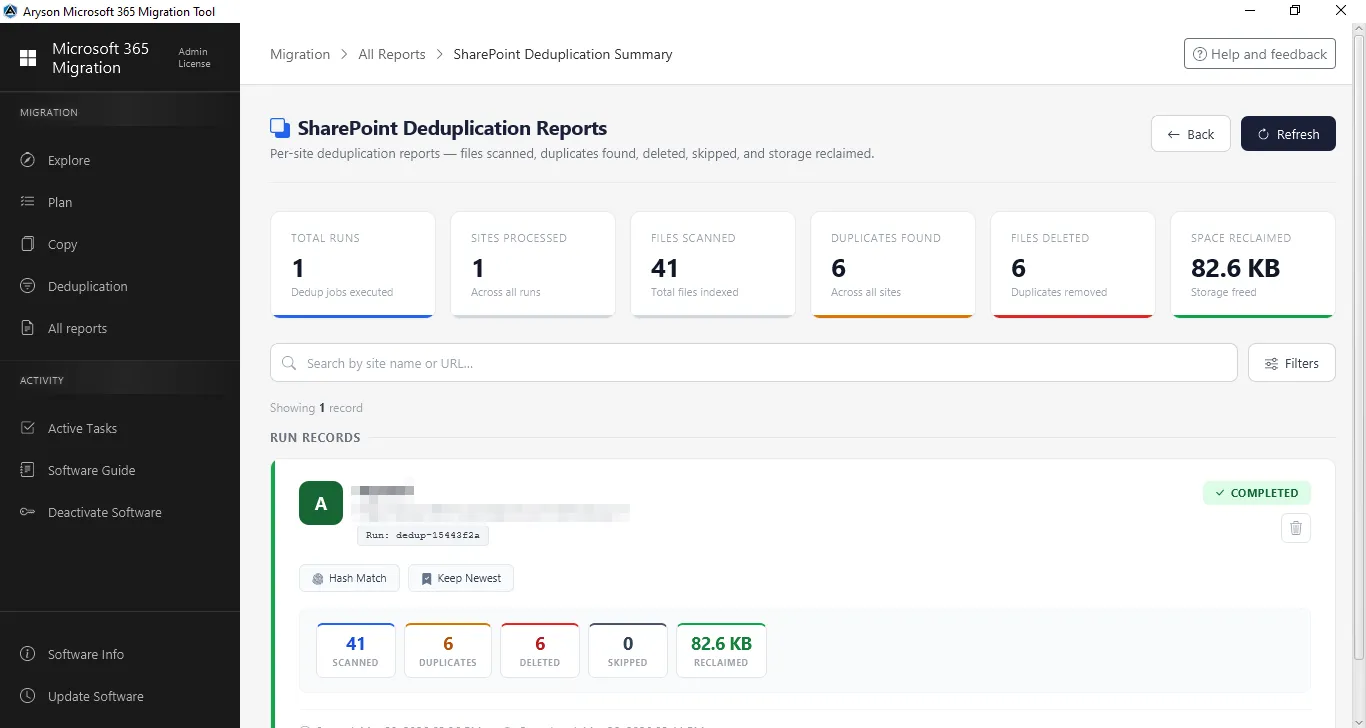
Step 13: The SharePoint Deduplication Reports section shows a complete summary of all SharePoint. It helps administrators track progress, verify duplicate data, and calculate space reclaimed statistics after migration.
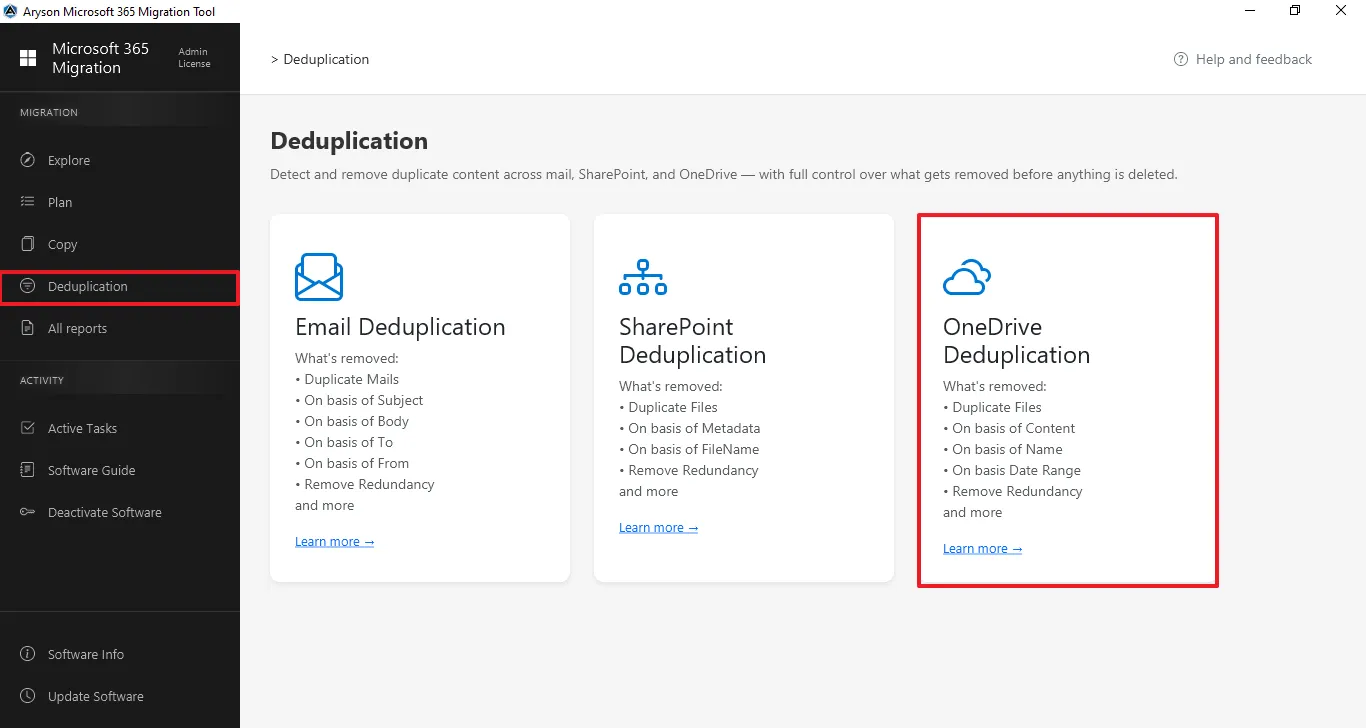
Step 1: Download and install the Aryson Microsoft 365 Migration Tool.
Step 2: From the left panel, click on Deduplicate and click on OneDrive Deduplication from the center panel.
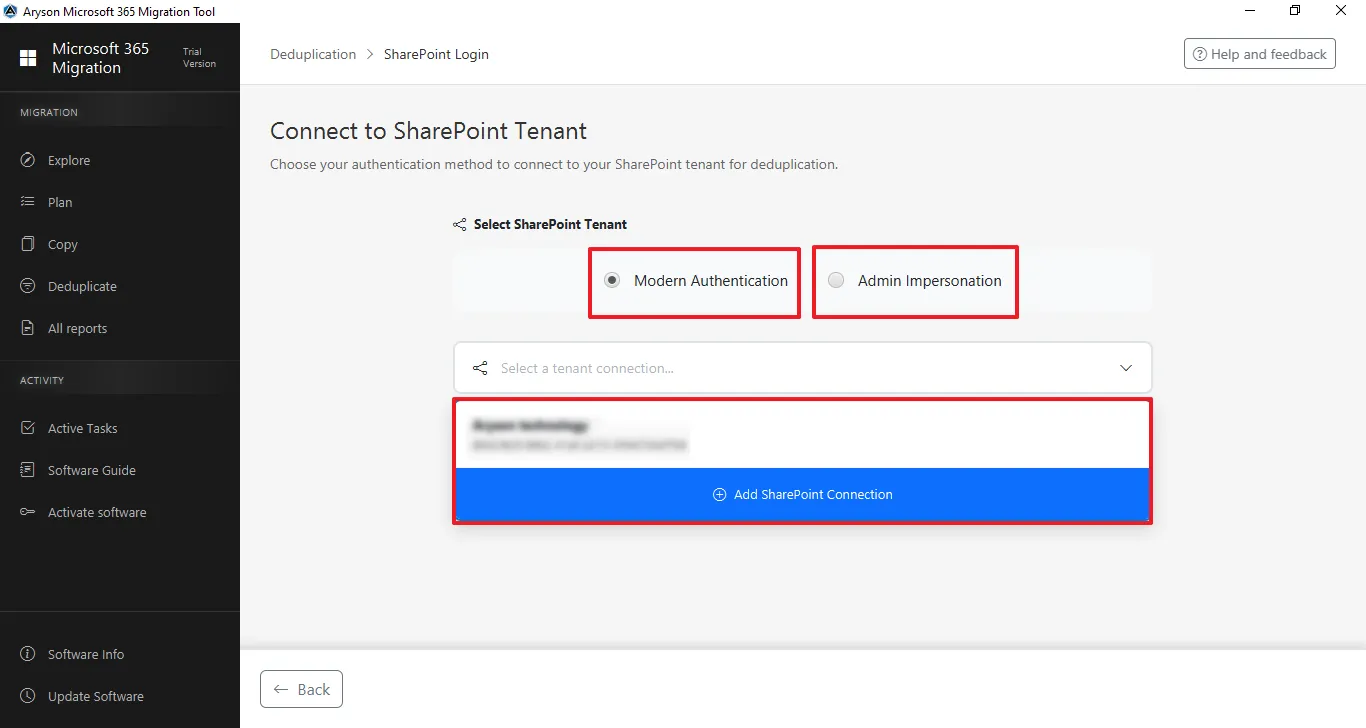
Step 3: Connect to the SharePoint Tenant -
- Select Modern Authentication (recommended), then click Add connection or select the previously added tenant.
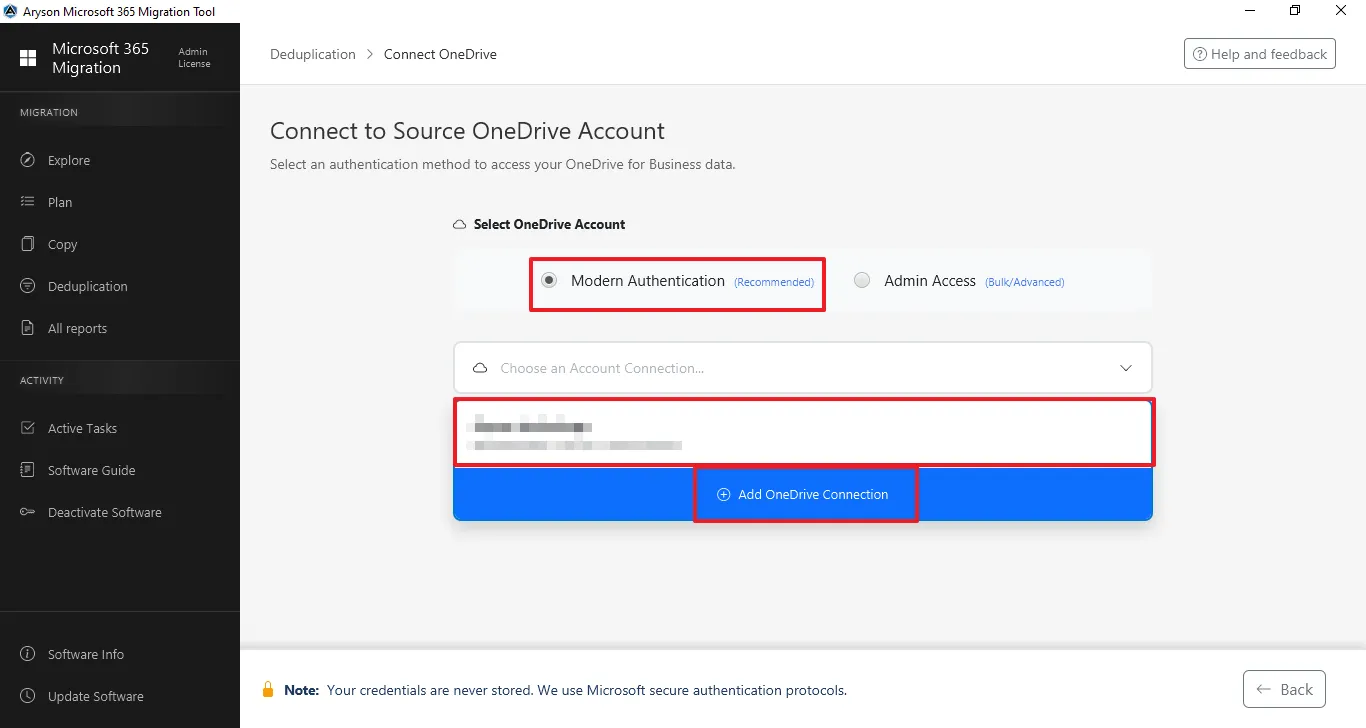
- Select Admin Access (Bulk/Advanced) and enter the Application client ID or select a previously added client ID through the Use Saved Admin Connection.

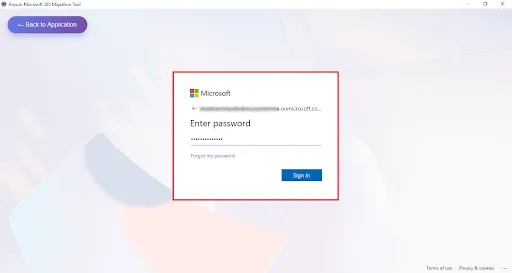
Step 4: Login process for Modern Authentication
- Enter the Admin email ID for secure sign-in.

- Enter the Microsoft Office 365 associated Password for the authentication.
- This screen shows the Microsoft permissions consent page for the Microsoft 365 Migration Tool, listing the required organisation-wide access permissions for mailbox and data migration—click Accept to grant access and continue or Cancel to stop the process.

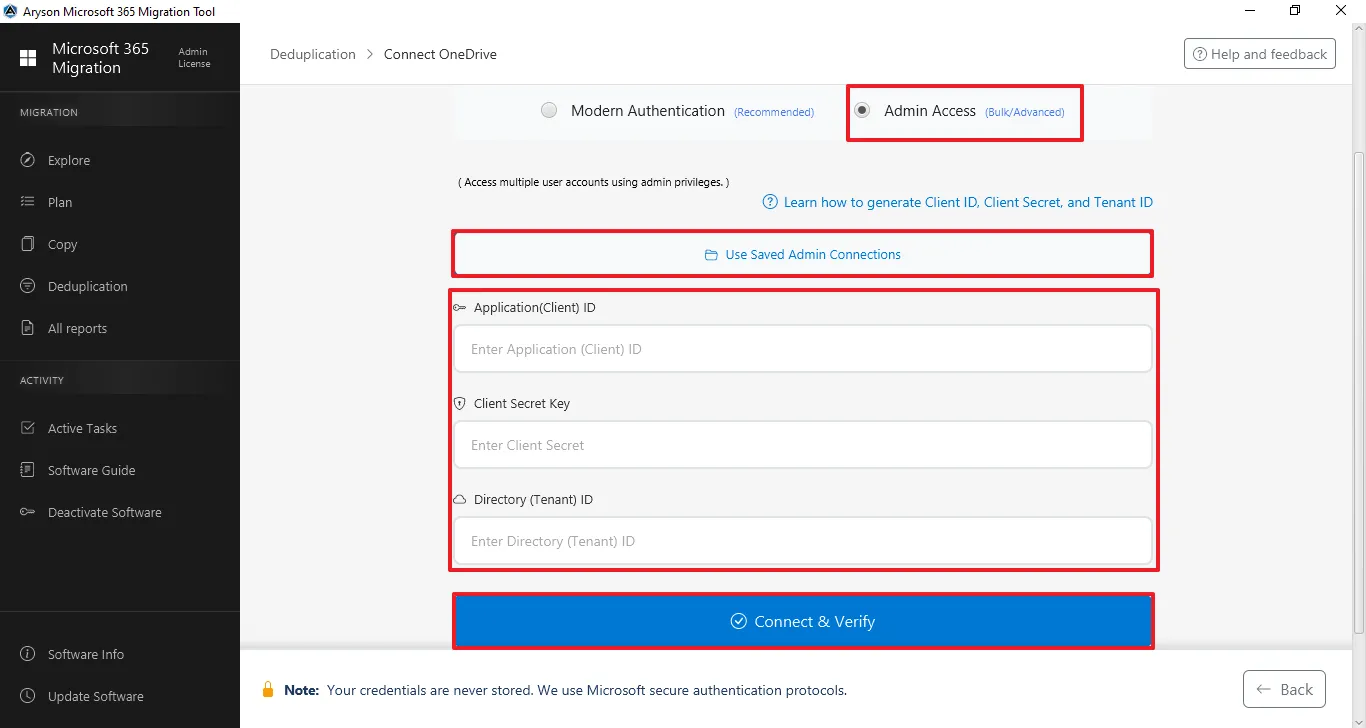
Step 5: Login process for Admin Access - Enter the Application (Client) ID, Client Secret ID, and Directory (Tenant) ID, and click on Connect & Verify.
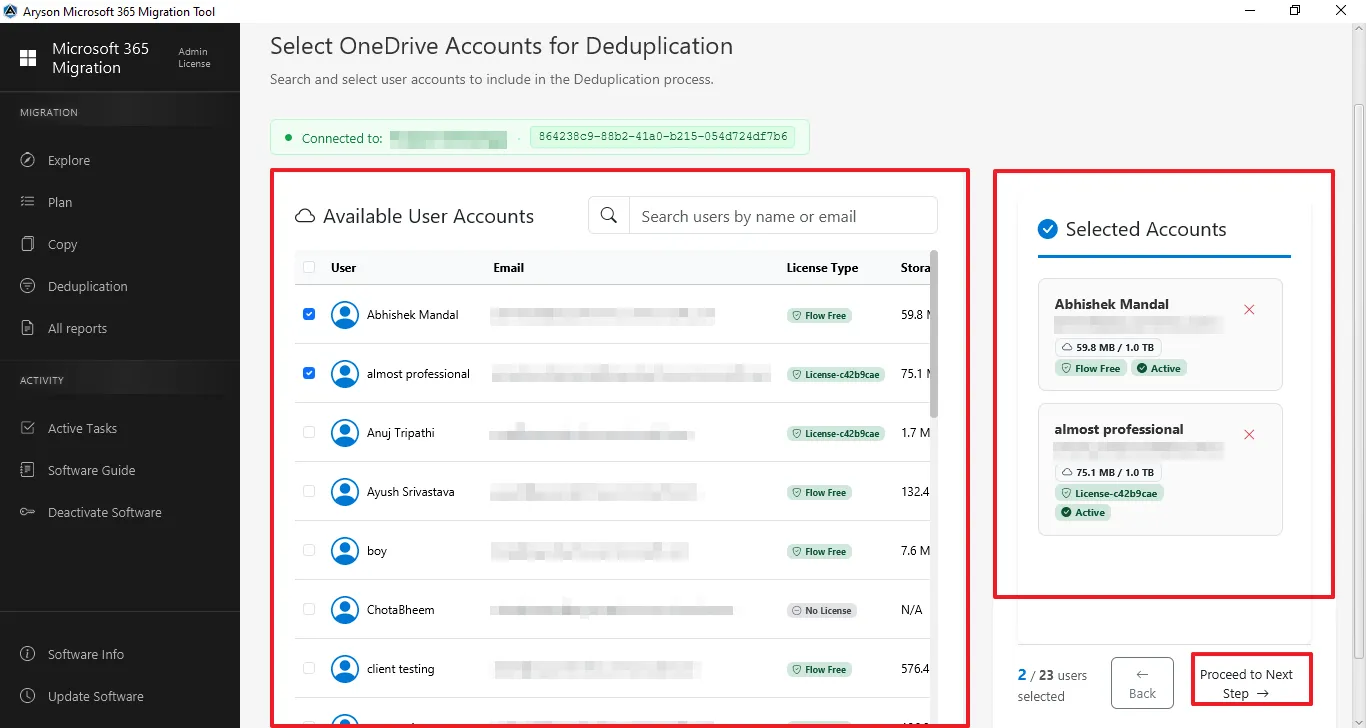
Step 6: Select Available Users to Identify Duplicates
- View and search available OneDrive Users by URL.
- Select the required users and confirm them in the Selected Users panel.
- Click Proceed to Next Step to apply the filters to scan the duplicate files.
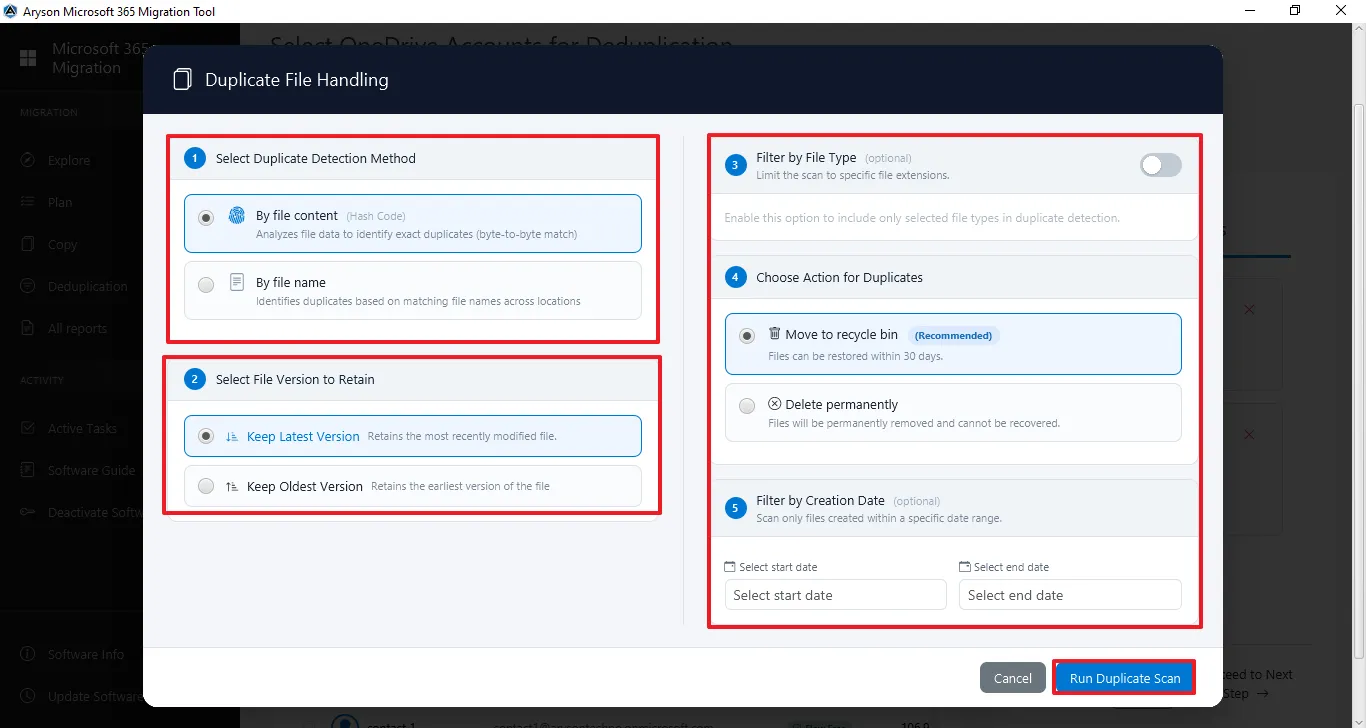
Step 7: Select the option based on which you want to identify duplicates.
- Duplicate Detection Method: Choose to find duplicate files by file content or file name.
- Version Selection: Option to keep the newest or oldest file among duplicates.
- Date Filter: Set a start and end date to scan files within a specific time range.
- Duplicate Handling: Detected duplicate files are moved to the Recycle Bin automatically.
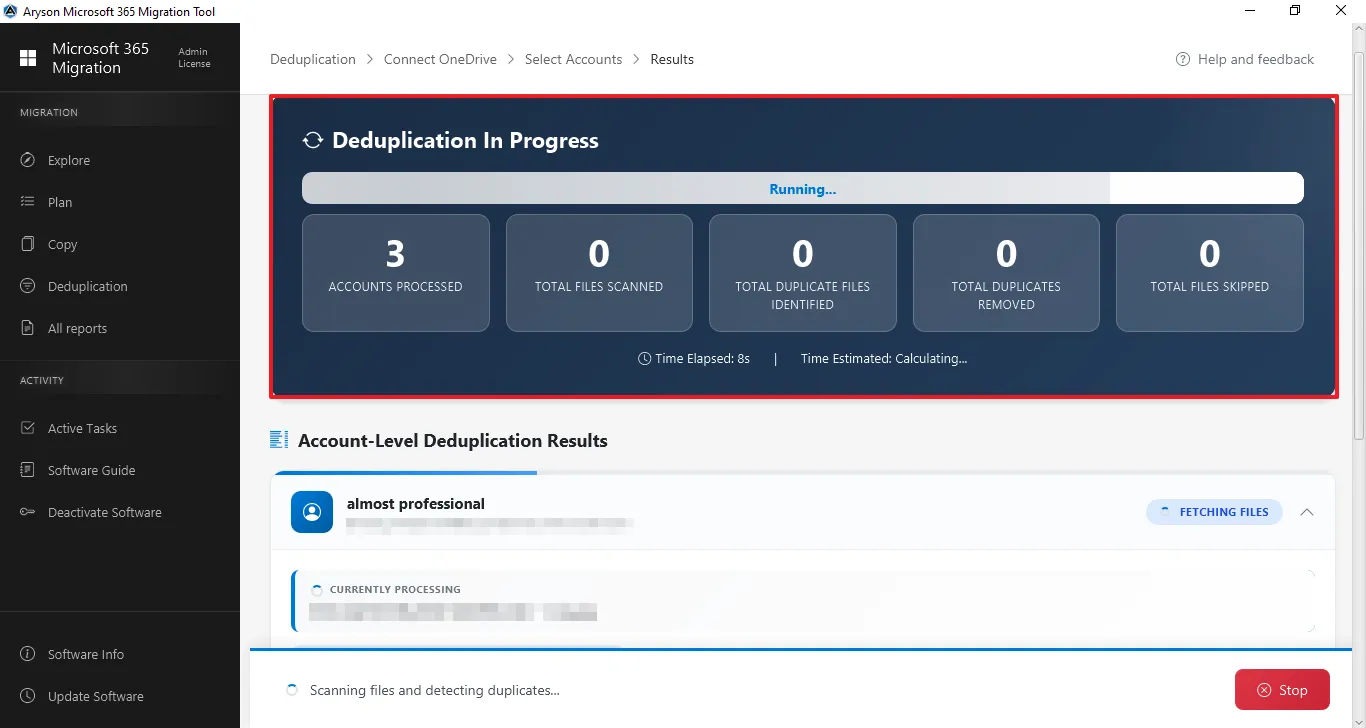
Step 8: The Deduplication In Progress page displays the real-time status of the OneDrive deduplication process. It provides a clear overview of how many sites and files are being processed and shows the progress of duplicate detection and removal.
Deduplication Phases
The process is divided into three phases for better transparency:
- Phase 1 – Fetch Files: It scans the selected OneDrive users and indexes all files available in the libraries.
- Phase 2 – Detect Duplicates: After fetching files, the system analyzes them to identify duplicate items based on the selected criteria.
- Phase 3 – Delete Duplicates: Once duplicates are detected, the tool removes them according to the configured rules, ensuring only the required version remains.
Additional Controls
- Displays real-time updates while scanning and detecting duplicates.
- Provides a Stop option to cancel the process if needed.
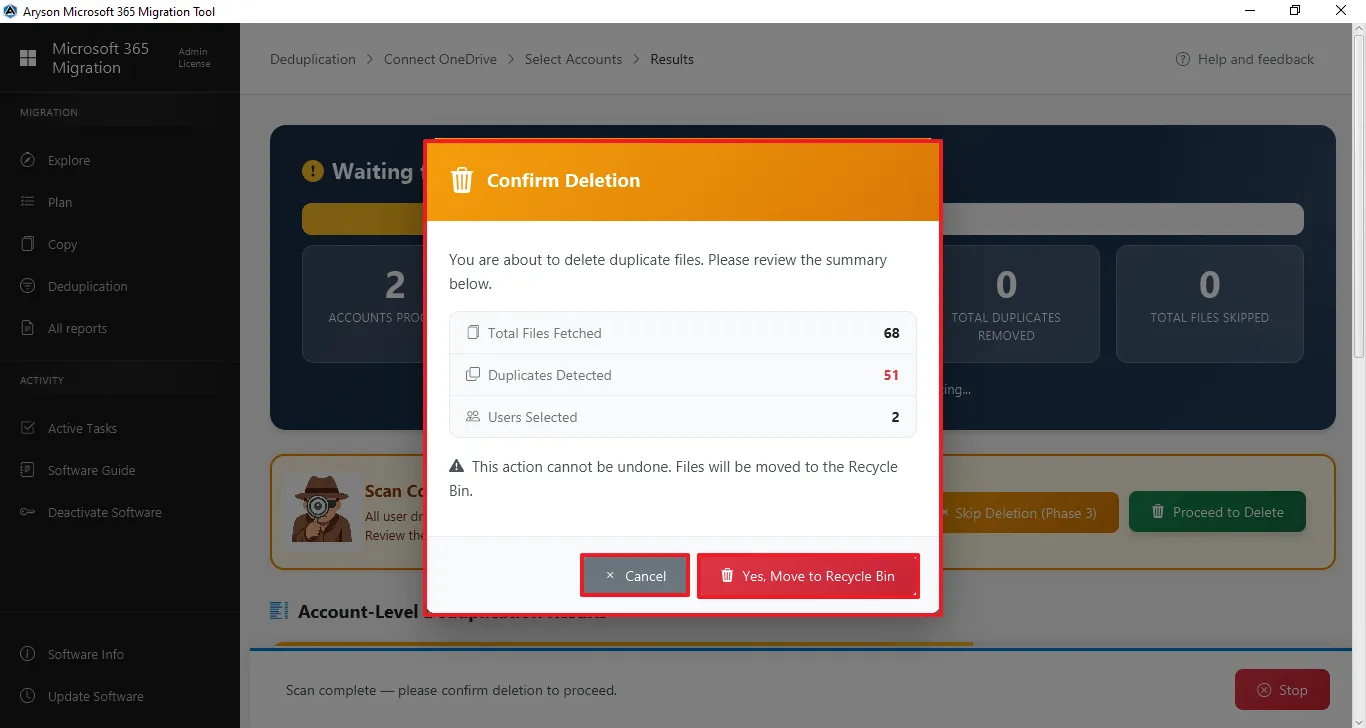
Step 9: After Scanning Completion - It provides two options after the duplicate scan is complete: Skip Deletion (Phase 3) to ignore the removal of duplicate files, or Proceed to Delete to confirm and delete the detected duplicate files from the selected OneDrive data.

Step 10: It displays a “Confirm Deletion” dialog that appears after the scan for duplicate files has completed.
Step 11: Deduplication Completed - It displays that the process of duplicate removal has been completed.
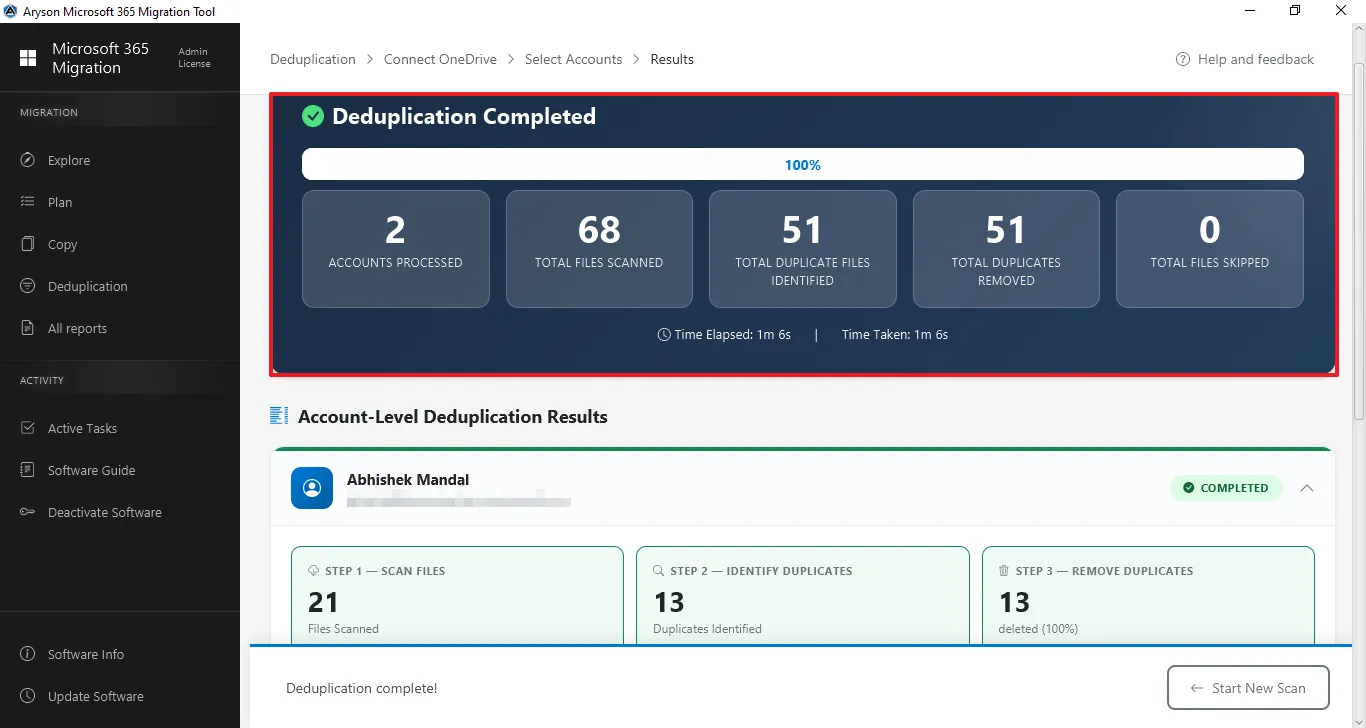
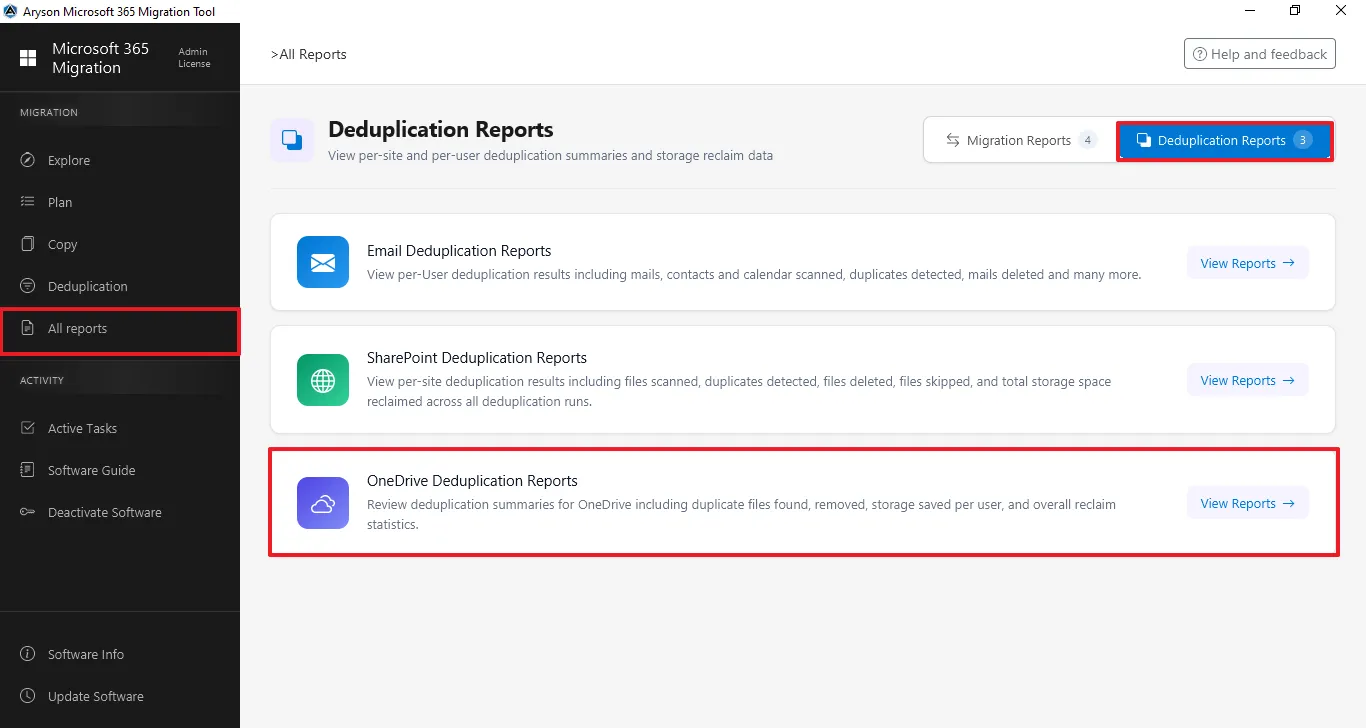
Step 12: The All Reports section gives a complete overview of all migration and backup activities. It lets users track status, view summaries, and review logs. Click on Deduplicate Reports and then click on the OneDrive Deduplication Reports.
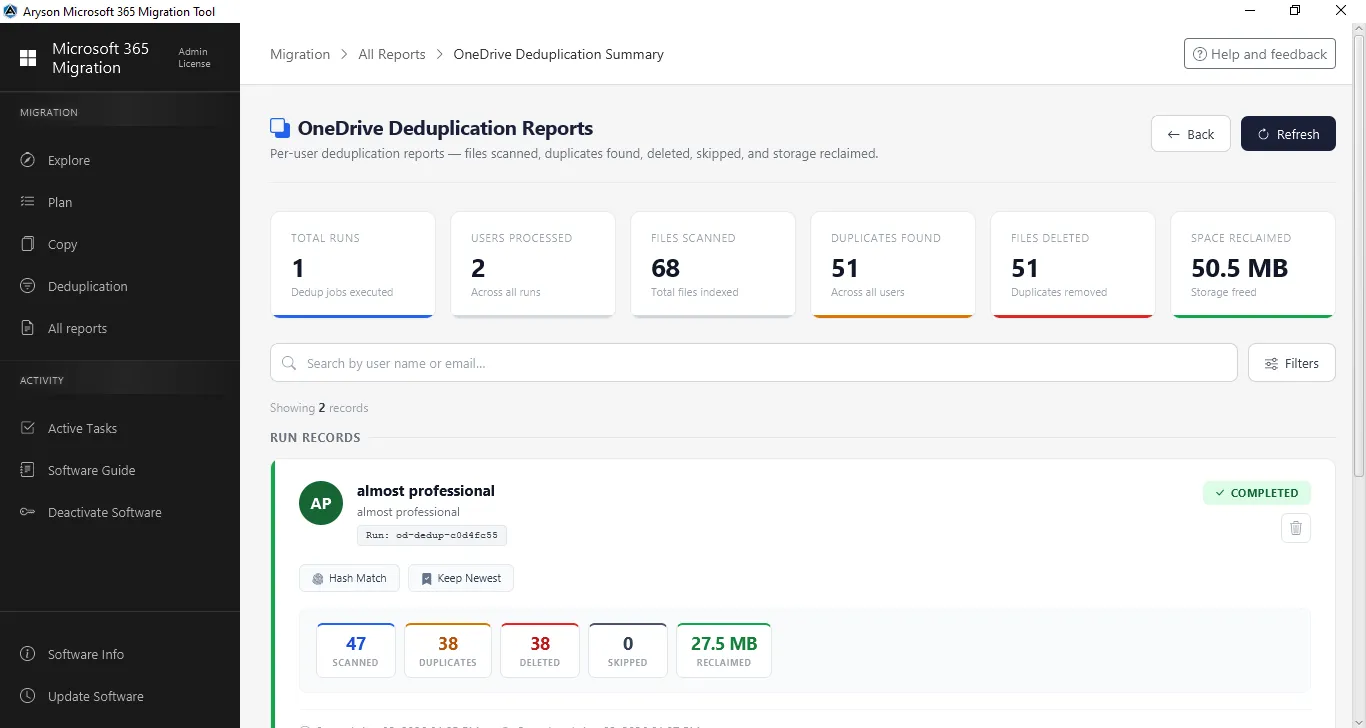
Step 13: The OneDrive Deduplication Reports section shows a complete summary of all SharePoint. It helps administrators track progress, verify duplicate data, and calculate space reclaimed statistics after migration.
Activation Guide
Activate the Software
Installation & Uninstallation
Installation & Uninstallation of Software
User Interface
User Interface
After downloading the Aryson Microsoft 365 Migration Tool, you will find the welcome screen as played below.