Software Guide - Aryson Mac PST Converter
Aryson Mac PST Converter is a professional Mac-based utility designed to convert Outlook PST files into multiple file formats and email clients while preserving data integrity. The software enables users to export PST emails, contacts, calendars, tasks, notes, and attachments to formats such as PDF, MBOX, EML, MSG, DOCX, CSV and more. It also supports direct migration of PST data to cloud platforms, including Microsoft 365, Google Workspace, IMAP Servers, Outlook.com, and GoDaddy email.
-
Table of Content
- Software Working Process
- Activation Guide
- Installation & Uninstallation
- User Interface
Software Working Process
Software Working Process
Step 1: Download and install the Aryson Mac PST Converter on your Mac system.
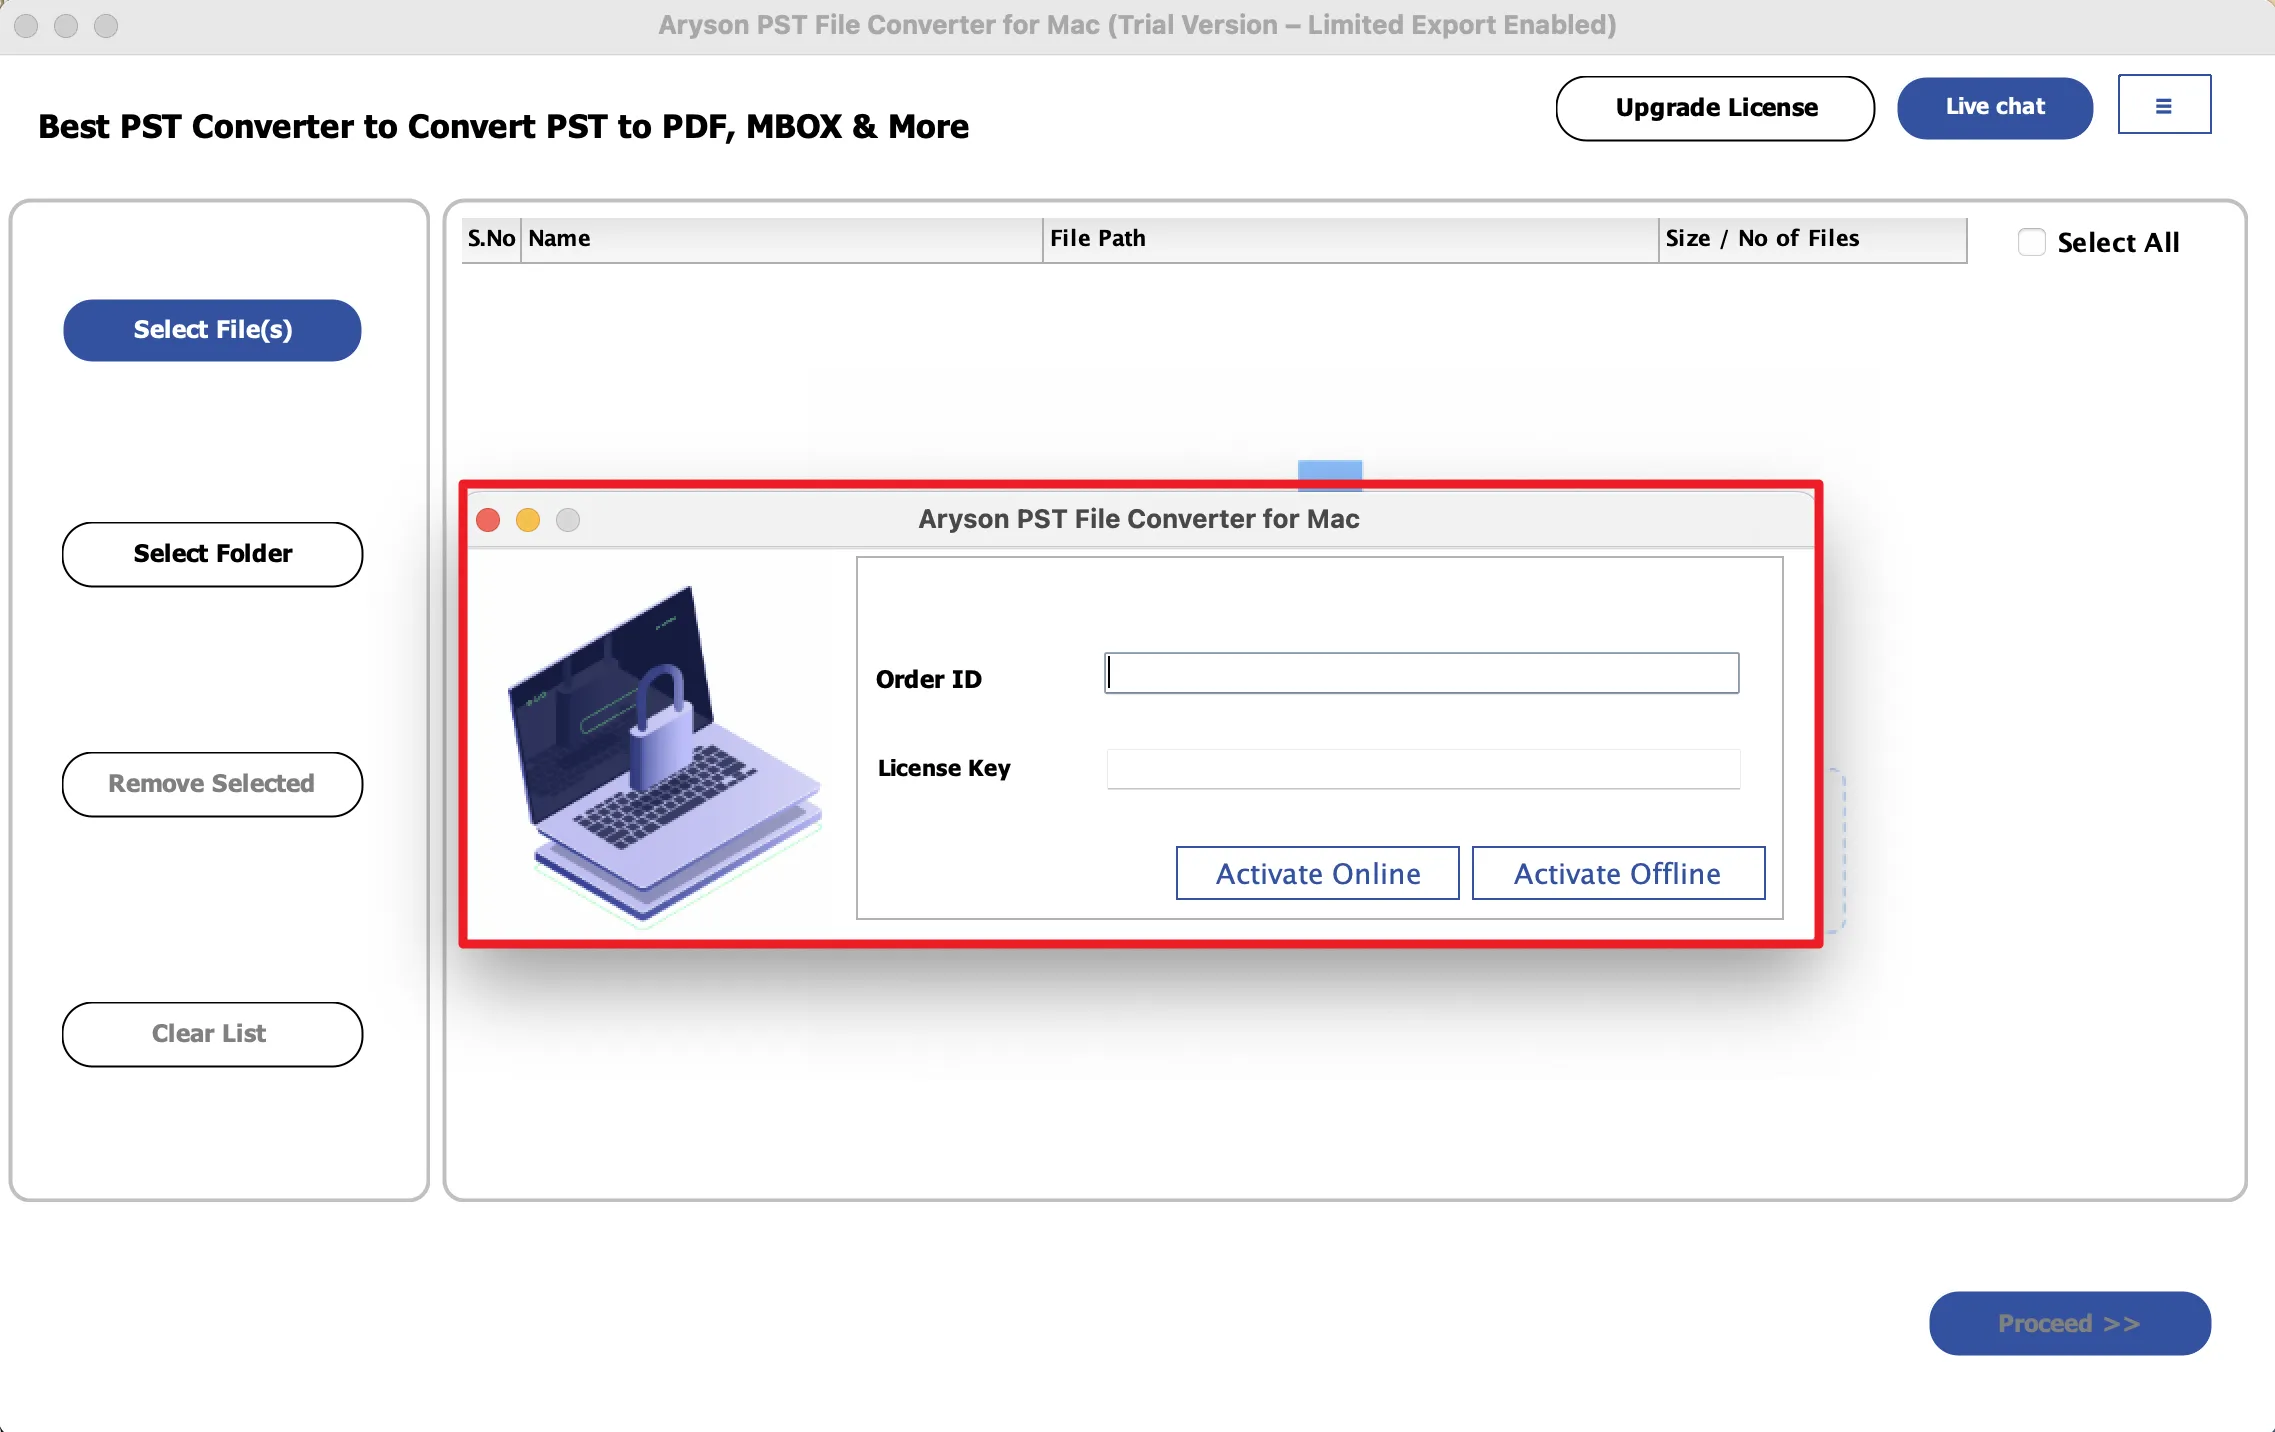
Step 2: Run it as administrator and activate it using the license key (or continue with the demo version ).
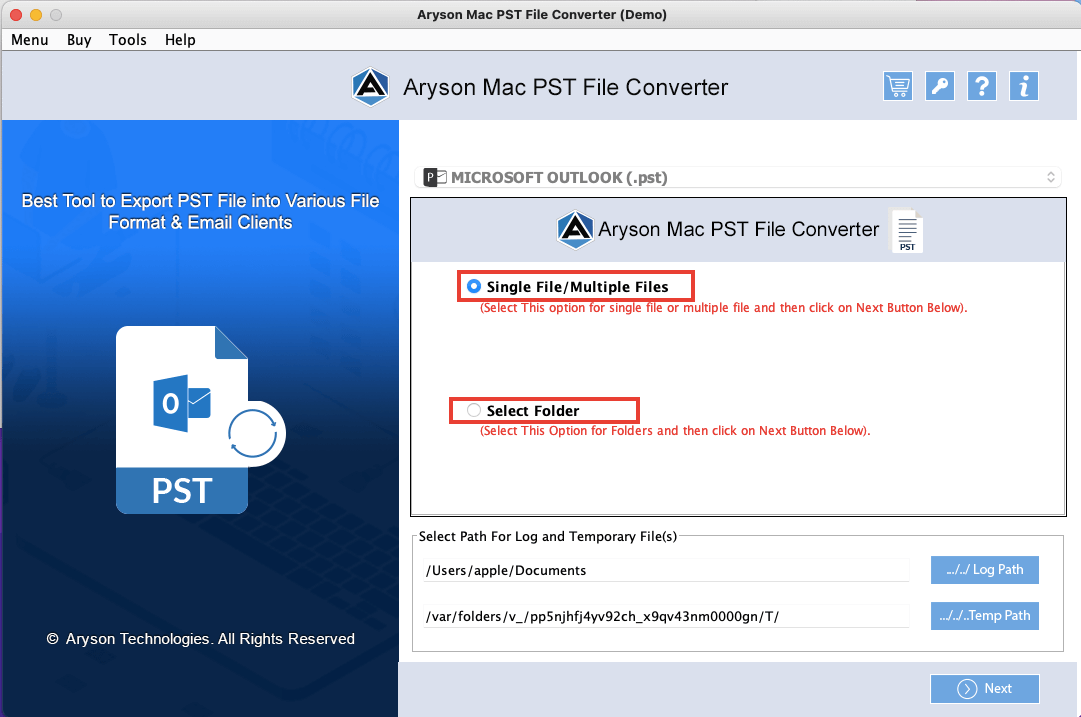
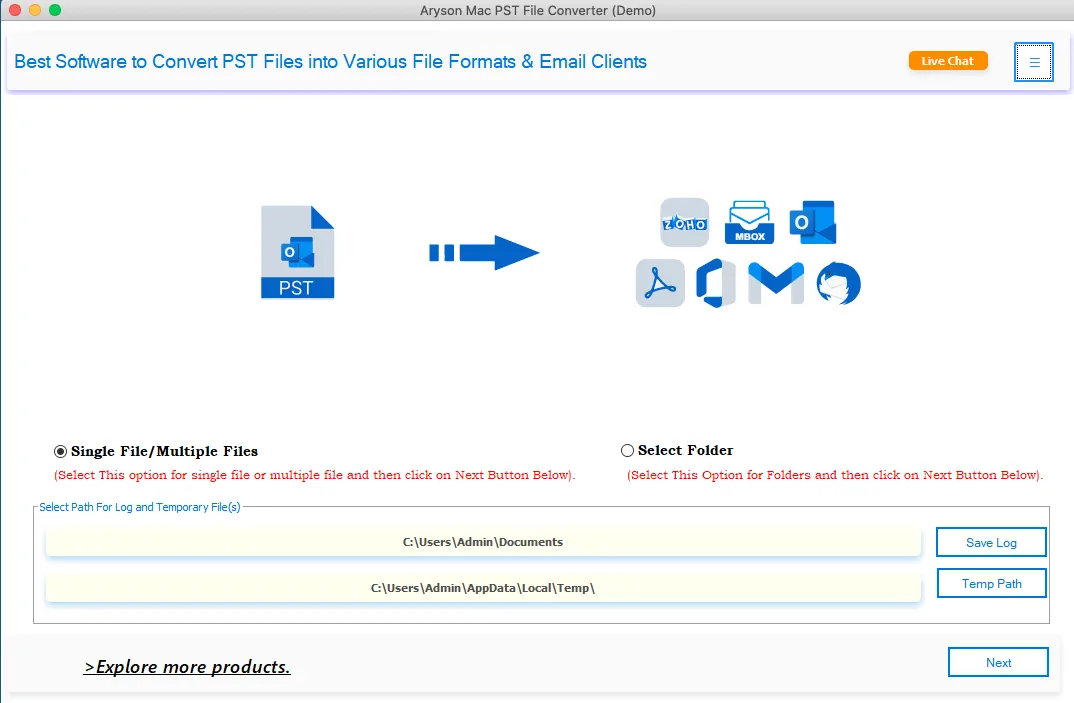
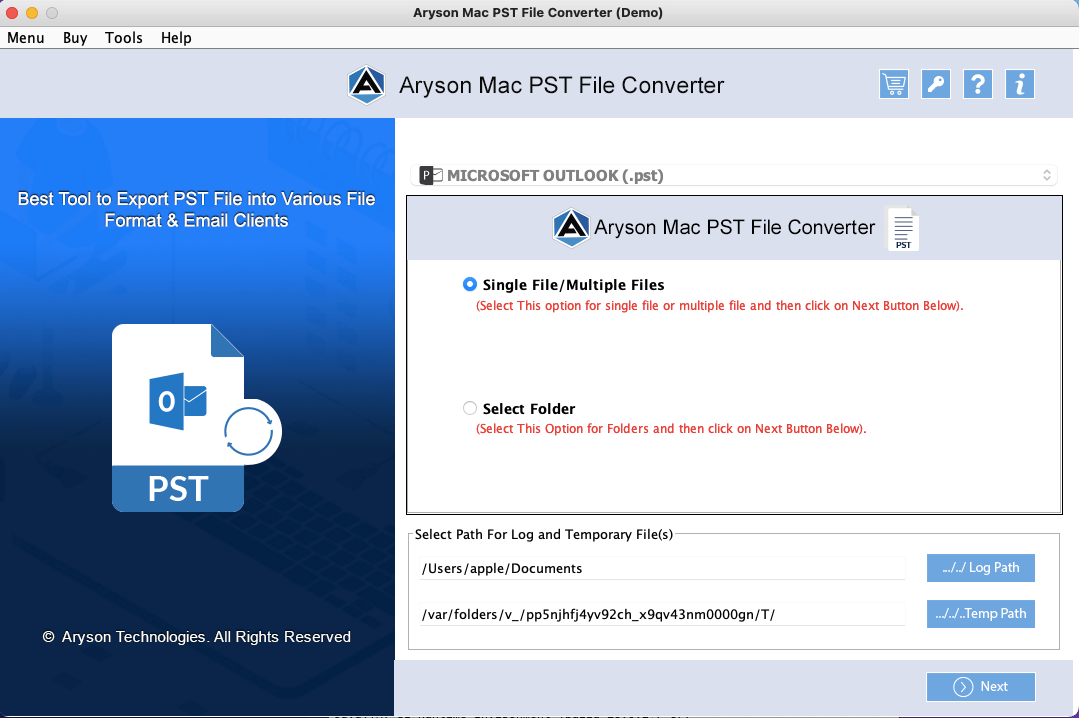
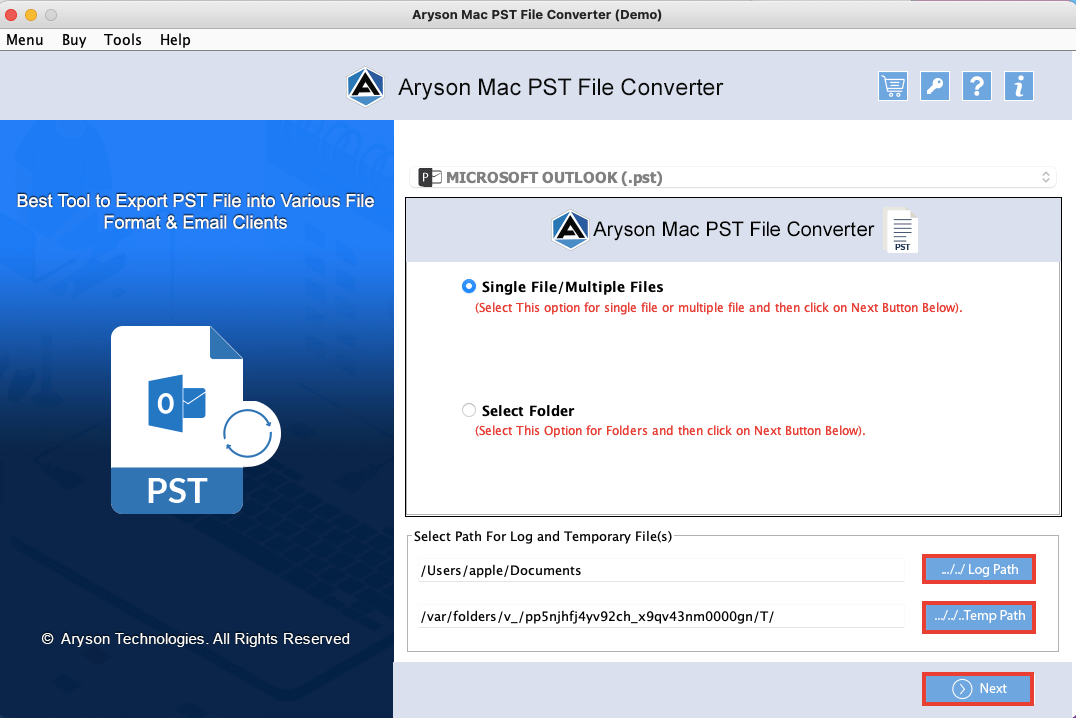
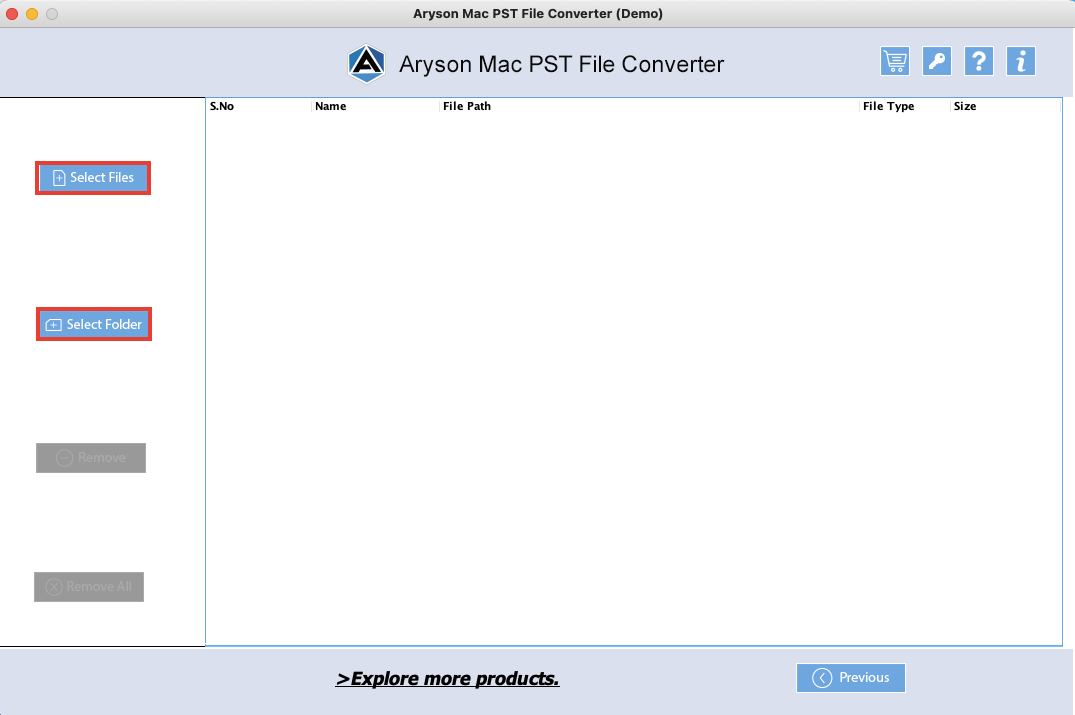
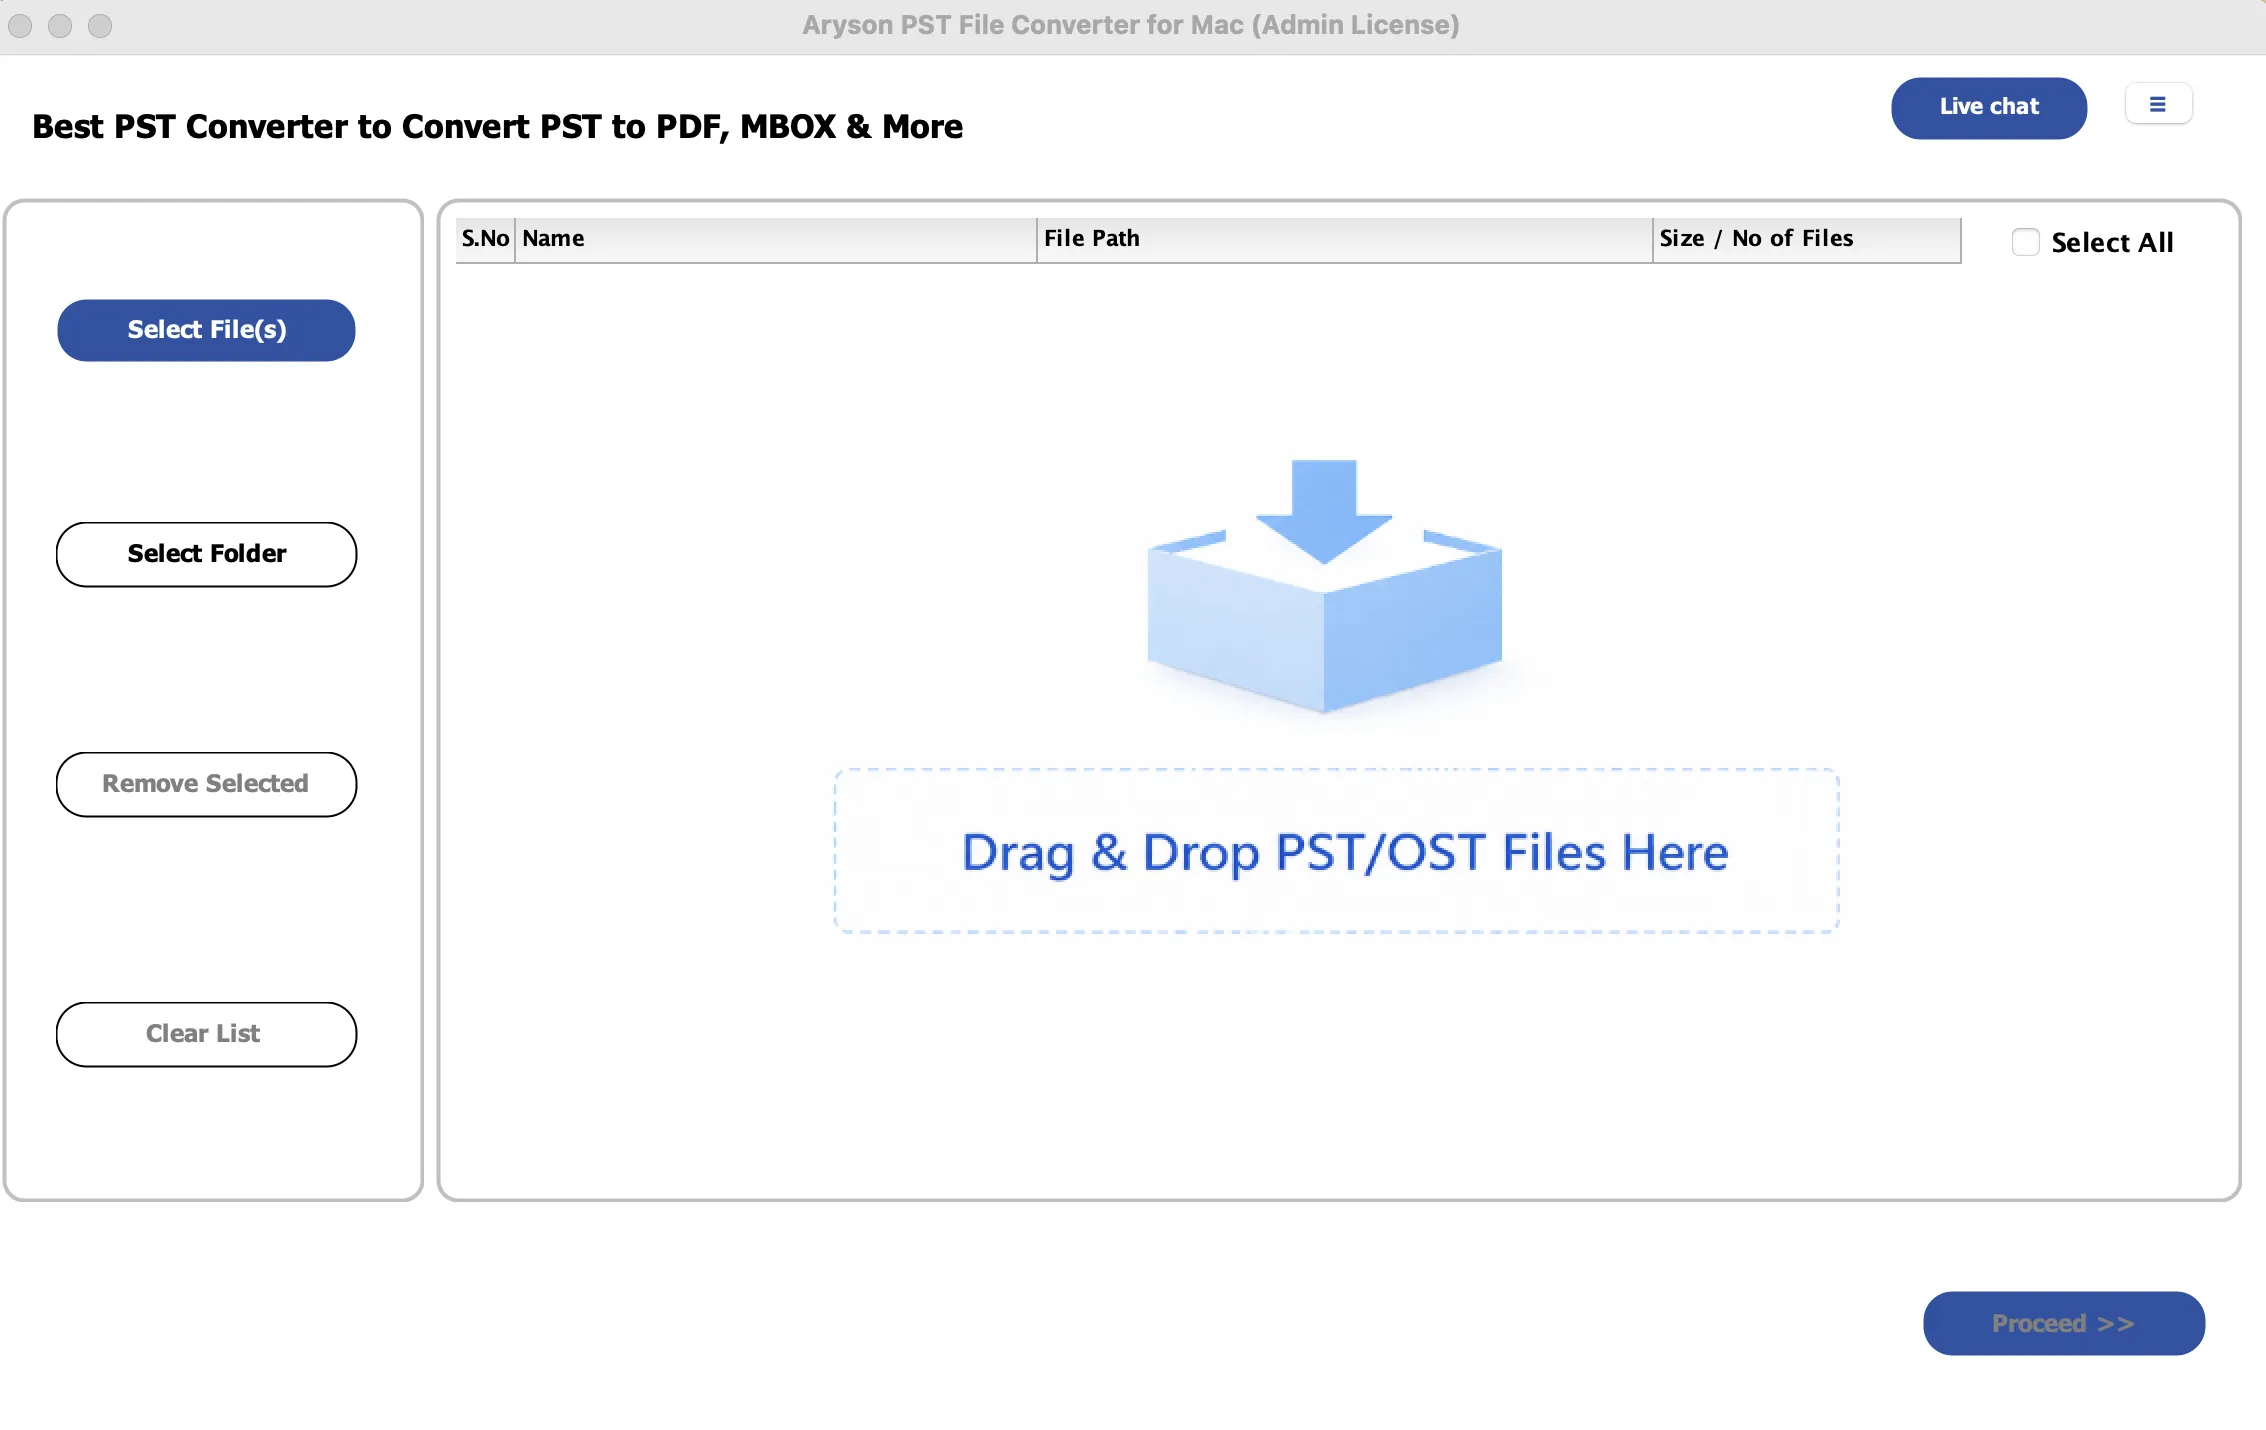
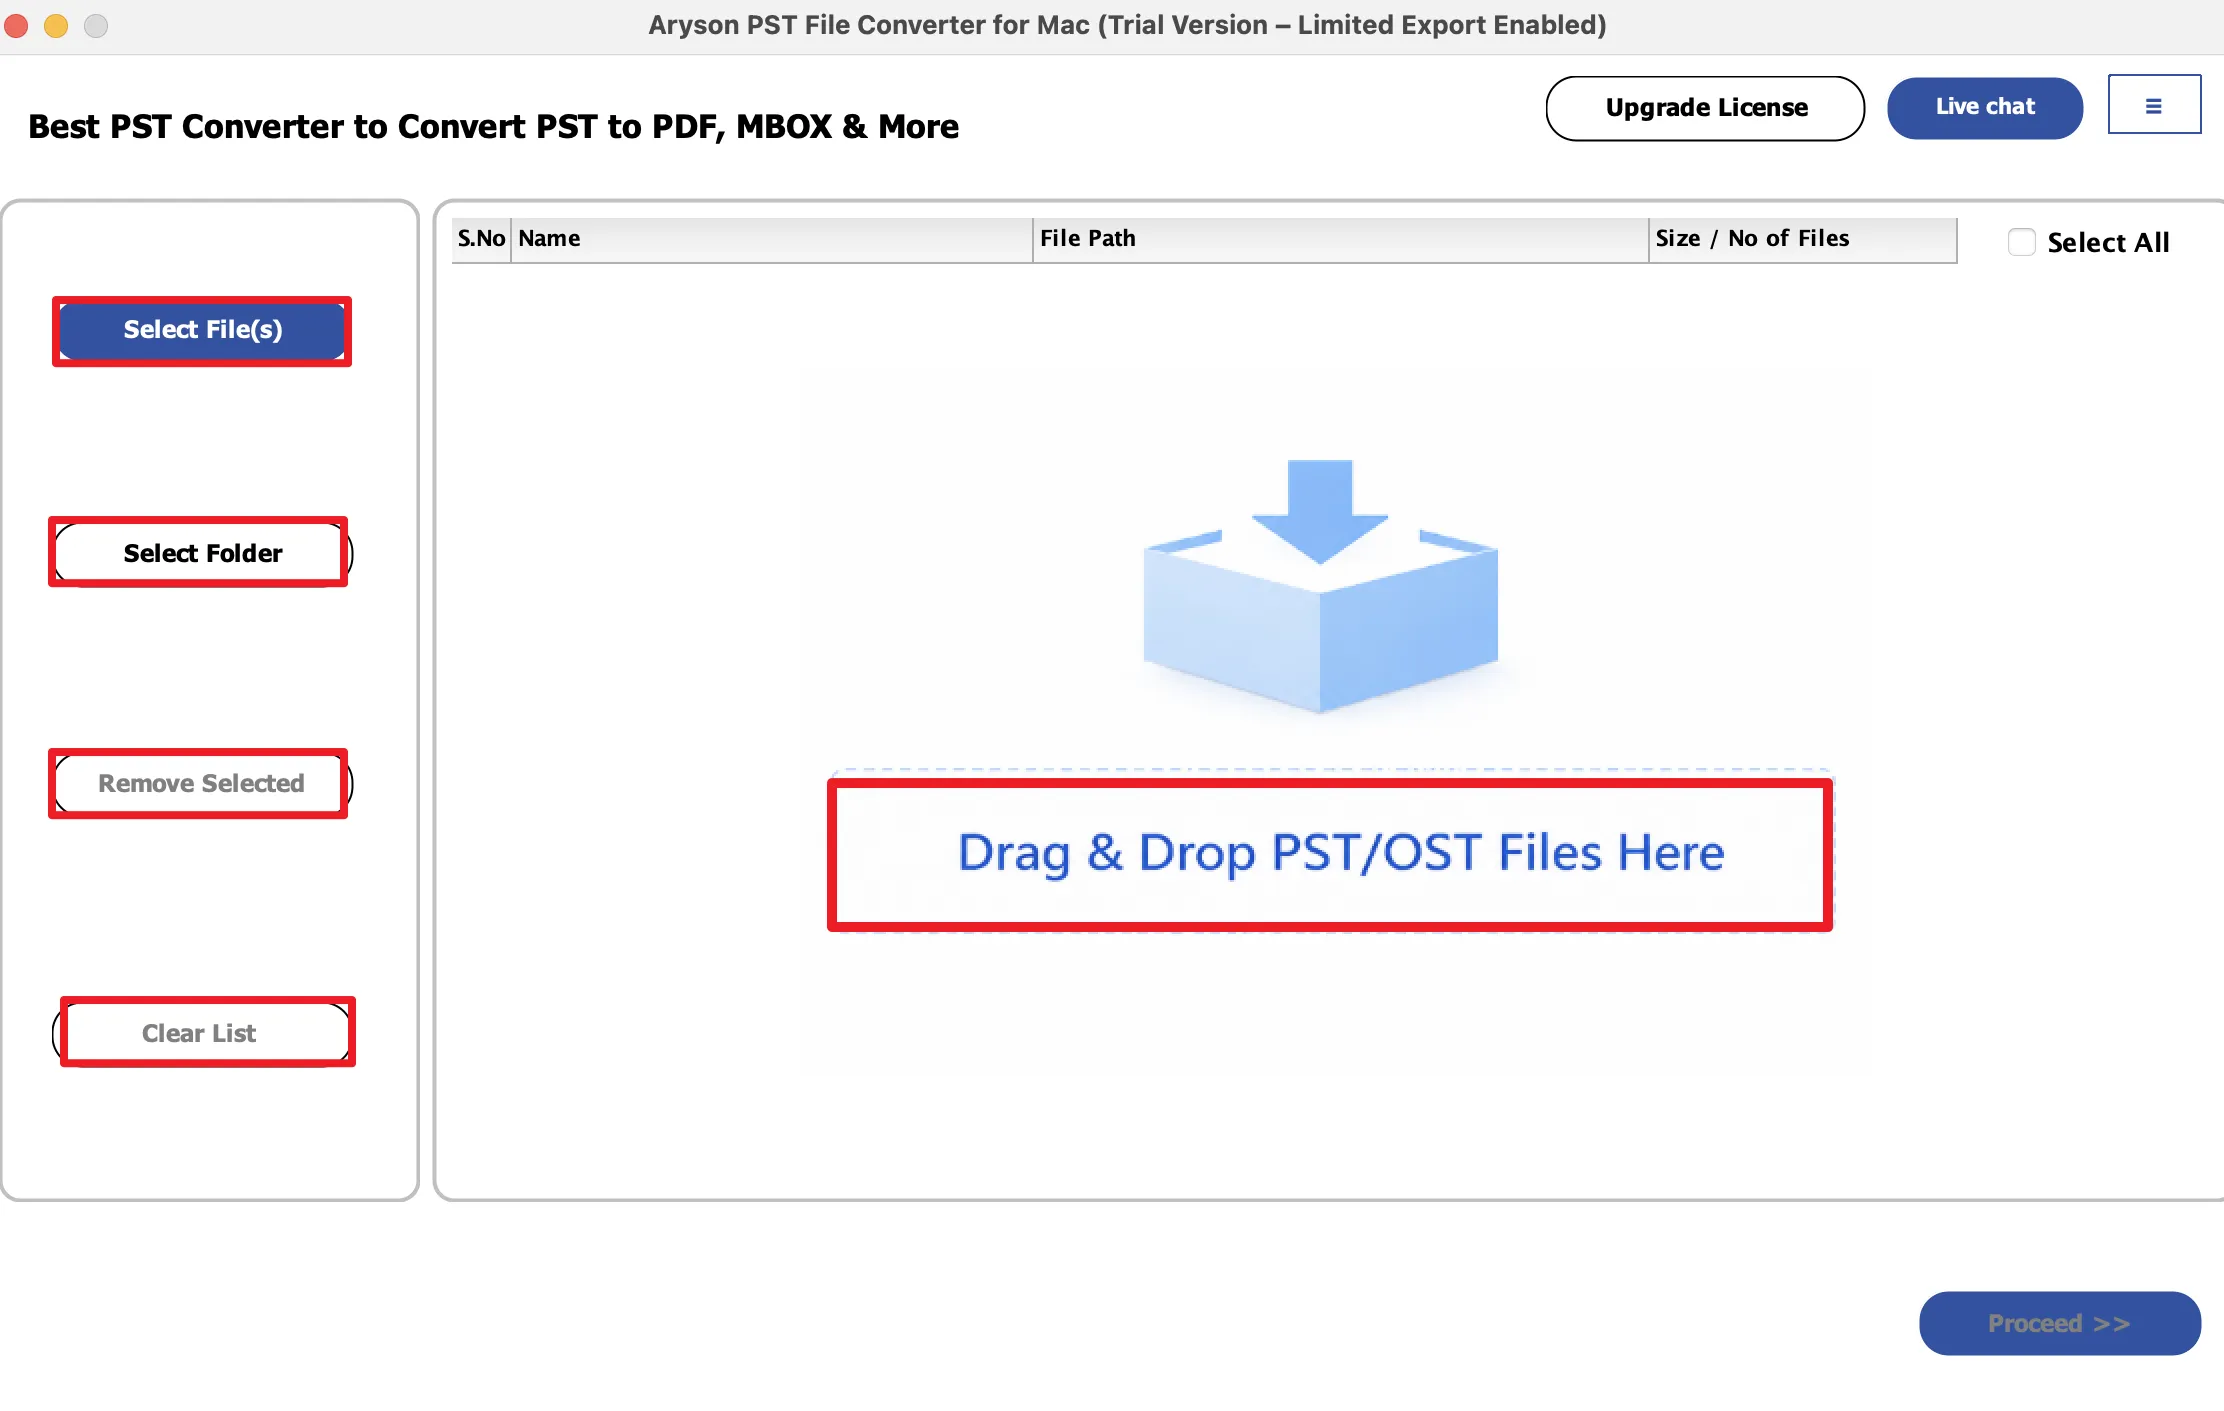
Step 3: Choose how you want to add the required PST data into the software:
- Select Files: Press this button to add single or multiple PST/OST files.
- Select Folder: Use it to add an entire folder that contains PST/OST files.
- Remove Selected: Delete selected PST/OST files from the list.
- Clear List: Clear all added PST/OST files.
- Proceed: Click on the Proceed button to proceed further.
- Drag-and-drop functionality: The user may add the required PST/OST files using the drag-and-drop features of the software.
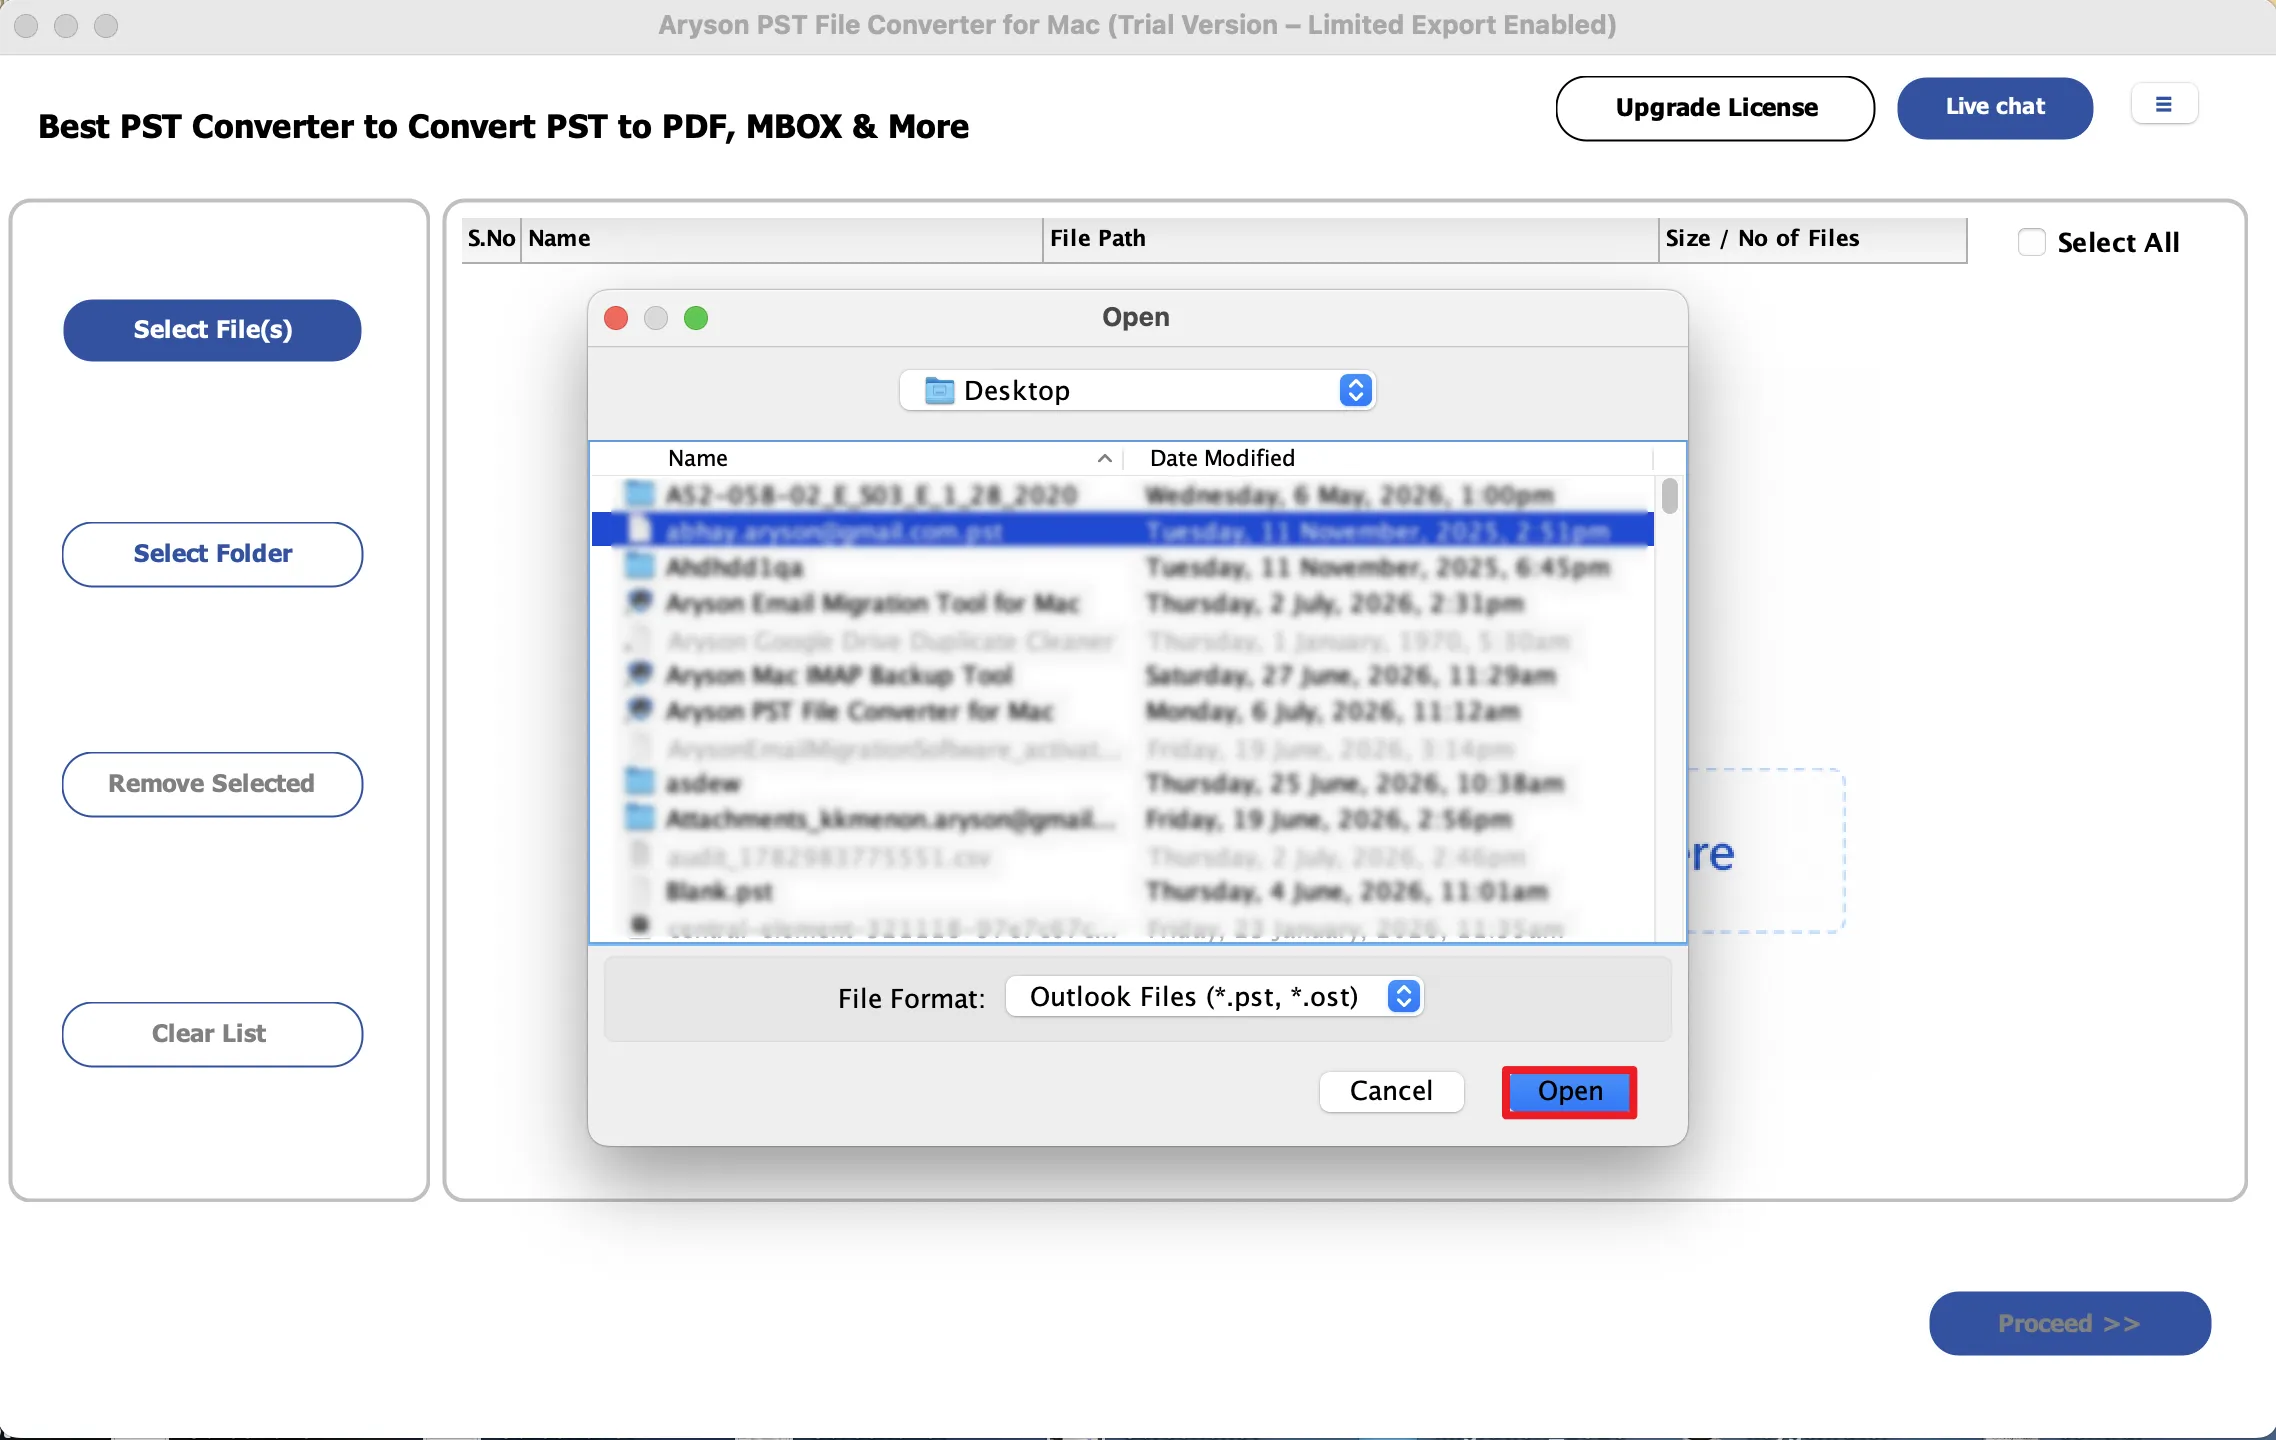
Step 4: Browse your system, select the required PST or OST file/folder, and click "Open" to load it into the software.
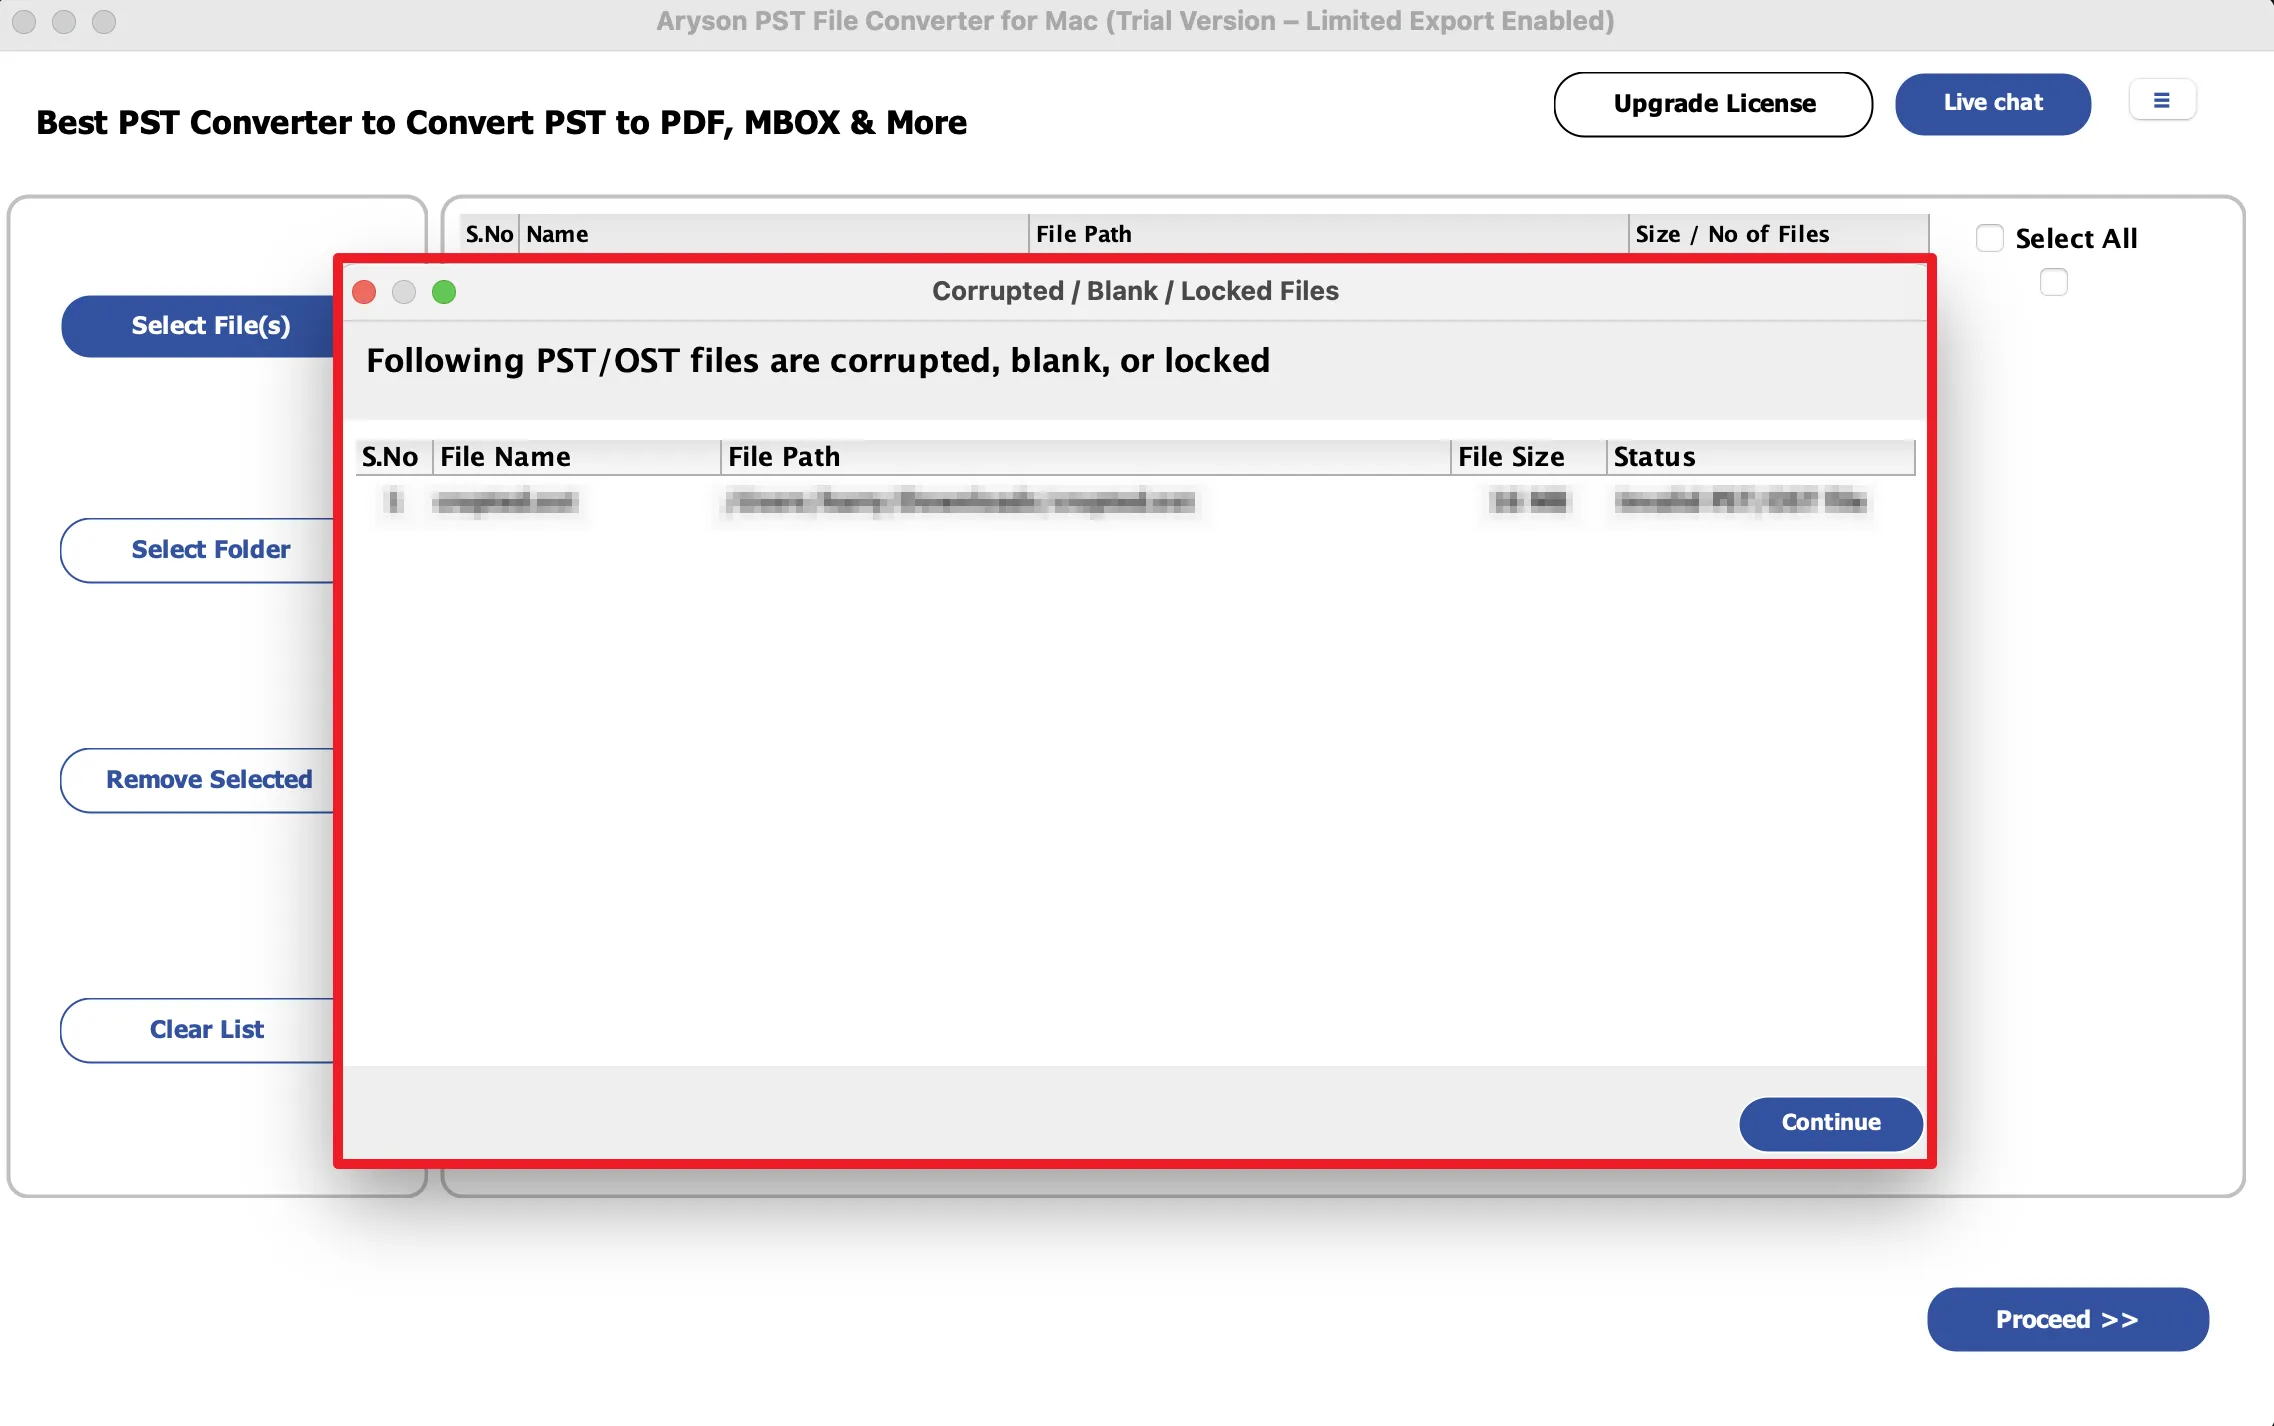
Step 5: The software will automatically detect the corrupted, blank, and invalid PST/OST files, display a warning panel, and skip these files during the conversion.
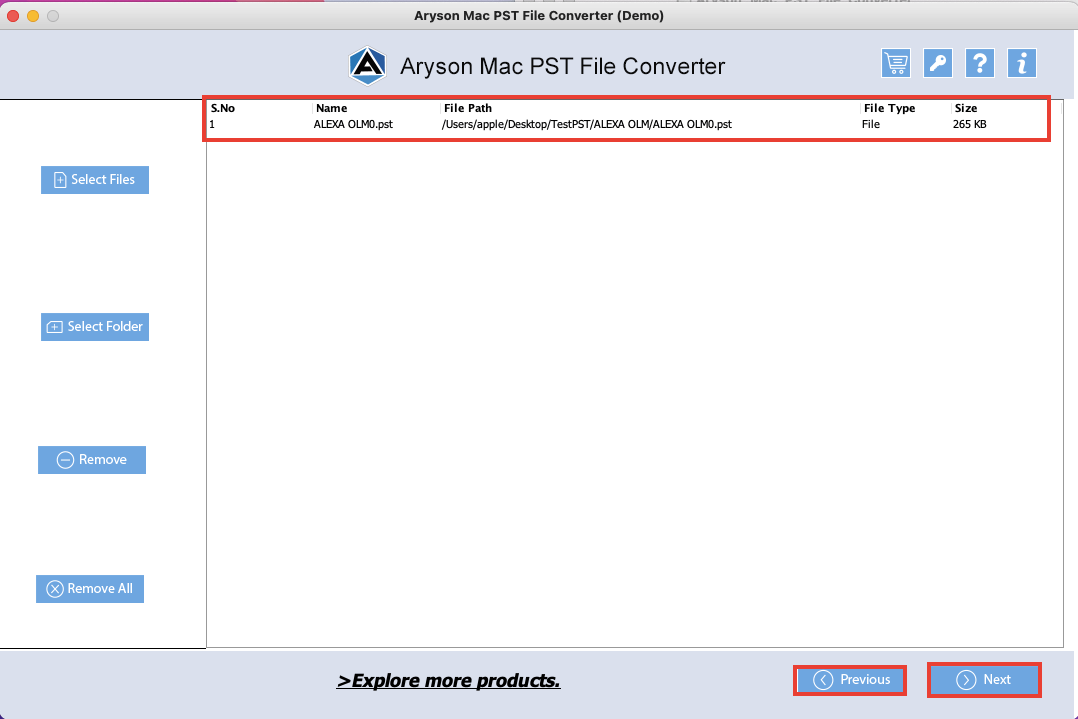
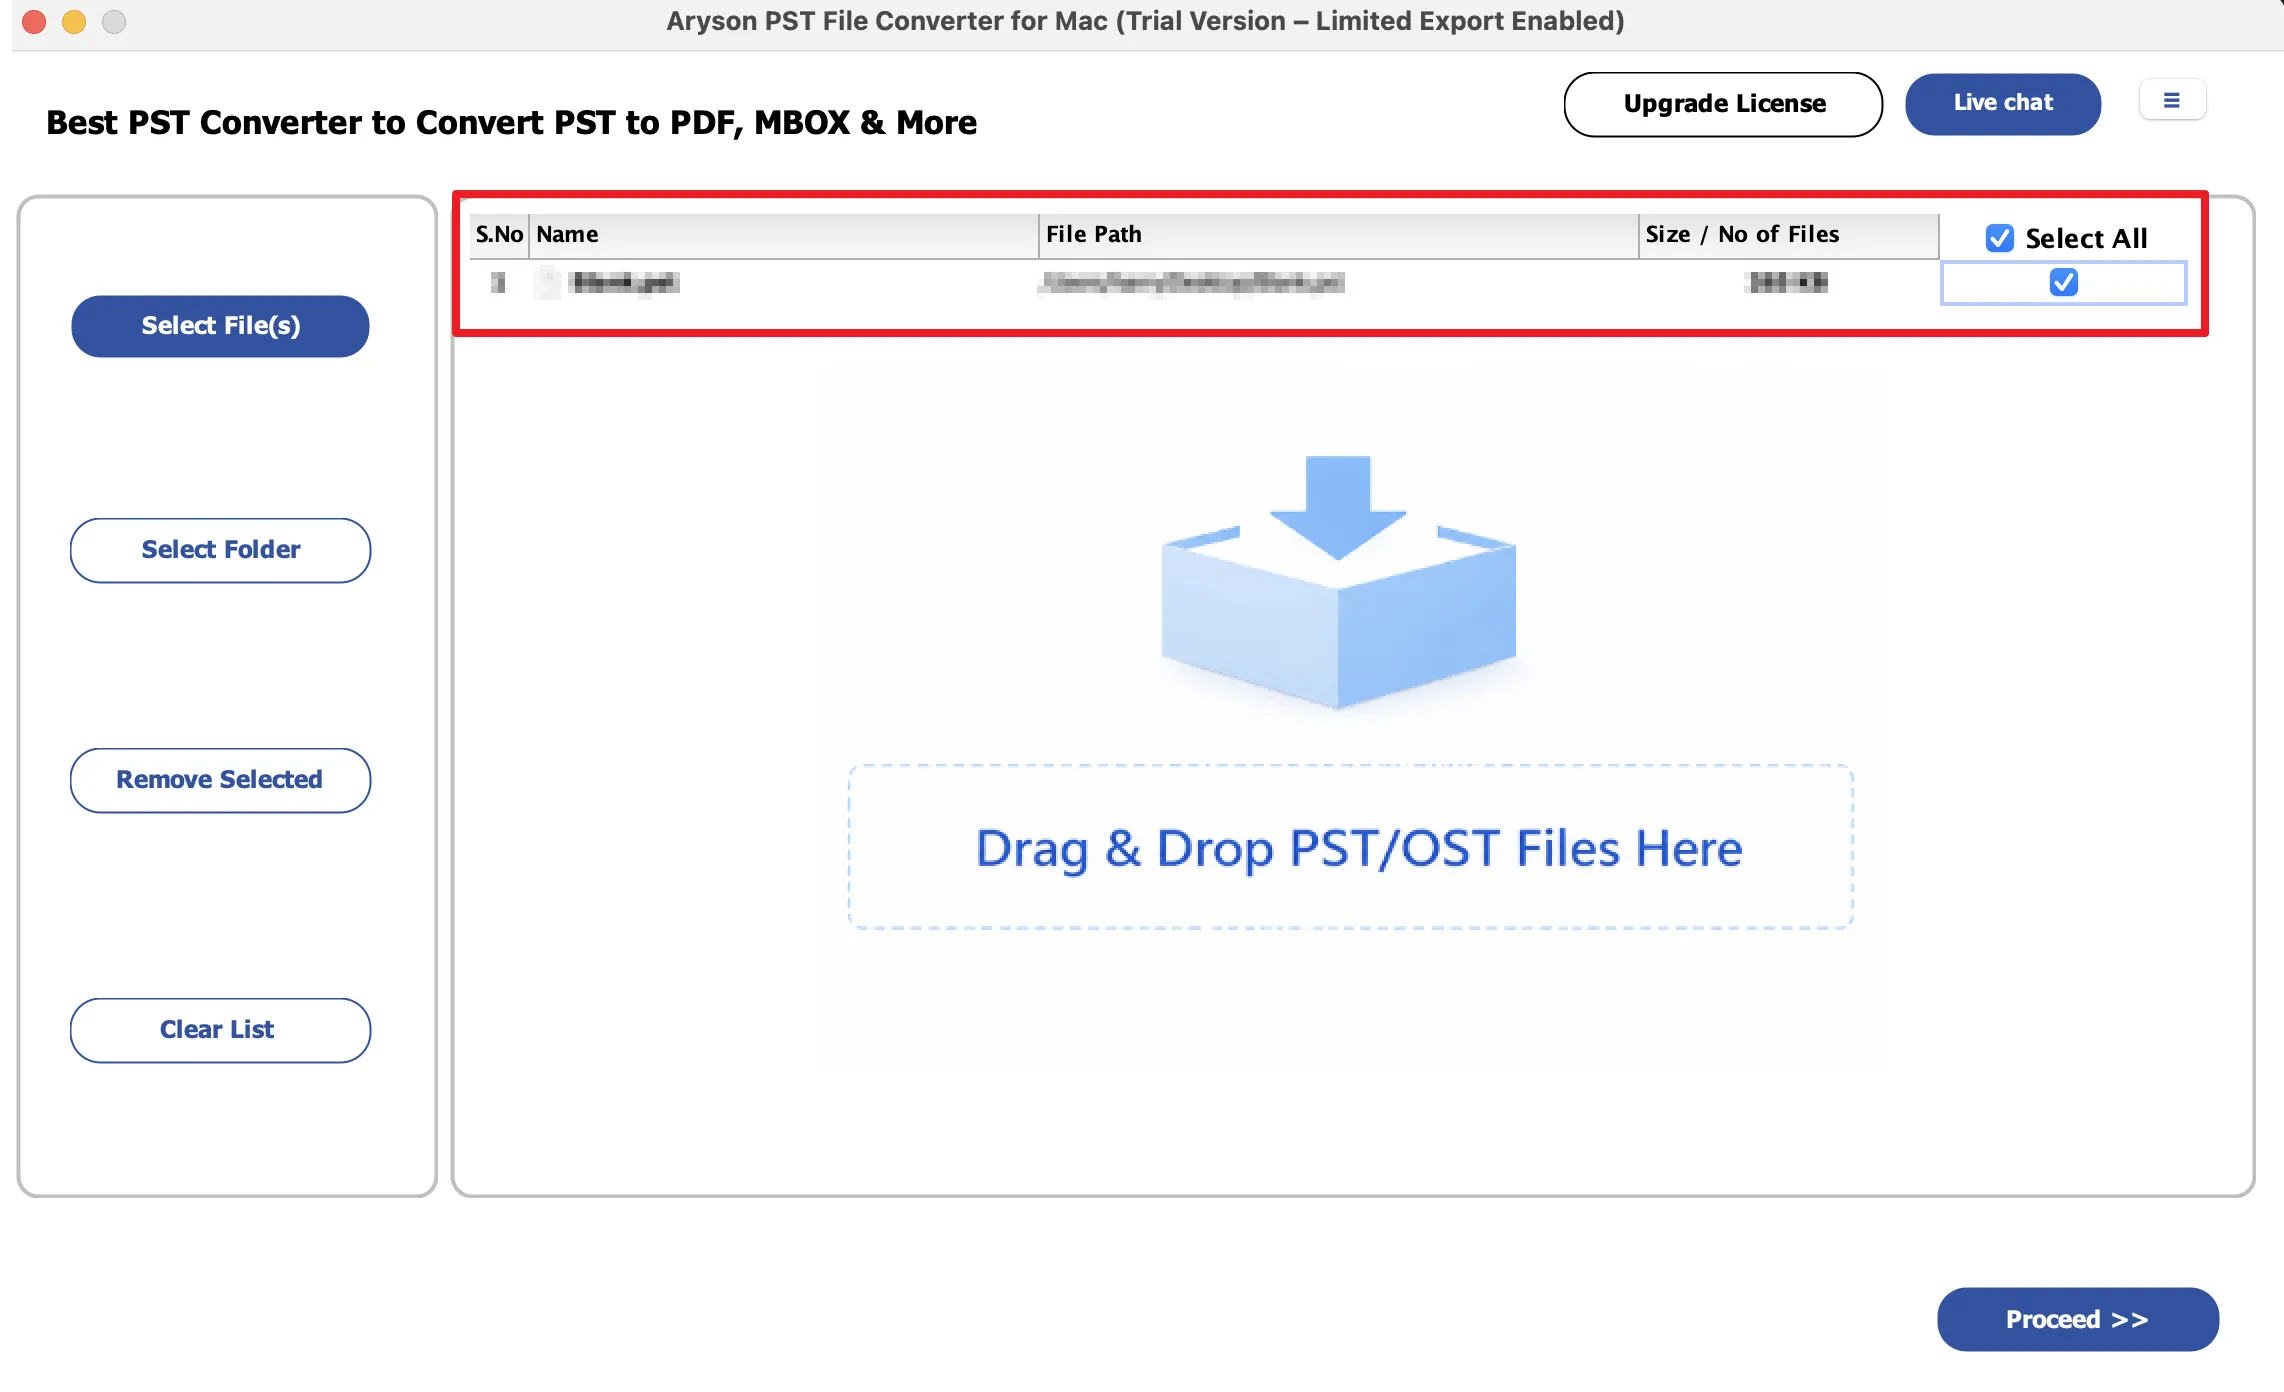
Step 6: The software displays all added PST/OST files in a tabular view showing details such as S. No., File Name, File Path, and Size/Number of Files. Review the loaded files, select the required items if needed, and click Proceed to continue the conversion process.
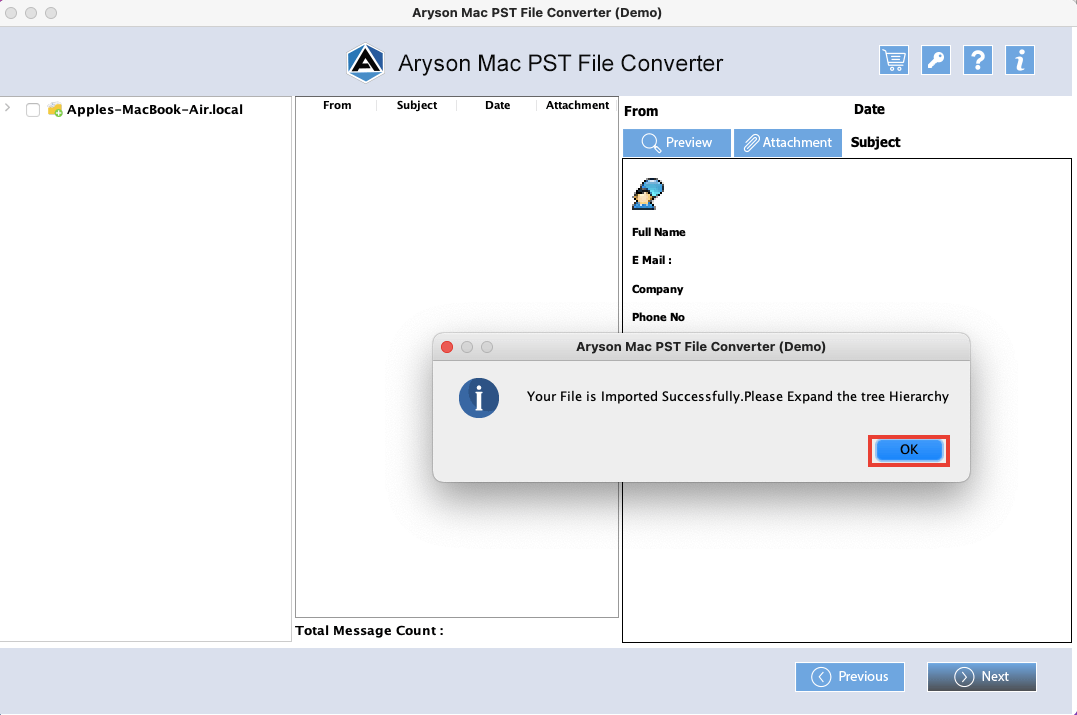
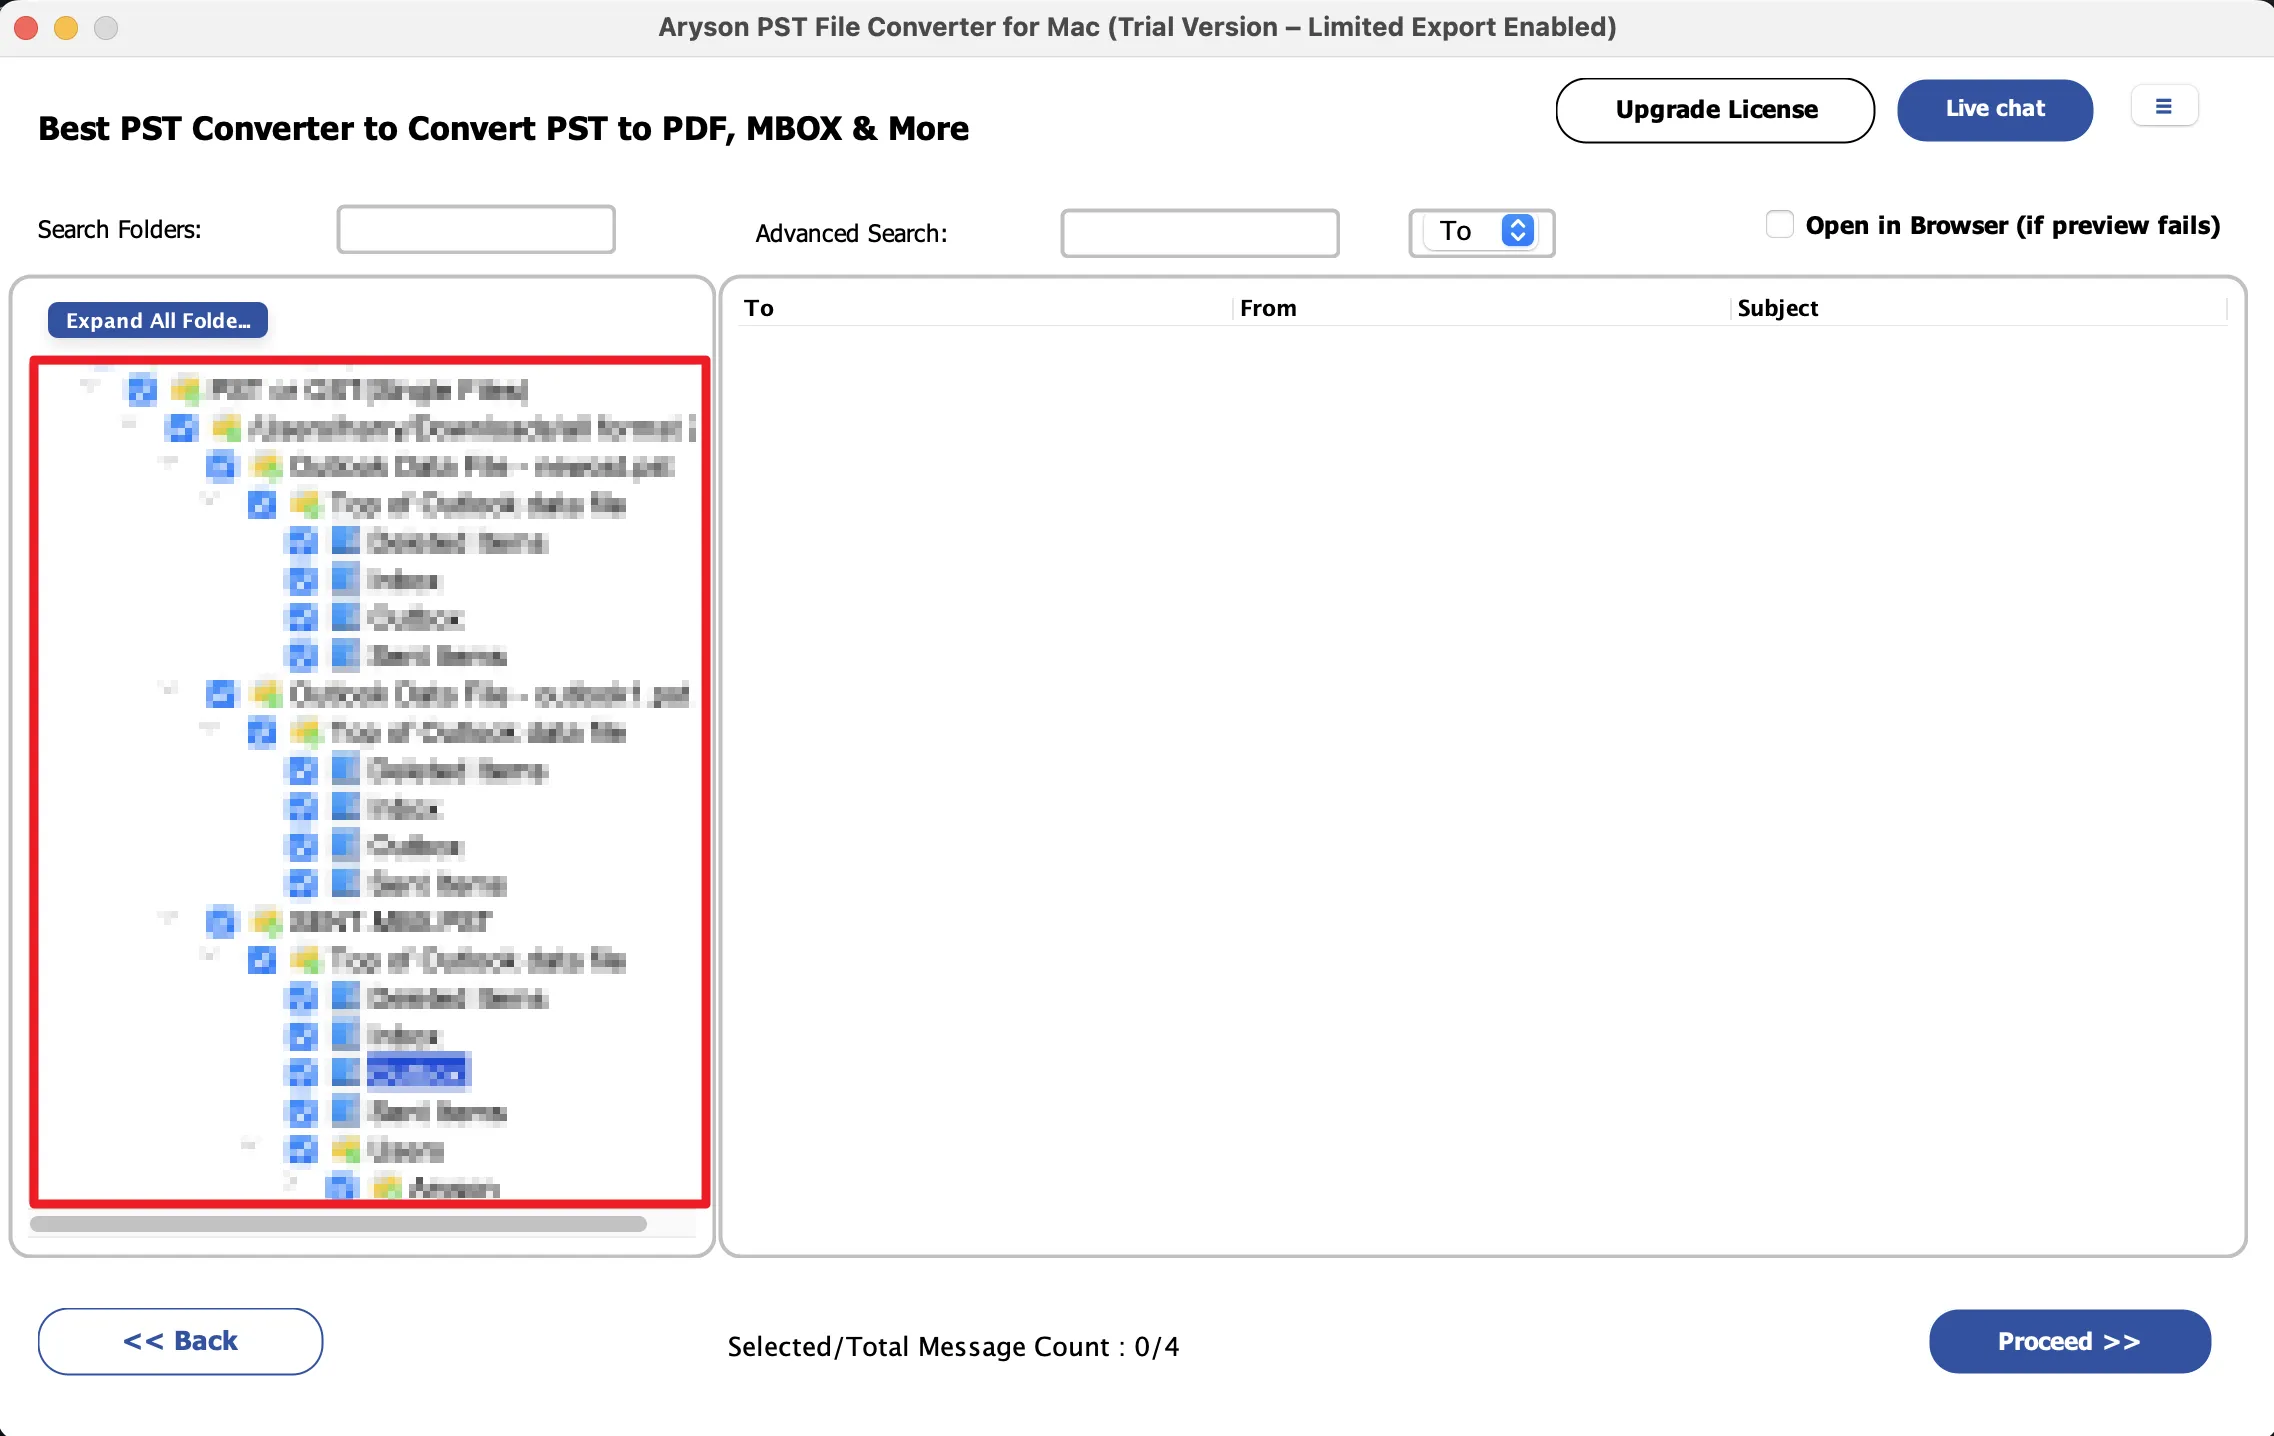
Step 7: Now, an advanced preview panel will appear. Expand the tree-like hierarchy of the selected files and folders.

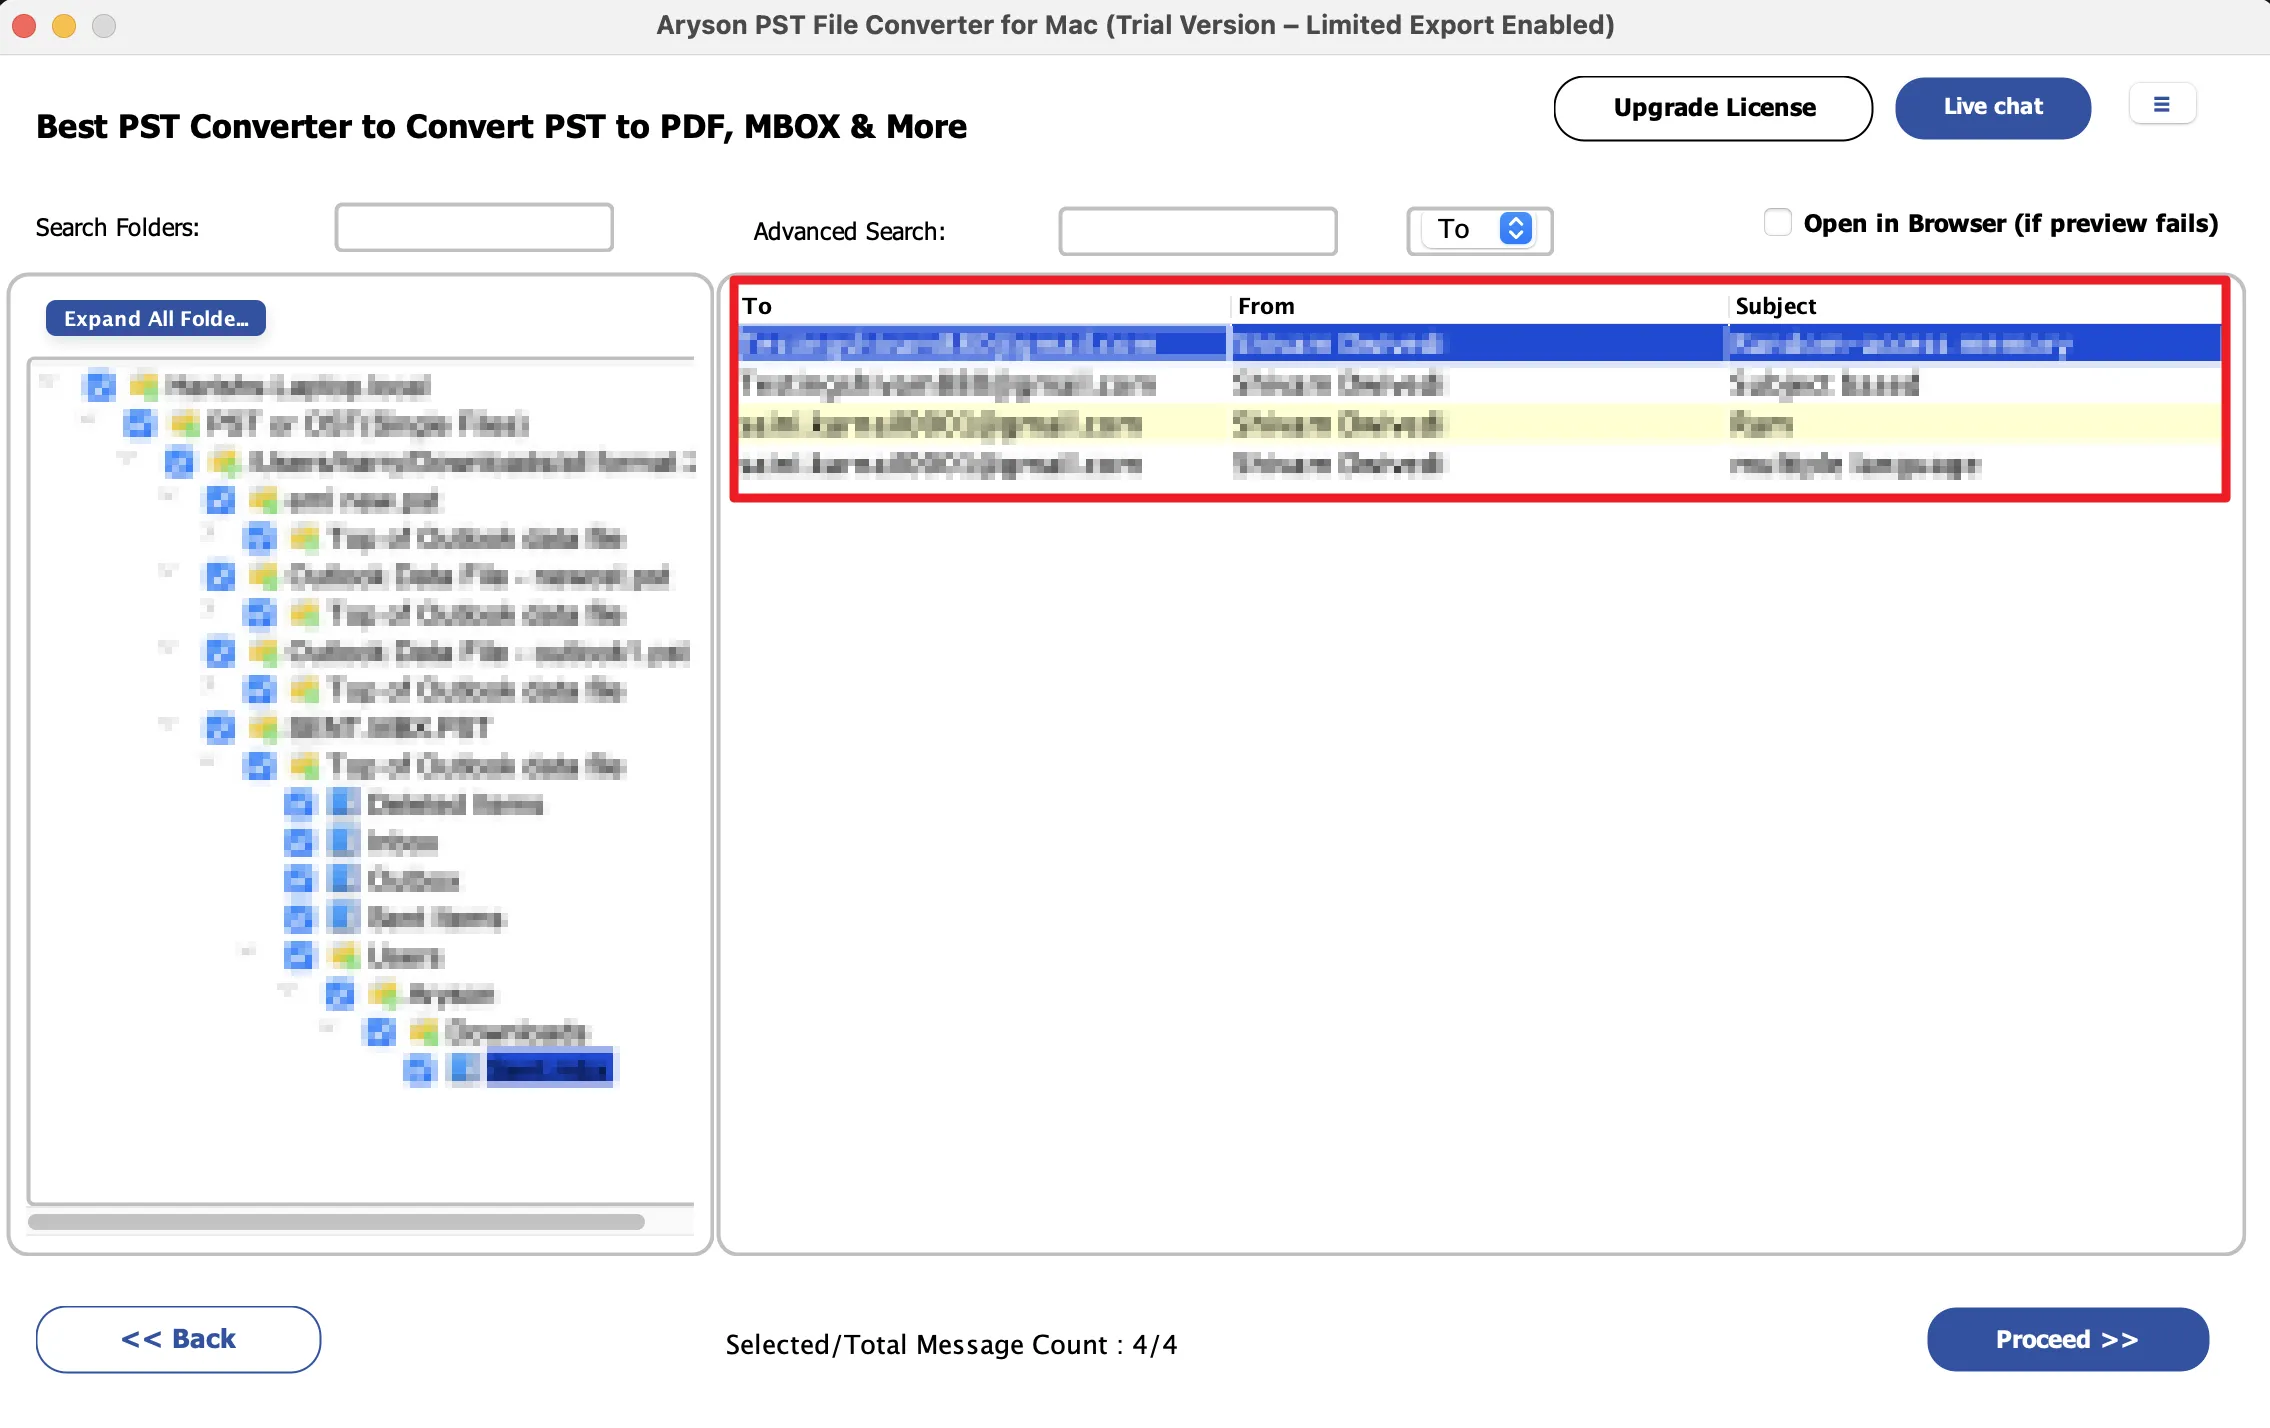
Step 8: Preview the emails and their associated attachments. The preview panel displays:
- From: Displays the sender’s email address and information for the selected email.
- To: Shows the recipient’s email address to whom the message was sent.
- Subject: Indicates the subject line of the selected email.
Step 9: You may use the other options for better filtering of PST/OST data.
- Search Folders: Find specific folders by entering keywords from the folder name.
- Advanced Search: Search emails using "To," "From," or "Subject" criteria of emails.
- Open in Browser: Opens the selected email in a web browser if the preview is not displayed properly in the software.
You can also preview emails in the following:
- HTML format: Displays the email with its original formatting, including fonts, colors, and images.
- Attachments: Click here to preview the attachments.
- Plain text: Shows the email content in simple text without any formatting.
- Headers: Display detailed technical header information of the email.
- MIME: Shows the MIME structure and encoding details of the message.
- Calendars: Displays the calendars' associated fields.
- Contacts: Shows the information like phone numbers, emails, etc.
- Tasks: Displays the fields like start date, end date, due date, and sensitivity.
- Notes: To preview the notes' content and their creation date.
- Raw HTML: Displays the original HTML source code of the email message.
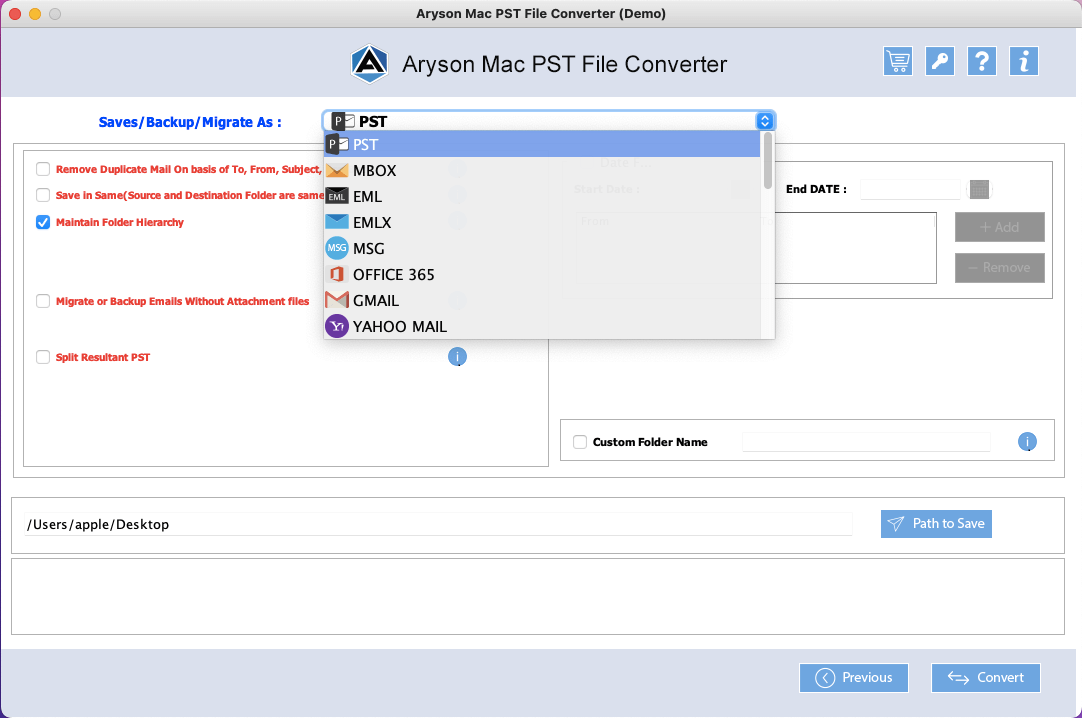
Step 10: Select Outlook Message (.msg) under the Export File Formats drop-down list.
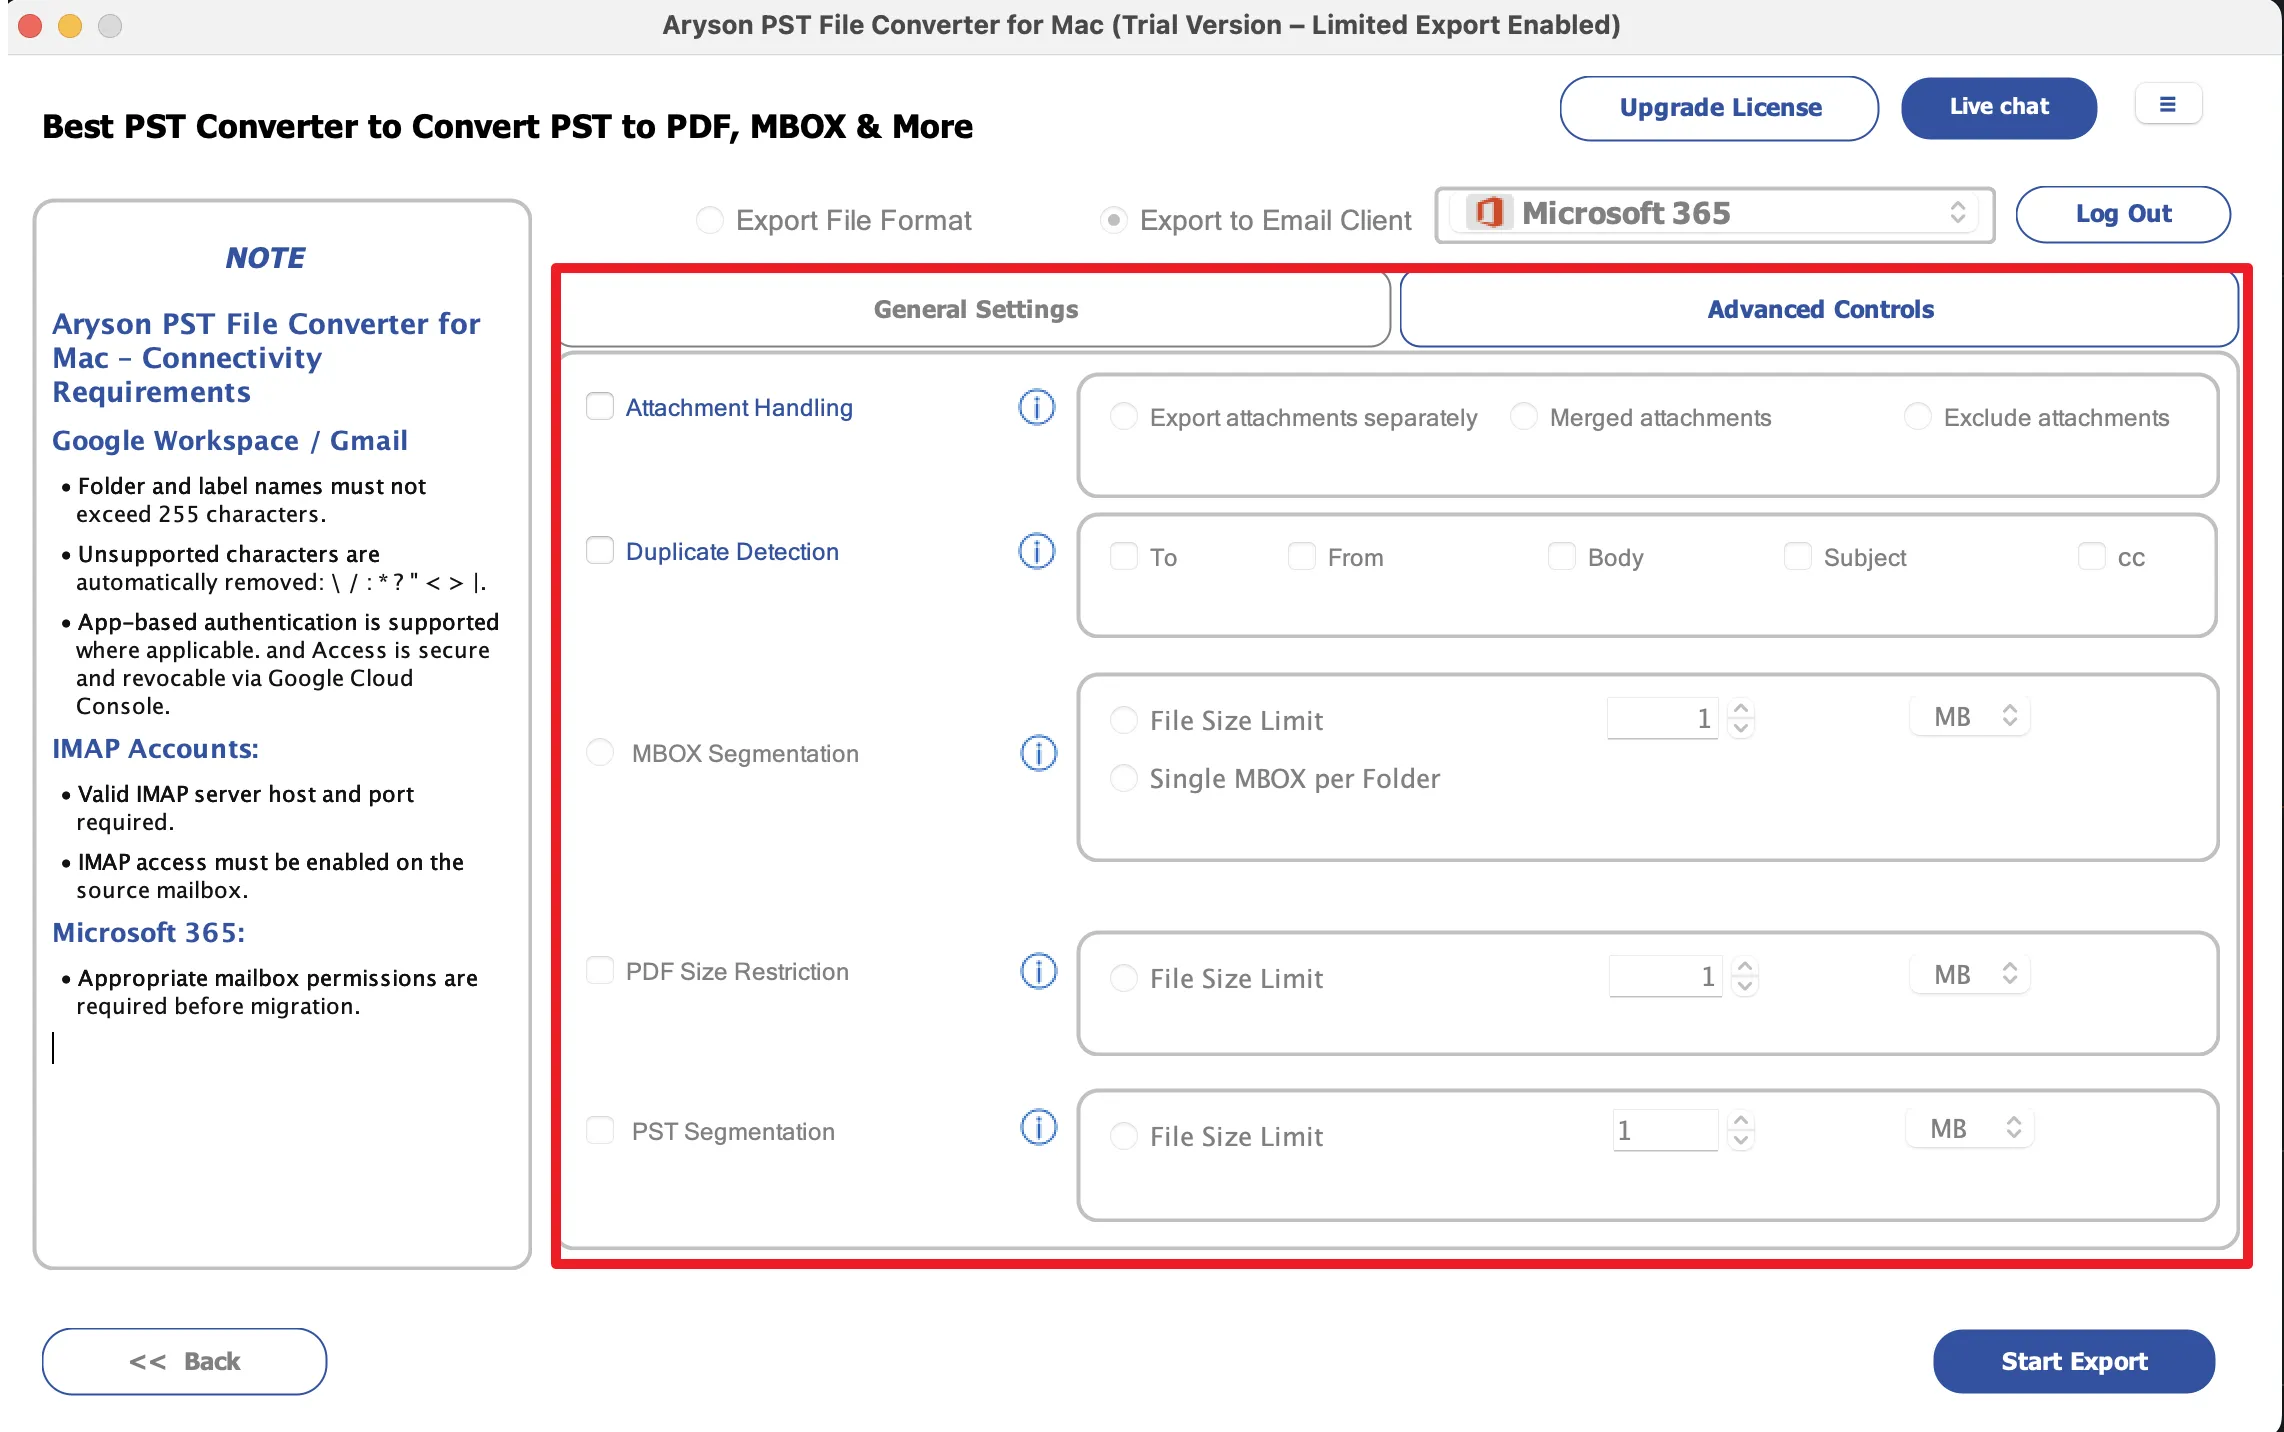
Step 11: Configure advanced export settings according to your requirements:
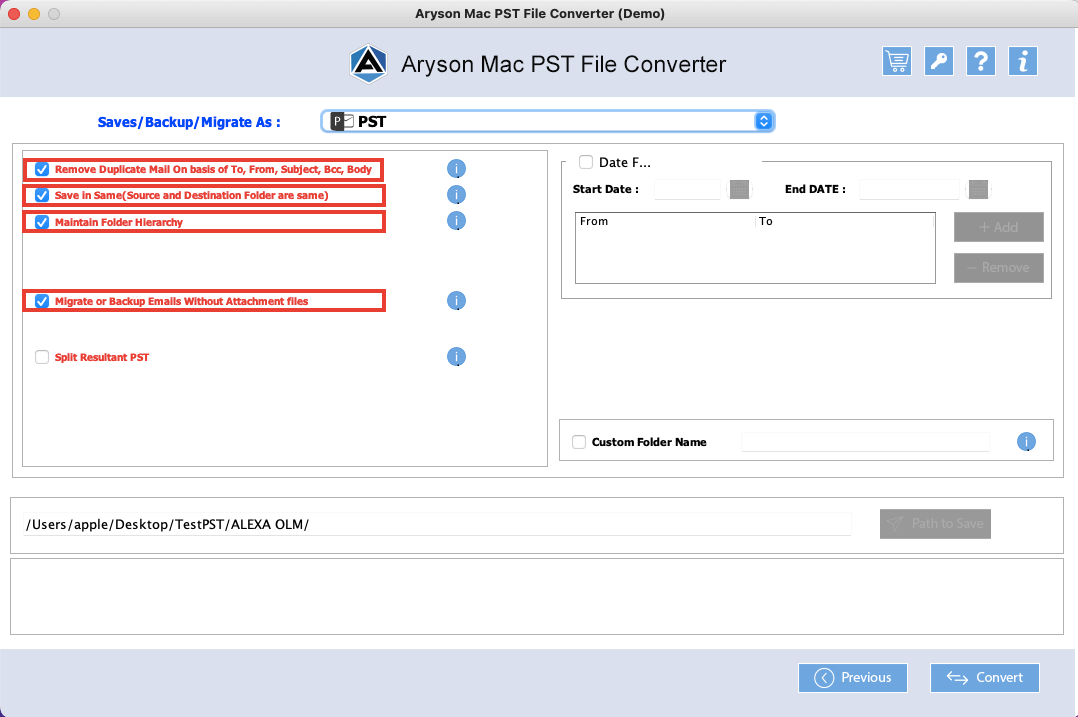
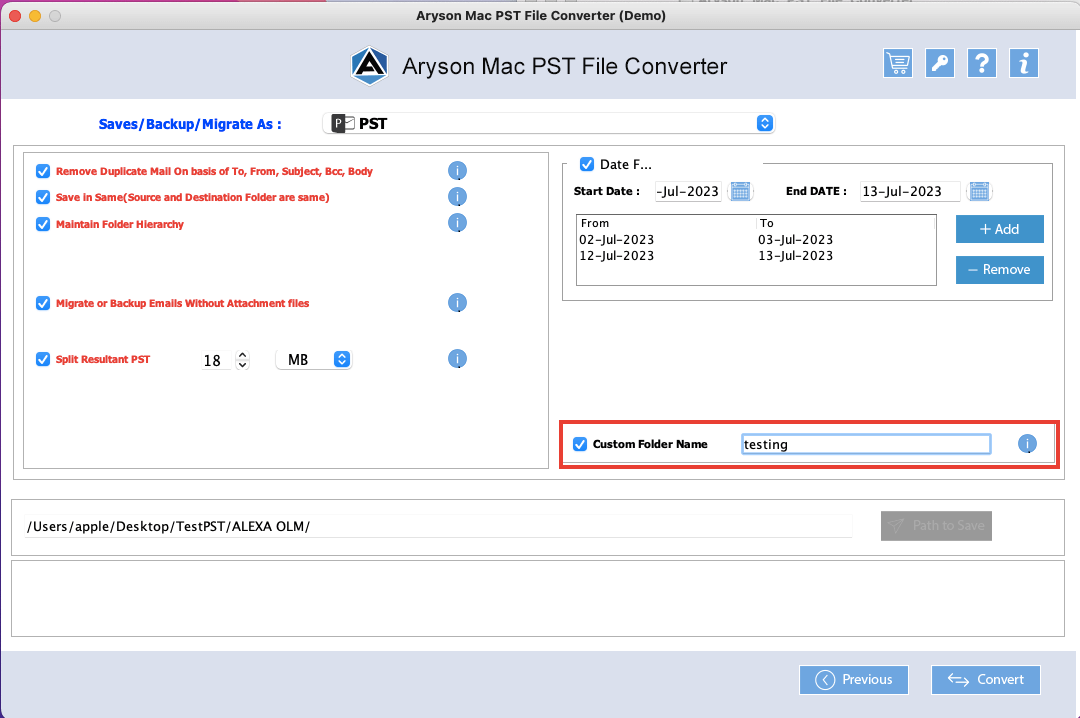
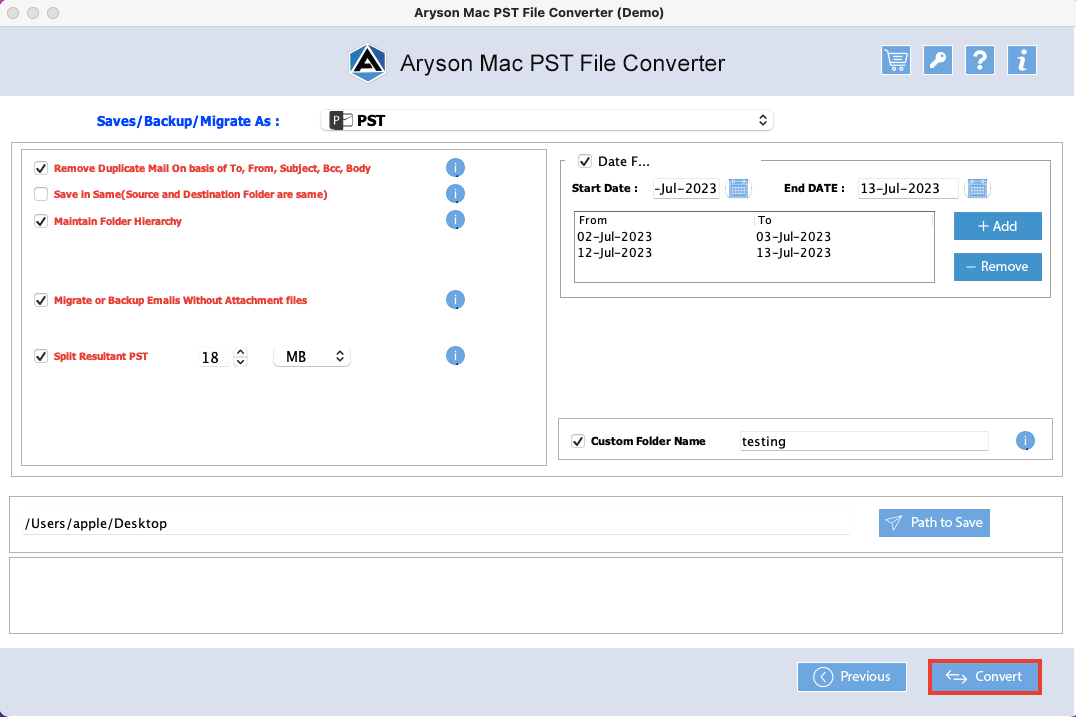
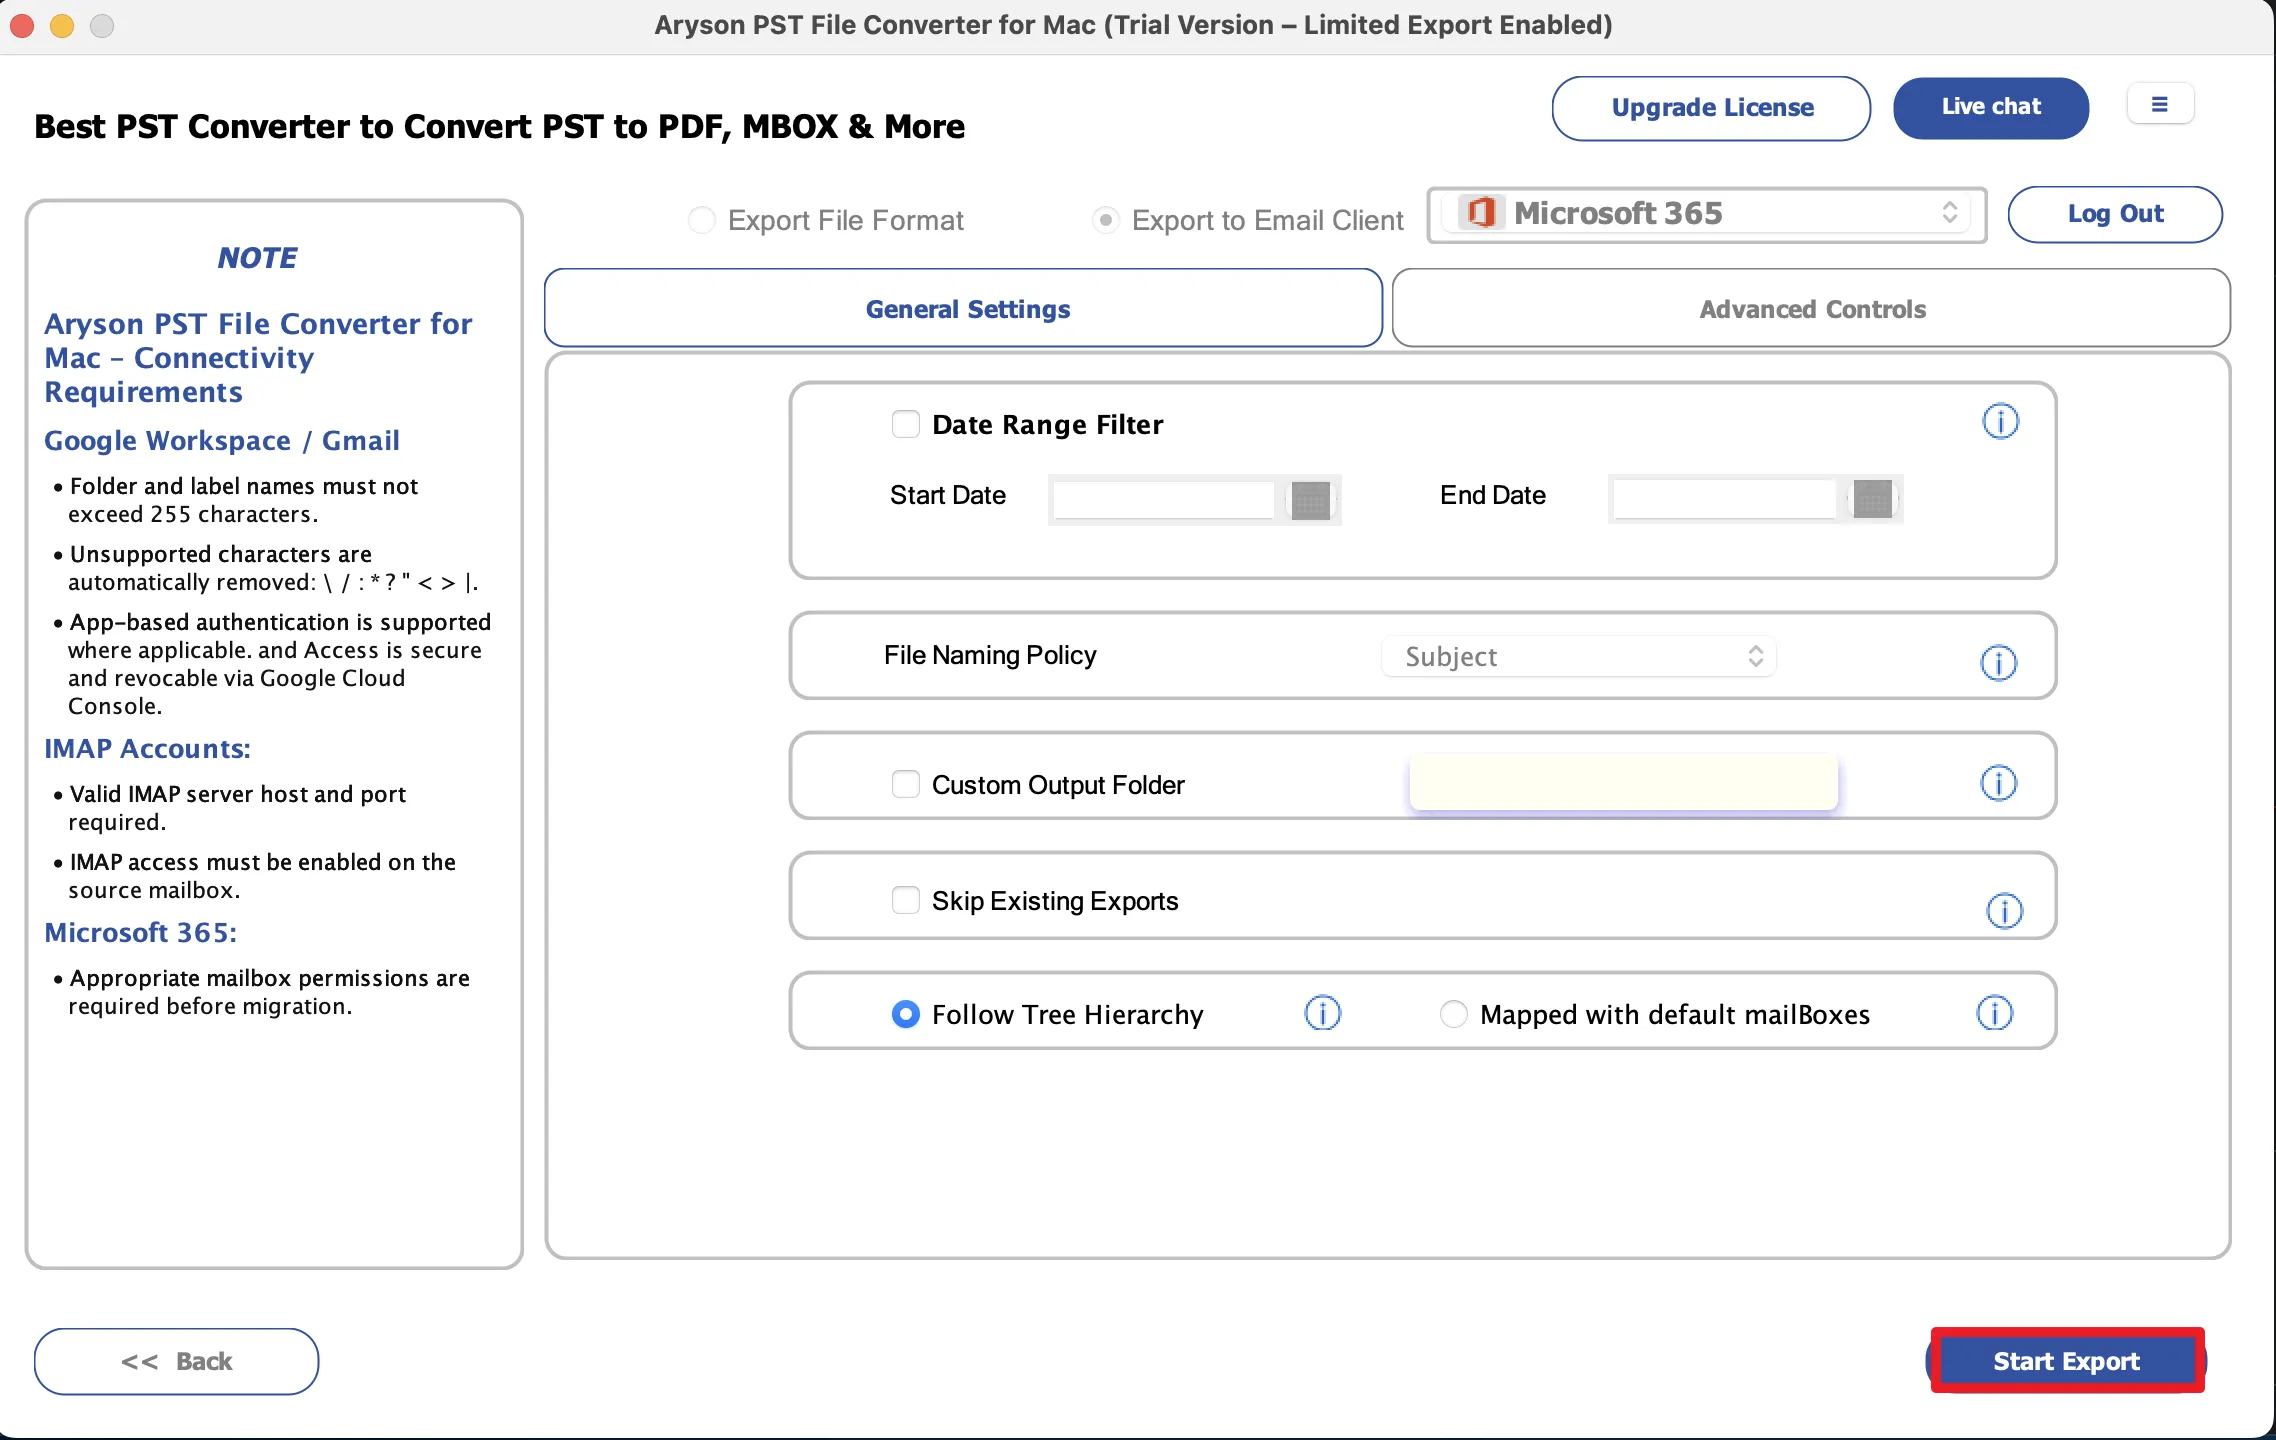
- Date Range Filter: Export only those emails that fall within a specified start and end date, helping reduce the size of the output and focus on relevant data.
- File Naming Policy: Rename exported files using predefined patterns such as Subject, Date, Sender, or combinations of multiple attributes for easier file management.
- Custom Output Folder: Specify a custom folder name and destination path where the converted files will be stored for better organization.
- Skip Existing Exports: Skips items that have already been exported in previous sessions, preventing duplicate exports and saving processing time.

- Attachment Handling: Choose whether to keep attachments embedded within emails, save them separately, or exclude them entirely from the export.
- Duplicate Detection: Identify and remove duplicate emails based on selected criteria such as To, From, Subject, Body, and CC fields to ensure a clean and optimized output.
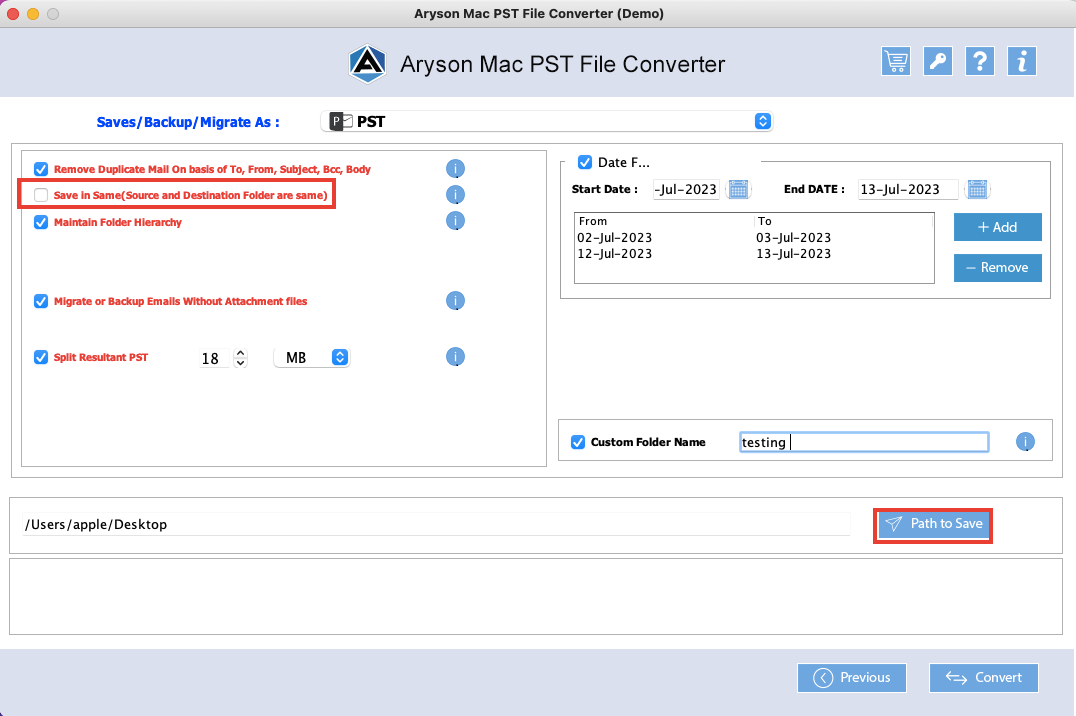
Step 12: Click on the Browse button to provide the destination path of the resultant files.
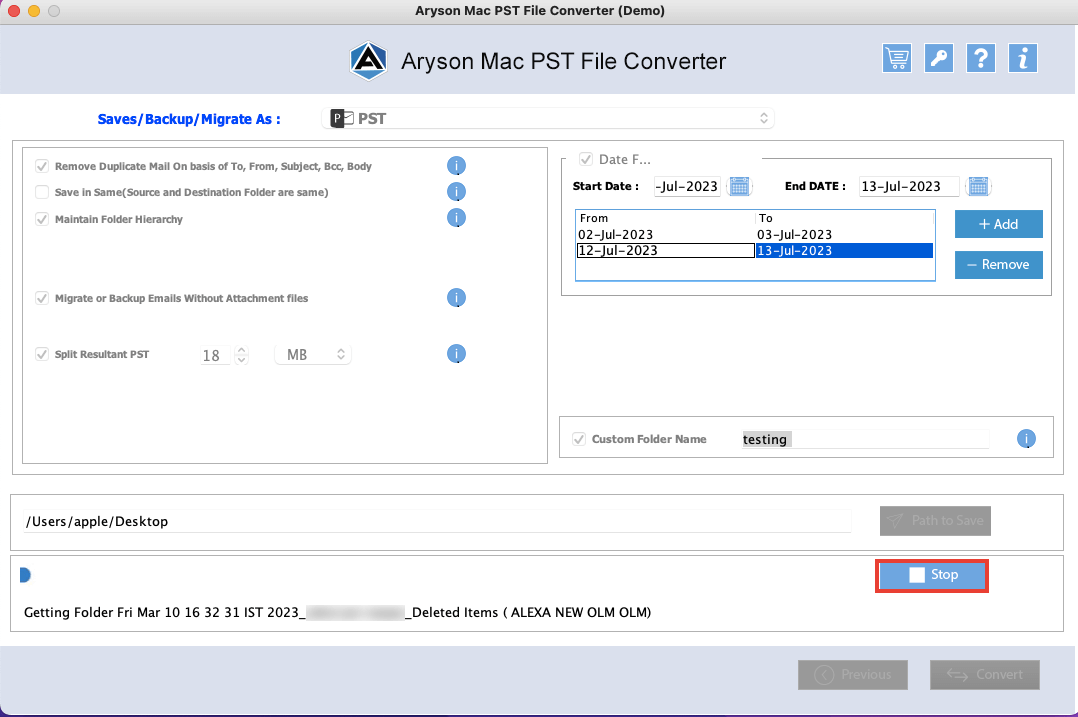
Step 13: Click on the Start Export button to begin the conversion process.
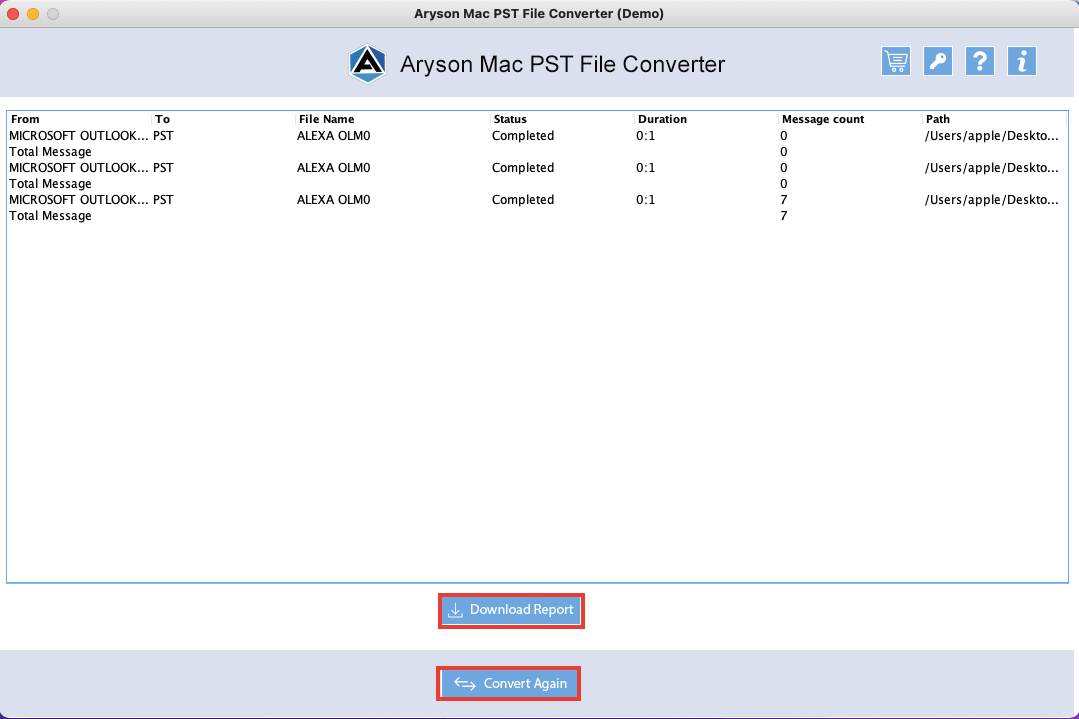
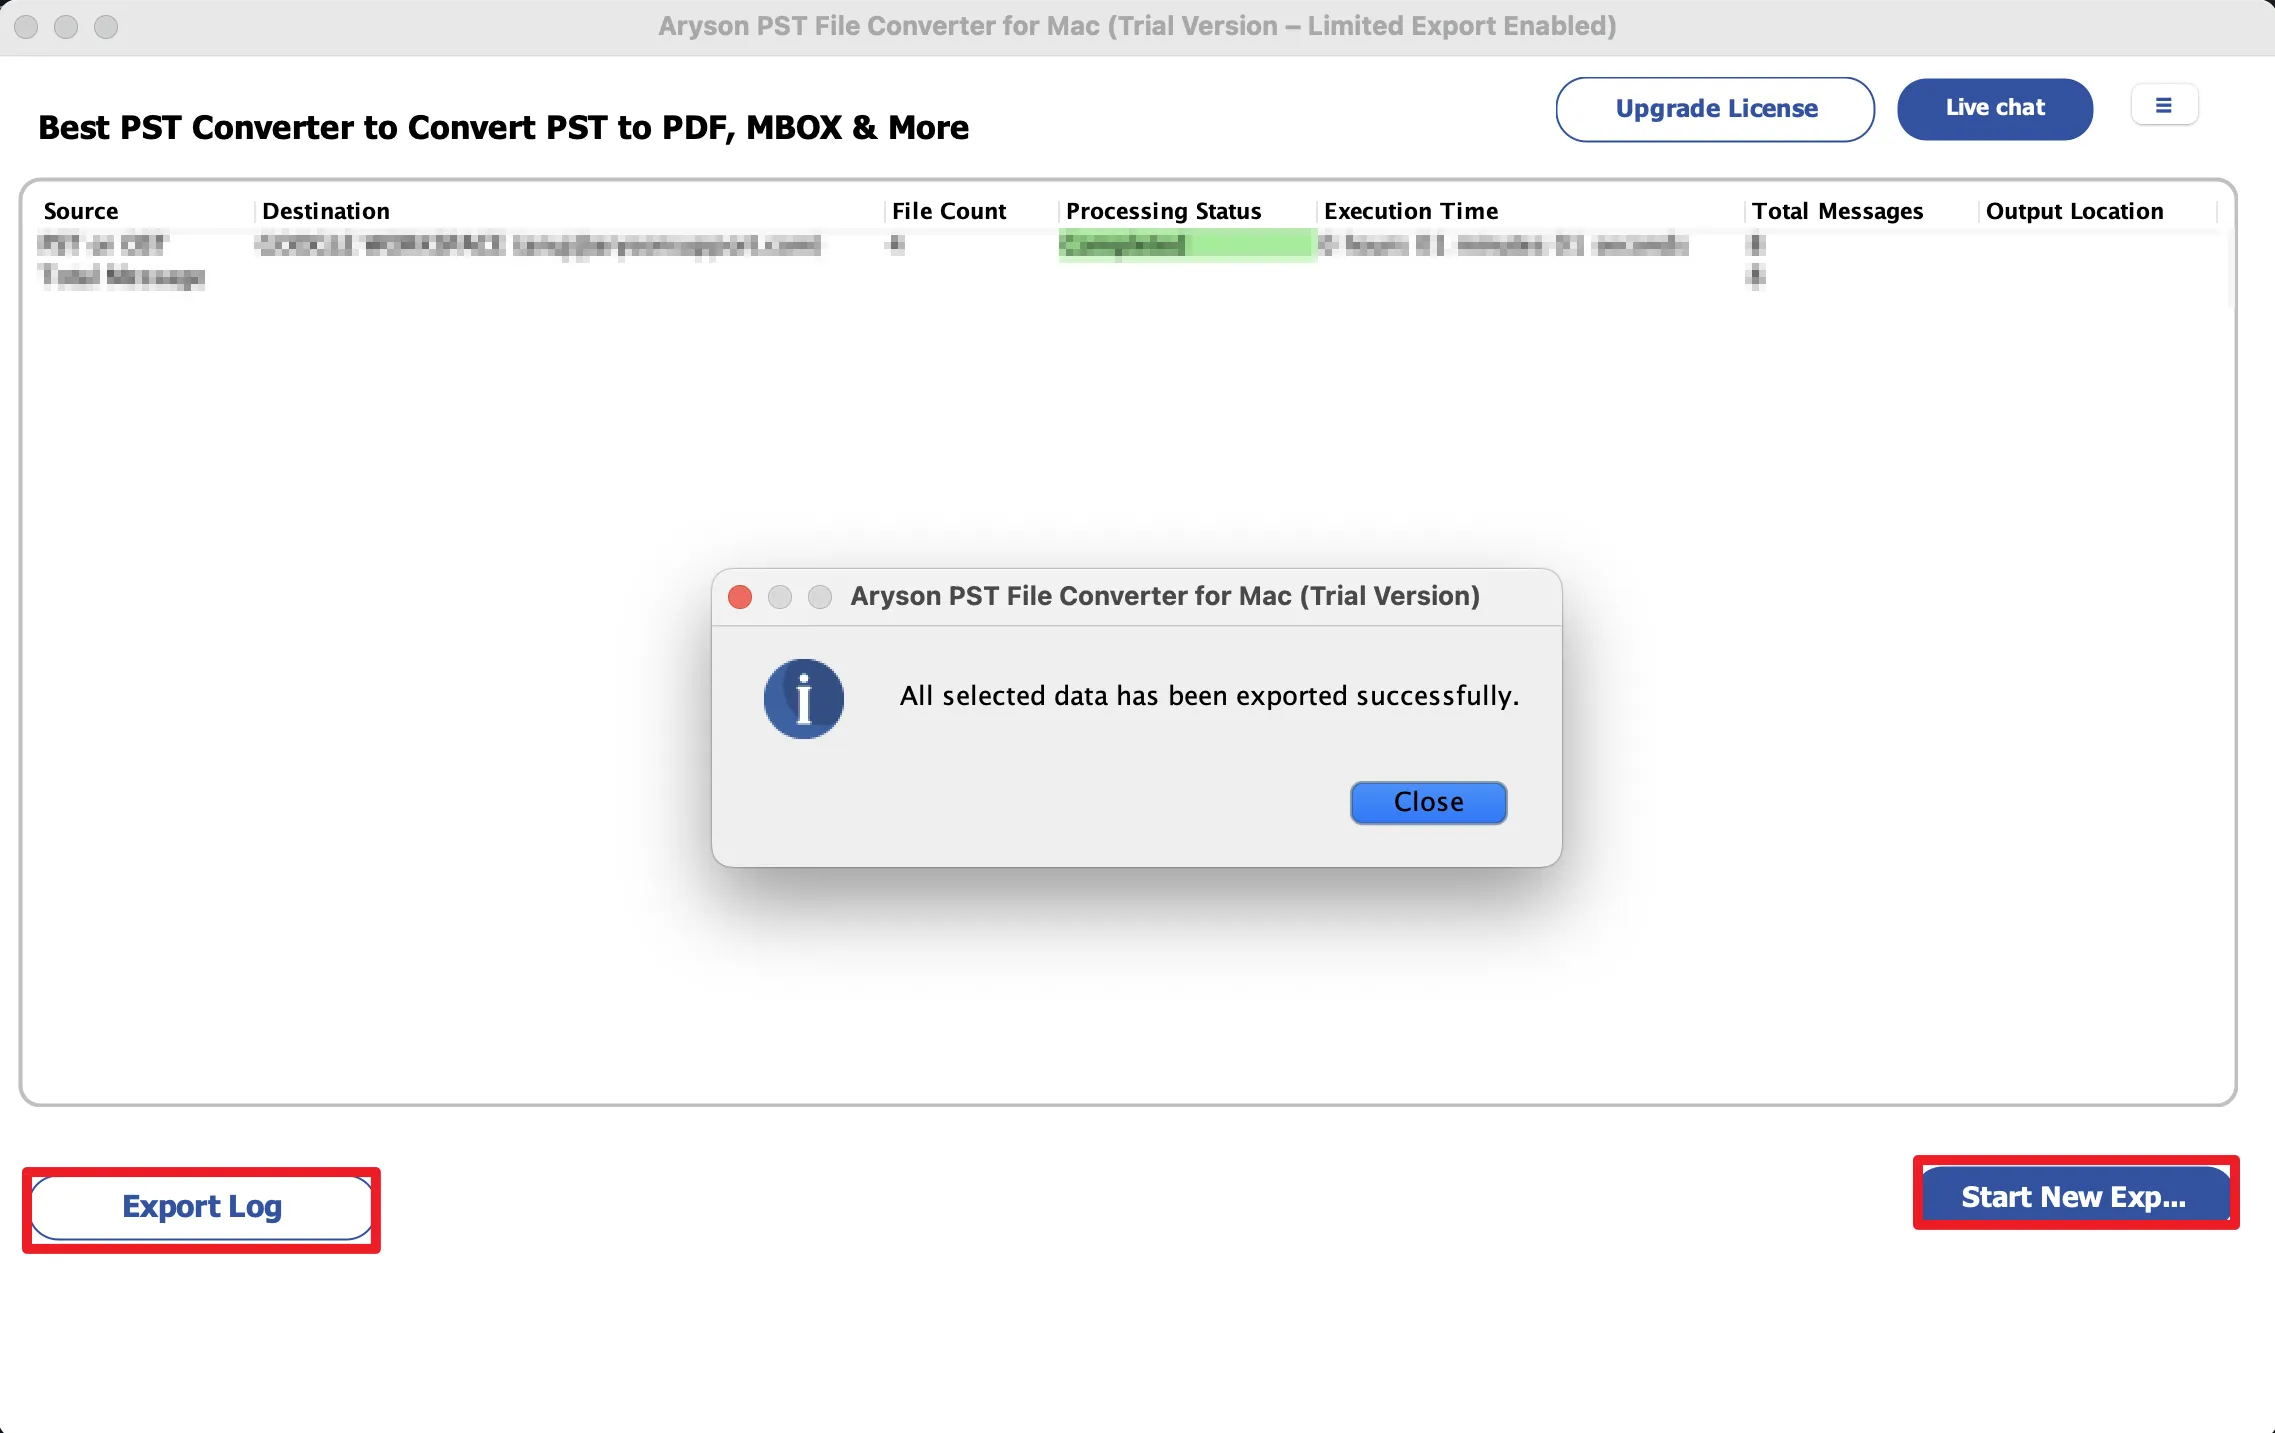
Step 14: After completion, the software displays Source, Destination, File Count, Processing Status, Execution Time, Total Messages, and Output Location.
Step 15: After conversion, details
- Start New Export: Start another conversion
- Export Log: Save the conversion report in CSV format.
Step 1: Download and install the Aryson Mac PST Converter on your Mac system.
Step 2: Run it as administrator and activate it using the license key (or continue with the demo version ).
Step 3: Choose how you want to add the required PST/OST data into the software:
- Select Files: Press this button to add single or multiple PST/OST files.
- Select Folder: Use it to add an entire folder that contains PST/OST files.
- Remove Selected: Delete selected PST/OST files from the list.
- Clear List: Clear all added PST/OST files.
- Proceed: Click on the Proceed button to proceed further.
- Drag-and-drop functionality: The user may add the required PST/OST files using the drag-and-drop features of the software.

Step 4: Browse your system, select the required PST or OST file/folder, and click "Open" to load it into the software.
Step 5: The software will automatically detect the corrupted, blank, and invalid PST/OST files, display a warning panel, and skip these files during the conversion.
Step 6: The software displays all added PST/OST files in a tabular view showing details such as S. No., File Name, File Path, and Size/Number of Files. Review the loaded files, select the required items if needed, and click Proceed to continue the conversion process.
Step 7: Now, an advanced preview panel will appear. Expand the tree-like hierarchy of the selected files and folders.
Step 8: Preview the emails and their associated attachments. The preview panel displays:
- From: Displays the sender’s email address and information for the selected email.
- To: Shows the recipient’s email address to whom the message was sent.
- Subject: Indicates the subject line of the selected email.
Step 9: You may use the other options for better filtering of PST/OST data.
- Search Folders: Find specific folders by entering keywords from the folder name.
- Advanced Search: Search emails using "To," "From," or "Subject" criteria of emails.
- Open in Browser: Opens the selected email in a web browser if the preview is not displayed properly in the software.
You can also preview emails in the following:
- HTML format: Displays the email with its original formatting, including fonts, colors, and images.
- Attachments: Click here to preview the attachments.
- Plain text: Shows the email content in simple text without any formatting.
- Headers: Display detailed technical header information of the email.
- MIME: Shows the MIME structure and encoding details of the message.
- Calendars: Displays the calendars' associated fields.
- Contacts: Shows the information like phone numbers, emails, etc.
- Tasks: Displays the fields like start date, end date, due date, and sensitivity.
- Notes: To preview the notes' content and their creation date.
- Raw HTML: Displays the original HTML source code of the email message.

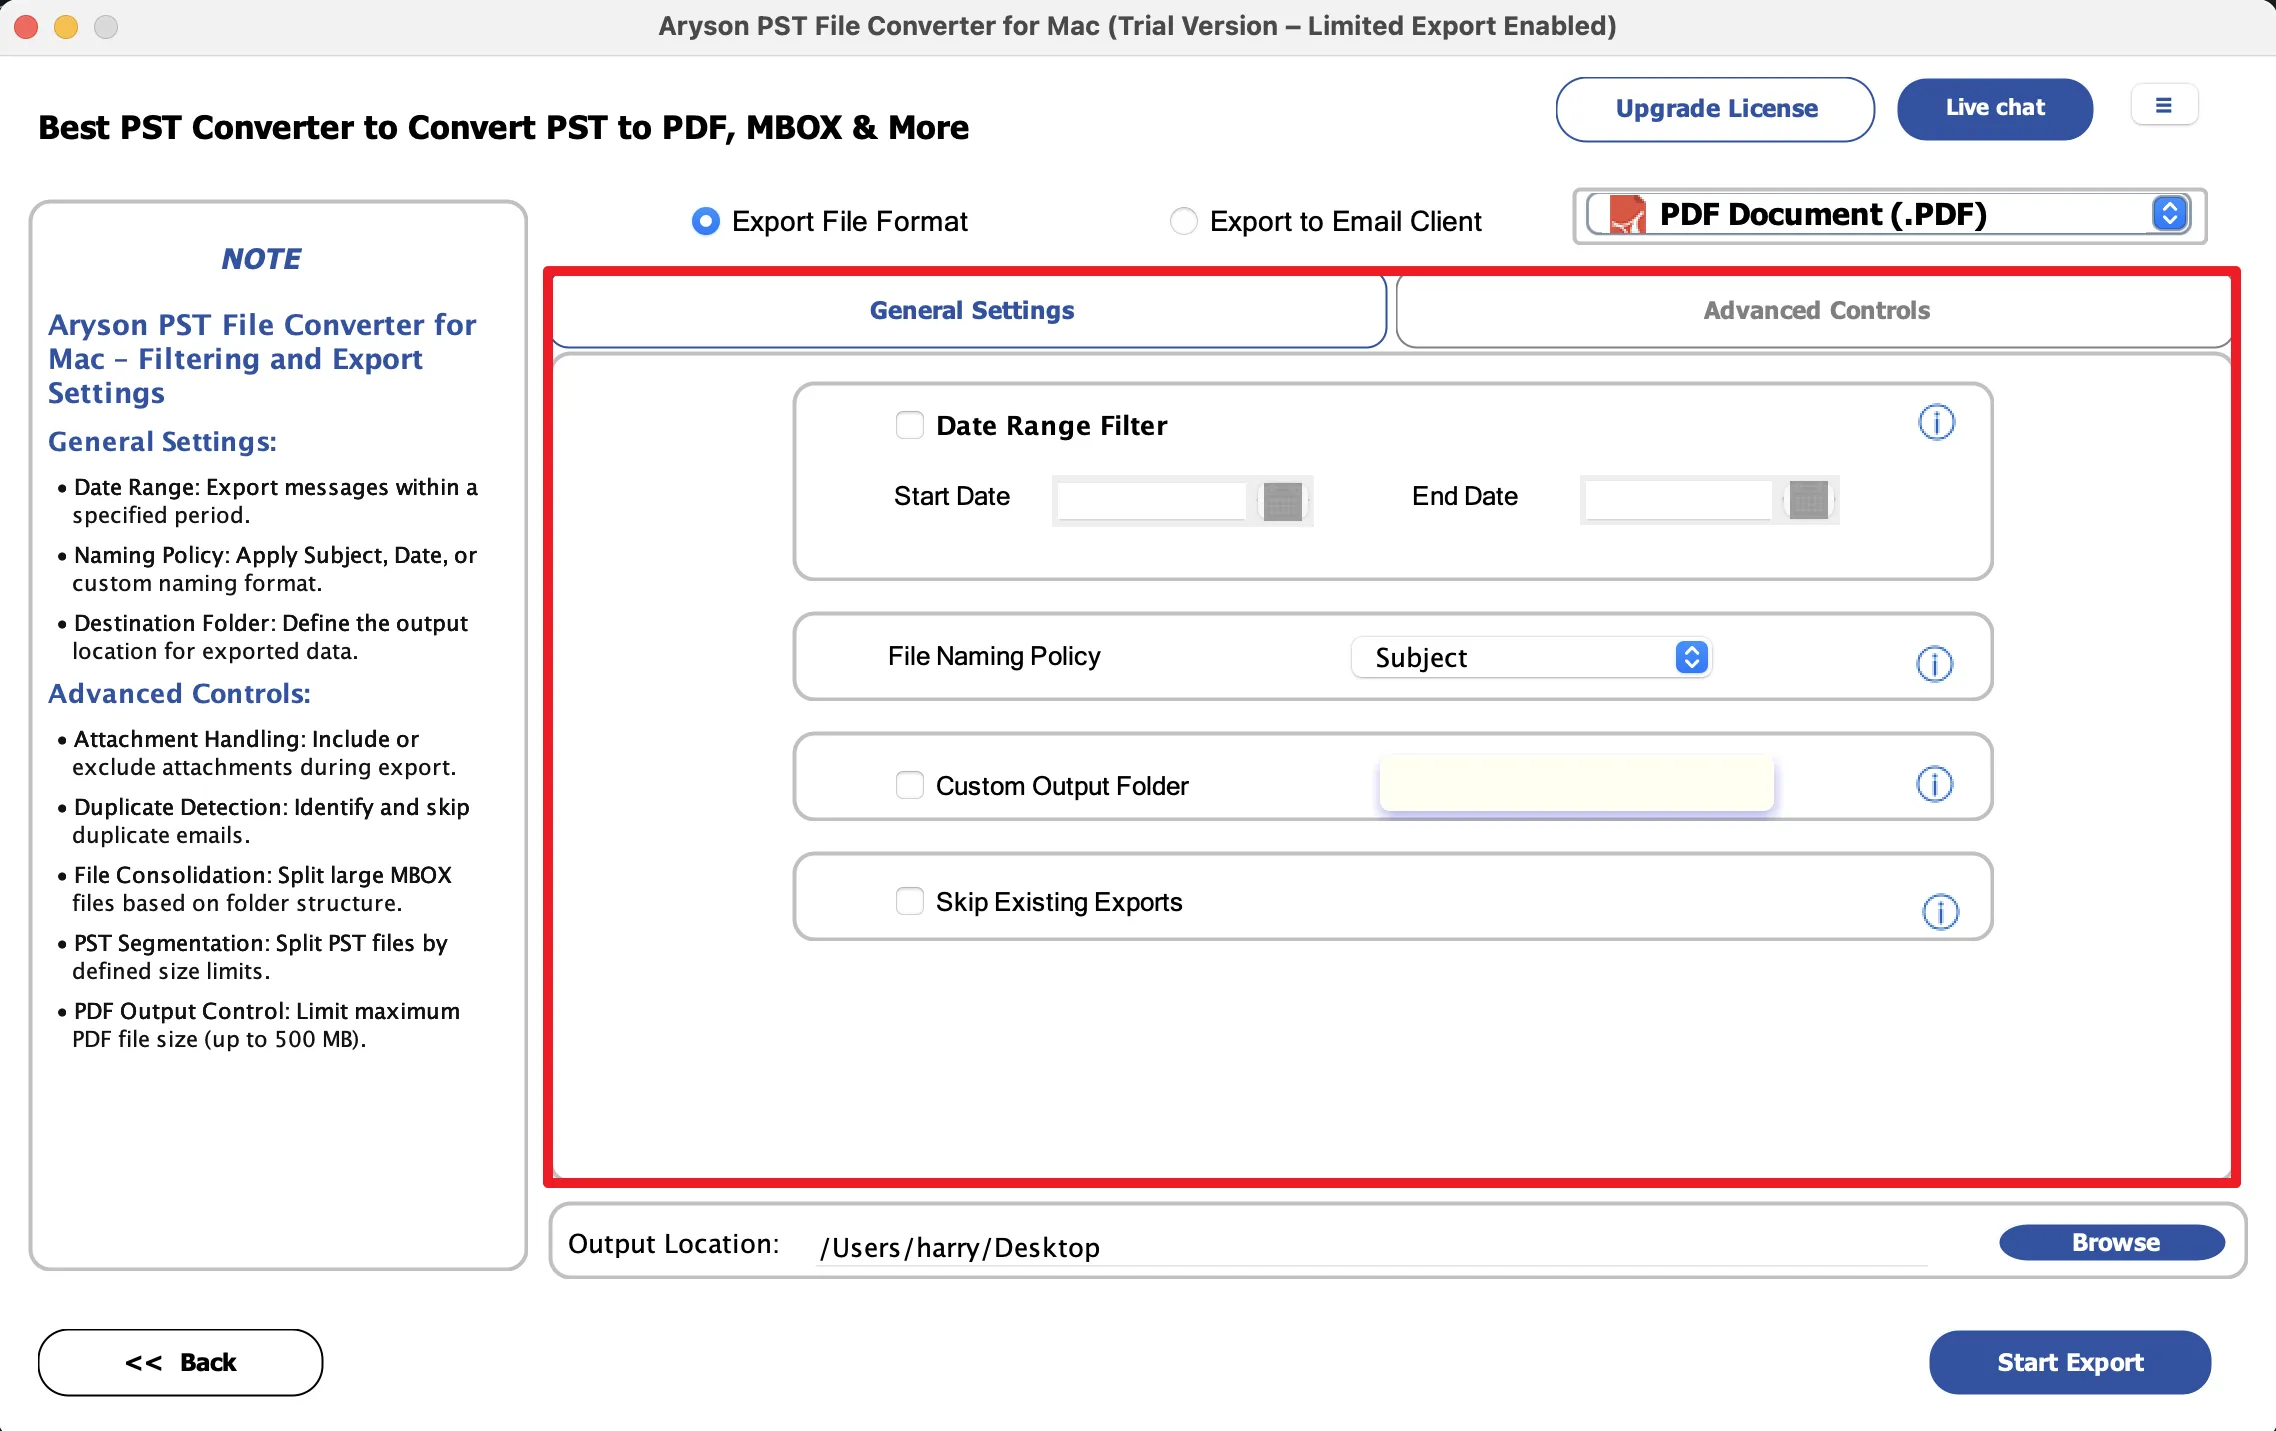
Step 10: Select PDF Document (.PDF) under the Export File Formats drop-down list.
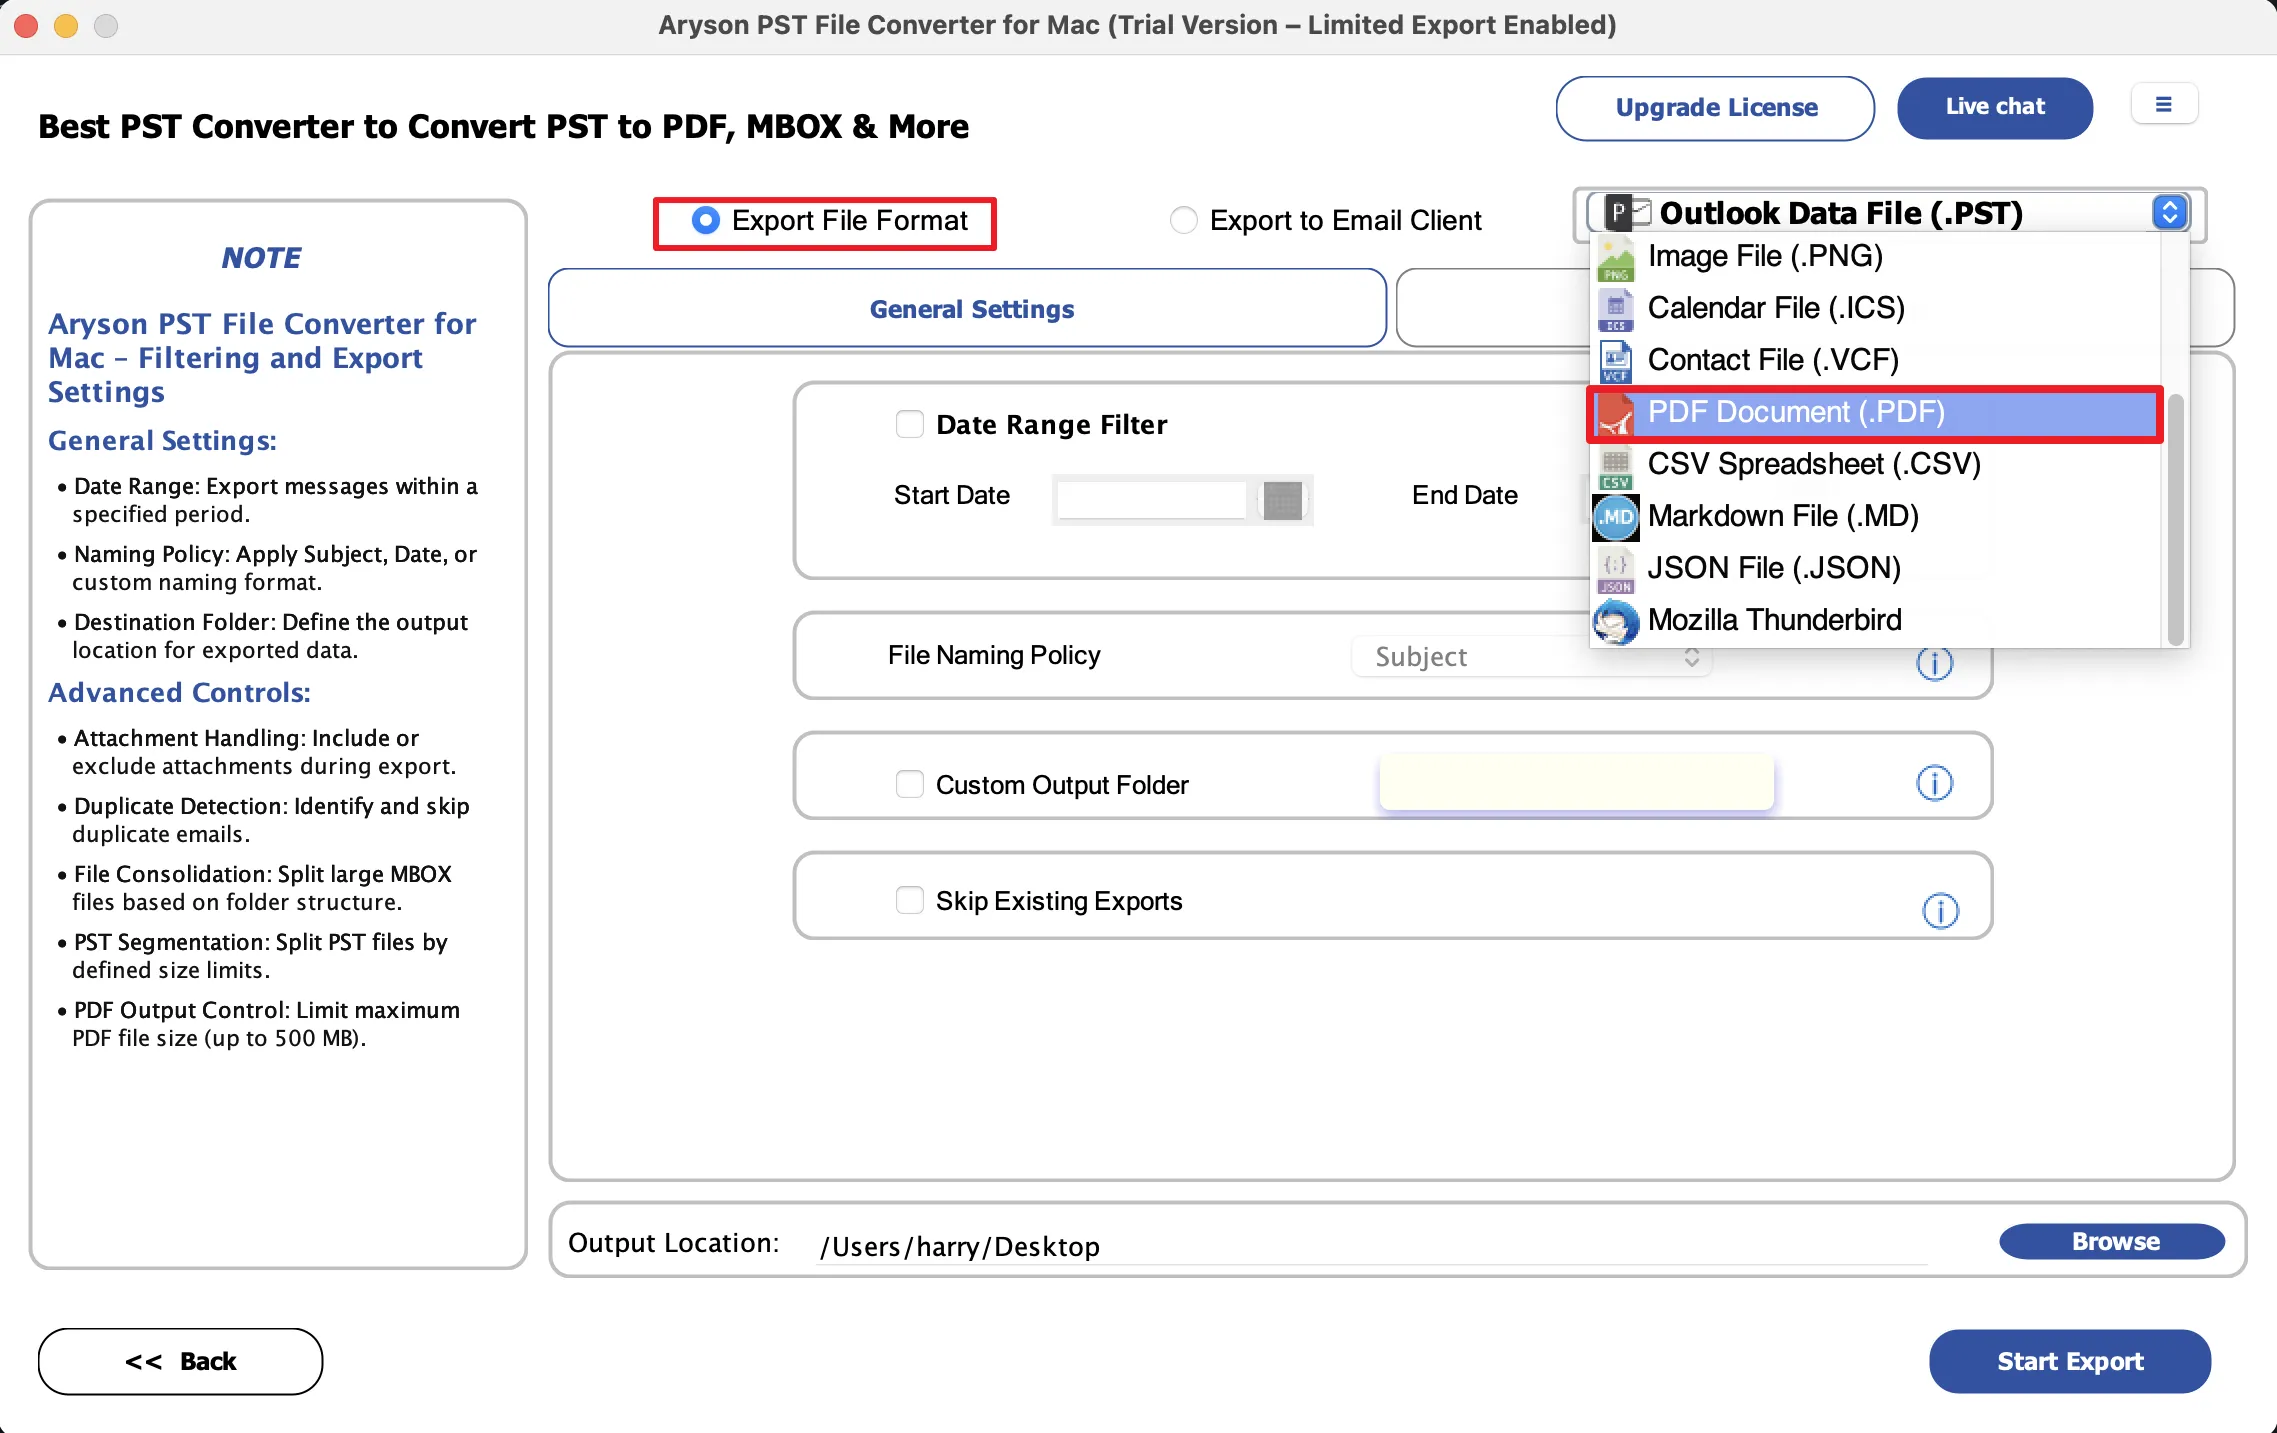
Step 11: Configure the advanced PDF export settings as needed:
- Date Range Filter: Export emails within a specified start and end date.
- File Naming Policy: Rename output PDF files using predefined naming conventions.
- Custom Output Folder: Specify a custom destination folder for saving the exported PDFs.
- Skip Existing Exports: Avoid re-exporting emails that have already been converted.
- Attachment Handling: Export attachments separately, merge them with the PDF, or exclude them from the output.
- Duplicate Detection: Identify and remove duplicate emails based on fields such as To, From, Subject, Body, and CC.
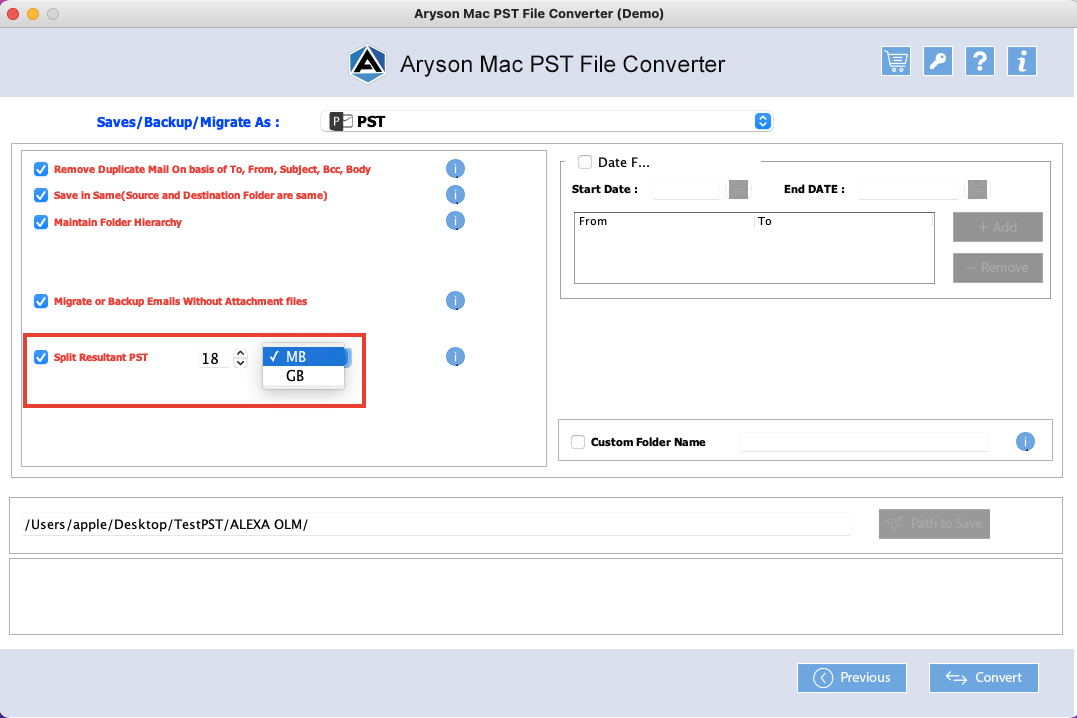
- PDF Size Restriction: Set a maximum PDF file size to split large PDF outputs into smaller files.
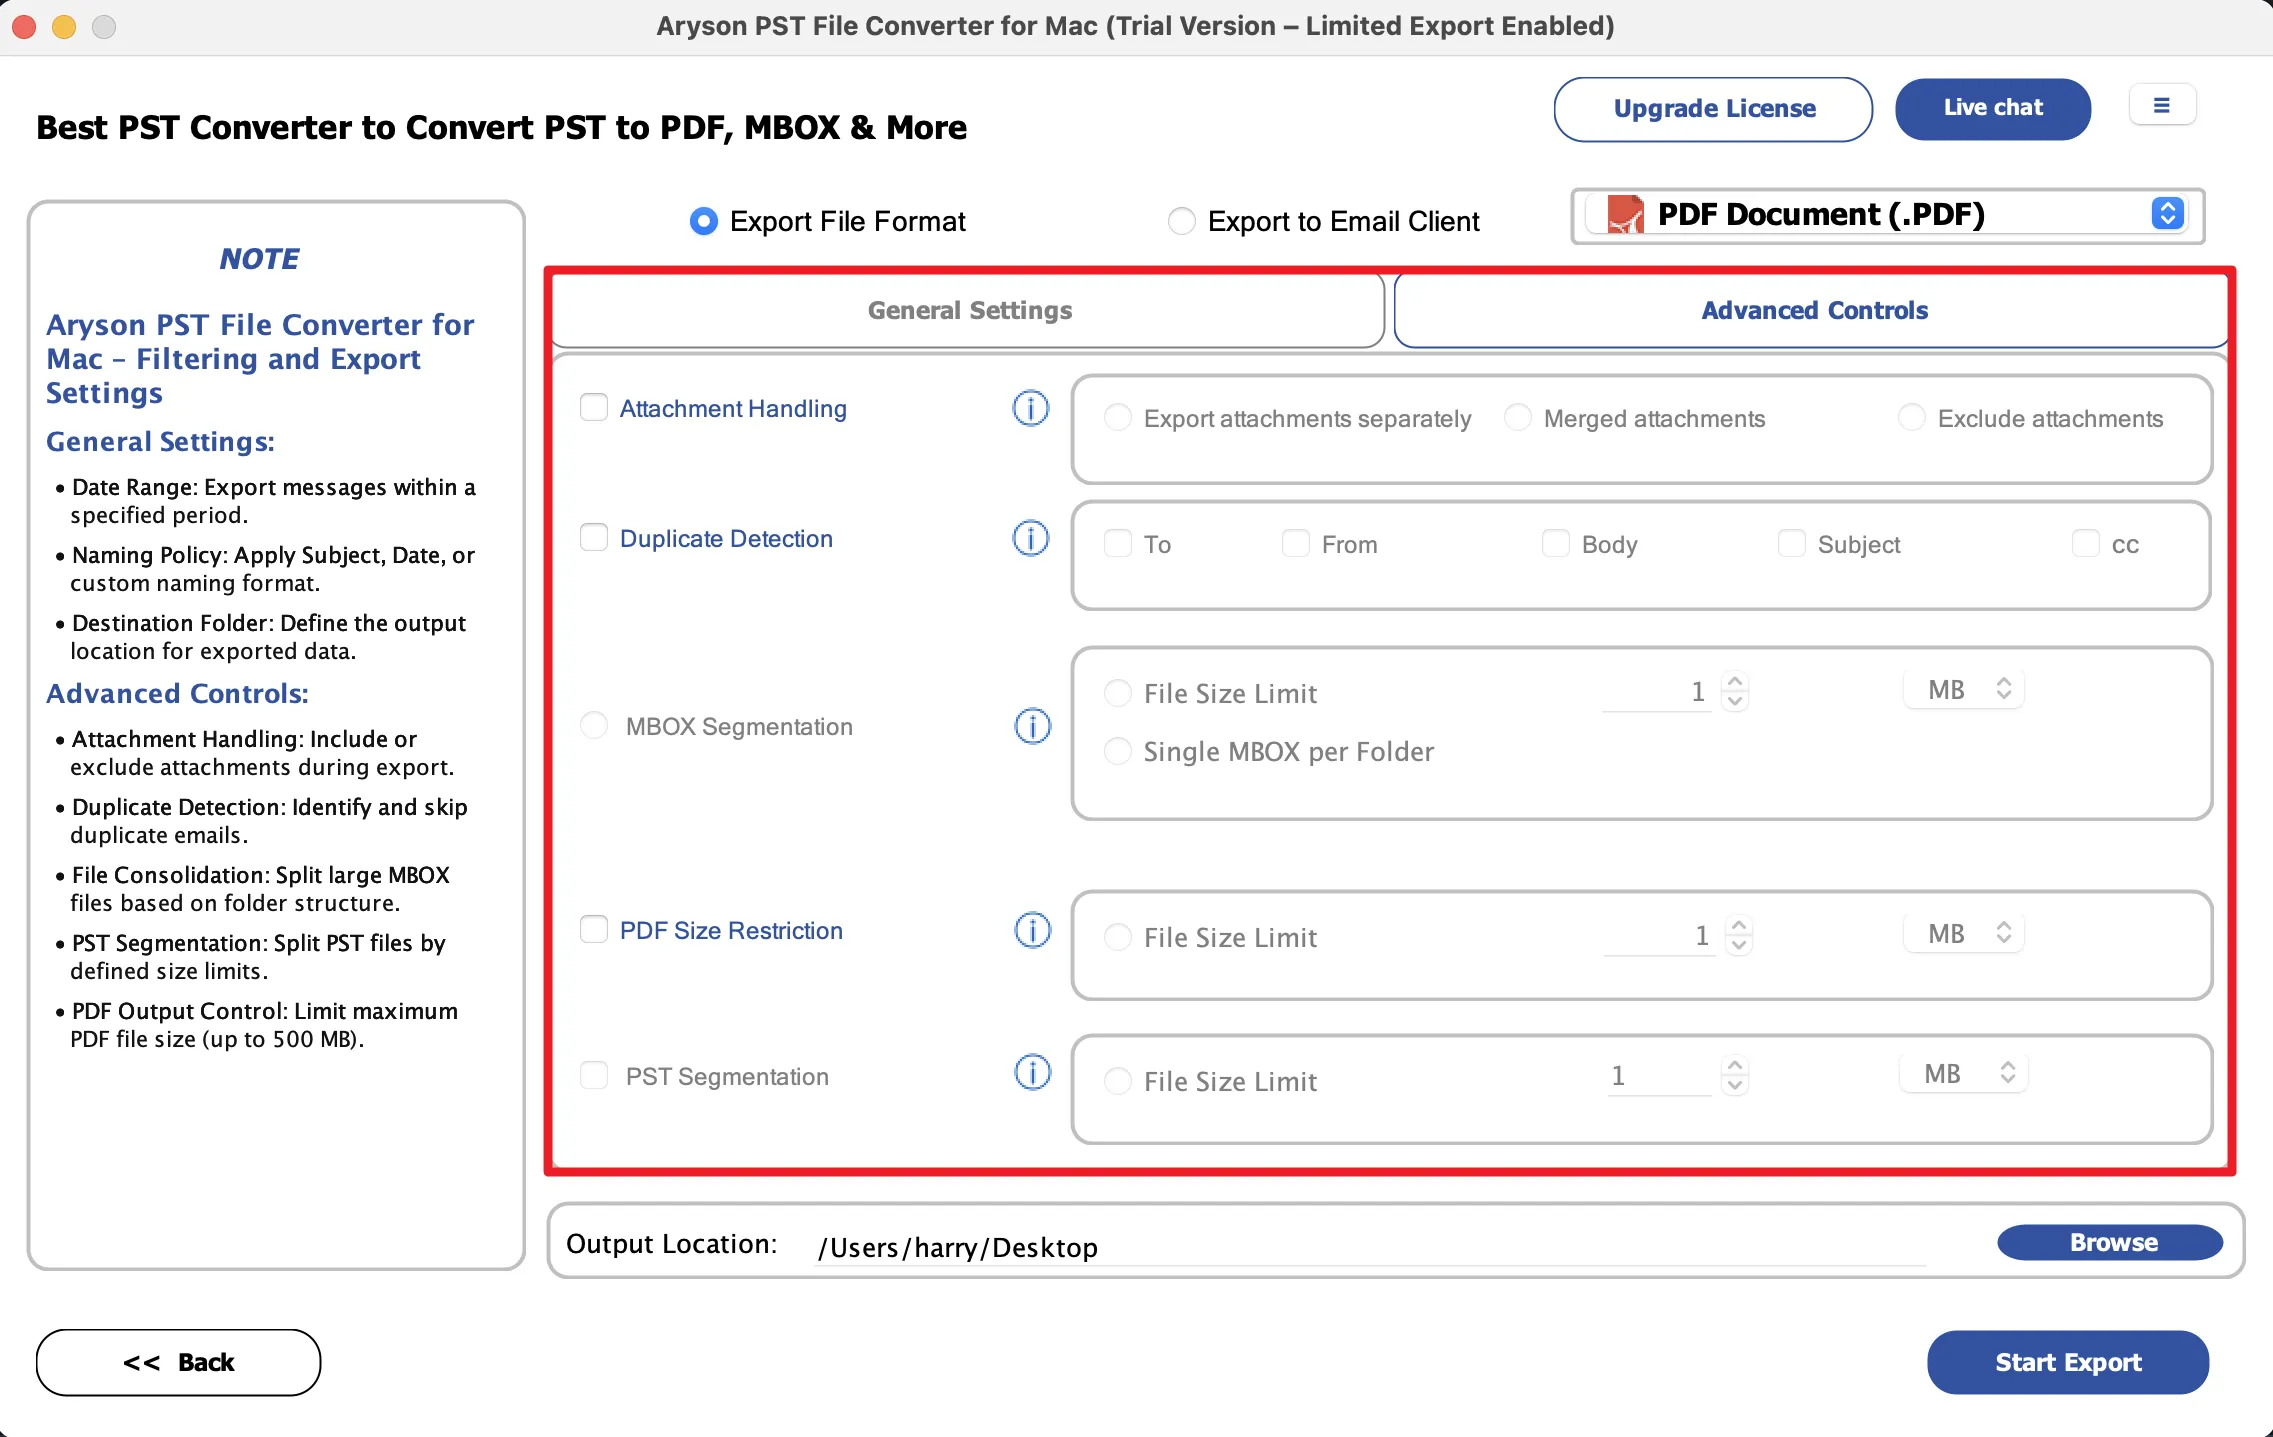
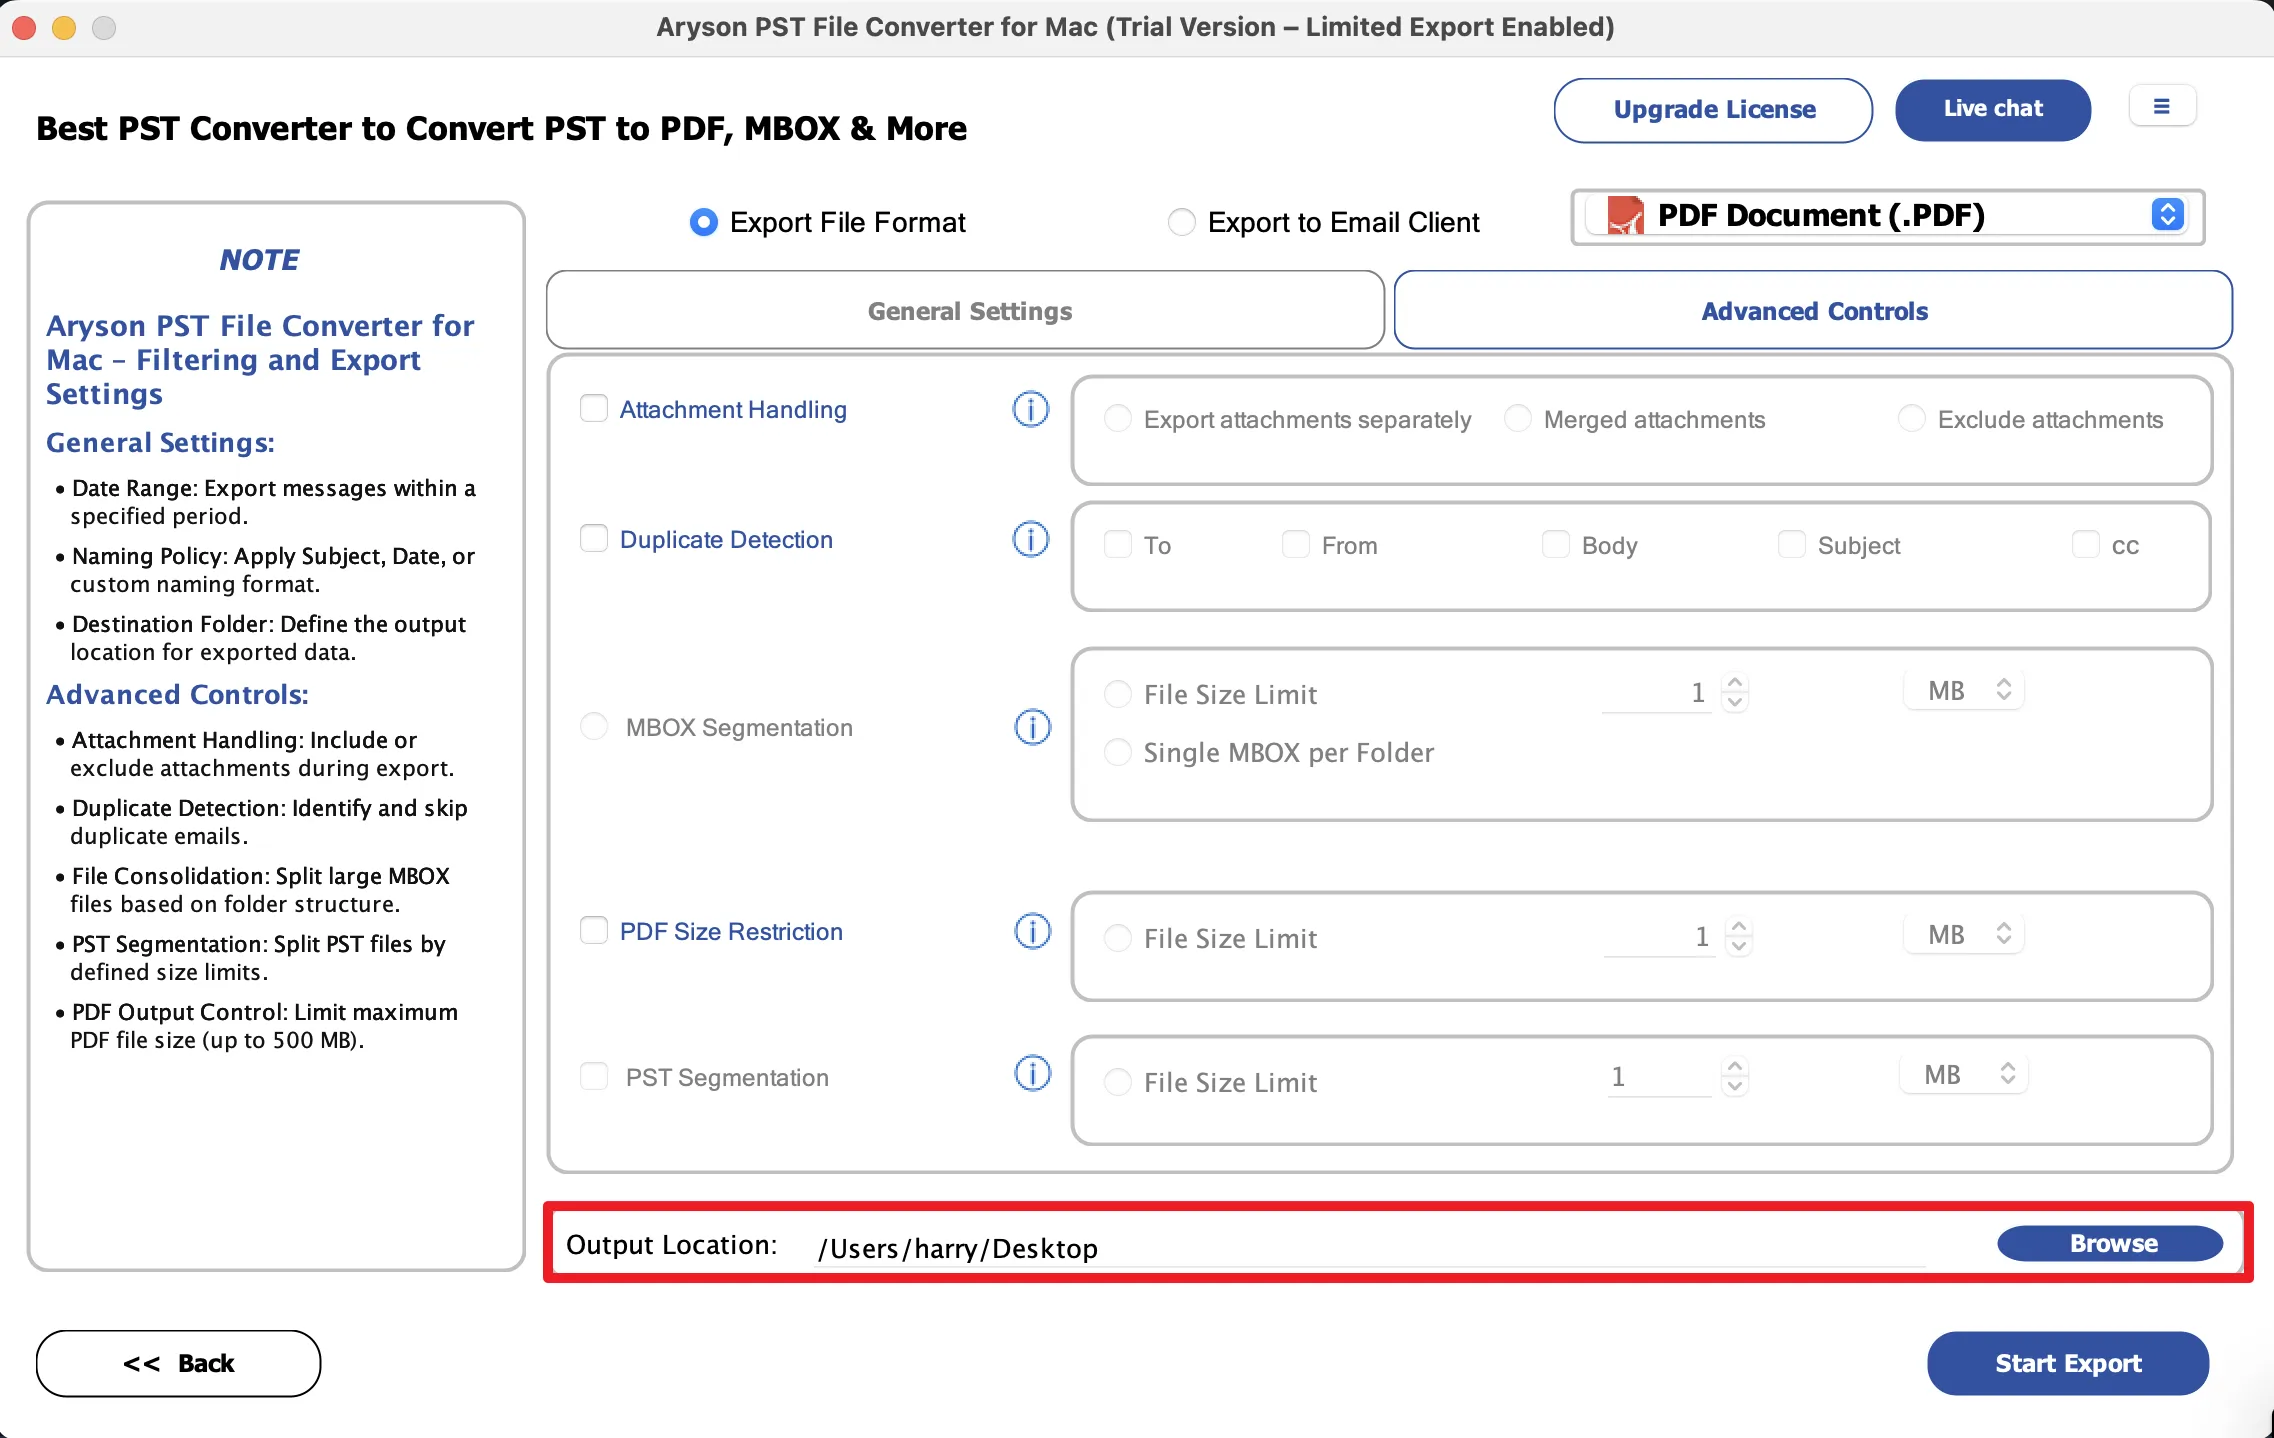
Step 12: Click on the Browse button to provide the destination path of the resultant files.
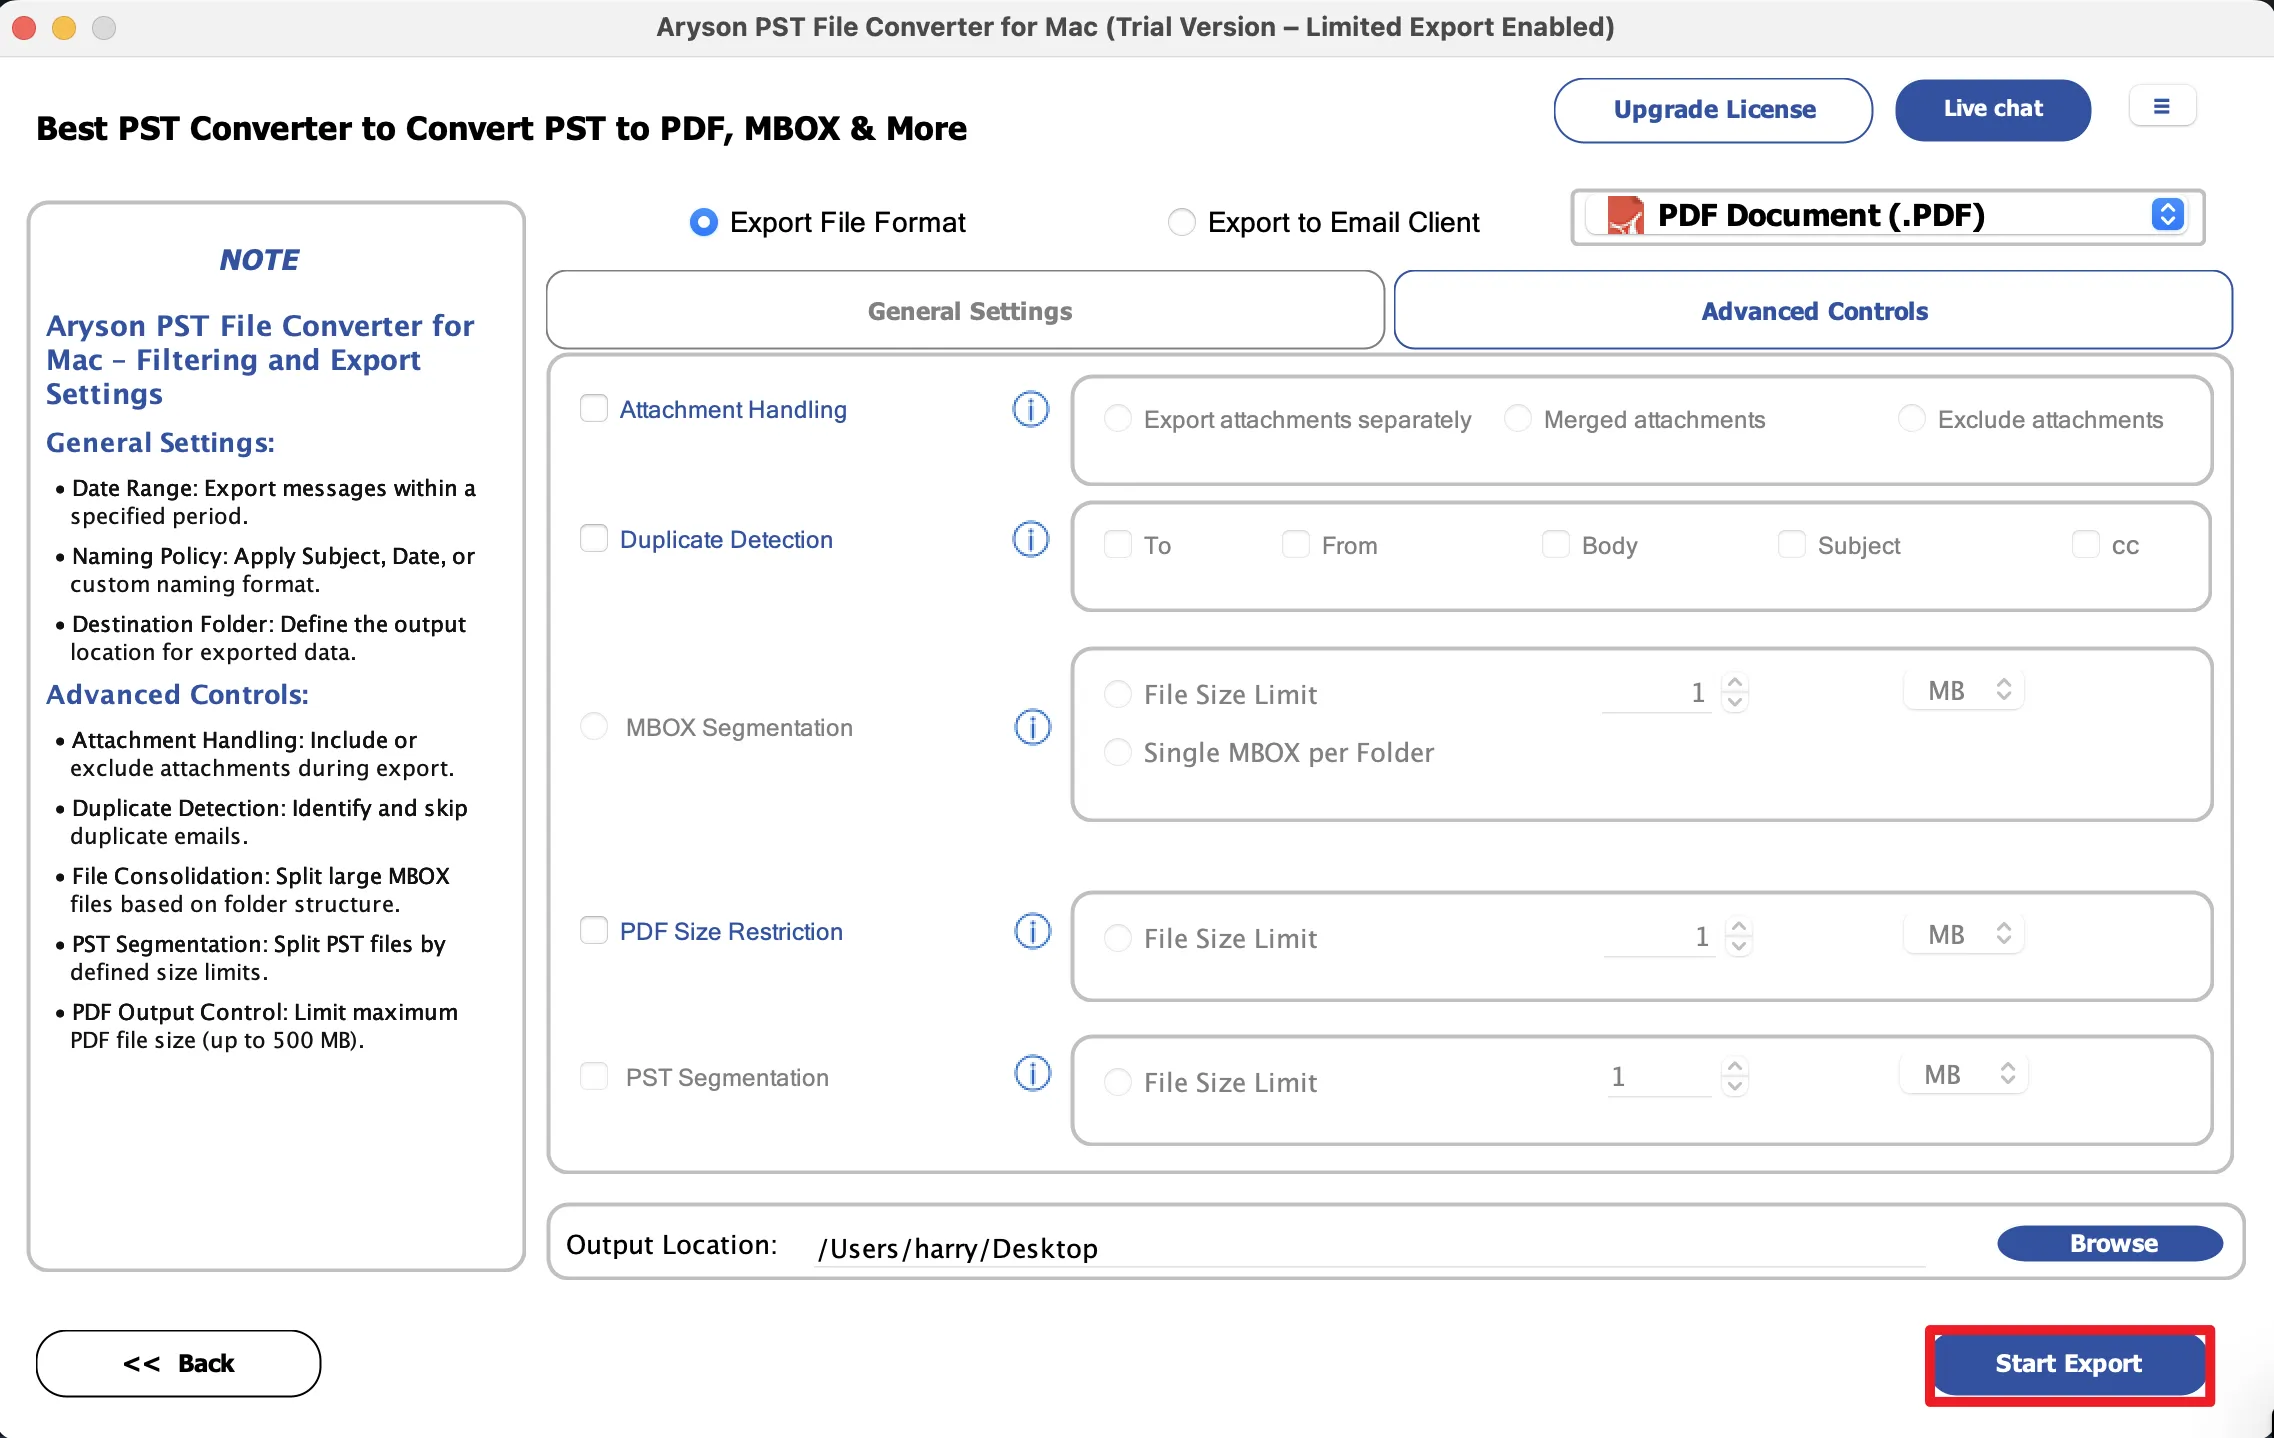
Step 13: Click on the Start Export button to begin the conversion process.
Step 14: After completion, the software displays Source, Destination, File Count, Processing Status, Execution Time, Total Messages, and Output Location.
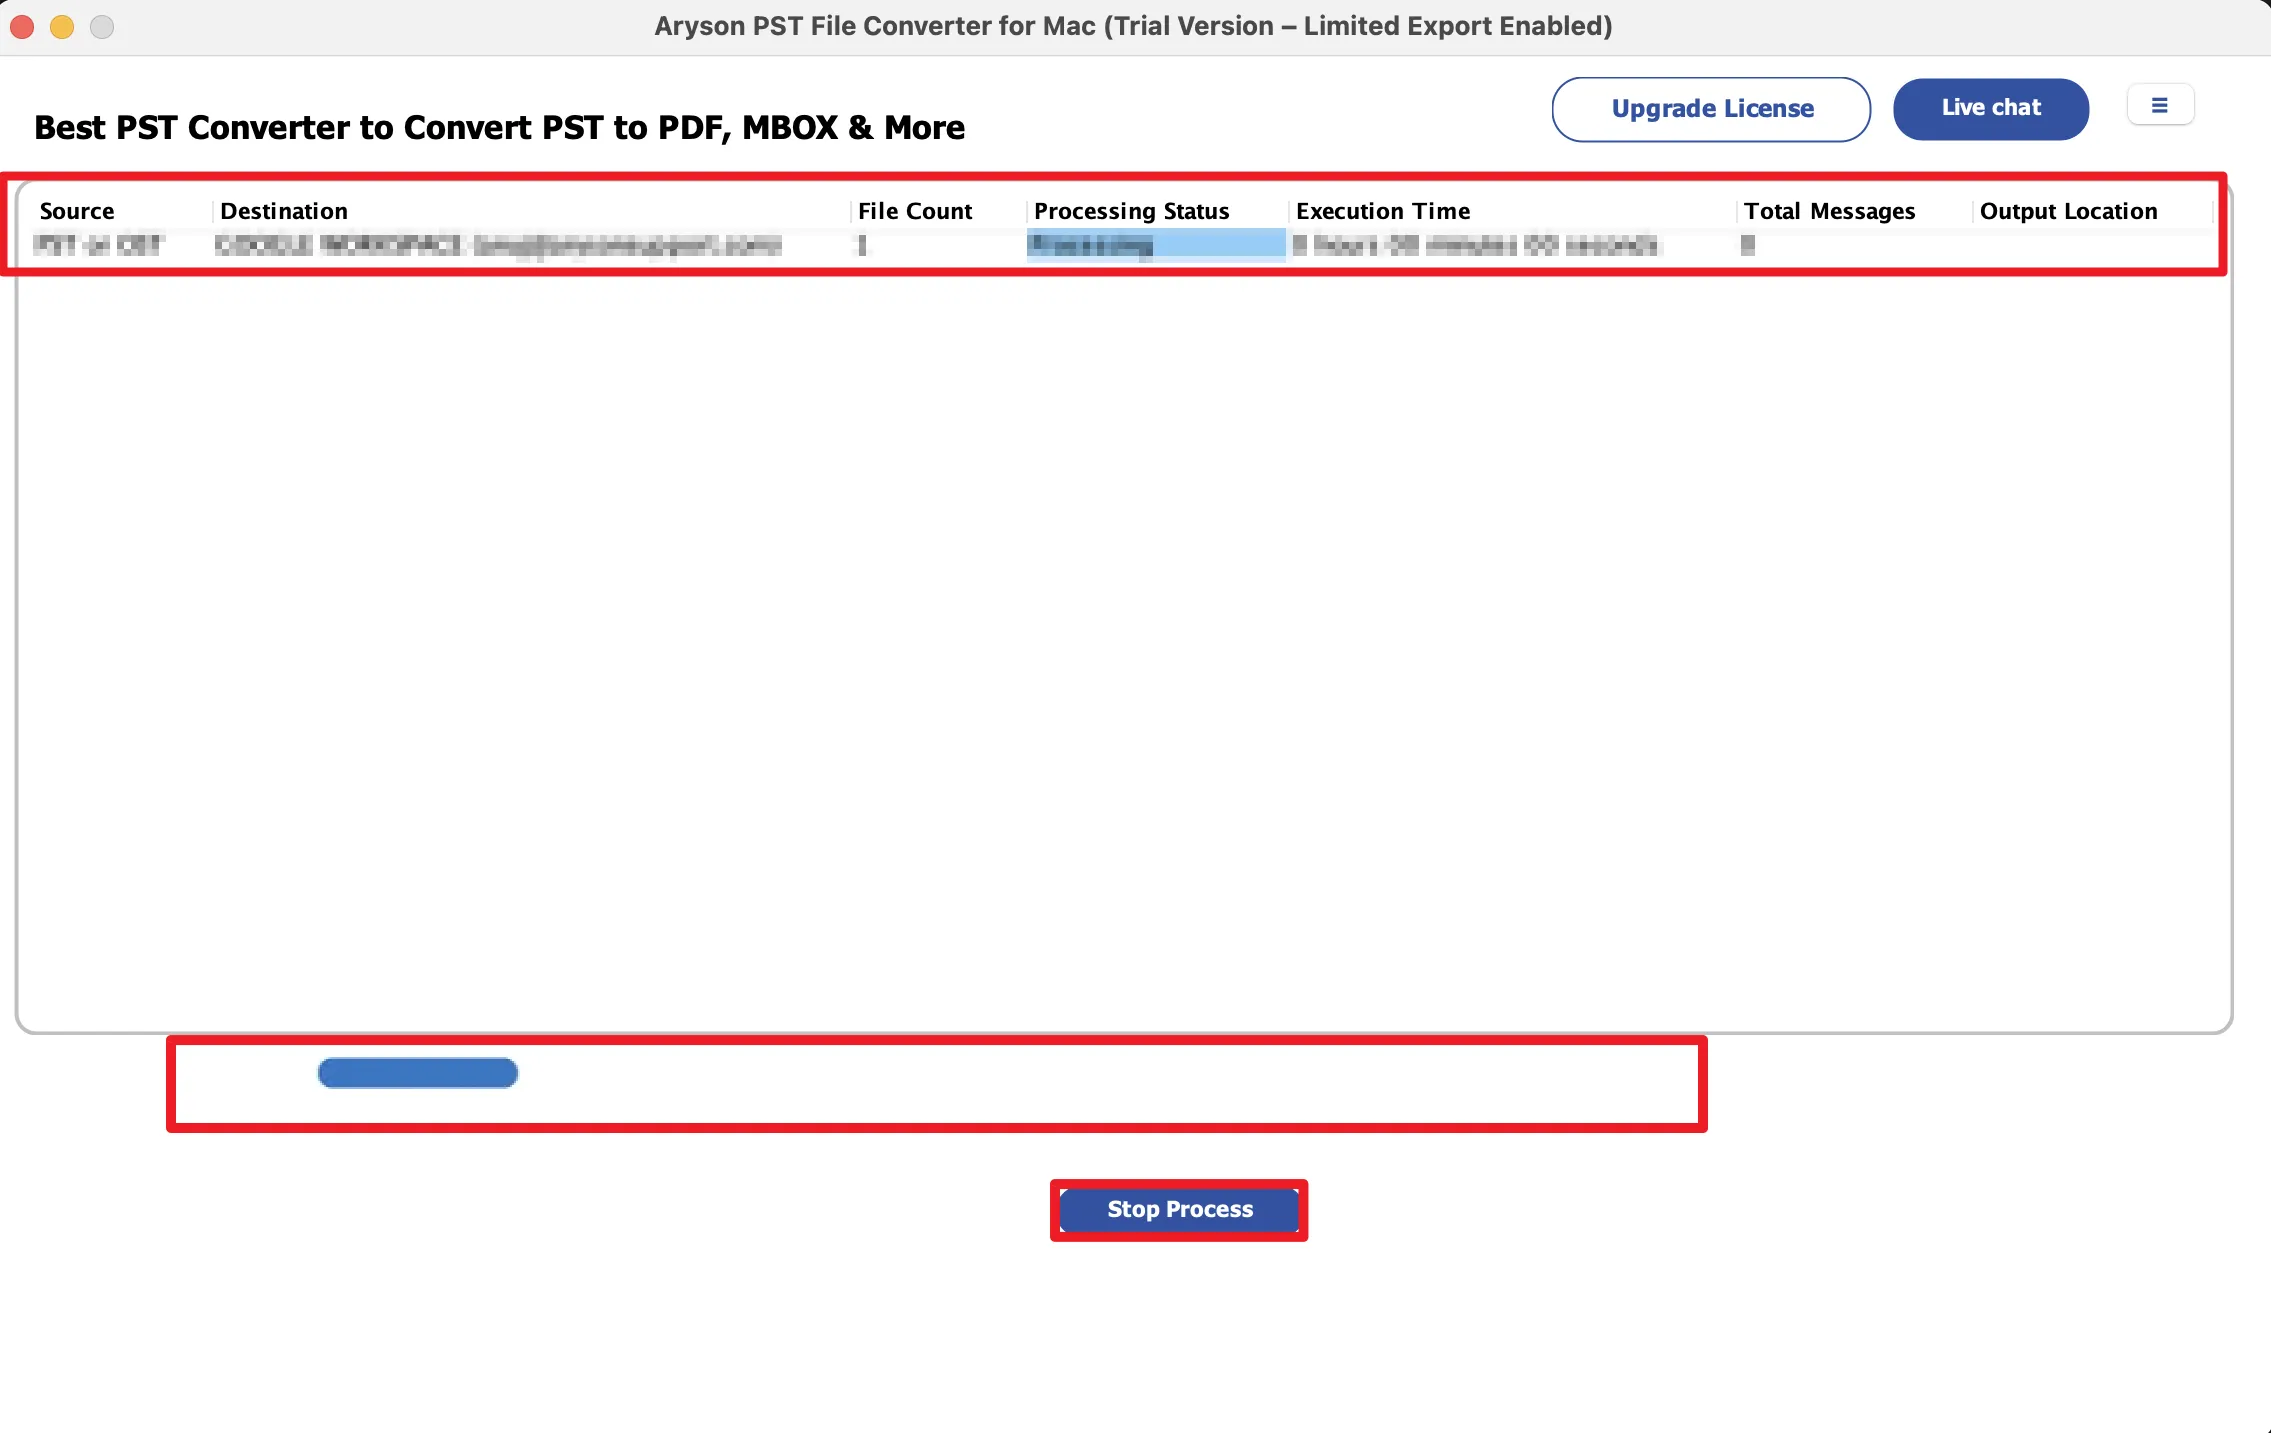
Step 15: After conversion, details
- Start New Export: Start another conversion
- Export Log: Save the conversion report in CSV format.
Step 1: Download and install the Aryson Mac PST Converter on your Mac system.

Step 2: Run it as administrator and activate it using the license key (or continue with the demo version ).
Step 3: Choose how you want to add the required PST/OST data into the software:
- Select Files: Press this button to add single or multiple PST/OST files.
- Select Folder: Use it to add an entire folder that contains PST/OST files.
- Remove Selected: Delete selected PST/OST files from the list.
- Clear List: Clear all added PST/OST files.
- Proceed: Click on the Proceed button to proceed further.
- Drag-and-drop functionality: The user may add the required PST/OST files using the drag-and-drop features of the software.

Step 4: Browse your system, select the required PST or OST file/folder, and click "Open" to load it into the software.

Step 5: The software will automatically detect the corrupted, blank, and invalid PST/OST files, display a warning panel, and skip these files during the conversion.
Step 6: The software displays all added PST/OST files in a tabular view showing details such as S. No., File Name, File Path, and Size/Number of Files . Review the loaded files, select the required items if needed, and click Proceed to continue the conversion process.

Step 7: Now, an advanced preview panel will appear. Expand the tree-like hierarchy of the selected files and folders.

Step 8: Preview the emails and their associated attachments. The preview panel displays:
- From: Displays the sender’s email address and information for the selected email.
- To: Shows the recipient’s email address to whom the message was sent.
- Subject: Indicates the subject line of the selected email.

Step 9: You may use the other options for better filtering of PST/OST data.
- Search Folders: Find specific folders by entering keywords from the folder name.
- Advanced Search: Search emails using "To," "From," or "Subject" criteria of emails.
- Open in Browser: Opens the selected email in a web browser if the preview is not displayed properly in the software.
You can also preview emails in the following:
- HTML format: Displays the email with its original formatting, including fonts, colors, and images.
- Attachments: Click here to preview the attachments.
- Plain text: Shows the email content in simple text without any formatting.
- Headers: Display detailed technical header information of the email.
- MIME: Shows the MIME structure and encoding details of the message.
- Calendars: Displays the calendars' associated fields.
- Contacts: Shows the information like phone numbers, emails, etc.
- Tasks: Displays the fields like start date, end date, due date, and sensitivity.
- Notes: To preview the notes' content and their creation date.
- Raw HTML: Displays the original HTML source code of the email message.
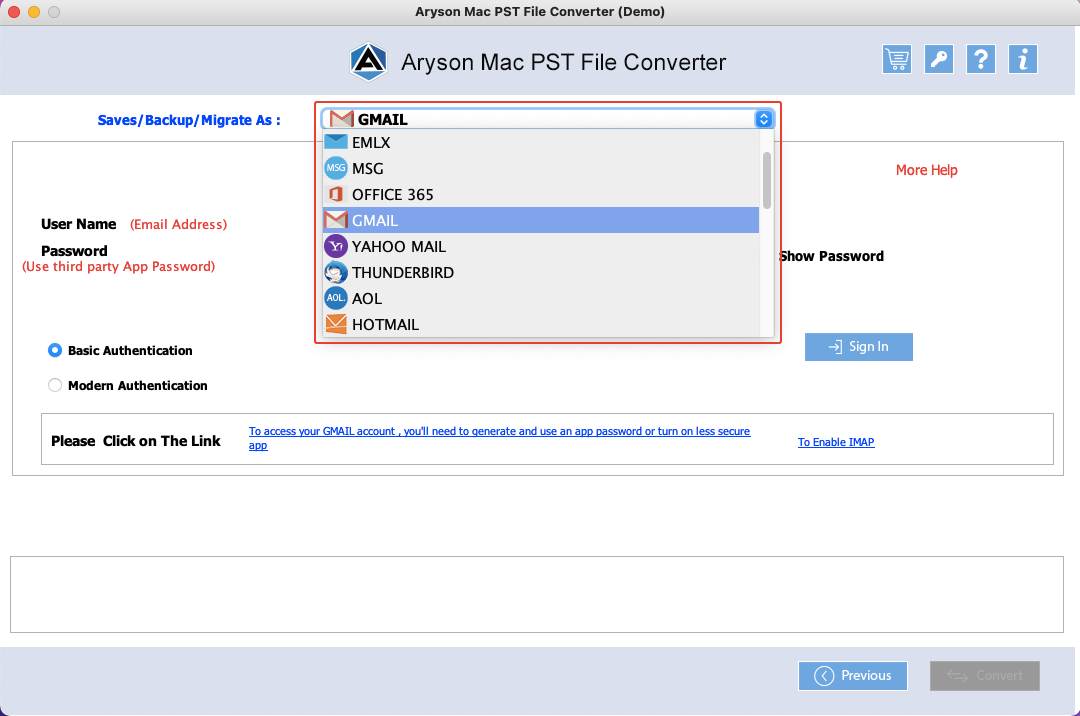
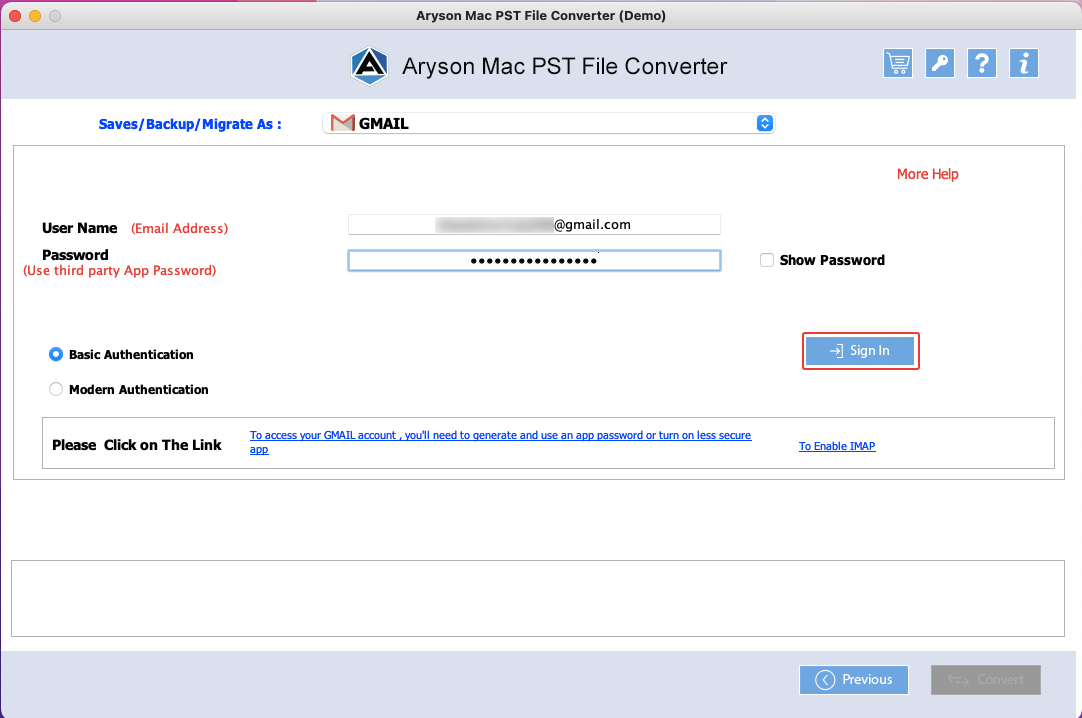
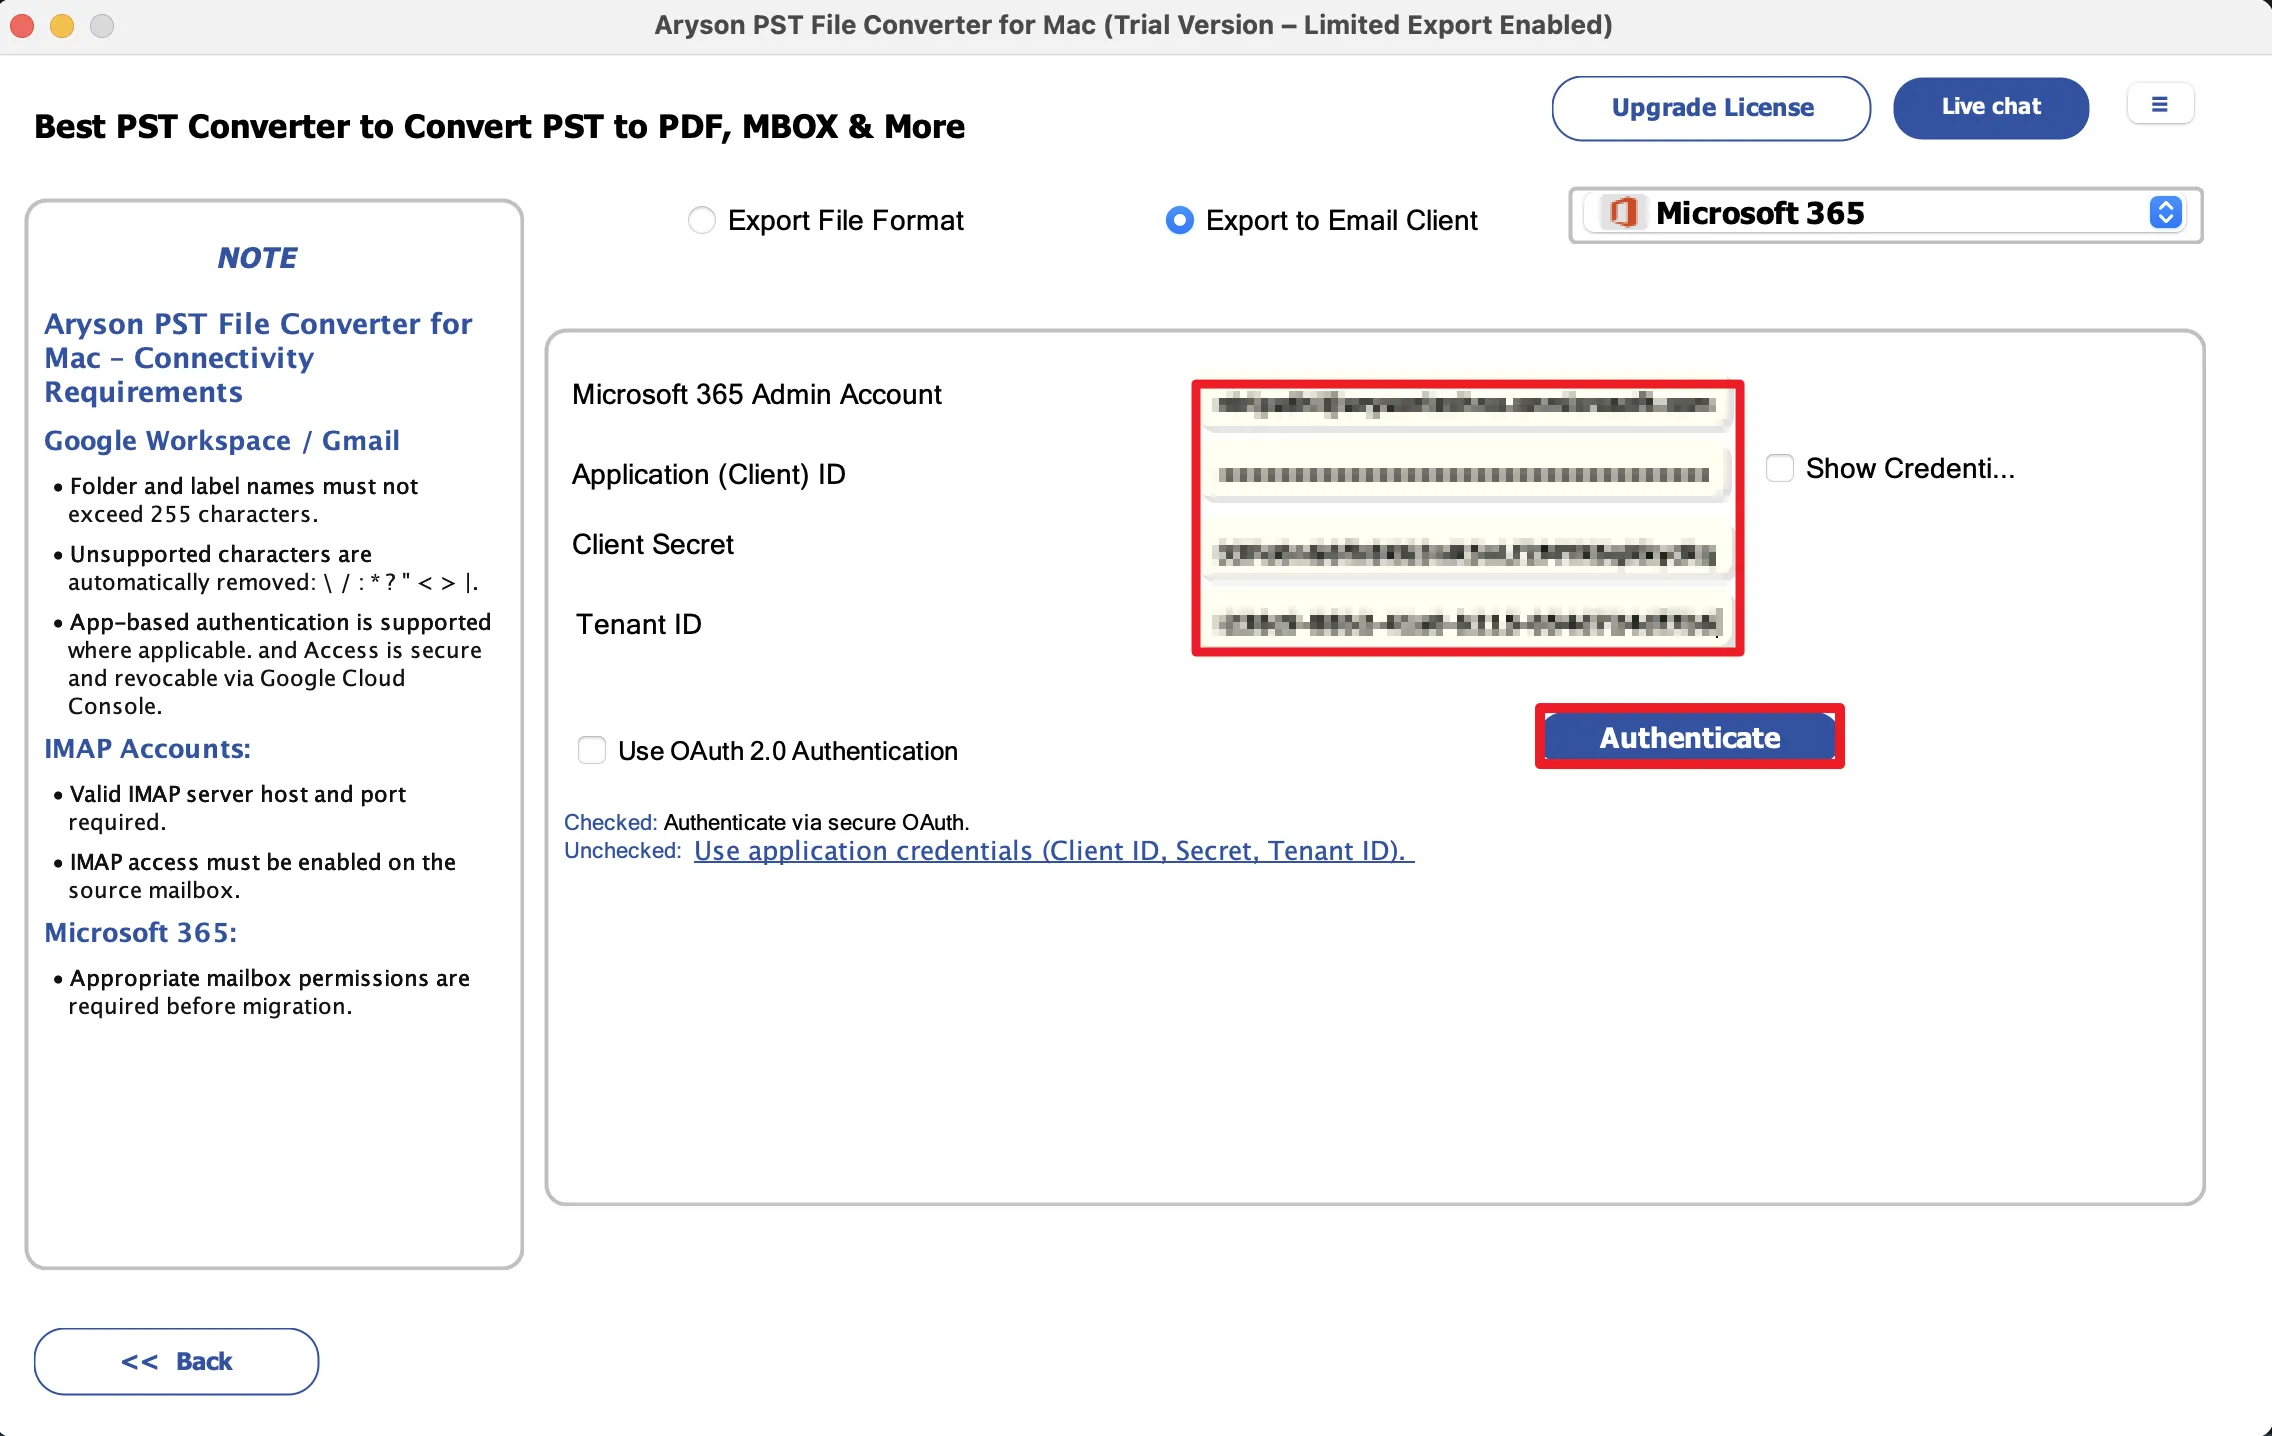
Step 10: Under the Export to Email Clients dropdown list, choose Microsoft 365.

Step 11: Log in to Office 365 using your credentials.
- Modern Authentication:
- Enable the OAuth 2.0 authentication checkbox.
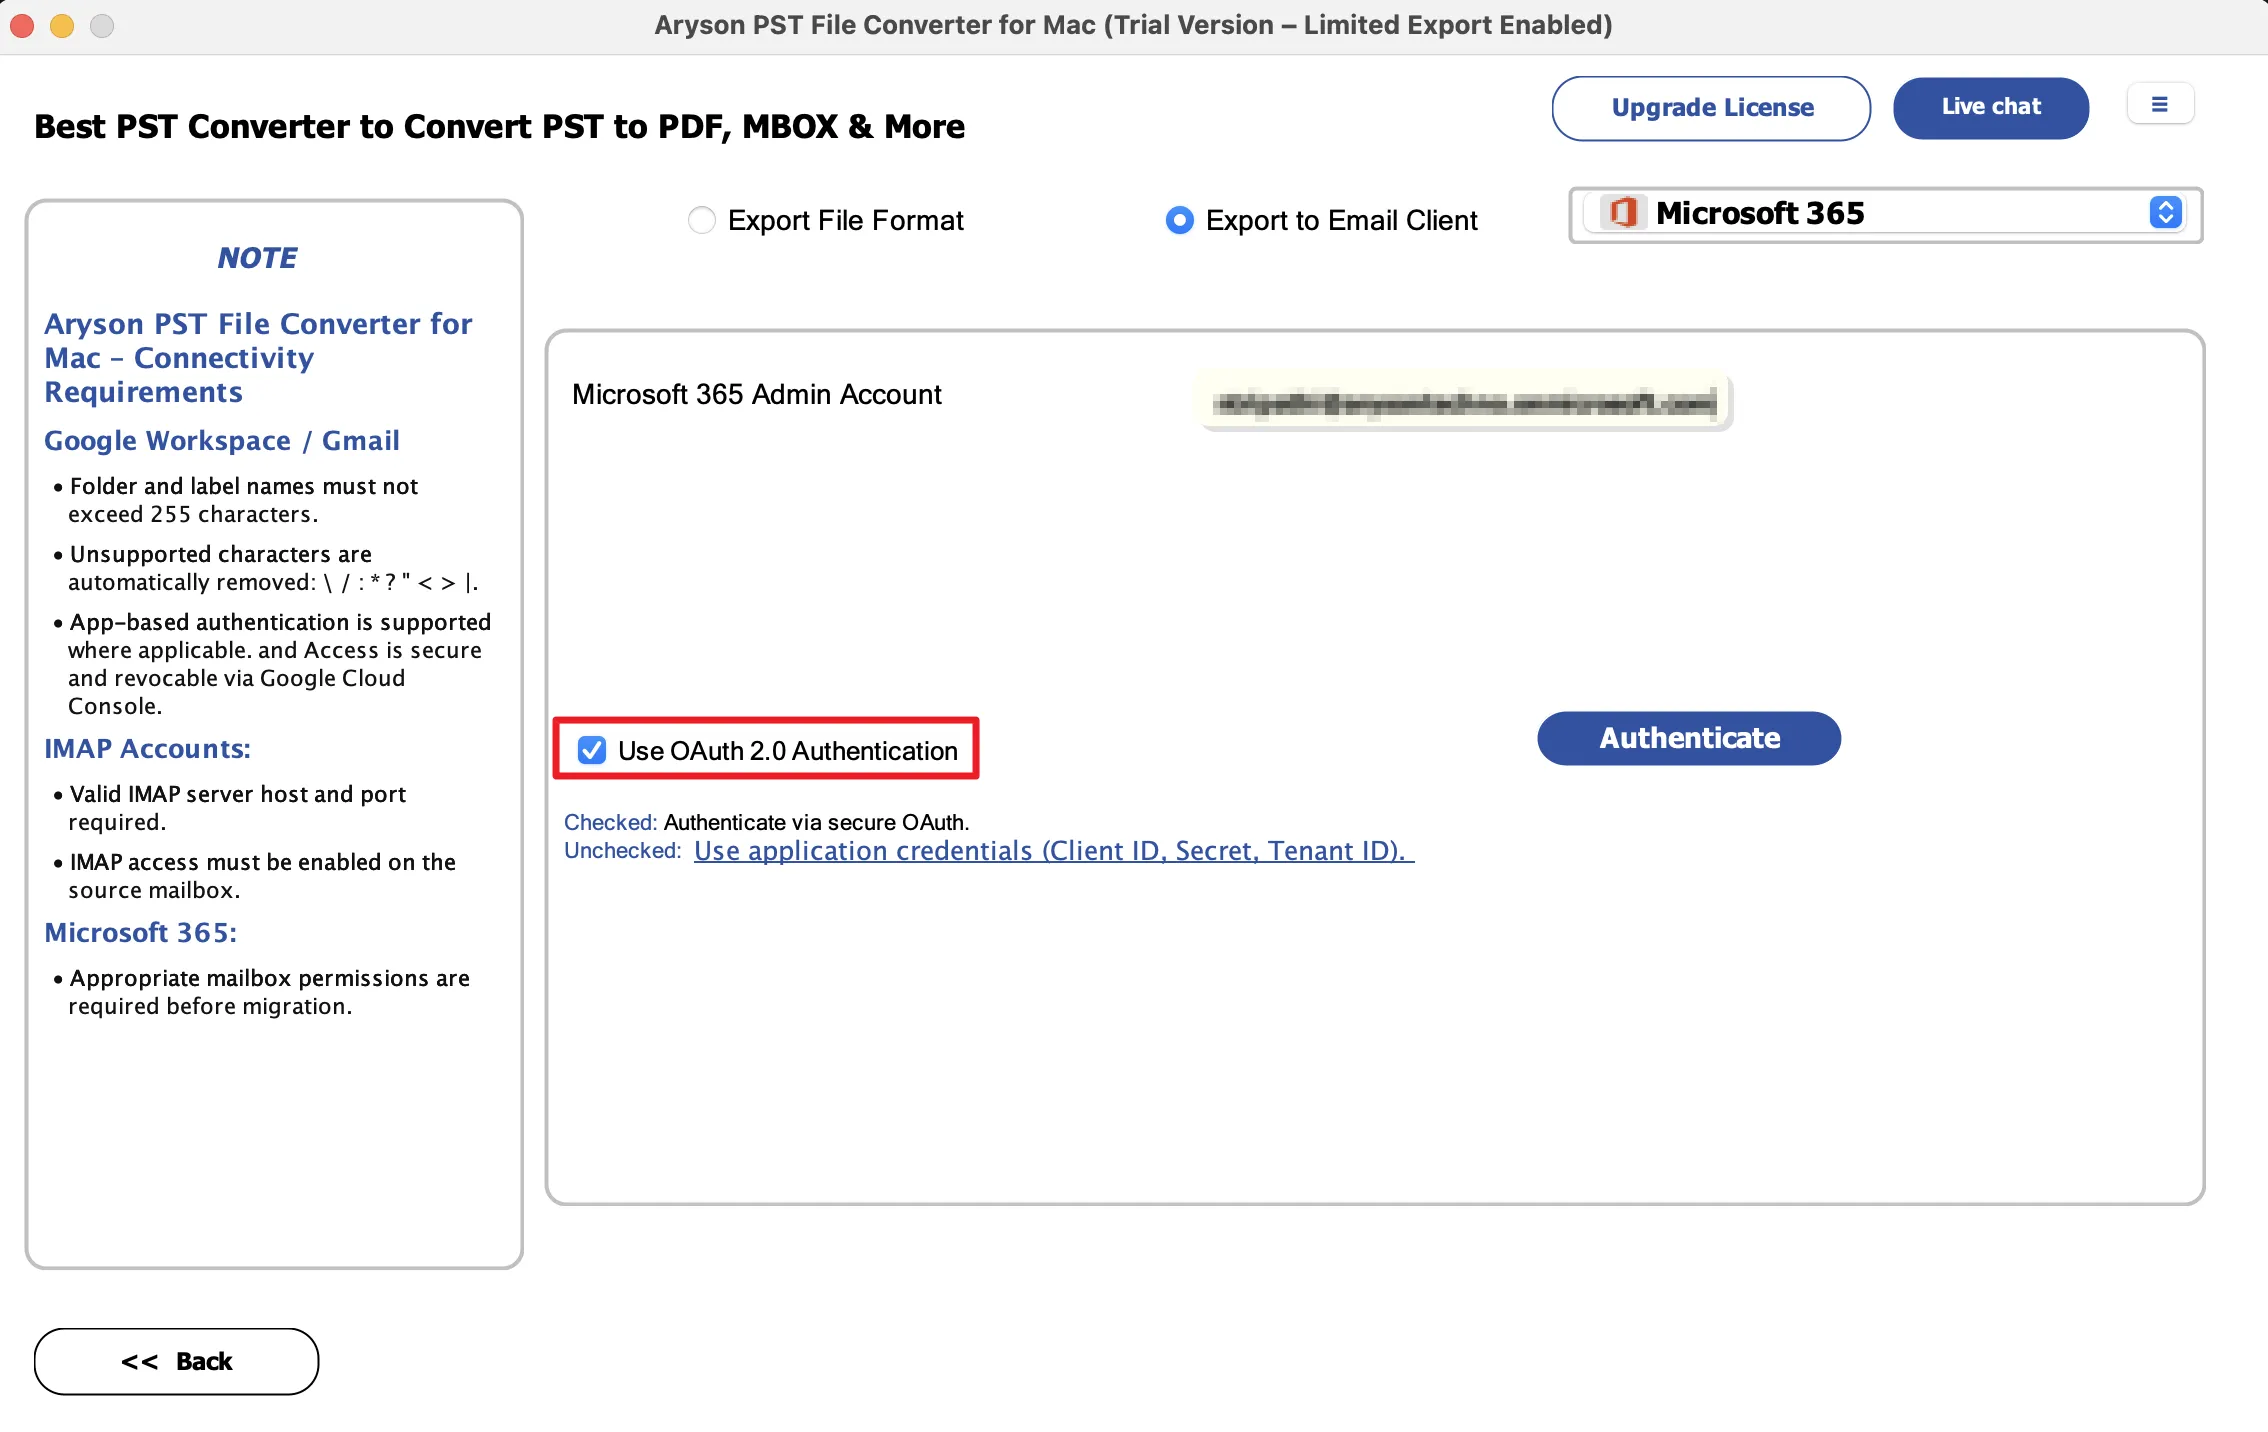
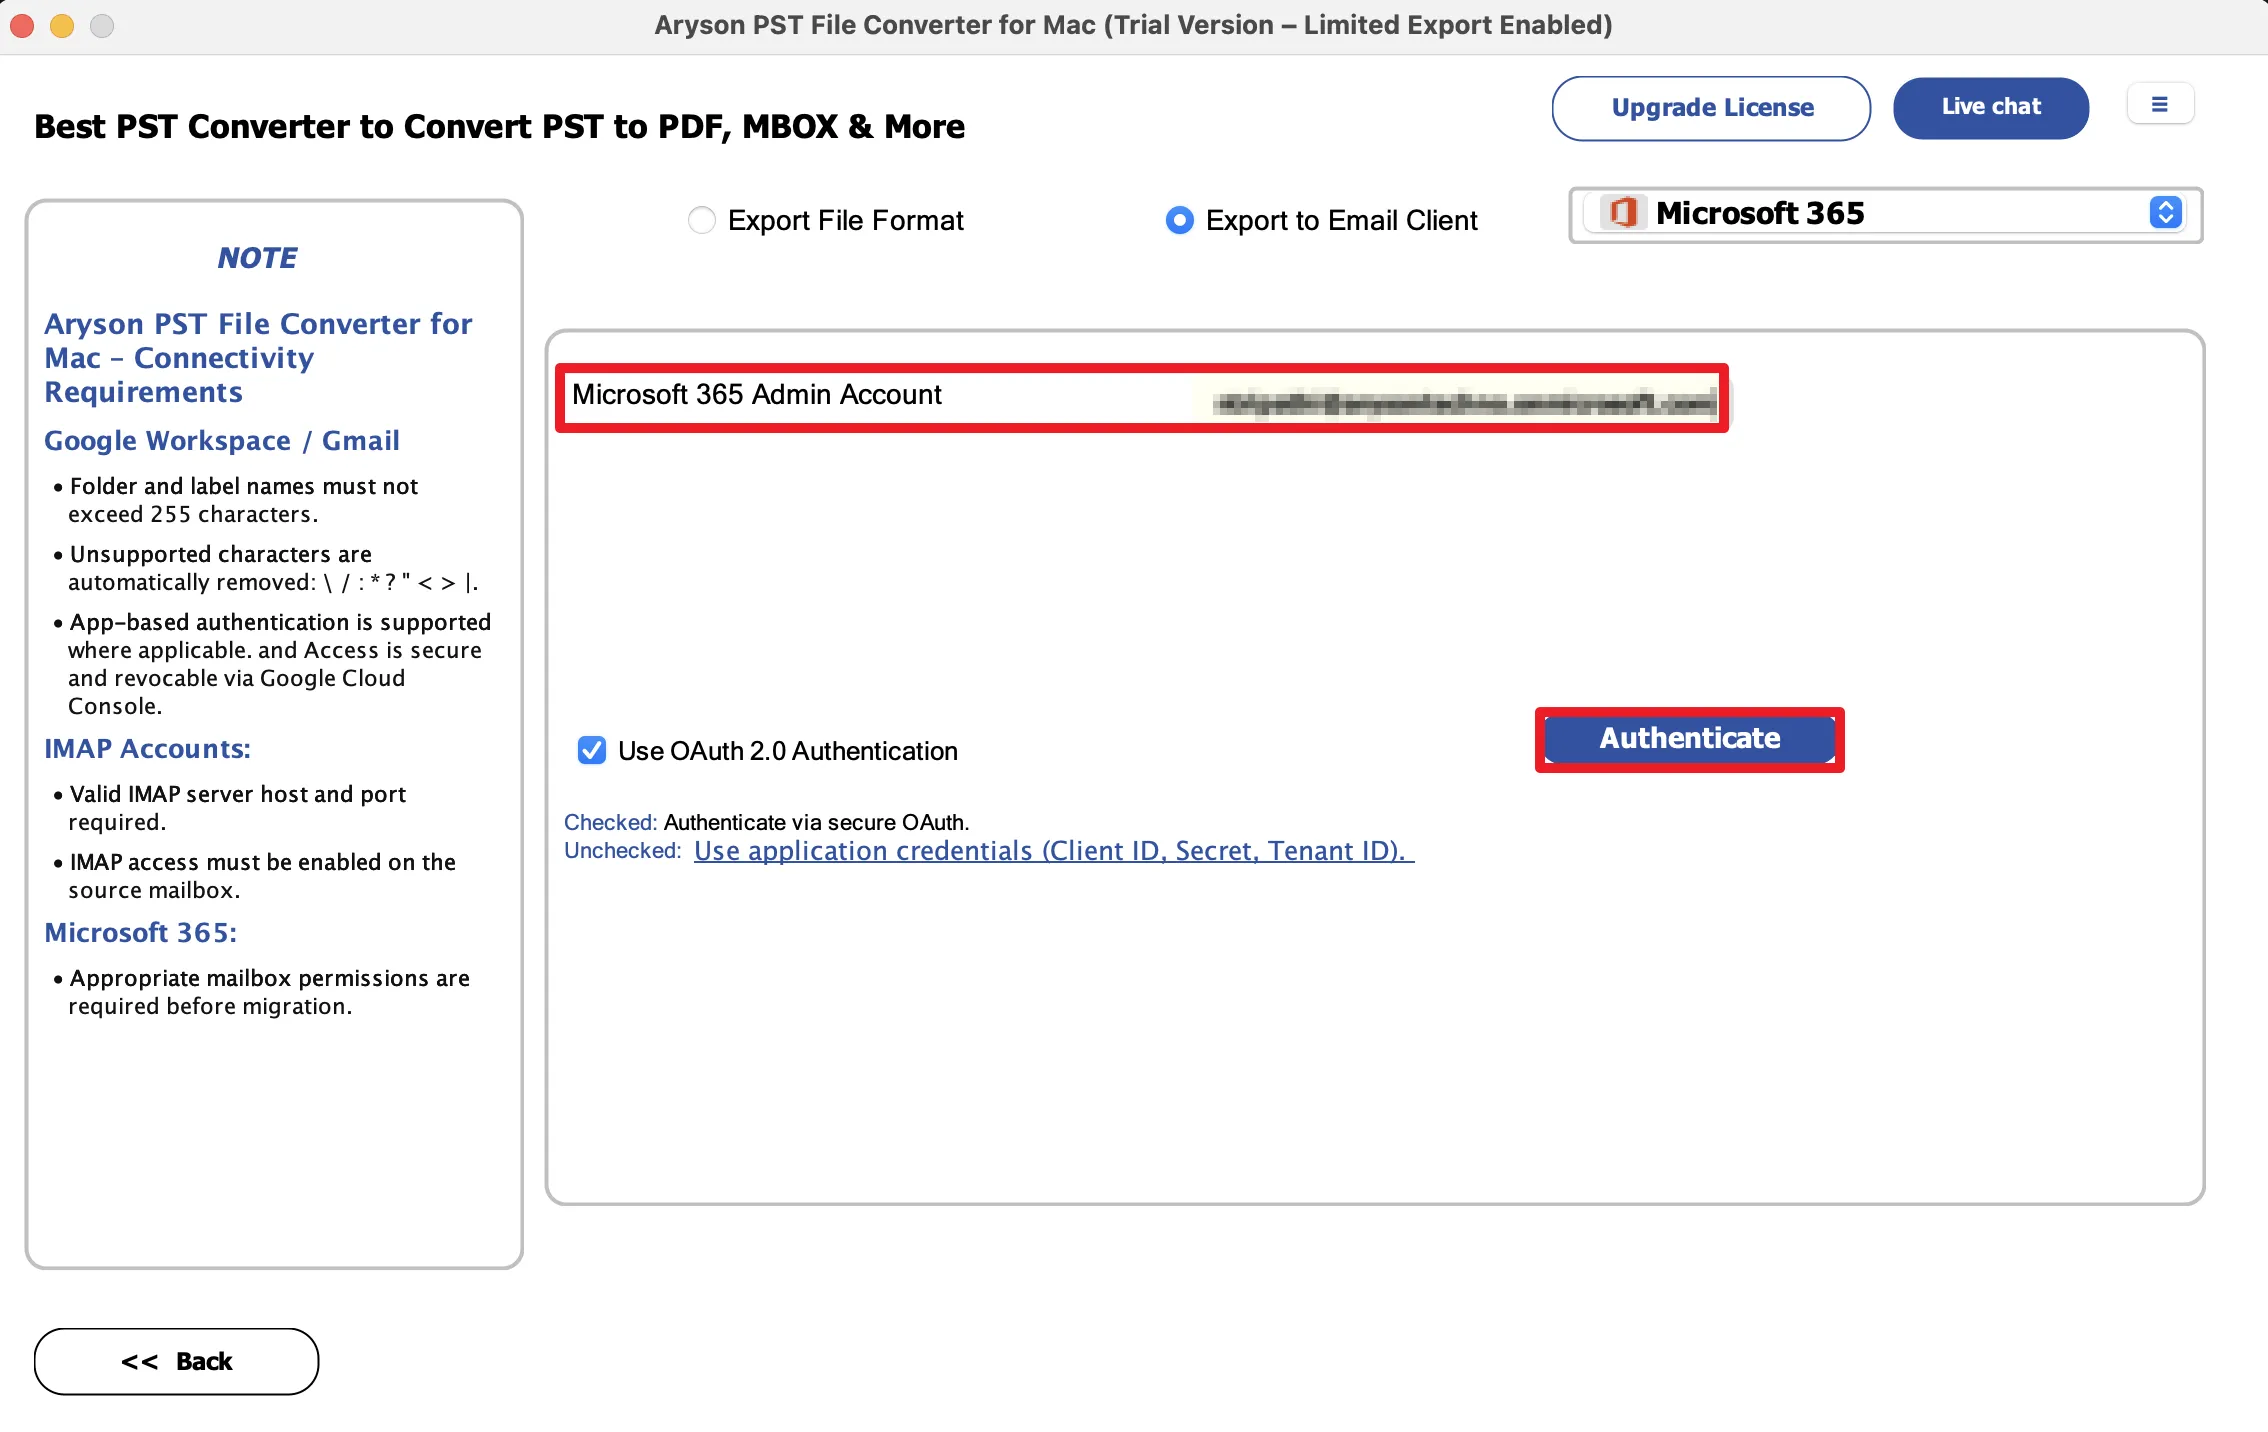
- Enter the Microsoft 365 Admin Account email address and click Authenticate.
- Choose the Microsoft 365 account from the authentication window or click Use another account.
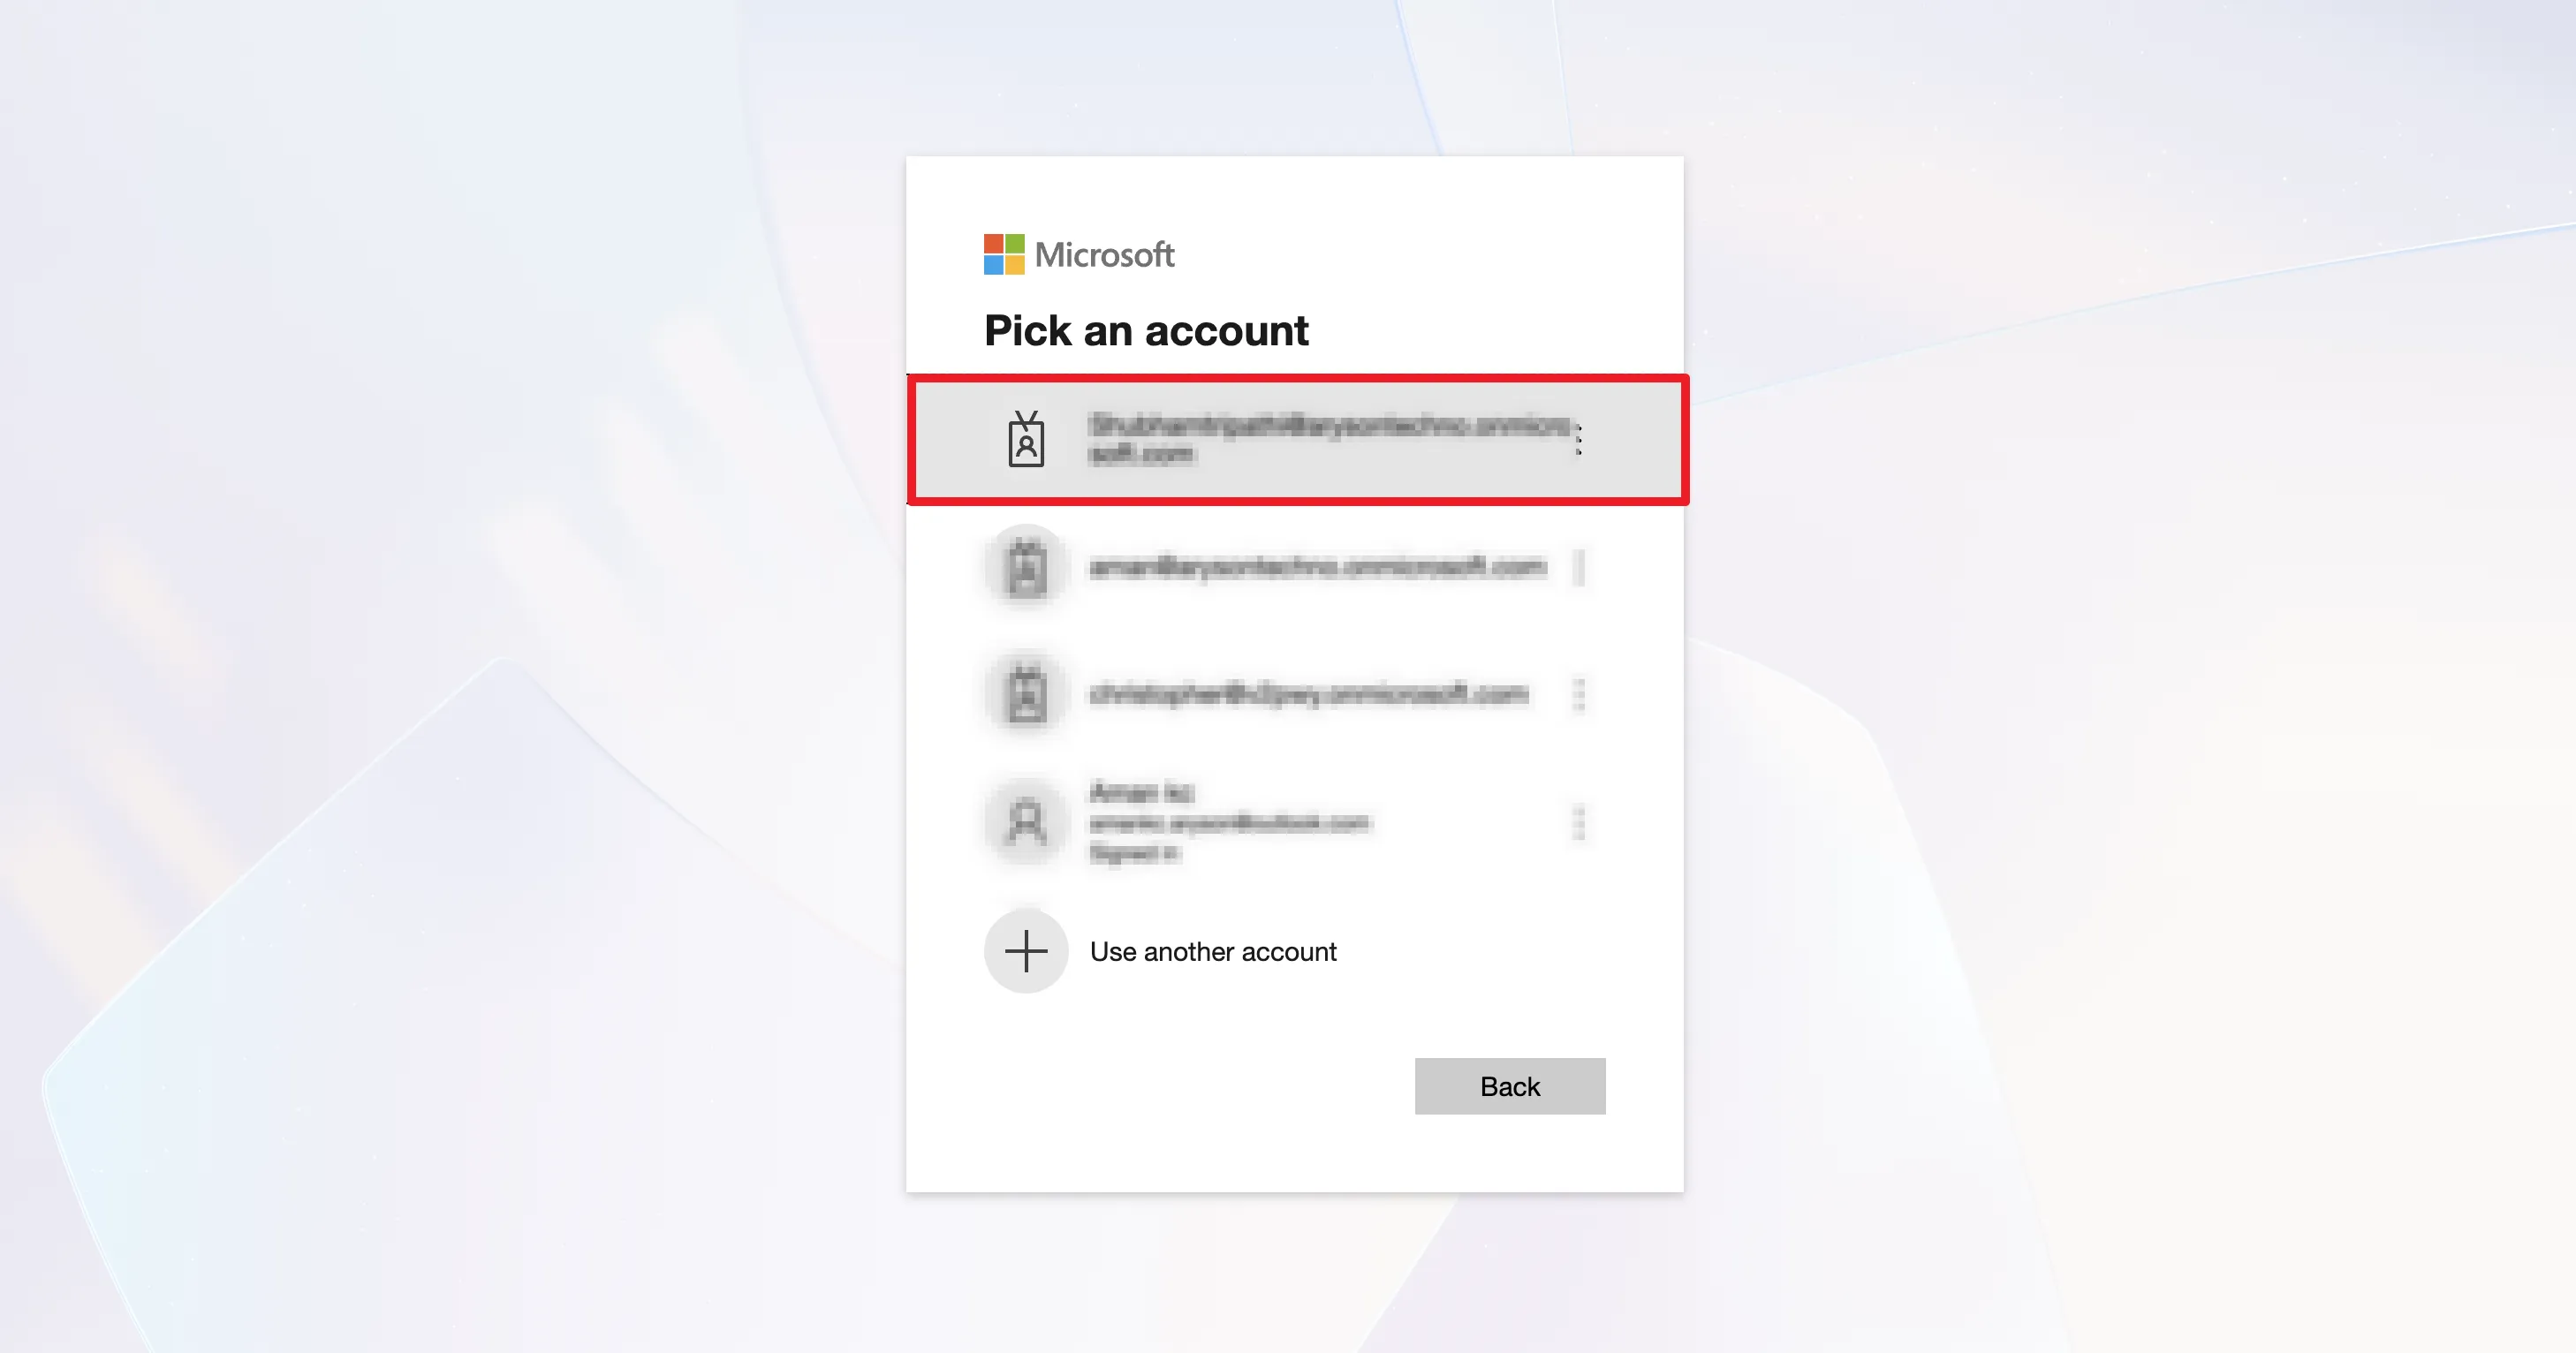
- After authentication, redirect back to the software.
- Enable the OAuth 2.0 authentication checkbox.
- Client Secret (Admin-based login)
- Uncheck the Use OAuth2.0 Authentication checkbox.
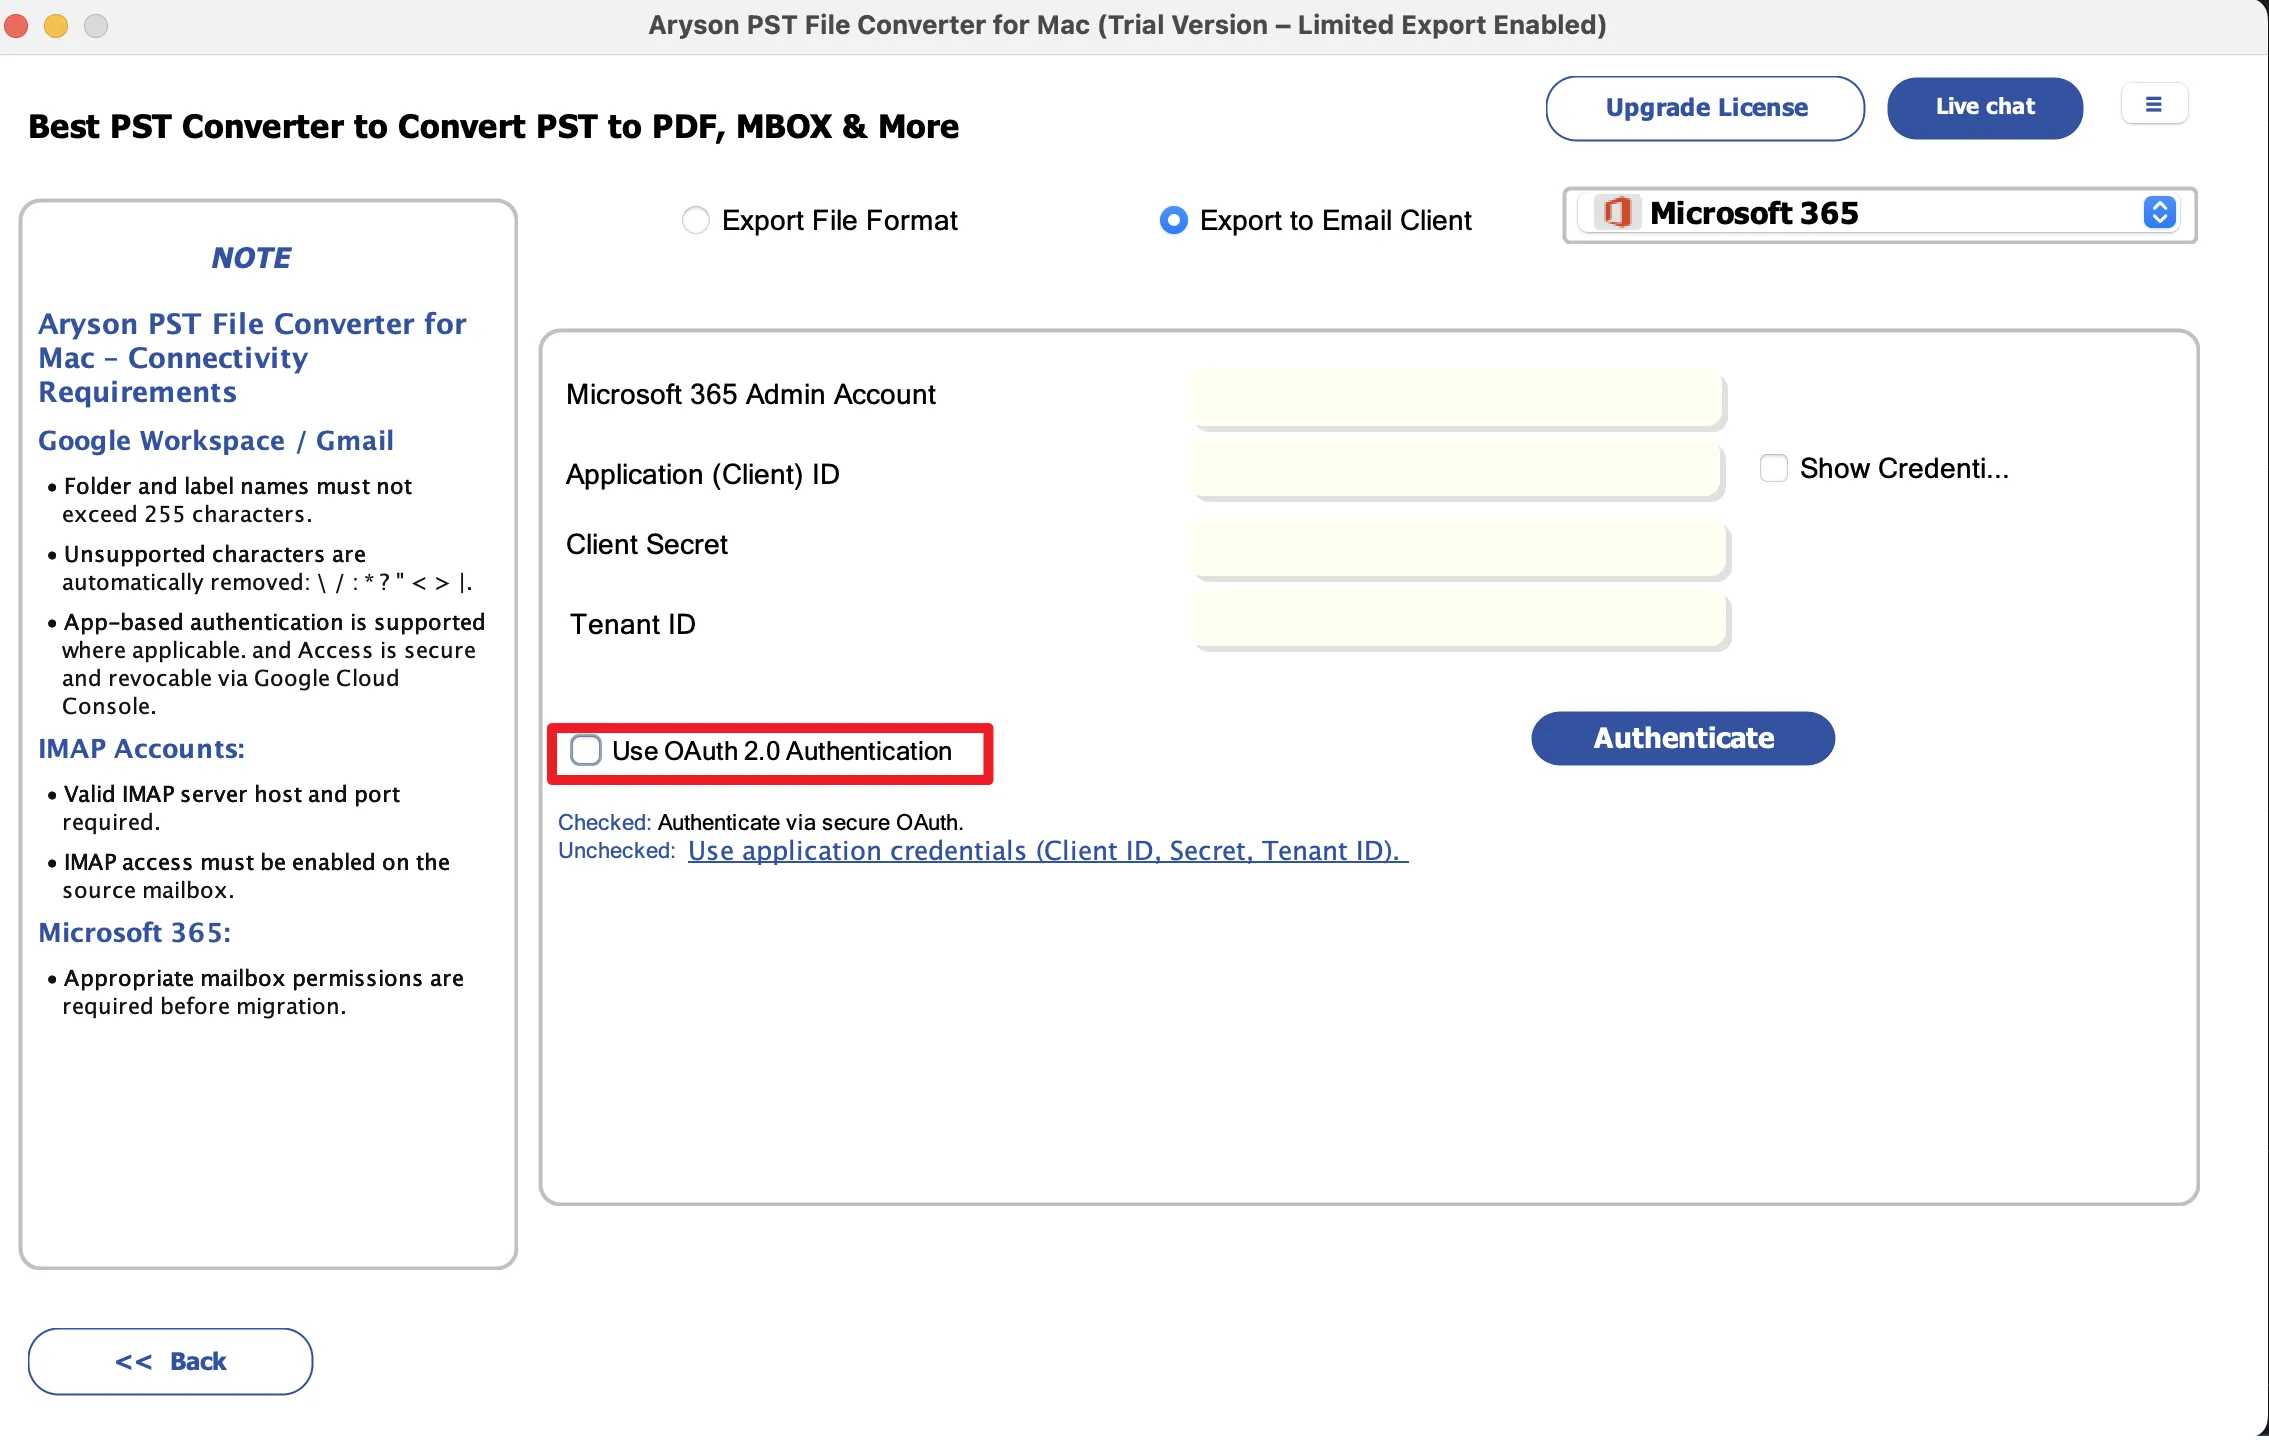
- Enter the Microsoft 365 Admin Account, Application (Client) ID, Client Secret, and Tenant ID in their respective fields and click Authenticate.
- Uncheck the Use OAuth2.0 Authentication checkbox.
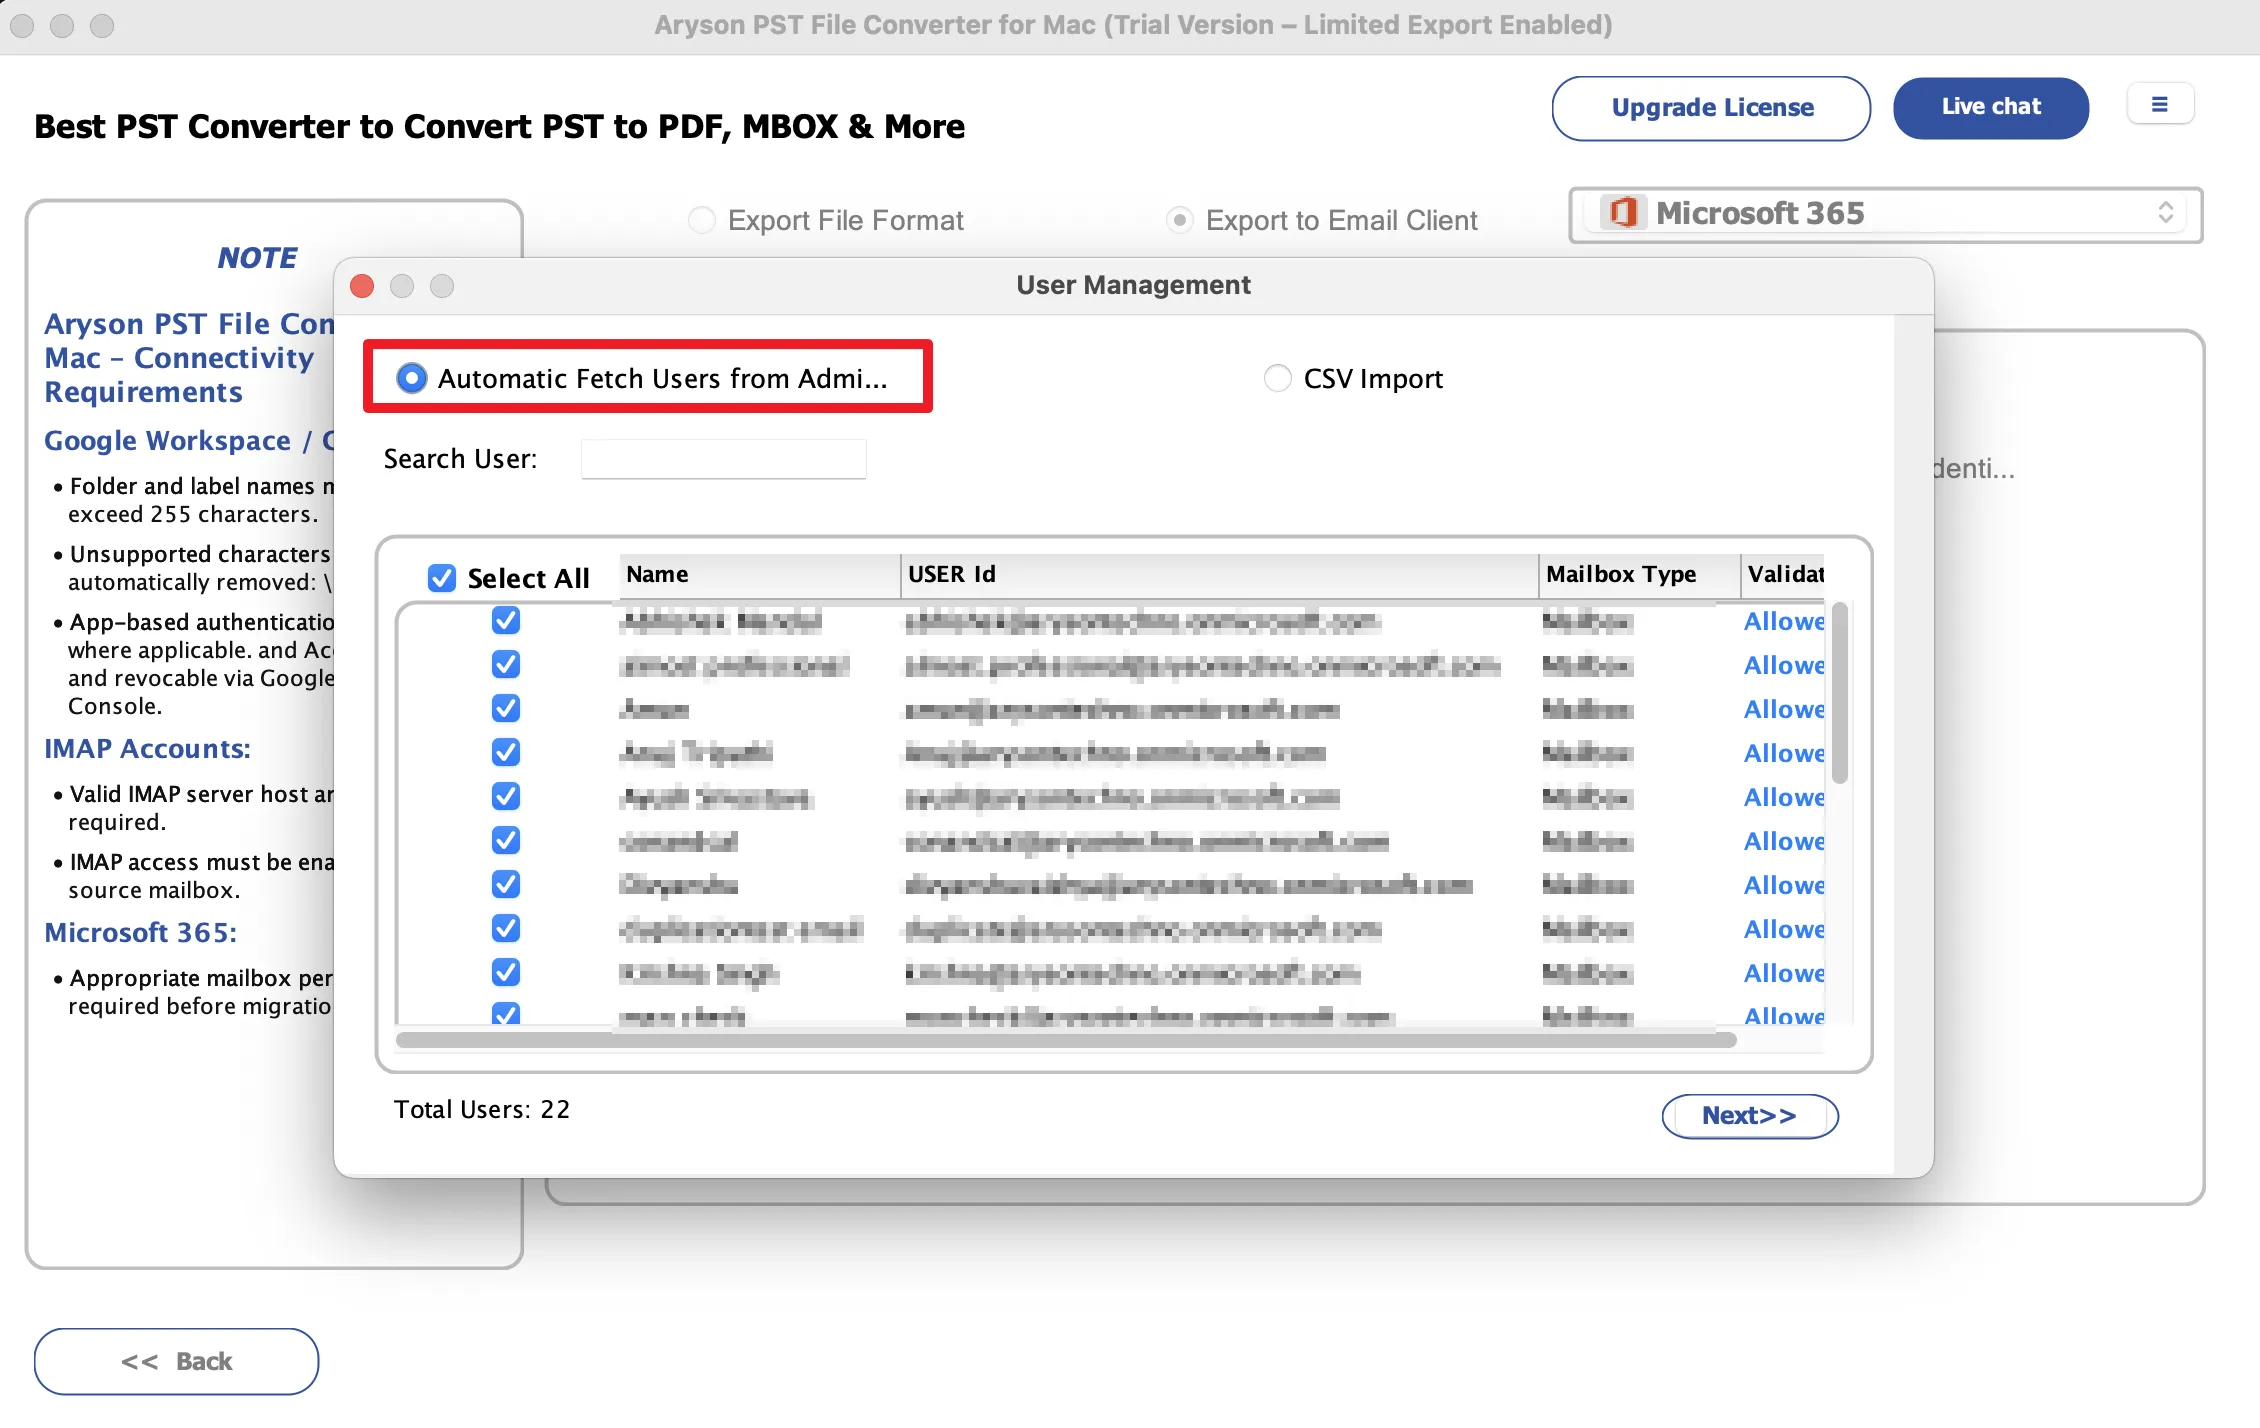
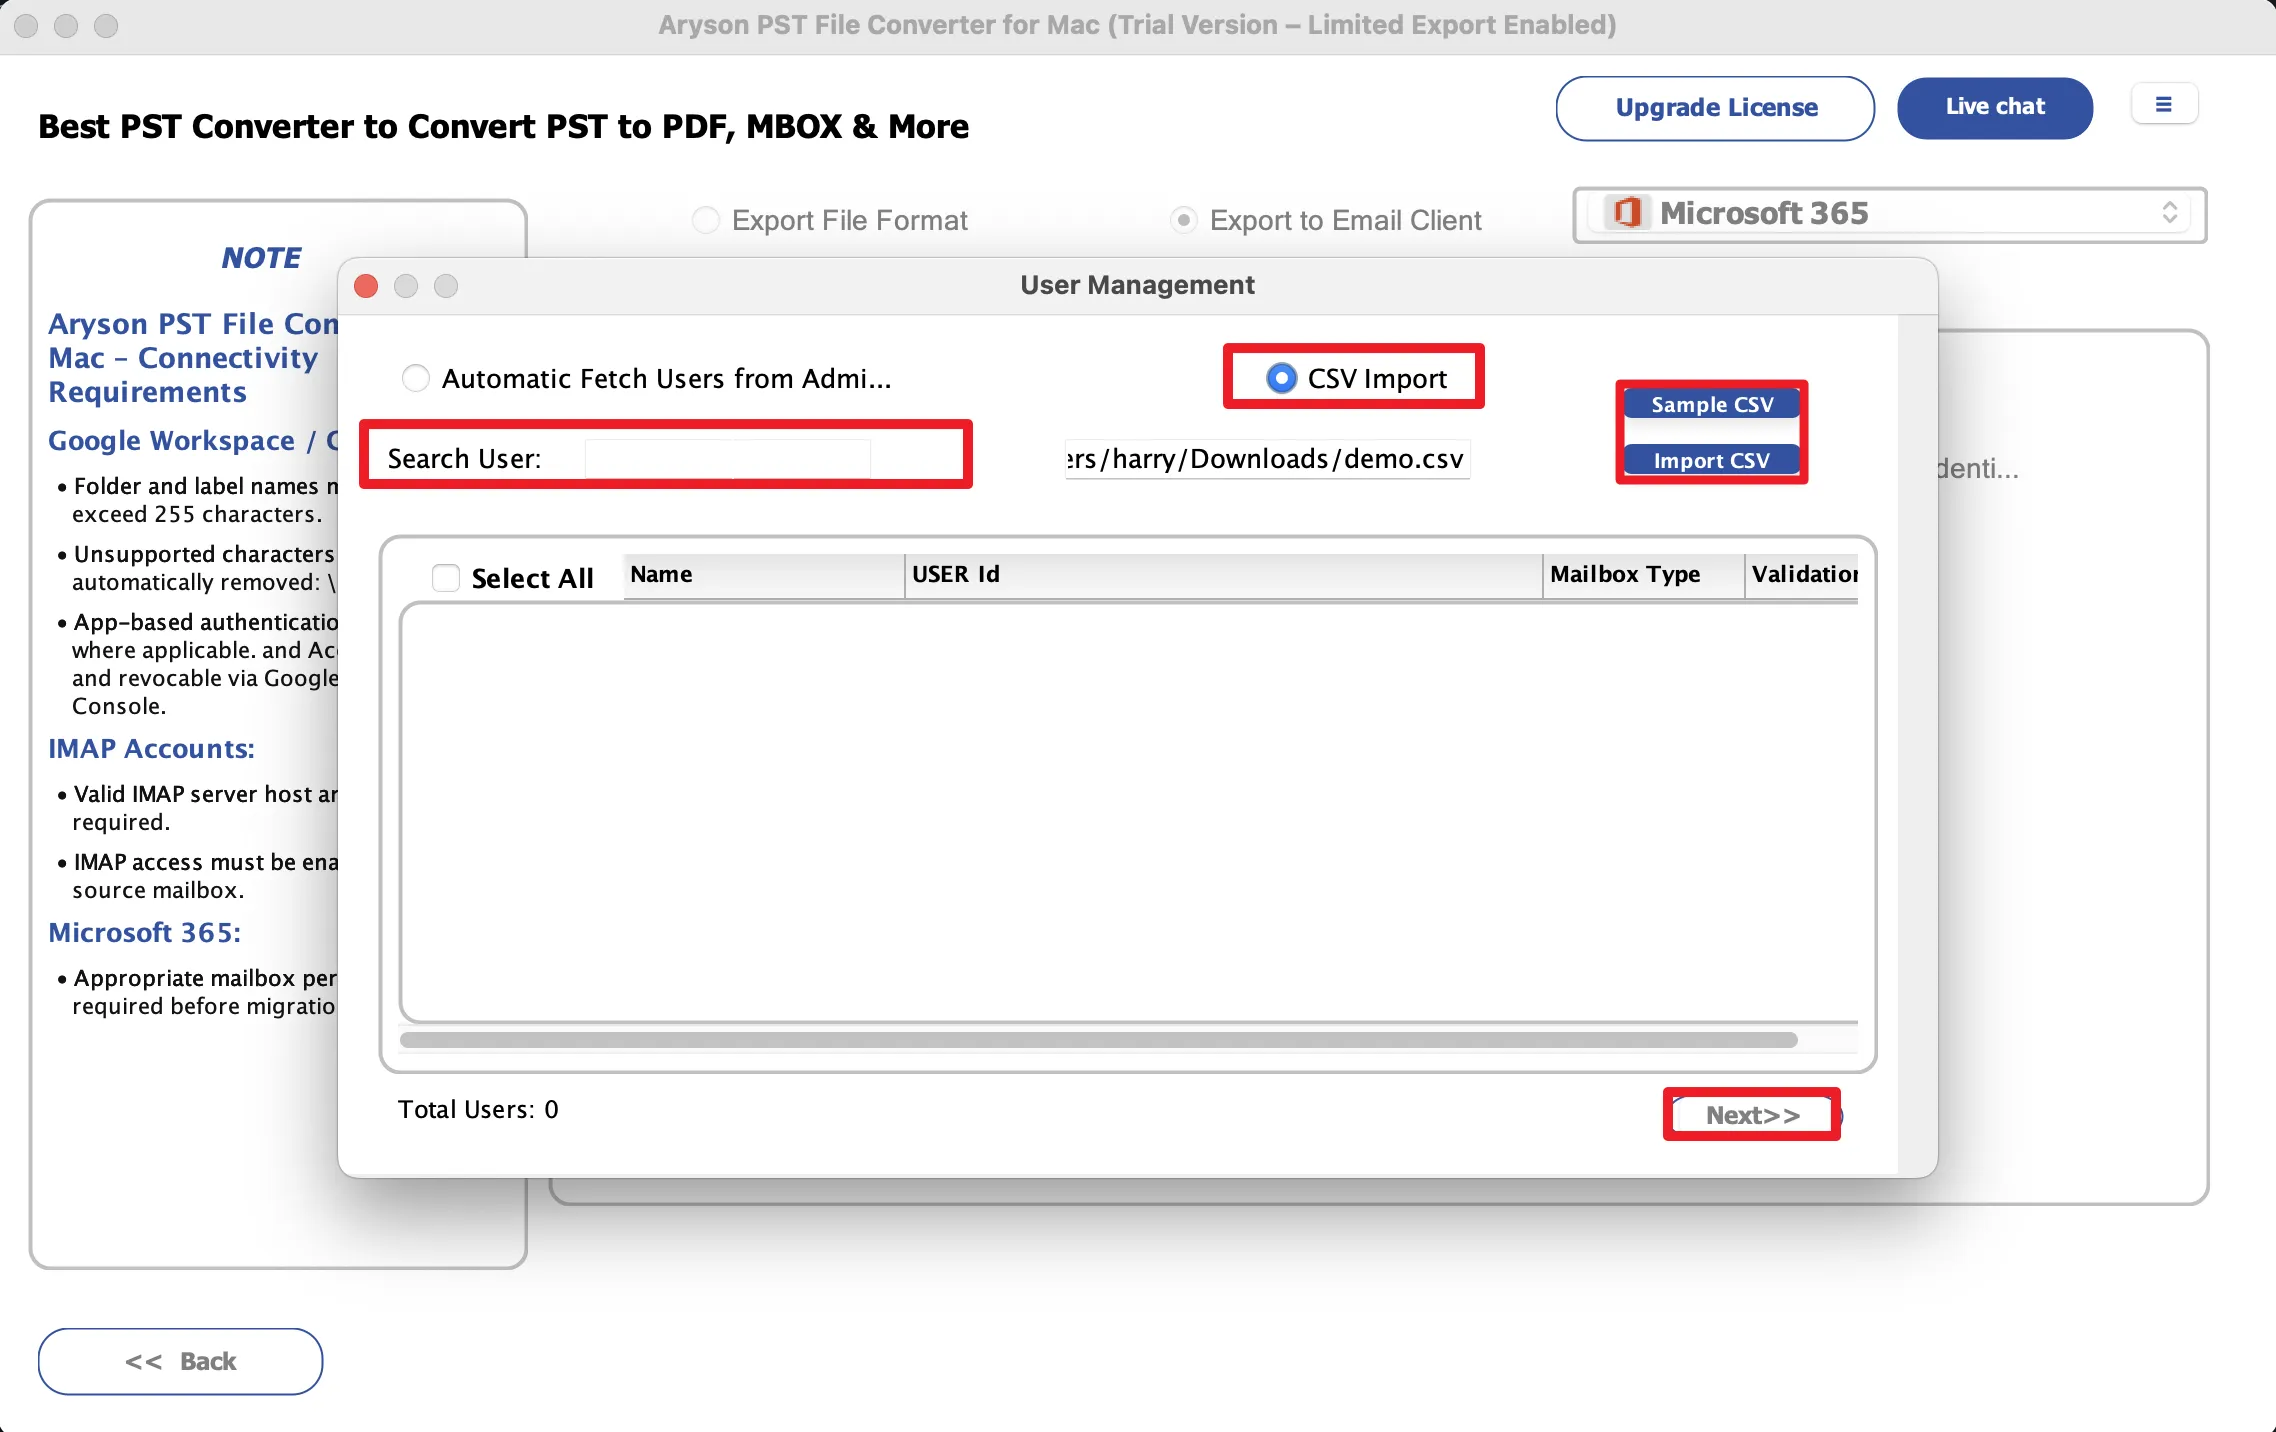
Step 12: Map the required sub-users displayed or import a CSV file containing the list of sub-users.
- Select Automatic Fetch Users from Admin ID to load mailboxes automatically.
- Alternatively, choose CSV Import to import user mailboxes using a CSV file.
- Review and select the required mailboxes from the user list.
- Use the Search User option to find specific mailboxes quickly.
- Click Next to proceed with mailbox mapping and migration.
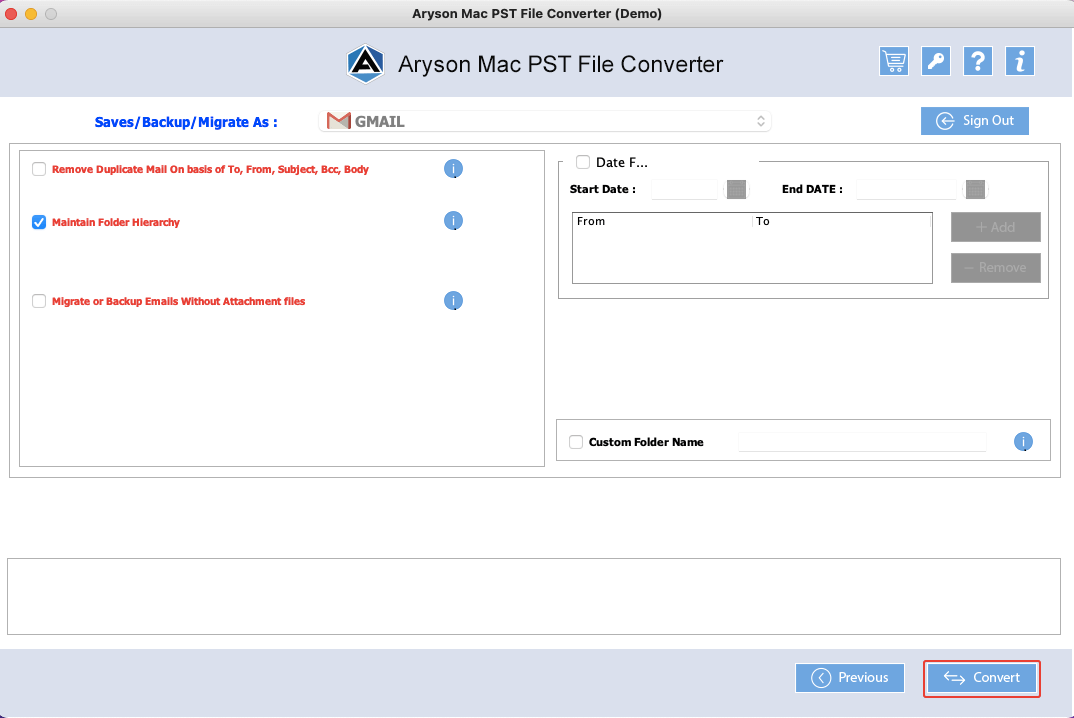
Step 13: Configure the advanced migration settings as required:
- Date Range Filter: Migrate emails from a specific date range.
- Custom Output Folder: Define a custom folder name for storing migrated data.
- Skip Existing Exports: Skip previously migrated emails to avoid duplicates.
- Follow Tree Hierarchy: Maintain the original mailbox folder structure during migration.
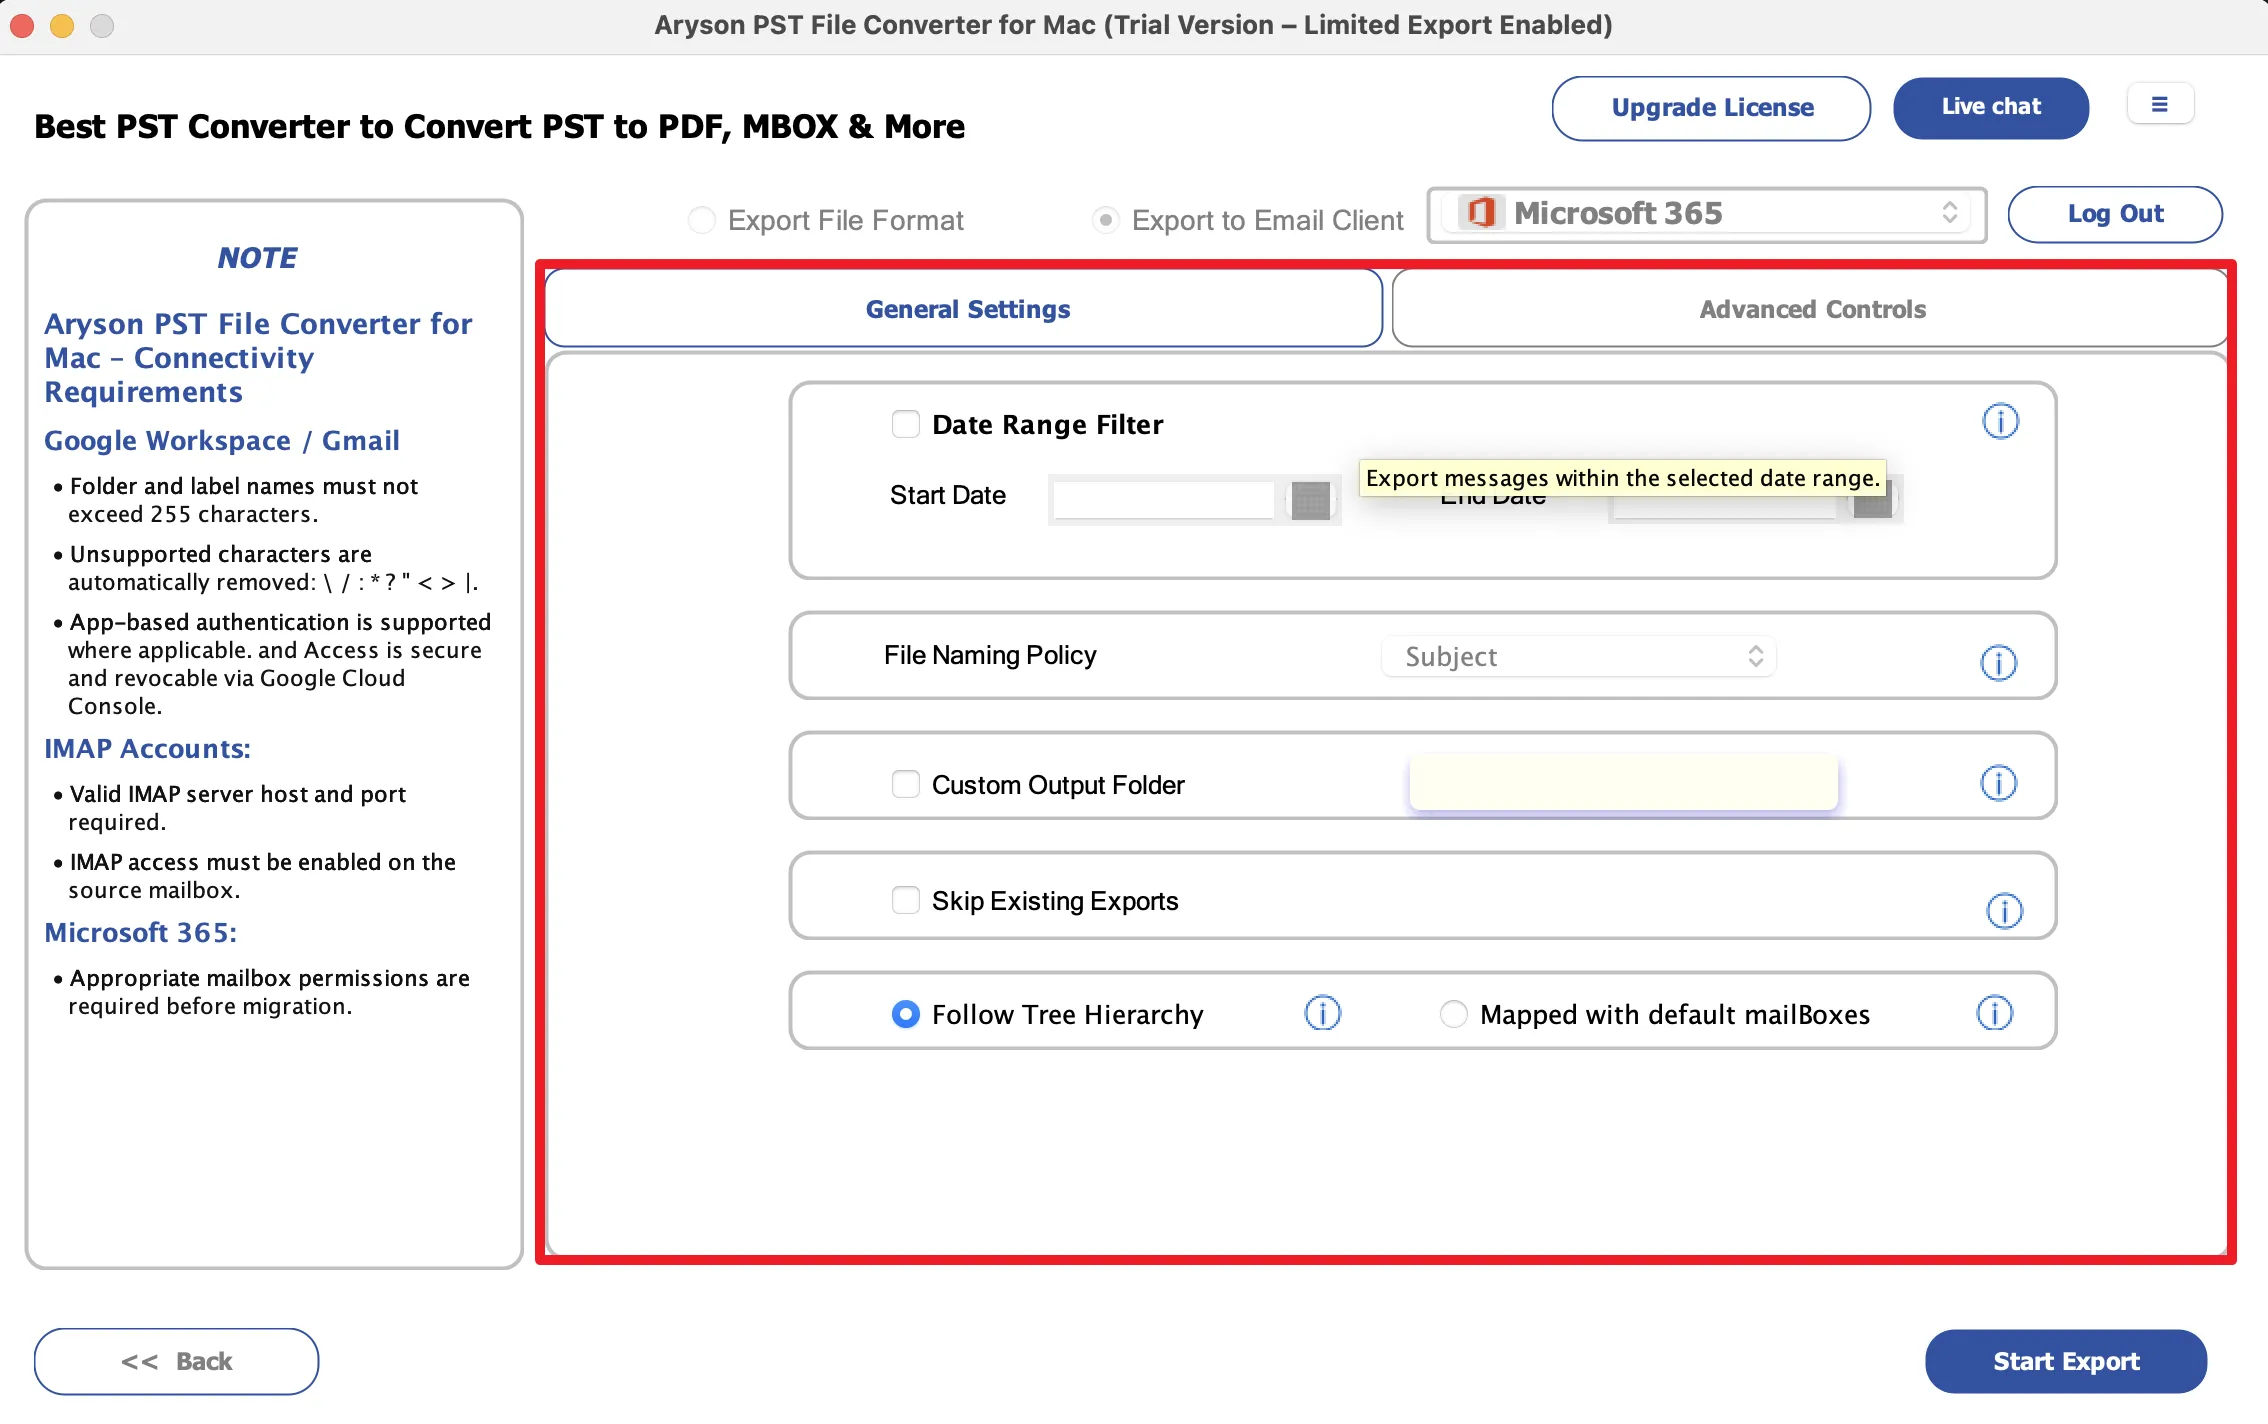
- Attachment Handling: Embed attachments, export them separately, or exclude them.
- Duplicate Detection: Remove duplicate emails based on fields such as To, From, Subject, and Body.
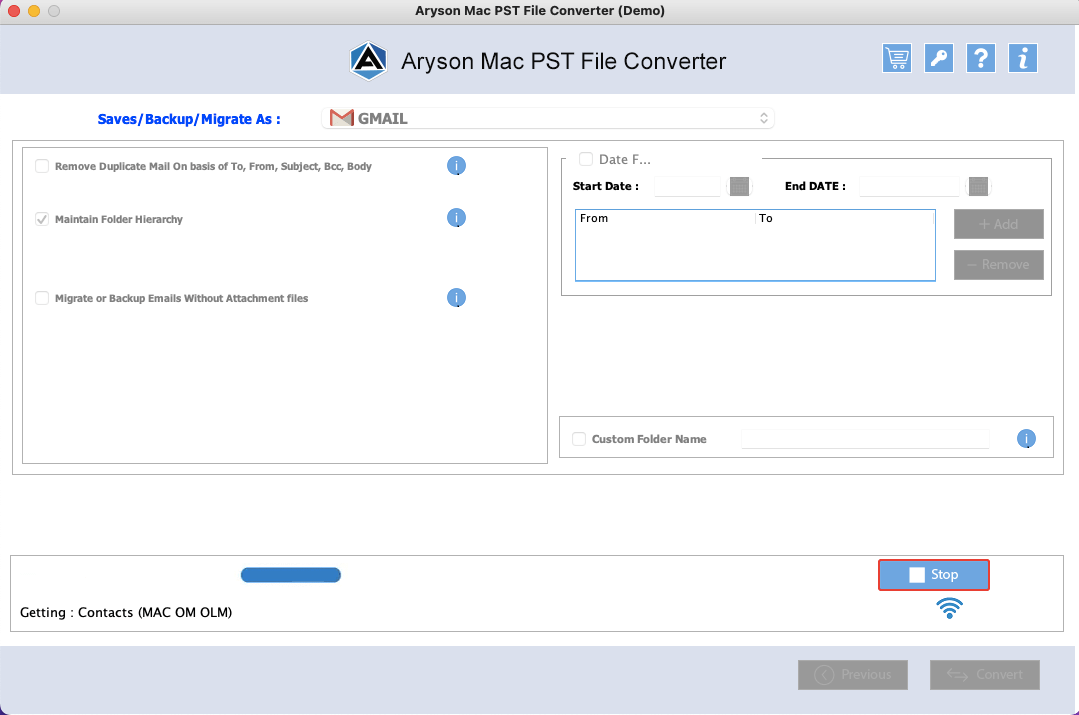
Step 14: Click on the Start Export button to begin the conversion process.
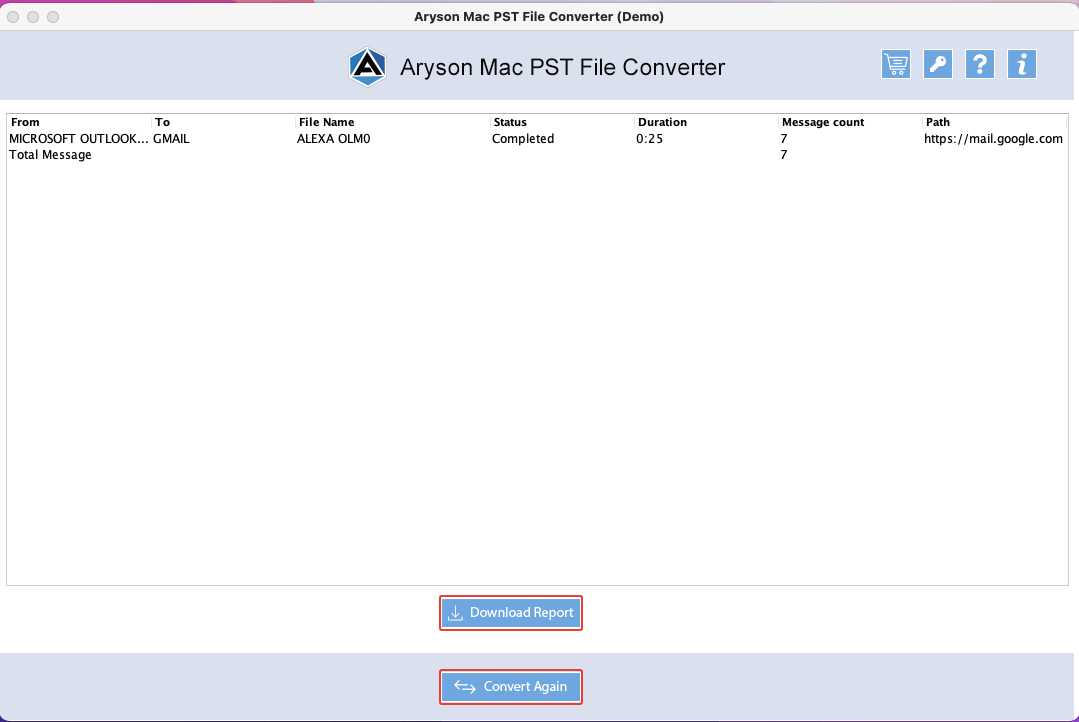
Step 15: After completion, the Conversion Report displays Source, Destination, File Count, Processing Status, Execution Time, Total Messages, and Output Location.

Step 16: After conversion, details:
- Start New Export: Start another conversion
- Export Log: Save the conversion report in CSV format.

Step 1: Download and install the Aryson Mac PST Converter on your Mac system.
Step 2: Run it as administrator and activate it using the license key (or continue with the demo version ).

Step 3: Choose how you want to add the required PST/OST data into the software:
- Select Files: Press this button to add single or multiple PST/OST files.
- Select Folder: Use it to add an entire folder that contains PST/OST files.
- Remove Selected: Delete selected PST/OST files from the list.
- Clear List: Clear all added PST/OST files.
- Proceed: Click on the Proceed button to proceed further.
- Drag-and-drop functionality: The user may add the required PST/OST files using the drag-and-drop features of the software.
Step 4: Browse your system, select the required PST or OST file/folder, and click "Open" to load it into the software.
Step 5: The software will automatically detect the corrupted, blank, and invalid PST/OST files, display a warning panel, and skip these files during the conversion.

Step 6: The software displays all added PST/OST files in a tabular view showing details such as S. No., File Name, File Path, and Size/Number of Files. Review the loaded files, select the required items if needed, and click Proceed to continue the conversion process.
Step 7: Now, an advanced preview panel will appear Expand the tree-like hierarchy of the selected files and folders.

Step 8: Preview the emails and their associated attachments. The preview panel displays:
- From: Displays the sender’s email address and information for the selected email.
- To: Shows the recipient’s email address to whom the message was sent.
- Subject: Indicates the subject line of the selected email.

Step 9: You may use the other options for better filtering of PST/OST data.
- Search Folders: Find specific folders by entering keywords from the folder name.
- Advanced Search: Search emails using "To," "From," or "Subject" criteria of emails.
- Open in Browser: Opens the selected email in a web browser if the preview is not displayed properly in the software.
You can also preview emails in the following:
- HTML format: Displays the email with its original formatting, including fonts, colors, and images.
- Attachments: Click here to preview the attachments.
- Plain text: Shows the email content in simple text without any formatting.
- Headers: Display detailed technical header information of the email.
- MIME: Shows the MIME structure and encoding details of the message.
- Calendars: Displays the calendars' associated fields.
- Contacts: Shows the information like phone numbers, emails, etc.
- Tasks: Displays the fields like start date, end date, due date, and sensitivity.
- Notes: To preview the notes' content and their creation date.
- Raw HTML: Displays the original HTML source code of the email message.

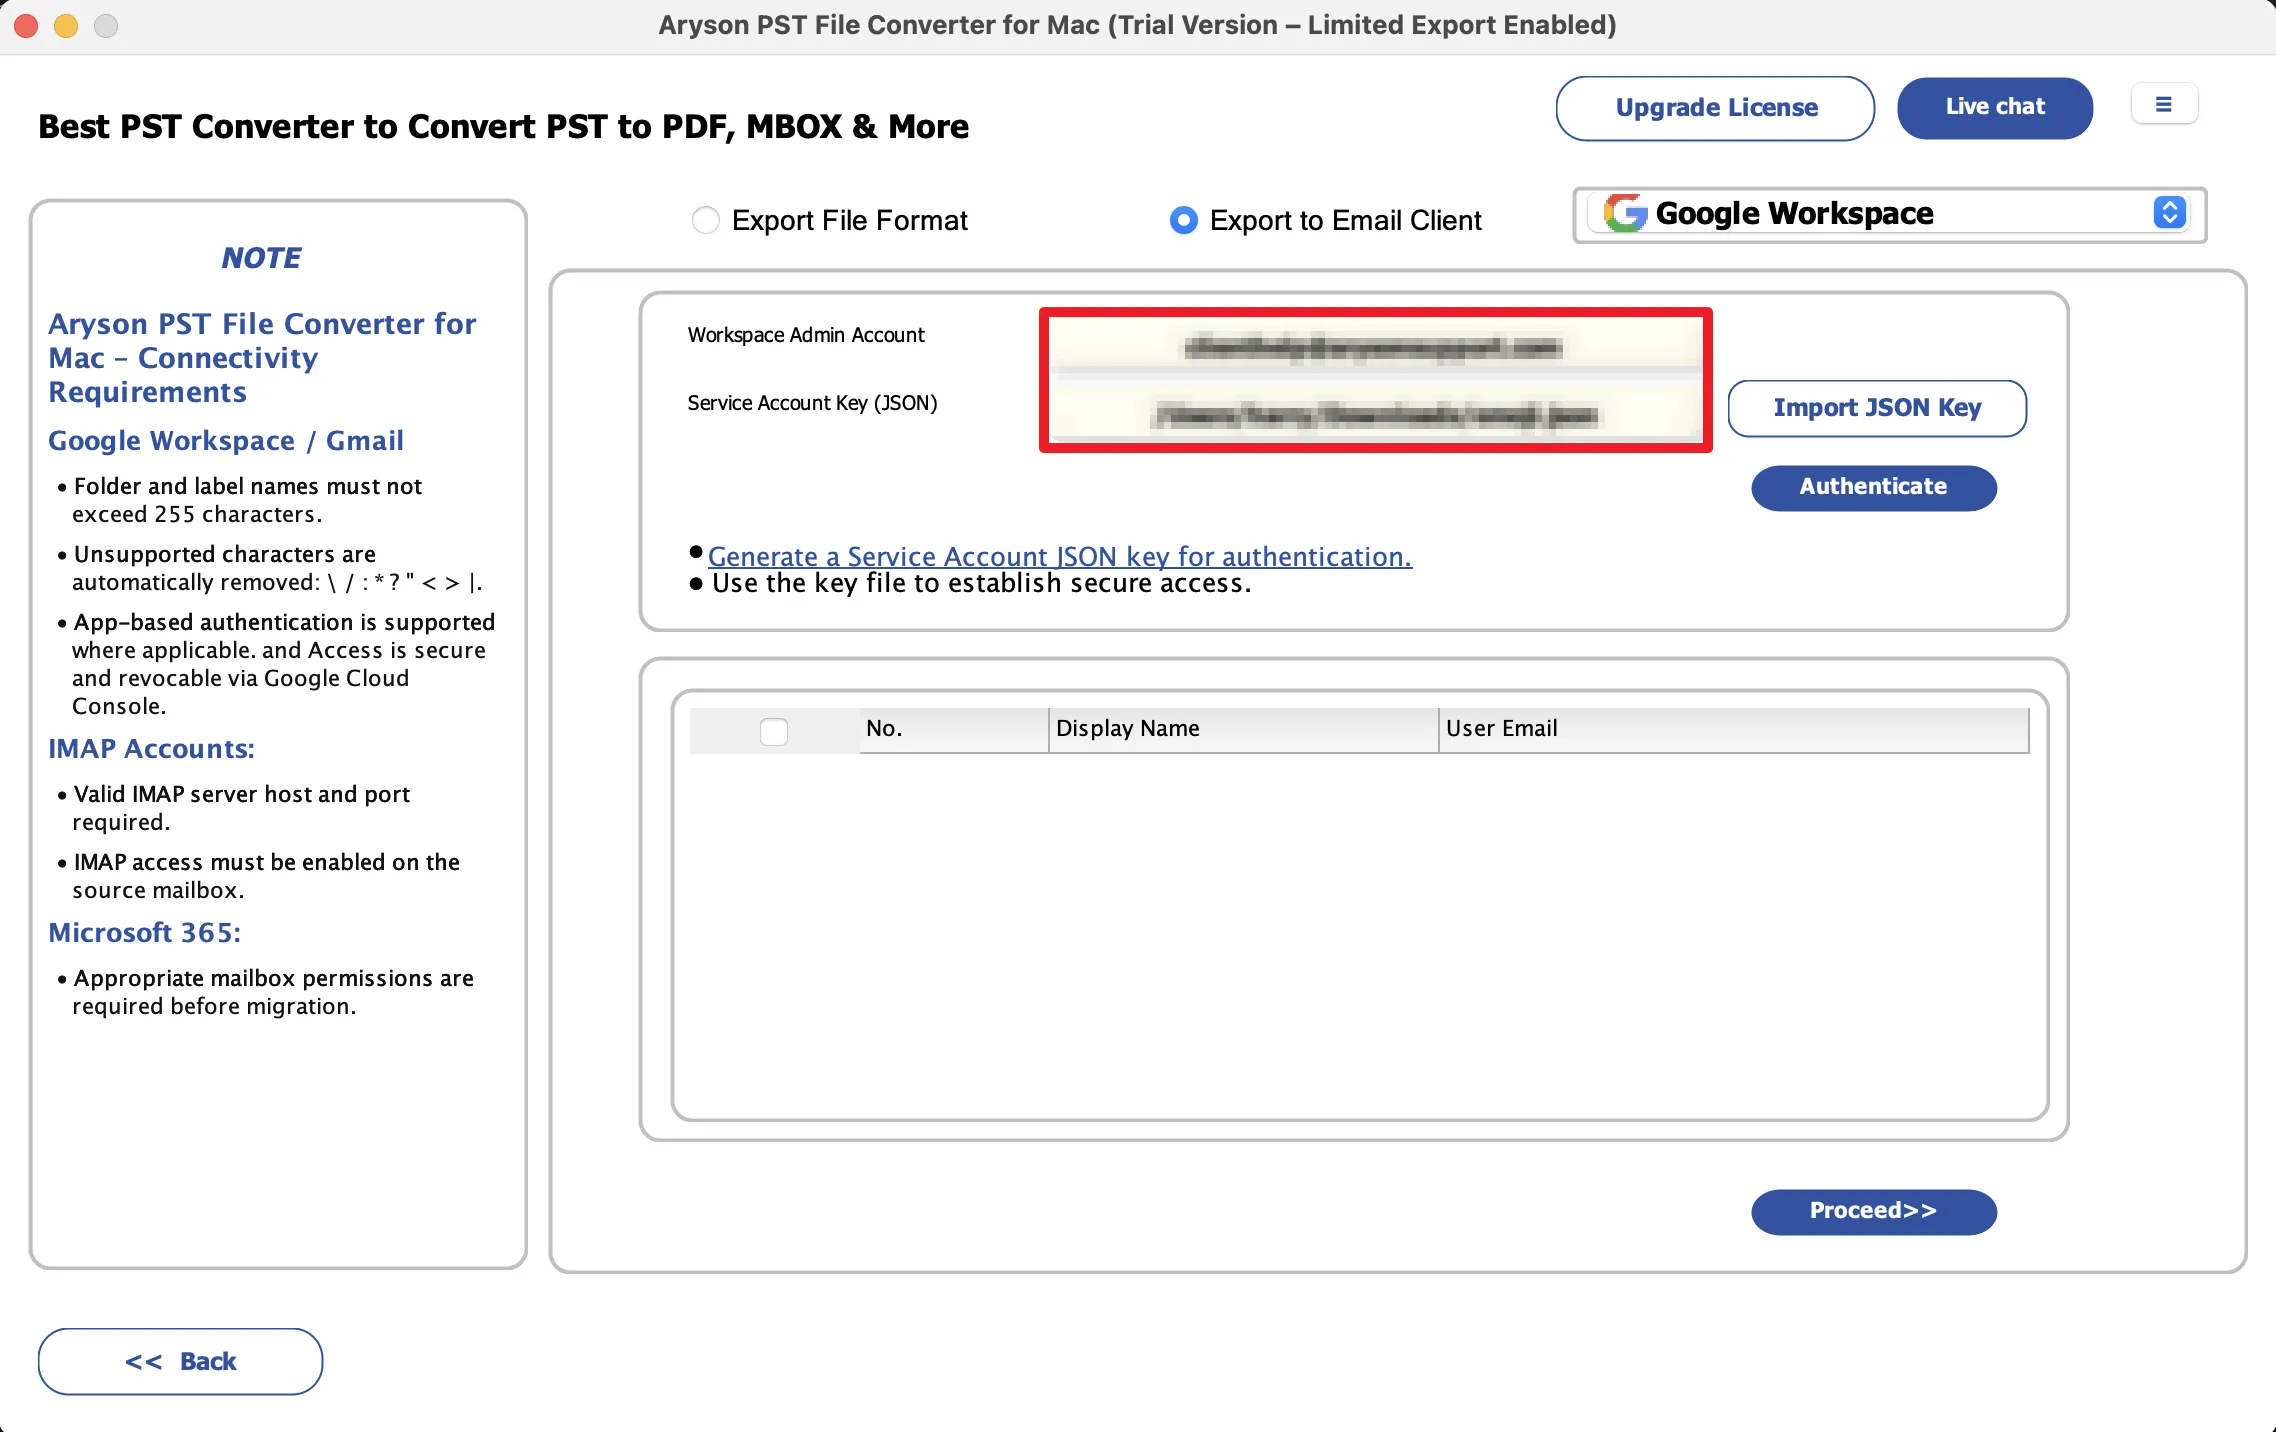
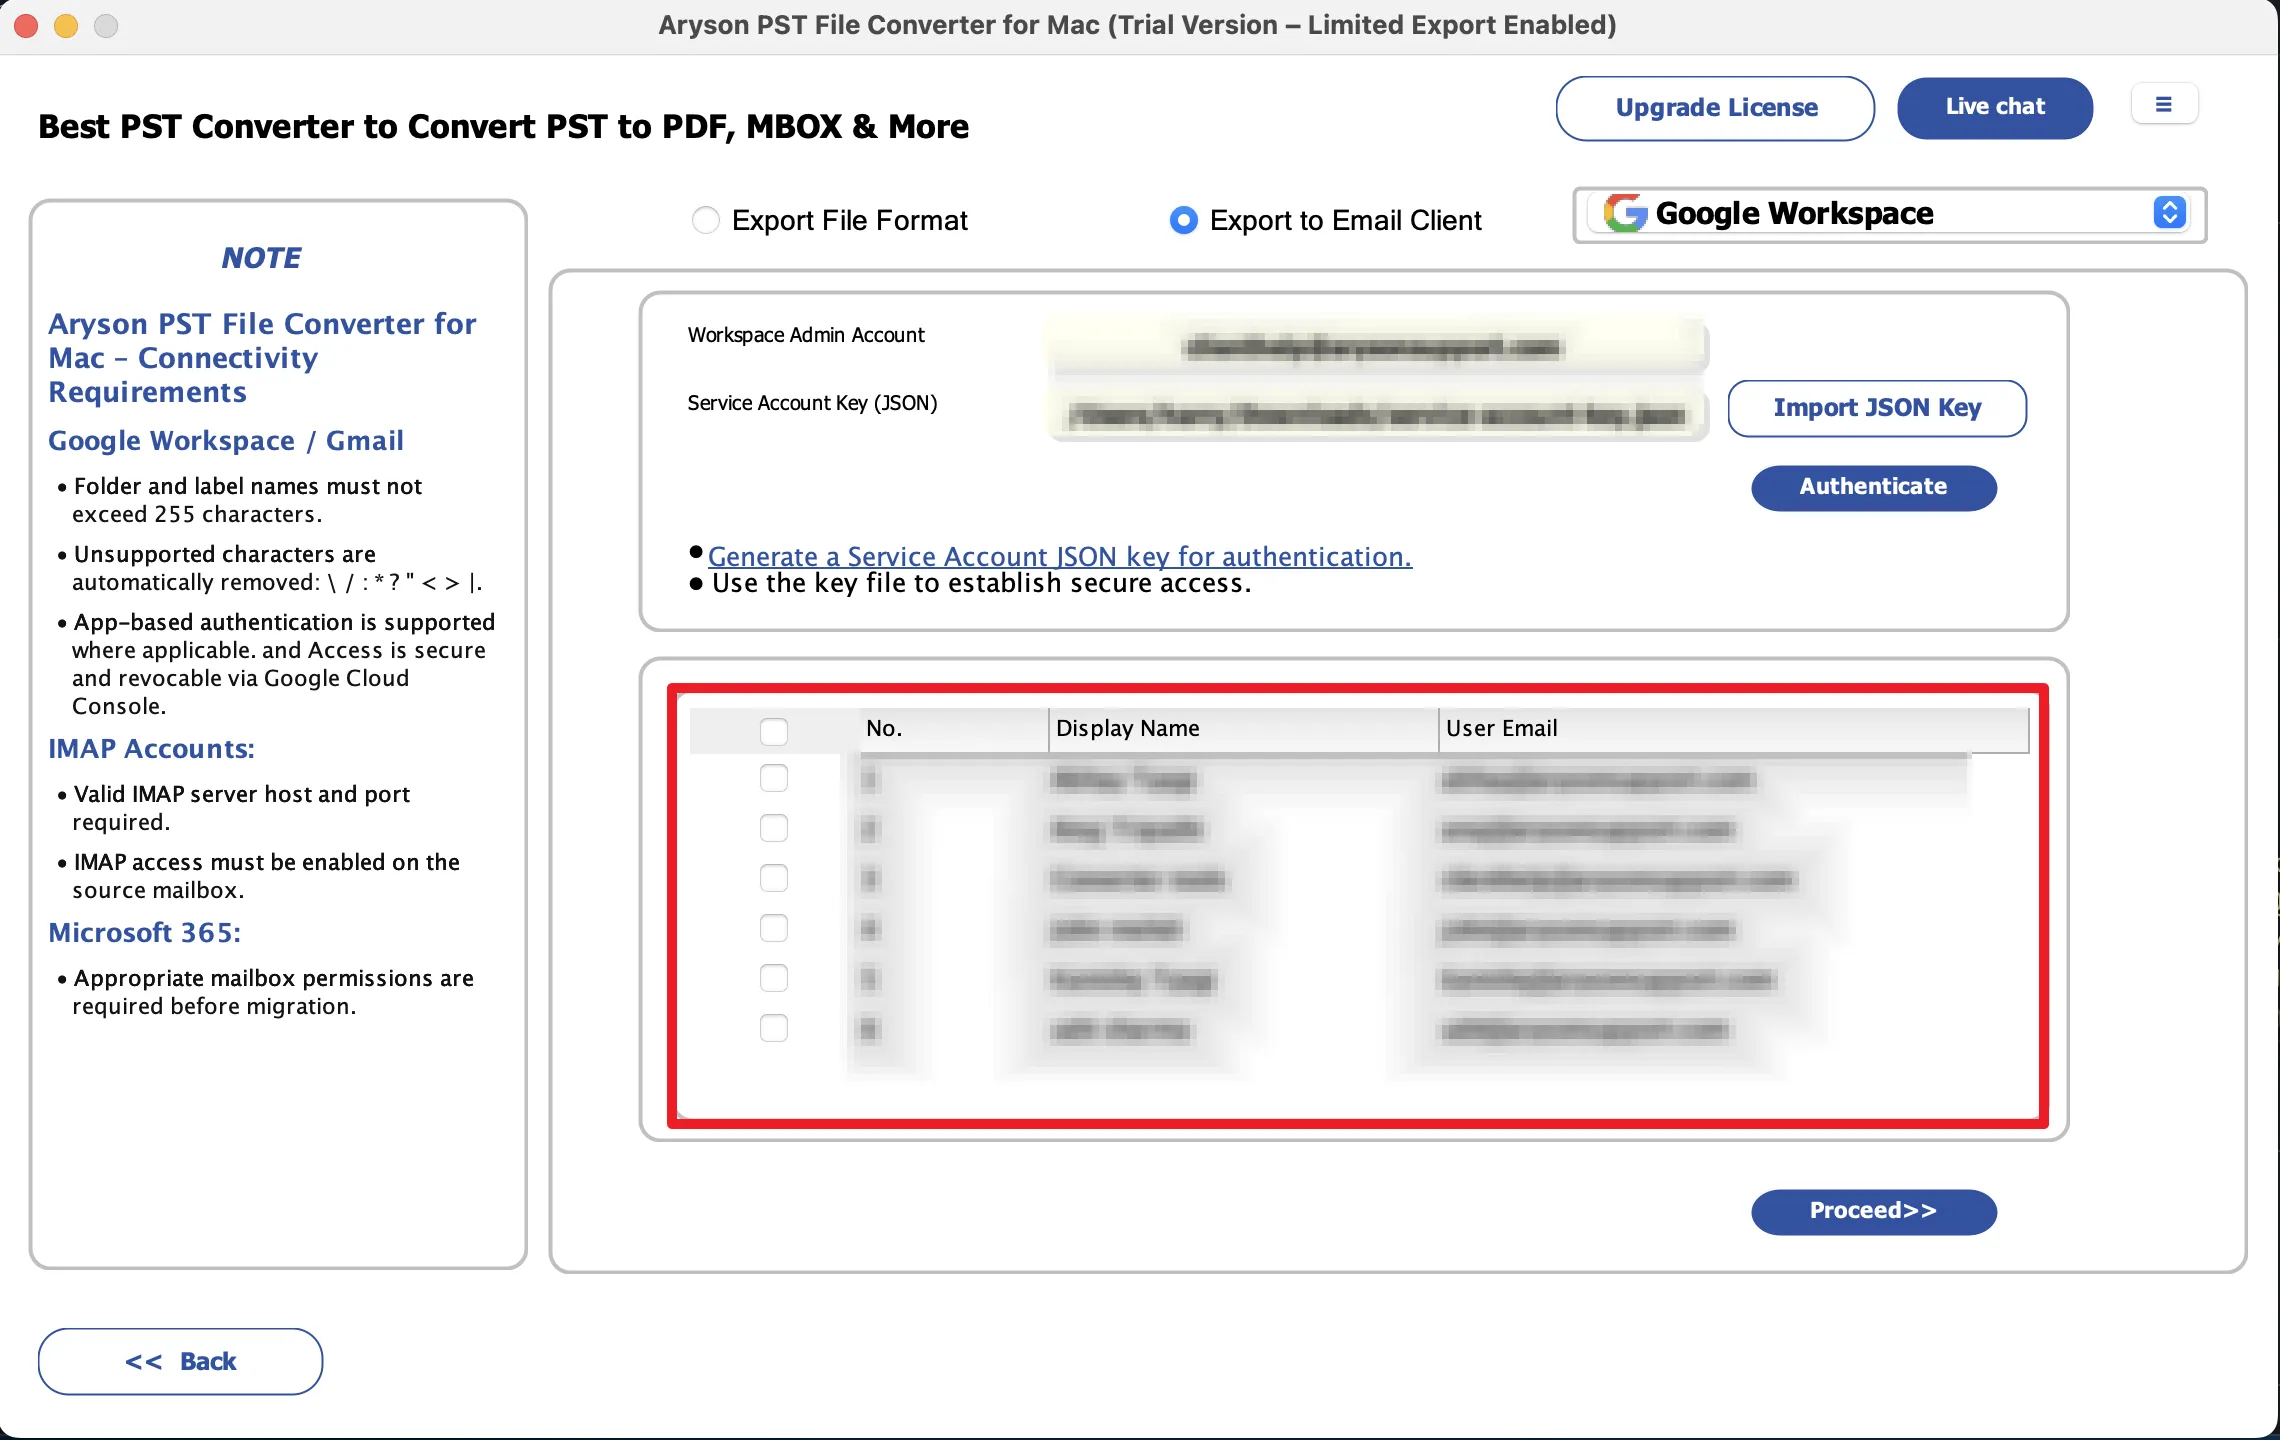
Step 10: Under the Export to Email Clients dropdown list, choose Google Workspace.
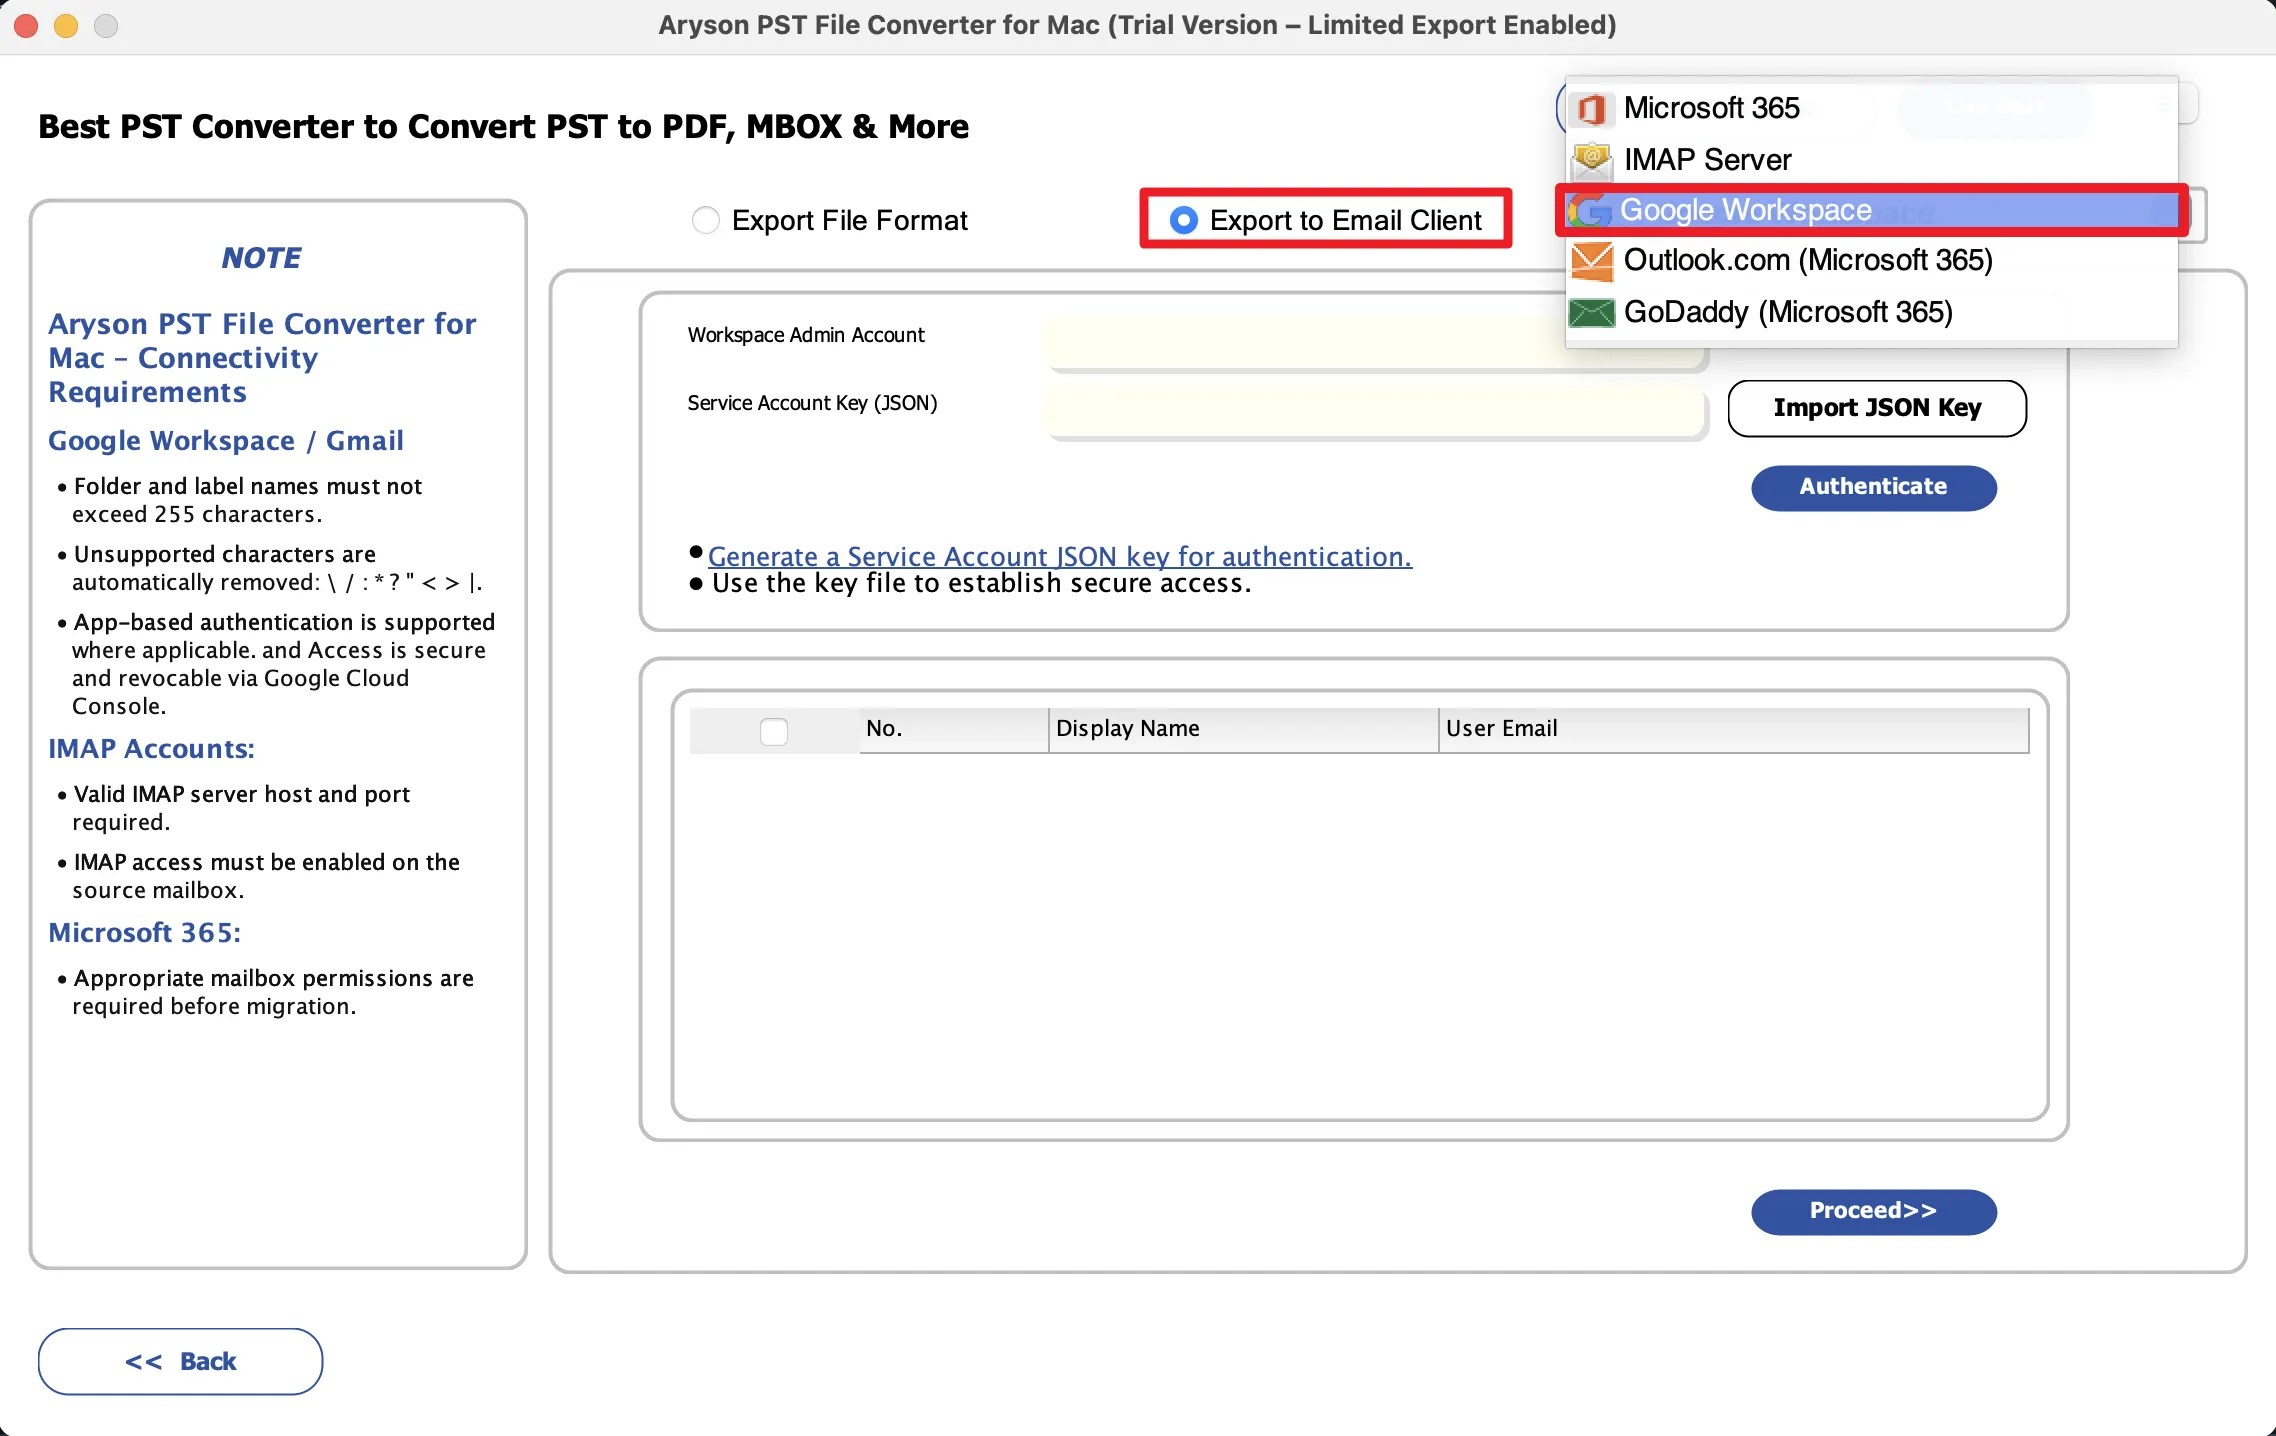
Step 11: Enter the required admin account ID and JSON key to log in.
Step 12: Select the sub-users of the admin account that you need to migrate.
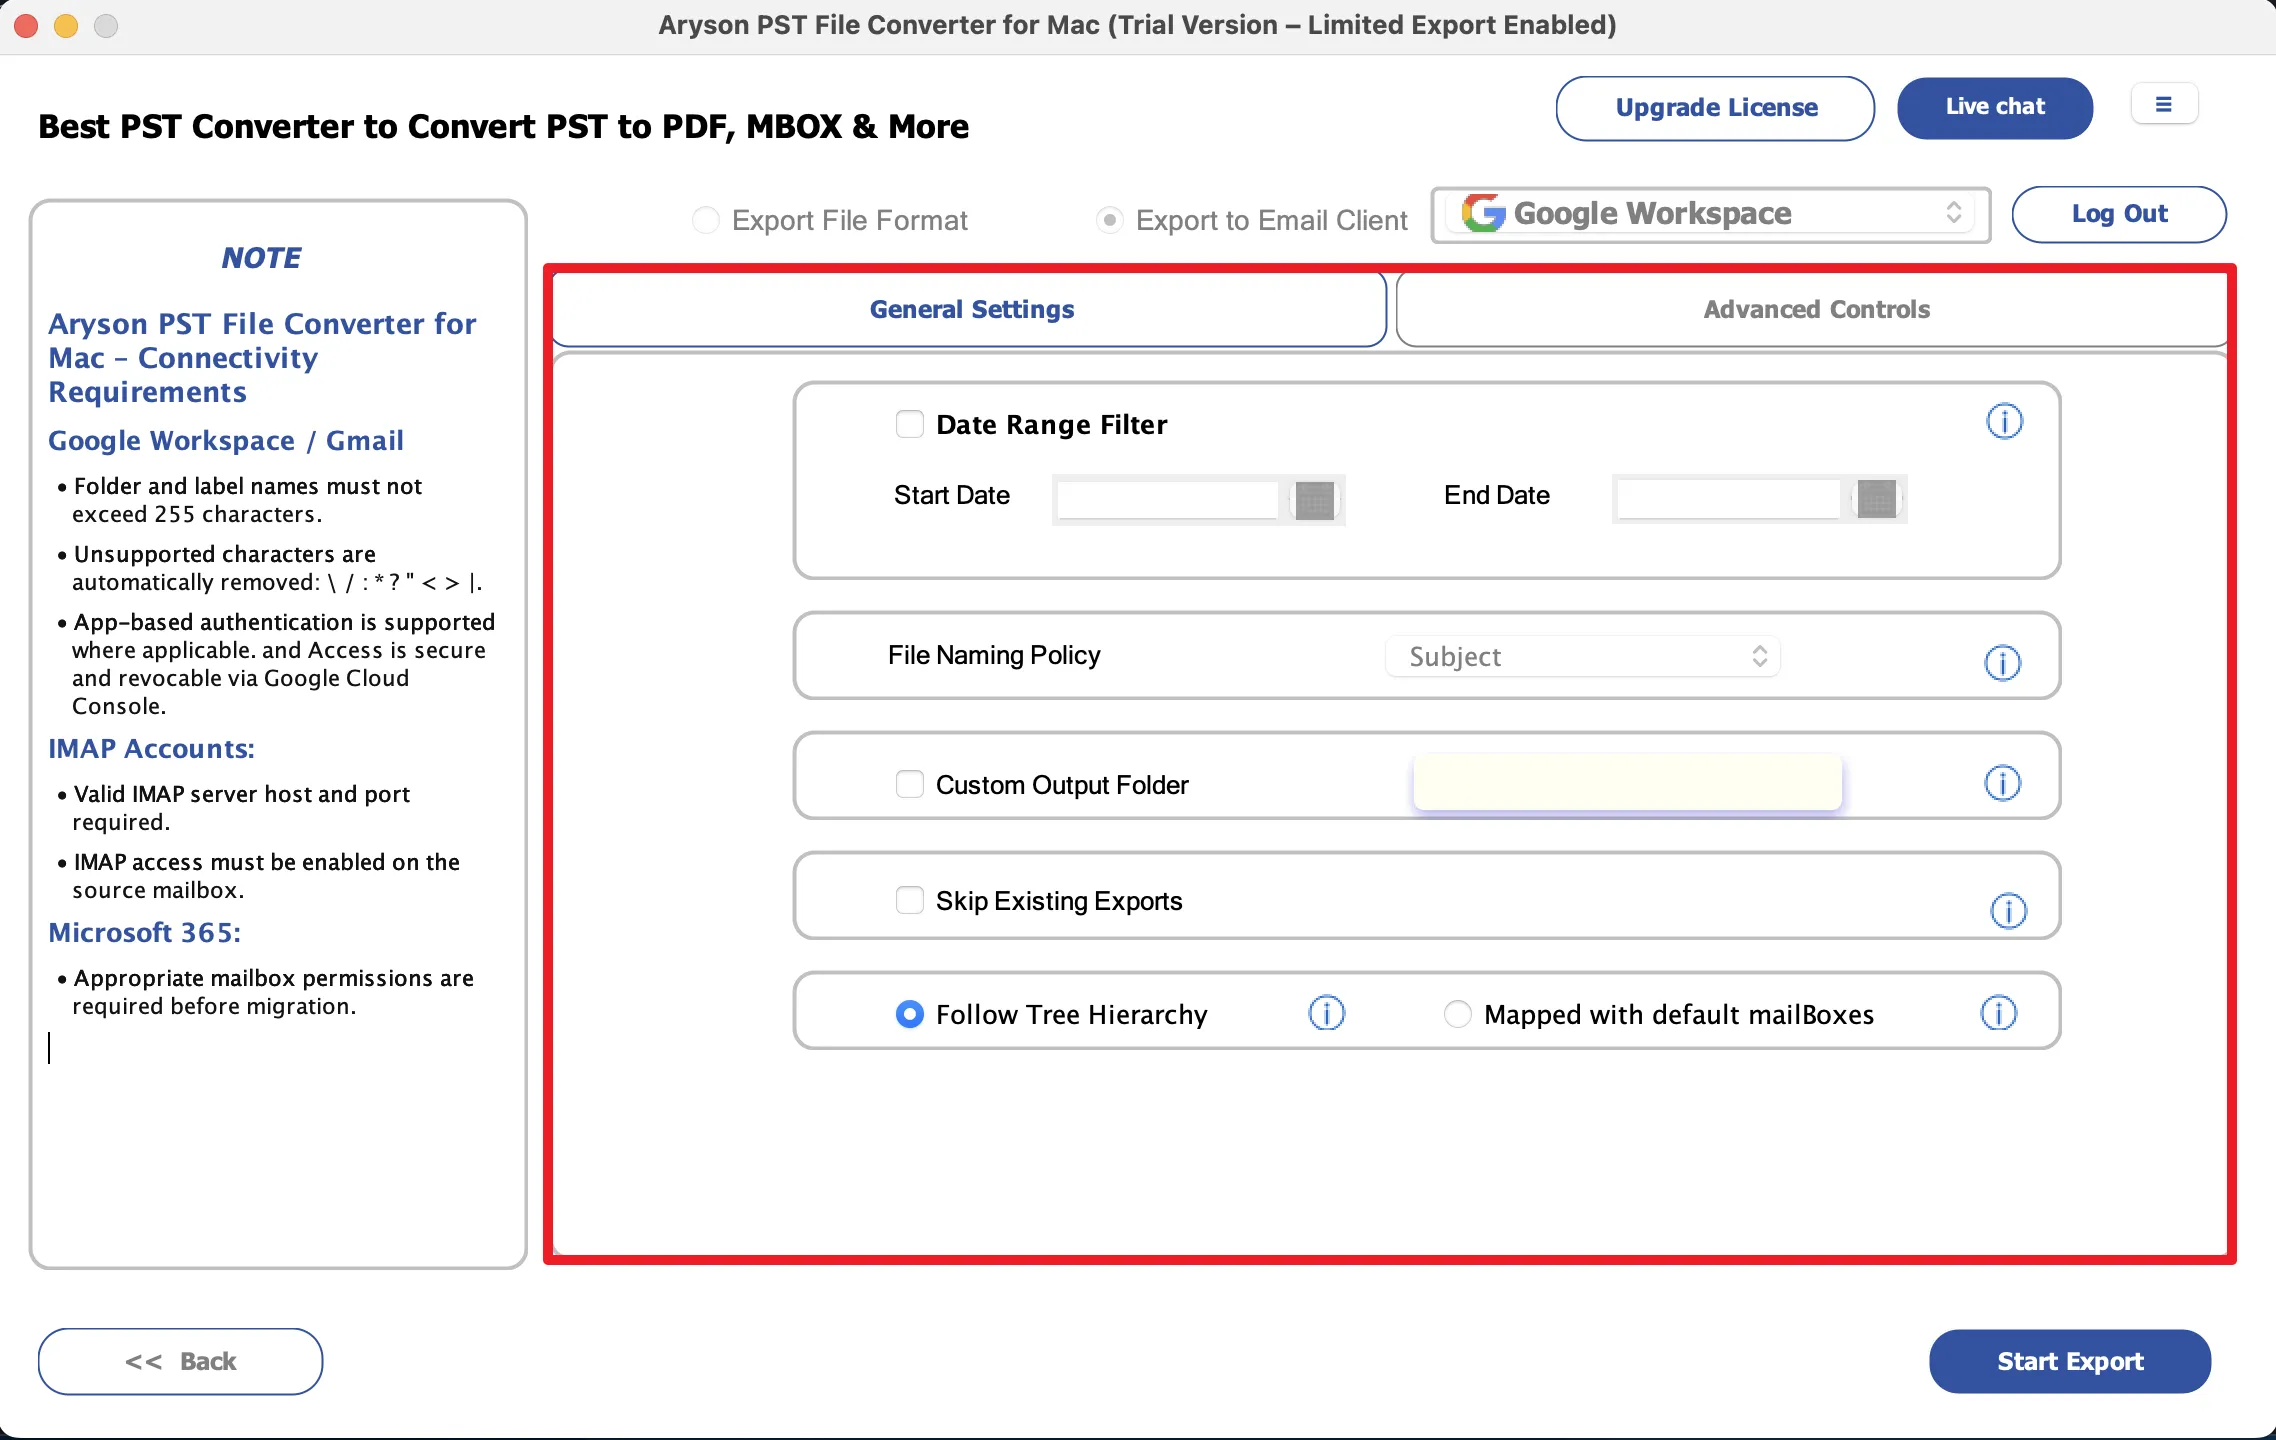
Step 13: Configure the advanced migration settings as required:
- Date Range Filter: Migrate emails within a specified date range.
- Custom Output Folder: Define a custom folder name for storing migrated data.
- Skip Existing Exports: Prevent duplicate migration by skipping already migrated emails.
- Follow Tree Hierarchy: Maintain the original mailbox folder structure throughout the migration.
- Mapped with Default Mailboxes: Automatically map PST/OST folders to their corresponding default Gmail folders.
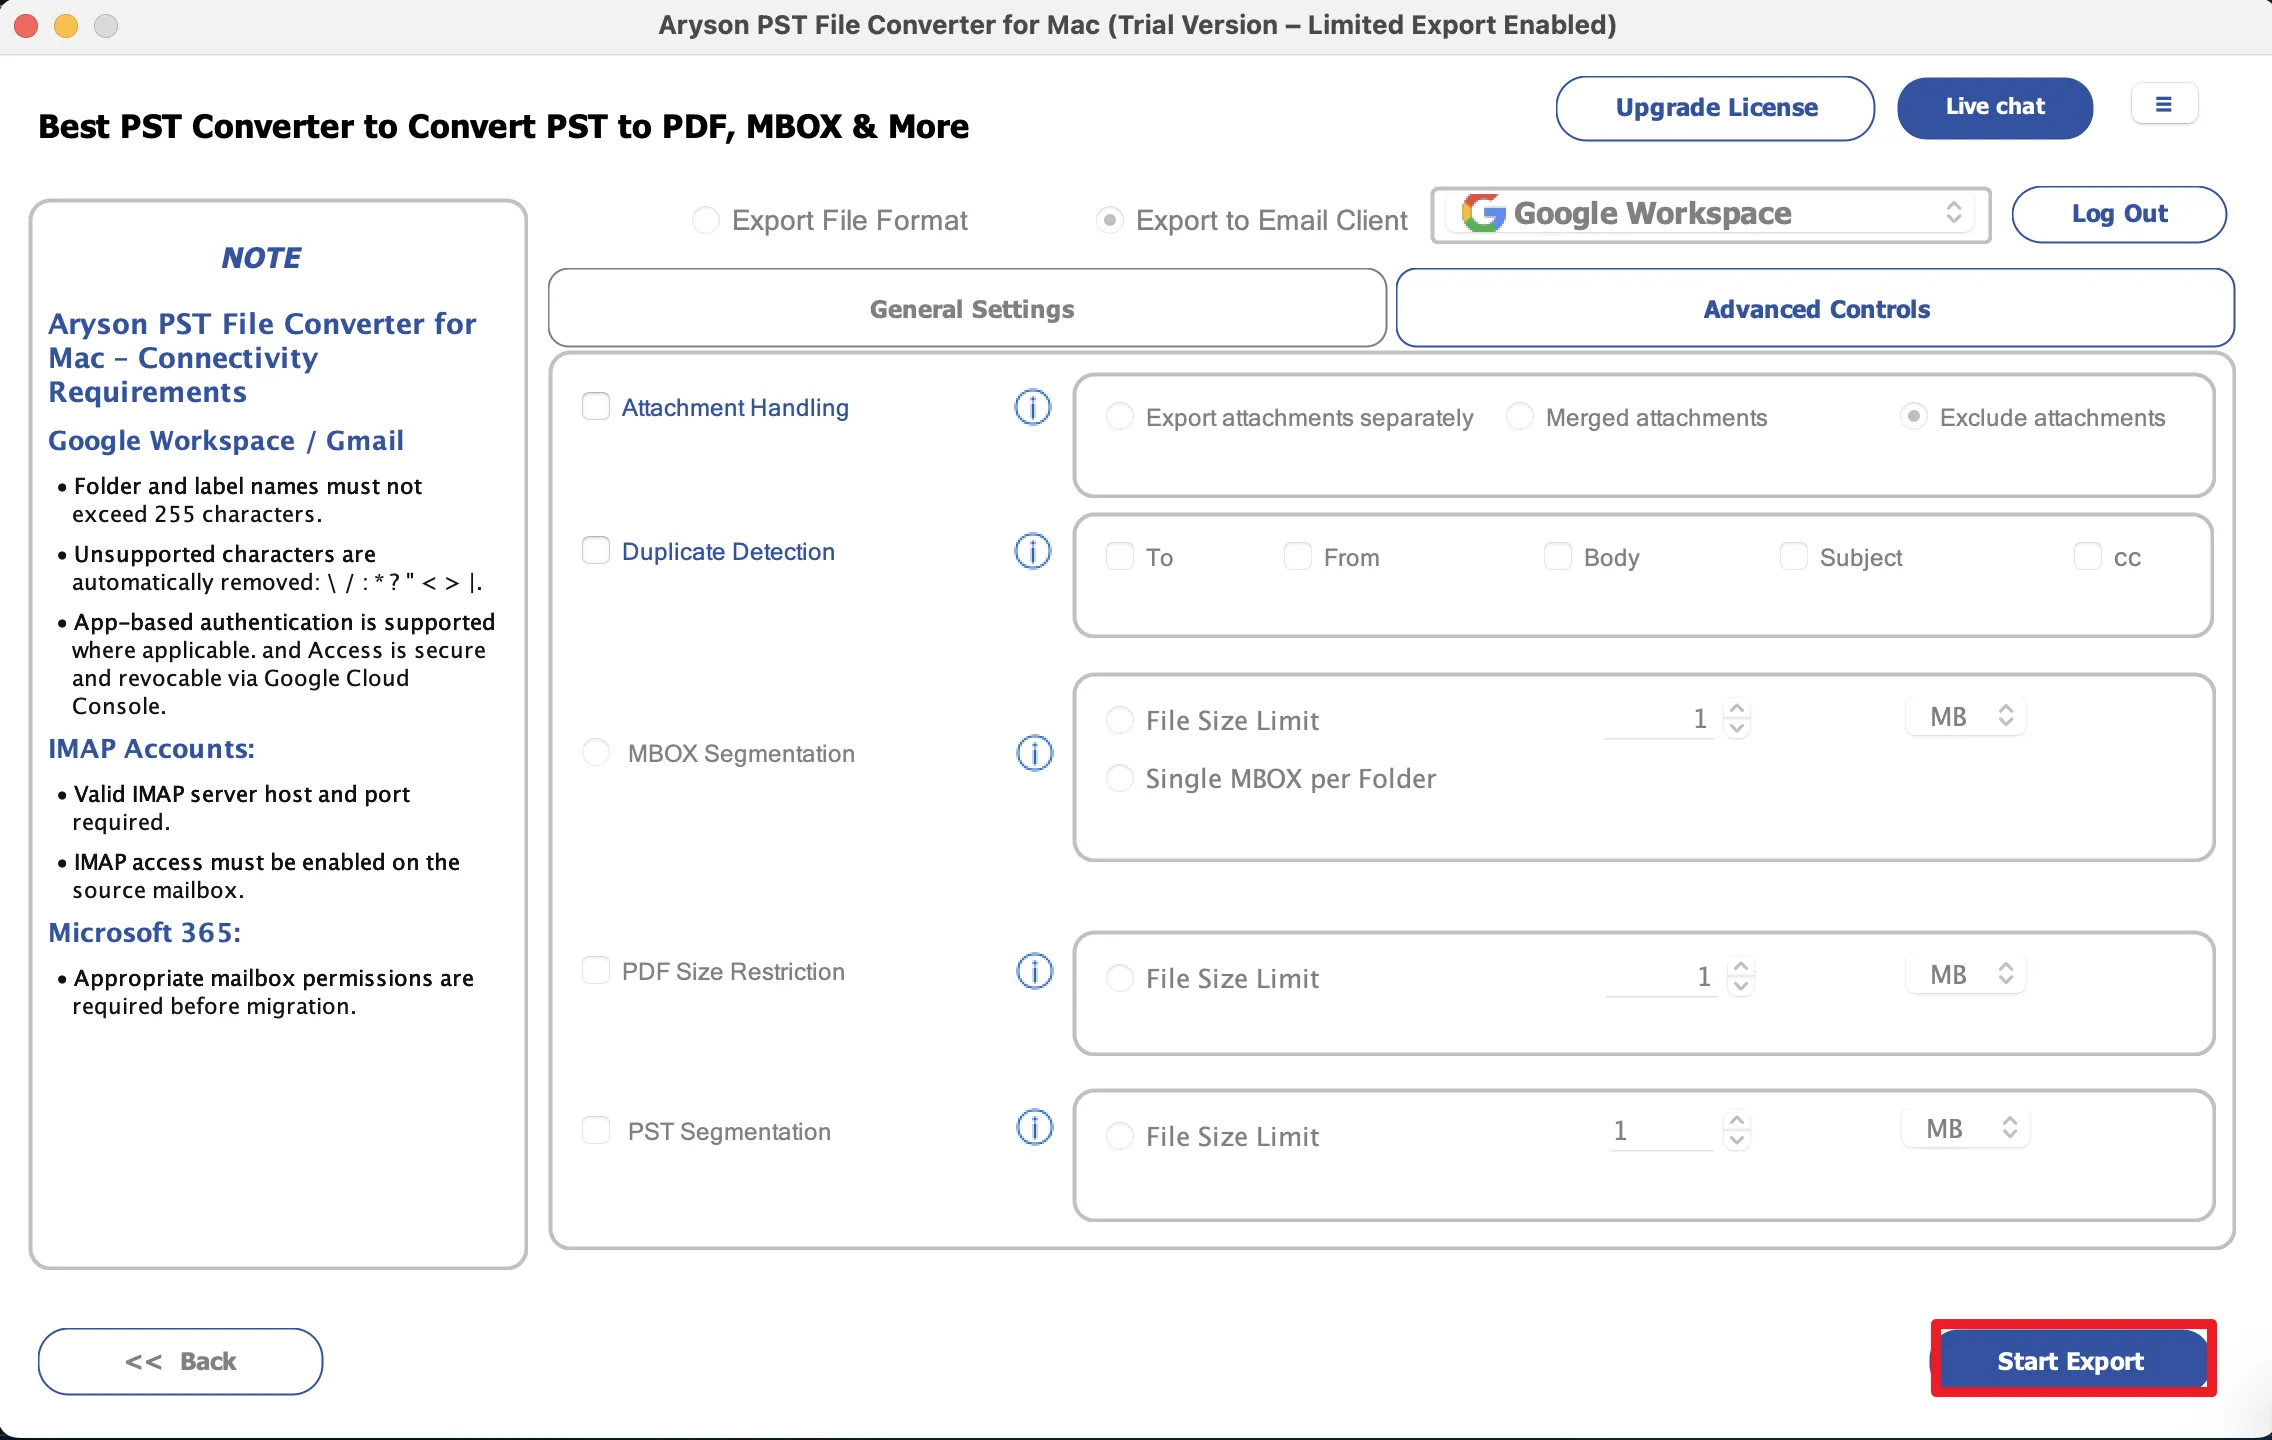
- Attachment Handling: Embed attachments, export them separately, or exclude them from the migration.
- Duplicate Detection: Identify and remove duplicate emails based on criteria such as To, From, Subject, and Body.

Step 14: Click on the Start Export button to begin the conversion process.
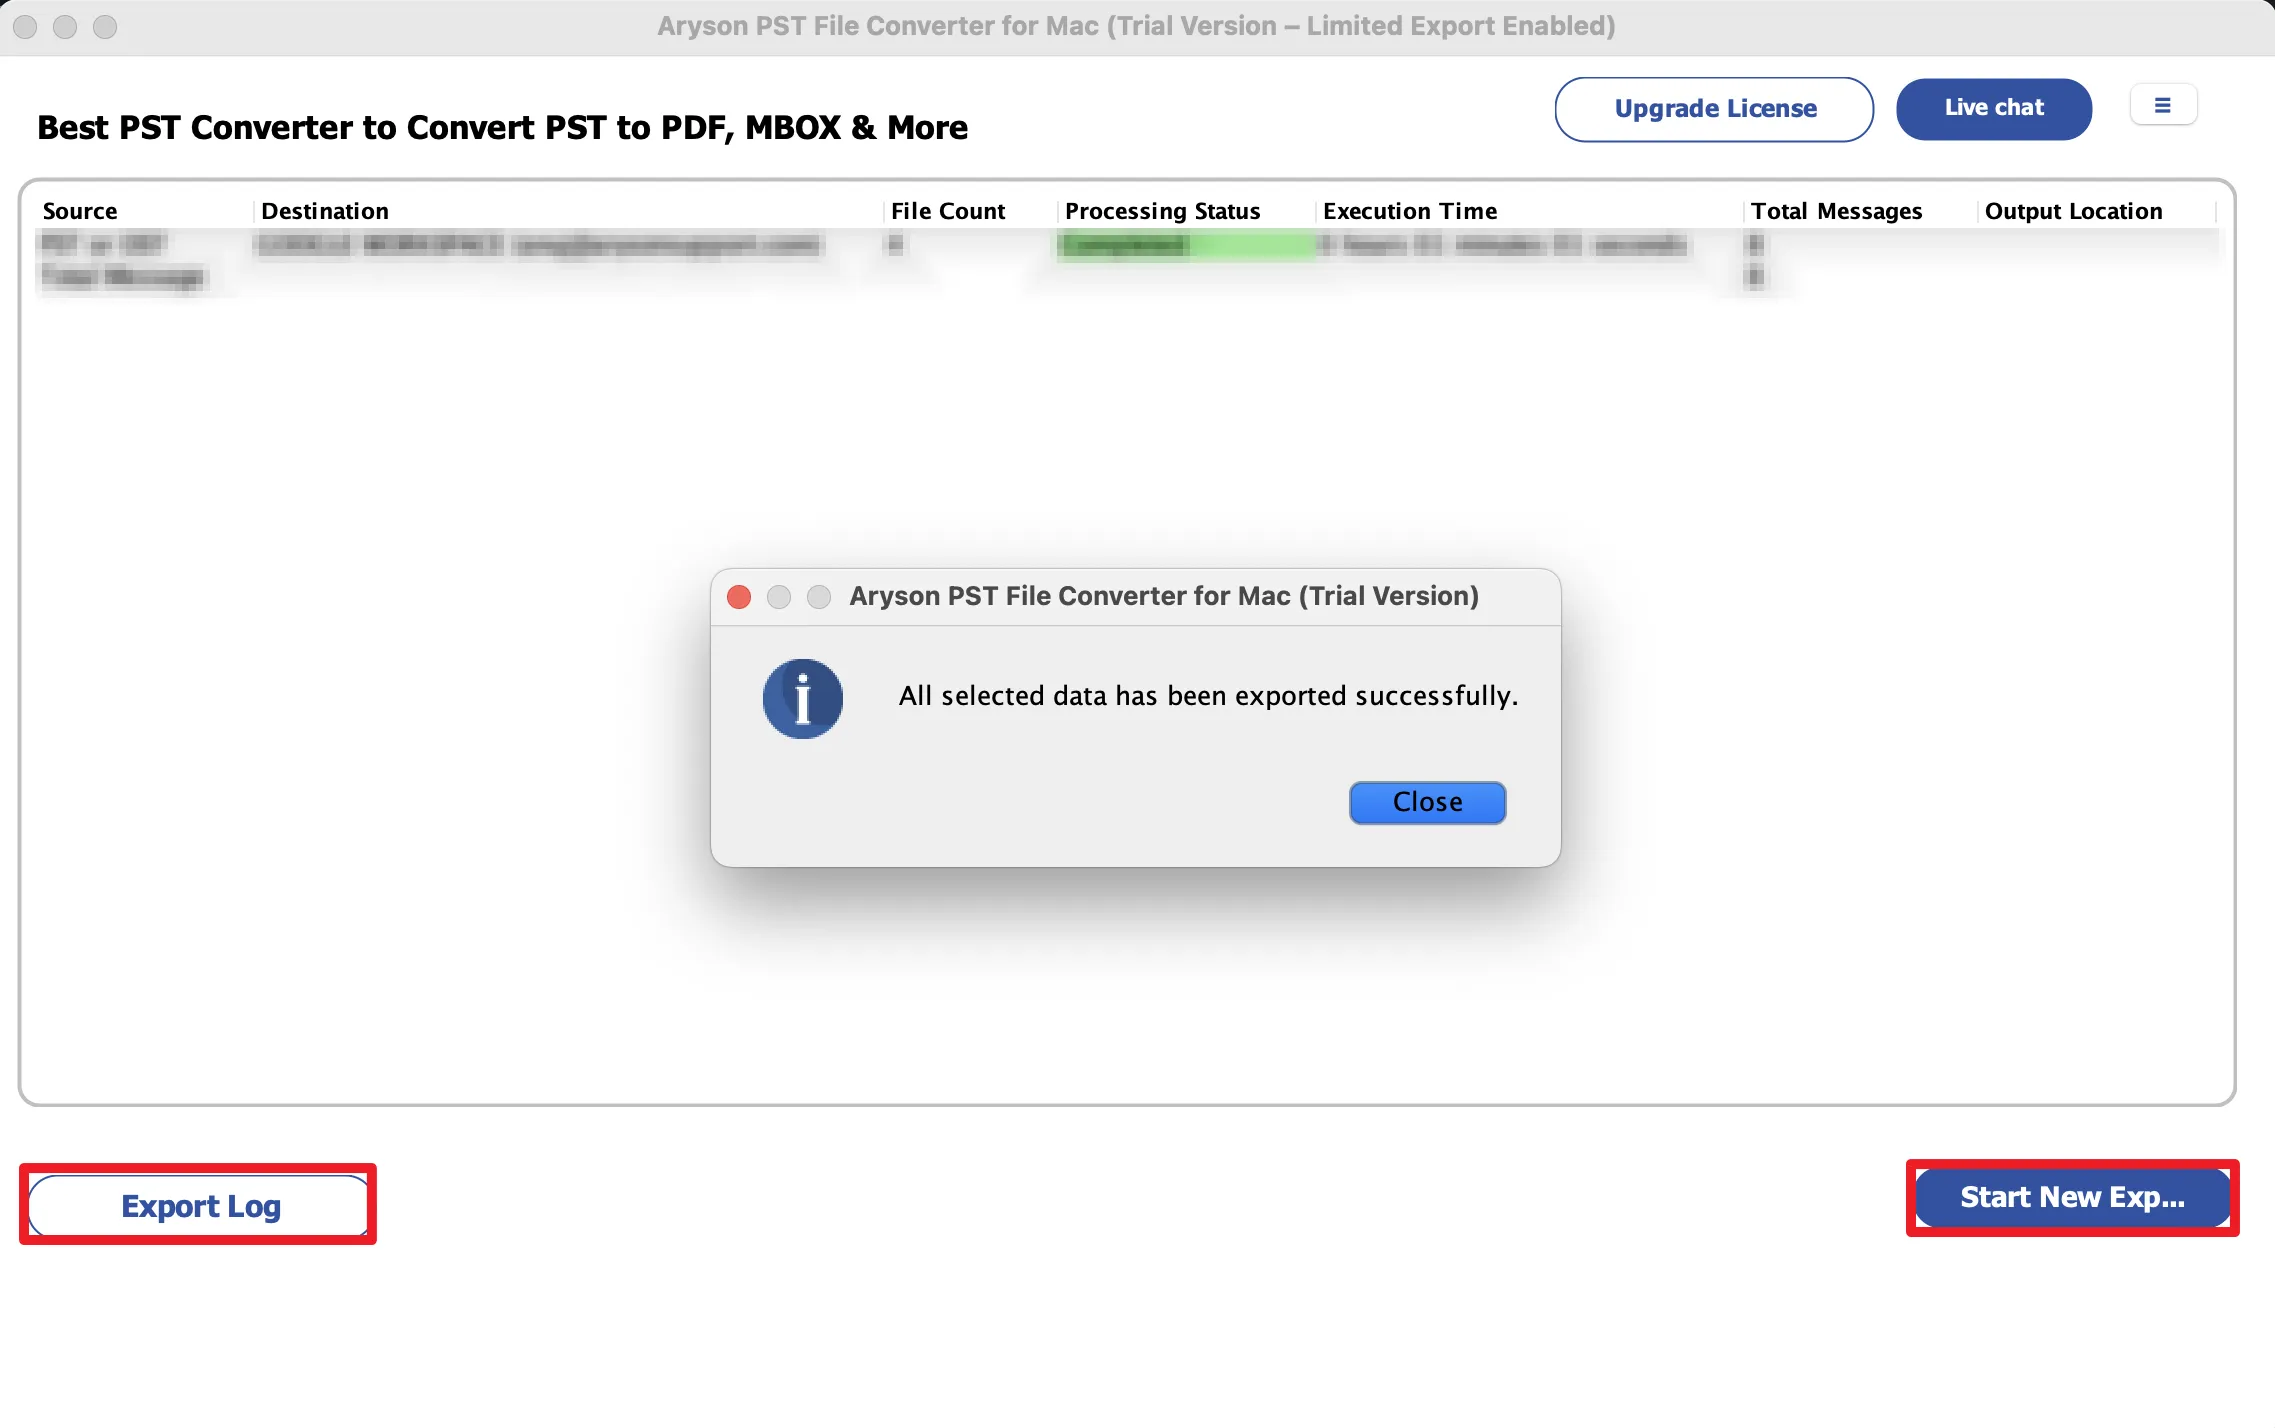
Step 15: After completion, the Conversion Report displays Source, Destination, File Count, Processing Status, Execution Time, Total Messages, and Output Location.

Step 16: After conversion, details
- Start New Export: Start another conversion
- Export Log: Save the conversion report in CSV format.
Activation Guide
Activate the Software
Installation & Uninstallation
Installation & Uninstallation of Software
User Interface
User Interface
After downloading the Aryson Mac PST File Converter, you will find the welcome screen as played below.